EMA/SMA Trend Following with Swing Trading Strategy Combined Volume Filter and Percentage Take-Profit/Stop-Loss System

Overview
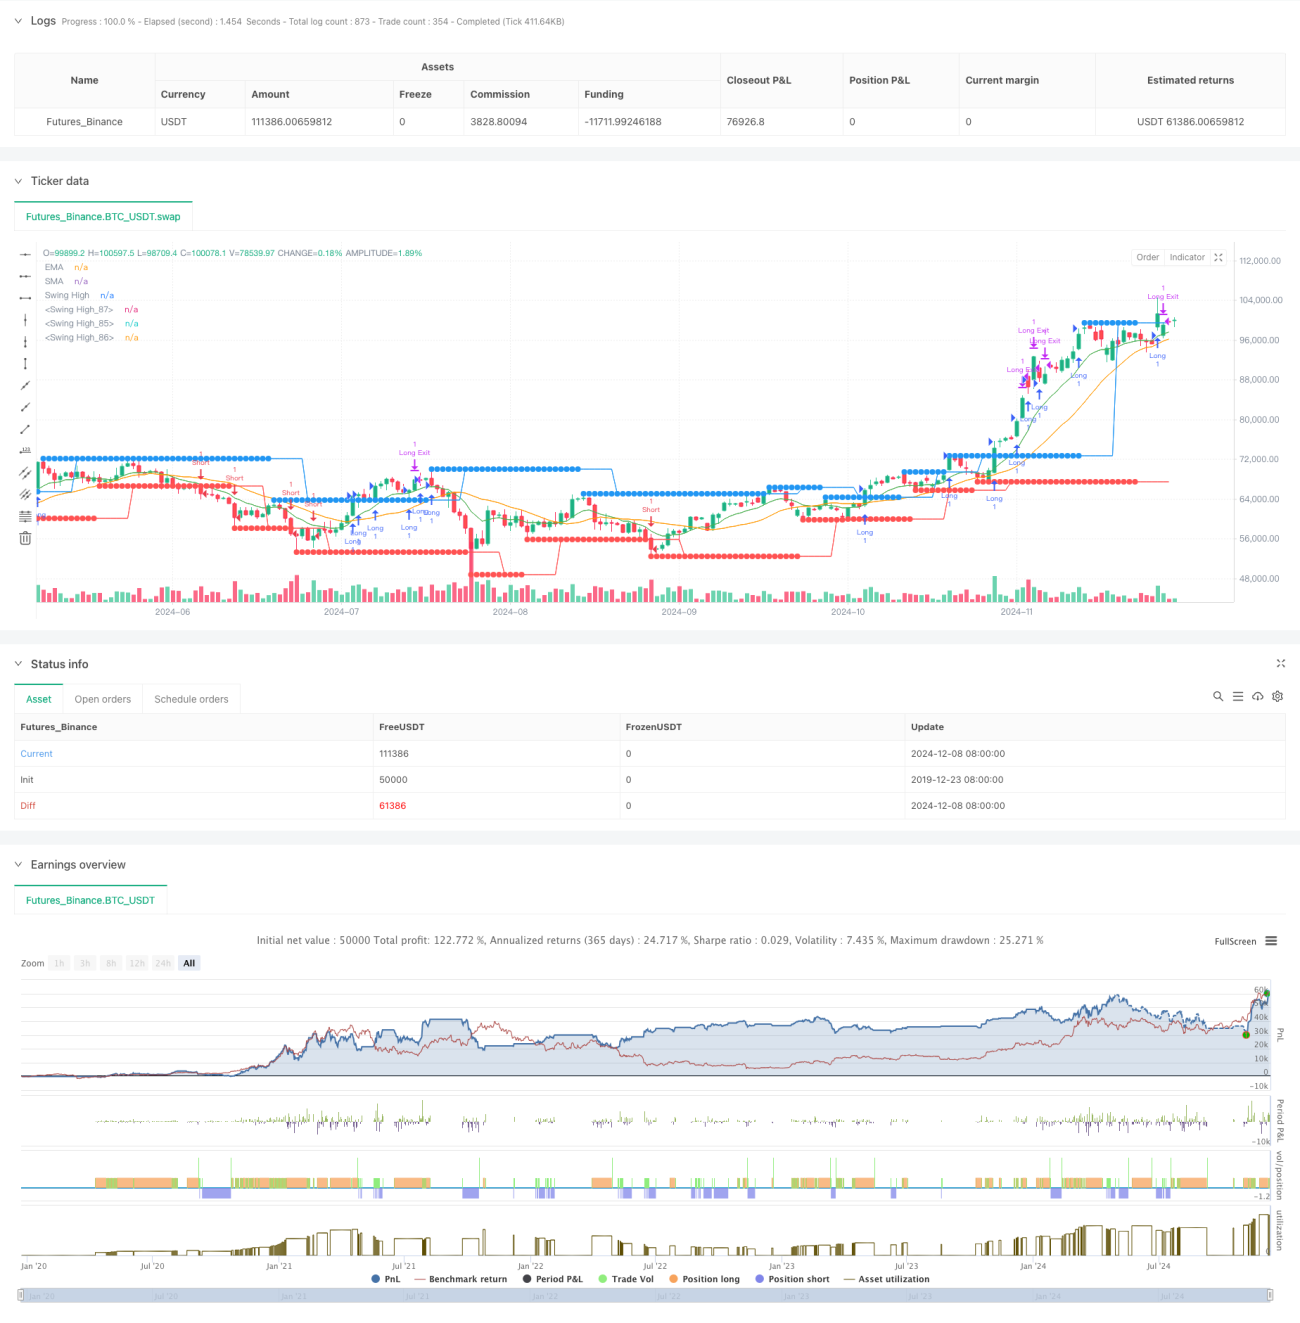
This strategy is a comprehensive trading system that combines trend following with swing trading methods, utilizing EMA and SMA crossovers, swing high/low identification, volume filtering, and percentage-based take-profit and trailing stop-loss mechanisms. The strategy emphasizes multi-dimensional signal confirmation, enhancing trading accuracy through the synergy of technical indicators.
Strategy Principles
The strategy employs a multi-layered signal filtering mechanism, starting with EMA(10) and SMA(21) crossovers for basic trend determination, then using 6-bar left/right pivot point breakouts for entry timing, while requiring volume above the 200-period moving average to ensure sufficient liquidity. The system uses 2% take-profit and 1% trailing stop-loss for risk management. Long positions are initiated when price breaks above swing highs with volume confirmation; short positions are taken when price breaks below swing lows with volume confirmation.
Strategy Advantages
- Multiple signal confirmation reduces false signals through trend, price breakout, and volume expansion verification
- Flexible profit/loss management using percentage-based take-profit with trailing stop-loss
- Comprehensive visualization system for monitoring trades and signals
- High customizability with adjustable key parameters
- Systematic risk management through preset stop-loss and take-profit levels
Strategy Risks
- Potential false breakouts in ranging markets
- Volume filtering may miss some valid signals
- Fixed percentage take-profit might exit too early in strong trends
- Moving average system has inherent lag in quick reversals
- Need to consider impact of trading costs on strategy returns
Optimization Directions
- Introduce volatility adaptation for dynamic adjustment of take-profit/stop-loss
- Add trend strength filtering to avoid trading in weak trends
- Optimize volume filtering algorithm considering relative volume changes
- Implement time-based filters to avoid unfavorable trading periods
- Consider market regime classification for parameter adaptation
Summary
The strategy builds a complete trading system through moving averages, price breakouts, and volume verification, suitable for medium to long-term trend following. Its strengths lie in multiple signal confirmation and comprehensive risk management, though performance in ranging markets needs attention. Through the suggested optimizations, particularly in adaptability, the strategy has room for improvement in stability and performance.
/*backtest
start: 2019-12-23 08:00:00
end: 2024-12-09 08:00:00
period: 1d
basePeriod: 1d
exchanges: [{"eid":"Futures_Binance","currency":"BTC_USDT"}]
*/

//@version=5
// Strategy combining EMA/SMA Crossover, Swing High/Low, Volume Filtering, and Percentage TP & Trailing Stop
strategy("Swing High/Low Strategy with Volume, EMA/SMA Crossovers, Percentage TP and Trailing Stop", overlay=true)
- 1