
Überblick
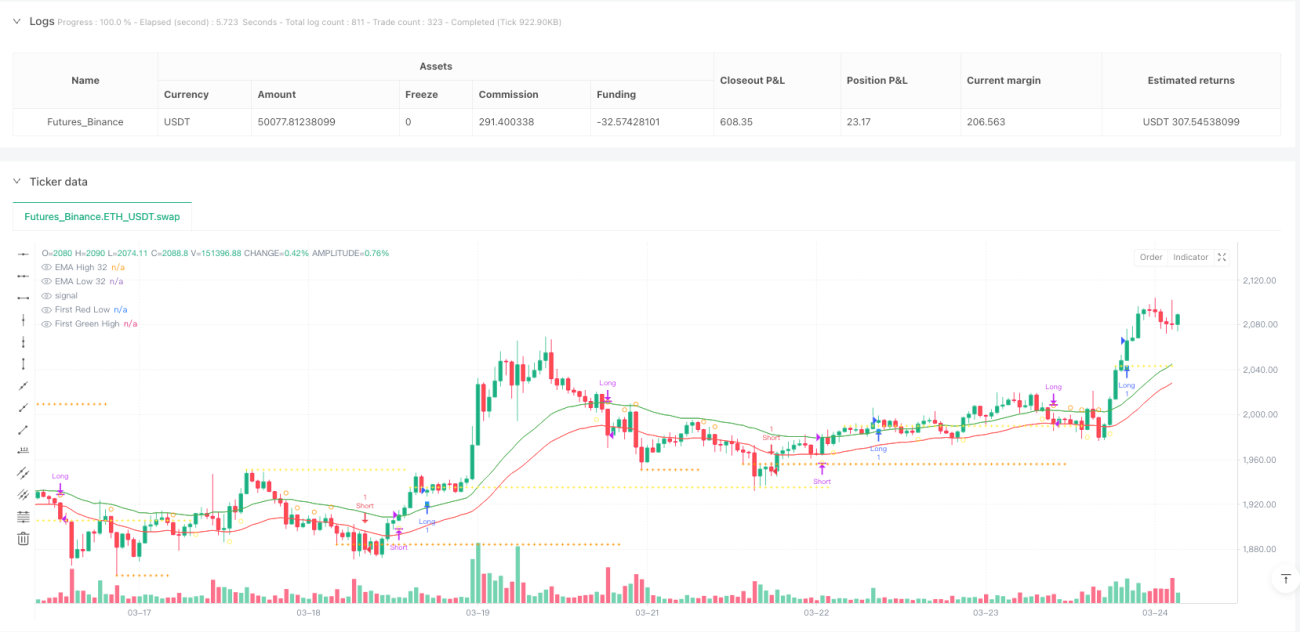
Die Strategie basiert auf den Höhen und Tiefen des 32-Zyklus-Index-Moving Averages (EMA). Die Kernidee der Strategie besteht darin, die Richtung des Trends zu bestätigen, indem die Preise die Kreuzungspunkte des 32-Zyklus-EMA sowie eine spezielle "Kontaktlosen-Reihe" -Form identifizieren, und nach der Bestätigung eines wichtigen Preisbruchs in den Handel einzutreten. Die Strategie wurde speziell für den 5-Minuten-Zeitrahmen entwickelt, um den Händlern die Möglichkeit zu geben, kurzfristige Trendänderungen durch strenge Einstiegsbedingungen und klare Ausstiegsregeln zu erfassen.
Strategieprinzip
Die Strategie basiert auf folgenden Schlüsselschritten:
- Berechnen Sie die Höchstpunkte ((ema_high_32) und die Tiefpunkte ((ema_low_32) der 32-Zyklus-EMA als Hauptreferenzlinie.
- Identifizieren Sie die wichtigsten Kreuzungen zwischen dem Preis und der EMA: Markieren Sie potenzielle Überschwemmungsmöglichkeiten, wenn der Kurs die EMA-Hochpunkte nach oben durchschreitet; Markieren Sie potenzielle Defizitmöglichkeiten, wenn der Preis die EMA-Tiefpunkte nach unten durchschreitet.
- Suchen Sie nach der "kontaktlosen" Form: in mehreren Richtungen, identifizieren Sie die Sonnenstrahlen, die sich vollständig über der hohen EMA befinden; in der Hohlradrichtung, identifizieren Sie die Wellen, die sich vollständig unter der niedrigen EMA befinden.
- Die Höhe oder Tiefe der ersten "kontaktlosen Zelle" wird als Durchbruch-Referenzpunkt aufgezeichnet.
- Wenn der Preis den Referenzpunkt überschreitet und der nächste Gleichgewichtstrich erscheint, wird ein Einstiegssignal ausgelöst.
- Exit-Strategie: Platzieren Sie, wenn der Preis unter der niedrigen EMA schließt. Platzieren Sie, wenn der Preis über der hohen EMA schließt.
Die Kernlogik der Strategie besteht darin, dass sie nicht nur ein Kreuzungsprozess zwischen dem Preis und der EMA erfordert, sondern auch die Falschmeldungen durch "kontaktlose Zähne" und Durchbruchbestätigungen filtern und die Genauigkeit der Transaktionen verbessern muss. Diese Mehrfachbestätigungsmechanismen verringern effektiv das Risiko eines Fehlintritts in die Bilanz.
Strategische Vorteile
Durch die tiefgreifende Analyse des Codes hat diese Strategie folgende deutliche Vorteile:
- Doppel Bestätigungsmechanismus: Die Strategie erfordert nicht nur die Kreuzung von Preisen mit EMAs, sondern auch die Bestätigung von "kontaktlosen Hügeln" und Preisbruch, wodurch das Risiko eines falschen Bruchs erheblich verringert wird.
- Trend-Tracking und Trend-Umkehr-Bewertung: Obwohl es sich hauptsächlich um eine Trend-Tracking-Strategie handelt, können potenzielle Trend-Umkehrungen auch durch die Erfassung von EMA-Kreuzungen erkannt werden.
- Klare Ein- und Ausstiegsregeln: Die Strategie hat streng definierte Ein- und Ausstiegsbedingungen, reduziert subjektive Beurteilungen und erleichtert die programmatische Umsetzung und Rückmeldung.
- Die Strategie bietet eine Vielzahl von visuellen Indikatoren auf den Diagrammen, einschließlich EMA-Linien, Durchbruchspunkte und verschiedene Handelssignalmarkierungen, um den Händlern zu helfen, die Marktlage intuitiver zu verstehen.
- Perfekte Statusverwaltung: Die Verwendung von mehreren Boolean-Variablen im Code sorgt dafür, dass der Status des Handels streng verfolgt wird, um sicherzustellen, dass keine wiederholten Eintritte oder verwirrenden Signale auftreten.
- Kurzfristige Volatilität: Entwickelt für einen 5-Minuten-Zeitrahmen, um die Handelschancen von kurzfristigen Marktschwankungen effektiv zu erfassen.
Strategisches Risiko
Obwohl die Strategie so gut konzipiert ist, gibt es folgende potenzielle Risiken:
- Repetitive Horizontale Risiken: In einem wackligen Markt, in dem die Preise häufig die EMA überschreiten, kann dies zu häufigen Transaktionen und anhaltenden Verlusten führen. Die Lösung besteht darin, zusätzliche Filterbedingungen für die Marktumgebung, wie z. B. einen Volatilitätsindikator oder einen Trendstärkenindikator, hinzuzufügen.
- Parameter-Sensitivität: Die 32-Zyklus-EMA-Parameter sind das Herzstück der Strategie. Unterschiedliche Märkte oder Zeitrahmen können unterschiedliche Parameter-Einstellungen erfordern. Es wird empfohlen, die Parameter zu ermitteln, die am besten für eine bestimmte Handelsvariante geeignet sind, durch Rücklaufoptimierung.
- Verzögerungsrisiko: Eintrittsverzögerungen können bei schnellen Trendwechseln auftreten, da die Strategie mehrfach bestätigt werden muss. Es kann in einem Umfeld mit starkem Trend eine angemessene Lockerung der Eintrittsbedingungen in Betracht gezogen werden.
- False-Breakout-Risiko: Trotz mehrfacher Bestätigung kann es zu einem schnellen Rückzug des Marktes nach einem False-Breakout kommen. Es kann in Betracht gezogen werden, eine Stop-Loss-Strategie hinzuzufügen oder eine konservativere Positionsverwaltung zu verwenden.
- Zeitfensterbeschränkung: Die Strategie wurde für die 5-Minuten-Frames entwickelt und kann nicht direkt auf andere Zeitfenster angewendet werden. Die Parameter müssen neu optimiert werden, wenn sie auf andere Zeitfenster angewendet werden.
- Fehlende Stop-Mechanismen: Die aktuelle Strategie besteht nur aus Verlusten. Es gibt keine eindeutigen Stop-Regeln, was zu einem vorzeitigen Ausstieg oder einem Verlust von Gewinnen vor dem Ende des Trends führen kann. Es wird empfohlen, dynamische Stop-Mechanismen auf Basis von Volatilität oder Unterstützungswiderstand hinzuzufügen.
Richtung der Strategieoptimierung
Auf der Grundlage der Code-Analyse lassen sich folgende Hauptrichtungen der Strategie optimieren:
- Dynamische EMA-Zyklen: Eine dynamische Anpassung der EMA-Zyklen an die Marktfluktuation kann in Betracht gezogen werden, wobei kürzere EMAs in hoch- und längere EMAs in niedrig-volatilen Märkten verwendet werden, um sich an unterschiedliche Marktbedingungen anzupassen.
- Hinzufügen von Trendstärke-Filtern: Trendstärke-Indikatoren wie ADX können eingeführt werden, um Positionen nur dann zu eröffnen, wenn die Trendstärke ausreicht, um häufige Transaktionen auf dem Quermarkt zu vermeiden.
- Optimierung der Stop-Off-Strategie: Hinzufügen von dynamischen Stop-Off-Mechanismen, die auf ATR oder kritischen Preisniveaus basieren, um die Gewinne zu schützen, wenn sich ein Trend positiv entwickelt.
- Zeit-Filter: Hinzufügen von Zeit-Filterbedingungen, um zu vermeiden, dass der Markt zu öffnen, zu schließen oder zu einem Zeitpunkt mit geringer Liquidität zu handeln.
- Multi-Time-Frame-Analyse: Integration der Trendrichtung der höheren Zeiträume als Filterbedingung, nur dann gehandelt wird, wenn die Multi-Time-Frame-Trends übereinstimmen.
- Positionsmanagement-Optimierung: Dynamische Anpassung der Positionsgröße basierend auf Marktschwankungen oder Konto-Risiko-Verhältnissen, anstatt auf festen Positionen.
- Erhöhung der Dauerbeschränkung für den Handel: Wenn der Handel innerhalb einer bestimmten Zeit nicht die erwarteten Erträge erzielt, wird die Position automatisch gelöscht, um eine langfristige Gefangenschaft zu vermeiden.
Diese Optimierungsrichtungen zielen hauptsächlich darauf ab, die Robustheit und Anpassungsfähigkeit der Strategie zu verbessern und Verluste in ungünstigen Marktbedingungen zu reduzieren.
Zusammenfassen
Die Cross-Breakout-Strategie ist ein technisch-analytisches Trading-System, das durch mehrere Mechanismen wie 32-Zyklus-EMA-Hochs und Tiefs, Preiskreuzungen, Kontaktlosen und Breakout-Bestätigungen hochprobable Handelschancen identifiziert. Die Strategie ist in tendenziell klaren Märkten gut und reduziert das Risiko von Fehlintritten durch strenge Eintrittsbestätigungen und klare Ausstiegsregeln.
Jede Handelsstrategie hat jedoch ihre Grenzen, die in horizontalen oder stark volatilen Märkten herausgefordert werden können. Die Stabilität und Anpassungsfähigkeit der Strategie kann durch die Einführung von Optimierungsmaßnahmen wie Trendstärkefilter, Anpassung der dynamischen Parameter und Analyse mehrerer Zeitrahmen weiter verbessert werden.
Als Short-Line-Trading-System mit einem 5-Minuten-Zeitrahmen eignet sich die Strategie besonders für Day-Trader und Short-Line-Trader. Schließlich ist gutes Risikomanagement immer der Schlüssel für die erfolgreiche Anwendung jeder Trading-Strategie, und es wird empfohlen, dass Trader vor der Anwendung auf dem Markt ausreichend Rückmeldungen und Simulationen vornehmen und angemessene Positionsmanagement-Regeln in Verbindung mit der persönlichen Risikobereitschaft entwickeln.
- 1