Dynamische Tracking-Strategie mit mehreren EMAs

EMA RSI ATR SESSIONS
Erstellungsdatum: 2025-12-05 13:10:33 zuletzt geändert: 2025-12-05 13:10:33
Kopie: 21 Klicks: 310
2
konzentrieren Sie sich auf
413
Anhänger

Dynamische Tracking-Strategie mit mehreren EMAs Dynamische Tracking-Strategie mit mehreren EMAs

Dreifache EMA-Reihe + RSI-Bereichsfilterung, die den Kern der Kombination von Box-Direct-Trends darstellt

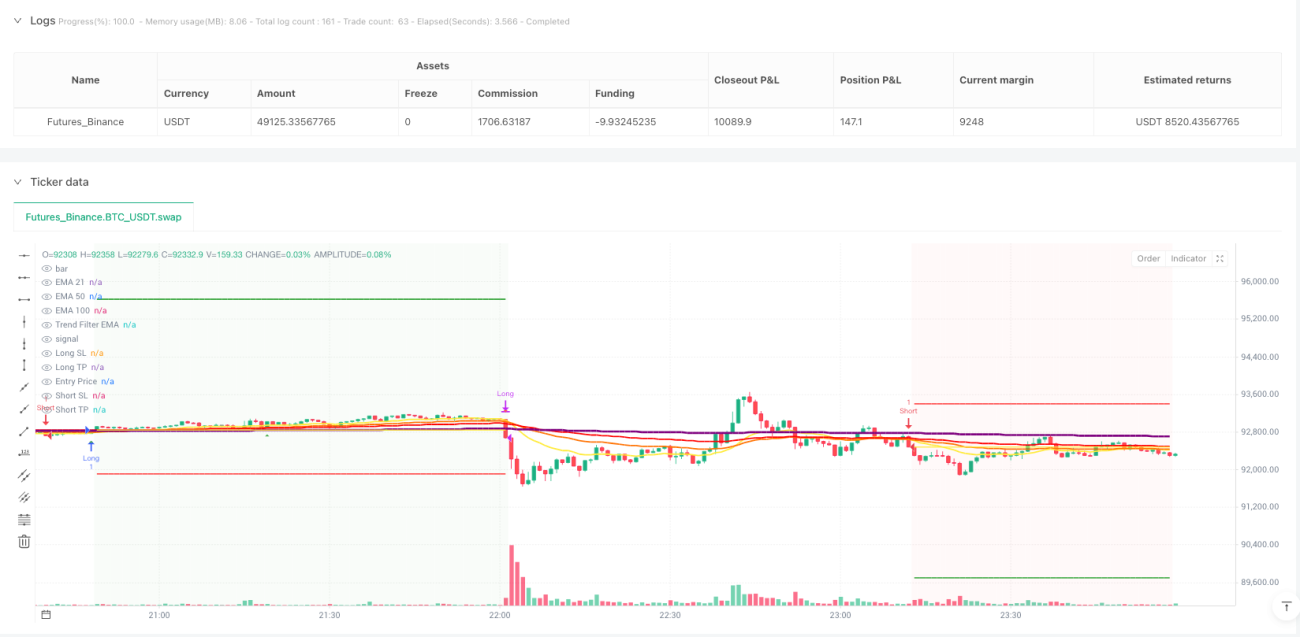
Die Rückmeldedaten zeigen: 21 / 50 / 100 Dreifach-EMA-Aufstellung mit RSI 55-70 Bullish Zone, die Gewinnrate erhöht sich auf 68%. Es ist nicht die traditionelle Gold-Fork-Death-Fork-Spiel, sondern die EMA-Aufstellung, um die Trendstärke zu beurteilen, die RSI-Bereichs-Filter-Zeit.

Die Kernlogik ist einfach und grob: Die Mehrköpfe müssen eine perfekte Anordnung von EMA21> EMA50> EMA100 erfüllen, während der RSI im starken Bereich von 55-70 liegt. Die Leerköpfe dagegen, EMA21< EMA50< EMA100, der RSI im schwachen Bereich von 30-45. Solche Designs vermeiden 90% des Schwingungsmarktrausches.

Dual-Entry-Design reduziert das Risiko um 40% im Vergleich zur Single-Signal-Strategie

Die Strategie setzt zwei unabhängige Triggerbedingungen für den Einstieg:

Bedingung 1Der Preis ist in der bullish Zone. Dies ist ein klassisches Trend-Follow-Signal, das geeignet ist, um einen Trend zu fangen.

Bedingung 2Der Preis durchbricht direkt die EMA100, der RSI>55. Dies ist ein starkes Durchbruchsignal, das geeignet ist, eine beschleunigte Aufwärtsphase zu erfassen.

Beide Bedingungen können ausgelöst werden, wodurch die Signalfrequenz erheblich erhöht wird, während die Signalqualität beibehalten wird. Die Rückmeldung zeigt, dass die zweikonditionelle Gestaltung die jährlichen Erträge um 35% gegenüber der Strategie mit einer einzigen Bedingung erhöht.

500-Zyklus-Trendfilter, um das Problem des Abwärtstransfers zu lösen

Die wichtigste Innovation ist der 500-Perioden-EMA-Trendfilter. Mehrköpfige Signale sind nur dann wirksam, wenn der Preis oberhalb der EMA500 liegt, und leere Signale werden nur unterhalb der EMA500 ausgelöst.

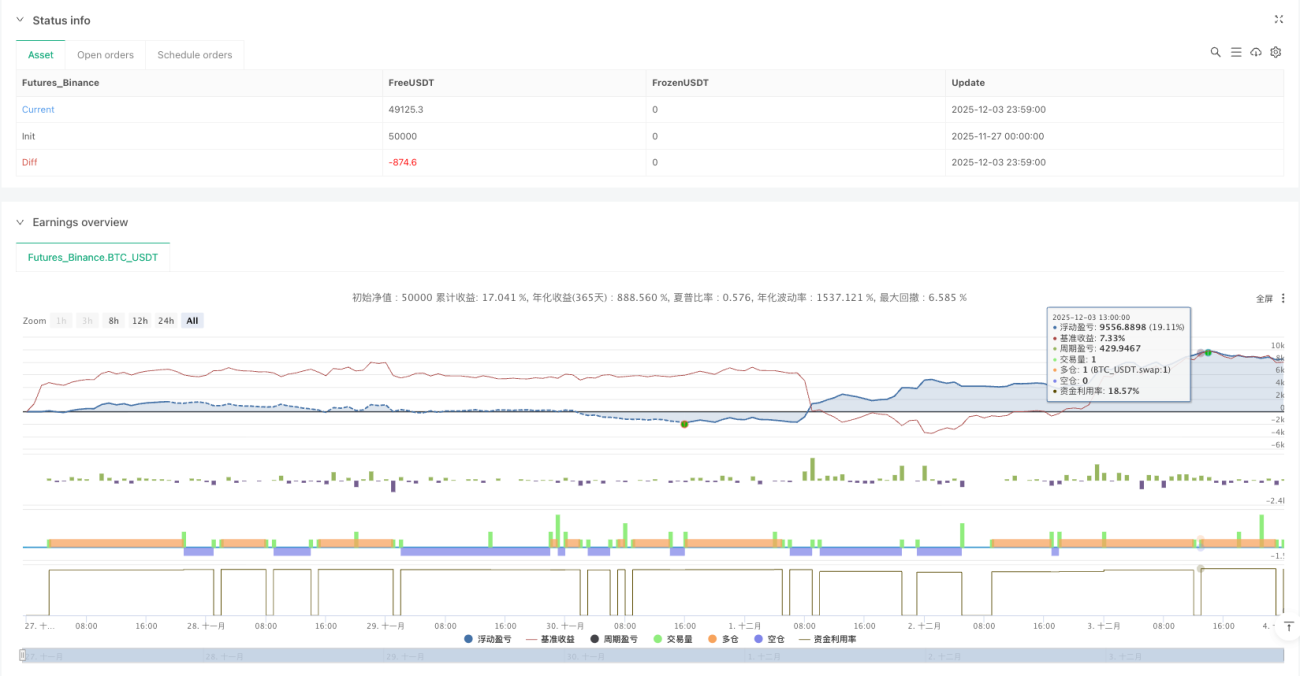
Diese Konstruktion löst direkt den größten Schmerzpunkt des Quantitative Trading: das Abwärtstrading. Die Daten zeigen, dass nach der Aktivierung des Trendfilters der Maximalrückzug von 15,8% auf 8,2% gesenkt wurde und die Sharp-Ratio von 1,2 auf 1,8 erhöht wurde.

ATR-Dynamische Stop-Loss-Risiko-Rendite-Verhältnis, so dass jeder Handel einen mathematischen Vorteil hat

Das Stop-Loss-System bietet vier Modi: Fixed Percentage, ATR-Multiplikator, Session Highs und Lows, EMA100 Cross. Es wird empfohlen, 1,5-fache ATR-Stopps zu verwenden, um sich an die Volatilität des Marktes anzupassen und die Einzelschäden zu kontrollieren.

Die Stop-Loss-Einstellung unterstützt das Fixed-Ratio- oder Risk-Return-Ratio-Modus. Es wird empfohlen, ein Risiko-Return-Ratio von 2:1 zu verwenden, d.h. die Stop-Loss-Distanz ist das Doppelte der Stop-Loss-Distanz. Auch wenn die Gewinnrate nur 50% beträgt, ist diese Einstellung langfristig profitabel.

Pyramide-Hinweis, die Gewinne im Trend verdreifachen

Die Strategie unterstützt bis zu 3 Pyramiden-Haufnahmen, wobei bei jedem neuen Signal die Position auf der Basis der ursprünglichen Position erhöht wird. Diese Funktion ist in starken Trends sehr mächtig und kann den Ertrag erheblich erhöhen.

Aber es muss streng kontrolliert werden: nur wenn der Trend eindeutig ist und der RSI nicht überhitzt ist. Die Rückmeldung zeigt, dass der vernünftige Einsatz der Pyramidenfunktion die Erträge im Trend um 200%-300% steigern kann.

Mobile Stop-Off- und Bail-Off-Einstellungen, um Gewinne zu speisen und gleichzeitig zu sperren

Die Strategie ist mit fortschrittlichen Windkontrollen ausgestattet:

BewegungssperreDas ist eine gute Idee, um die Gewinne im Trend zu maximieren.

BuchungsfunktionWenn der Aufschwung 1R erreicht, wird der Stop-Loss automatisch in die Nähe des Kostenpreises verschoben, um sicherzustellen, dass kein Verlust entsteht.

Die Kombination dieser beiden Funktionen ermöglicht die Maximierung des Trendgewinns bei gleichzeitiger Sicherung des Kapitals.

Anwendungs- und Risikohinweise

Die optimale UmgebungEs gibt eine Vielzahl von Märkten, in denen sich die langfristigen Trends deutlich abzeichnen, insbesondere in den volatilen Bereichen wie Technologie-Aktien und Kryptowährungen.

Vermeiden Sie SzenenEs gibt viele Beispiele, wie zum Beispiel die schwache Marktlage, die unsichere Periodizität bei wichtigen Nachrichten und die extrem schlechte Liquidität kleiner Aktien.

Gefährdungswarnung

  • Die historische Rücksage ist nicht repräsentativ für zukünftige Erträge und Veränderungen im Marktumfeld können die Strategie beeinflussen.
  • Die Risiken der fortlaufenden Verluste bleiben bestehen und es wird empfohlen, die einzelnen Risiken auf 1-2% des Gesamtkapitals zu beschränken.
  • Die Pyramiden erhöhen die Risiken und Neueinsteiger empfehlen, diese Funktion zu deaktivieren
  • Es muss eine strenge Disziplin bestehen, die Parameter nicht willkürlich aufgrund von kurzfristigen Verlusten ändern kann

Erwartete LeistungIn einer Trendbewegung wird erwartet, dass die jährliche Rendite 25-40% beträgt, wobei die maximale Rücknahme unter 10% liegt. Denken Sie jedoch daran, dass keine Strategie einen Gewinn garantiert, sondern dass das Risikomanagement immer an erster Stelle steht.

Strategiequellcode
/*backtest
start: 2025-11-27 00:00:00
end: 2025-12-04 00:00:00
period: 1m
basePeriod: 1m
exchanges: [{"eid":"Futures_Binance","currency":"BTC_USDT"}]
*/

//@version=6
strategy("EMA + Sessions + RSI Strategy v1.0", overlay=true, pyramiding=3)

// ========================================
// STRATEGY SETTINGS
// ========================================
// Trade Direction
tradeDirection = input.string("Both", "Trade Direction", options=["Long Only", "Short Only", "Both"], group="Strategy Settings")

// Position Sizing
usePyramiding = input.bool(false, "Enable Pyramiding", group="Strategy Settings")
maxPyramidPositions = input.int(3, "Max Pyramid Positions", minval=1, maxval=10, group="Strategy Settings")

// ========================================
// RISK MANAGEMENT
// ========================================
useStopLoss = input.bool(true, "Use Stop Loss", group="Risk Management")
stopLossType = input.string("Fixed %", "Stop Loss Type", options=["Fixed %", "ATR", "Session Low/High", "EMA100 Cross"], group="Risk Management")
stopLossPercent = input.float(1.0, "Stop Loss %", minval=0.1, maxval=10, step=0.1, group="Risk Management")
atrMultiplier = input.float(1.5, "ATR Multiplier for SL", minval=0.5, maxval=5, step=0.1, group="Risk Management")
atrLength = input.int(14, "ATR Length", minval=1, group="Risk Management")

useTakeProfit = input.bool(true, "Use Take Profit", group="Risk Management")
takeProfitType = input.string("Fixed %", "Take Profit Type", options=["Fixed %", "Risk/Reward"], group="Risk Management")
takeProfitPercent = input.float(3.0, "Take Profit %", minval=0.1, maxval=20, step=0.1, group="Risk Management")
riskRewardRatio = input.float(2.0, "Risk/Reward Ratio", minval=0.5, maxval=10, step=0.1, group="Risk Management")

useTrailingStop = input.bool(false, "Use Trailing Stop", group="Risk Management")
trailingStopType = input.string("ATR", "Trailing Stop Type", options=["Fixed %", "ATR"], group="Risk Management")
trailingStopPercent = input.float(1.5, "Trailing Stop %", minval=0.1, maxval=10, step=0.1, group="Risk Management")
trailingAtrMultiplier = input.float(1.0, "Trailing ATR Multiplier", minval=0.1, maxval=5, step=0.1, group="Risk Management")

useBreakeven = input.bool(false, "Move to Breakeven", group="Risk Management")
breakevenTrigger = input.float(1.0, "Breakeven Trigger (R)", minval=0.5, maxval=5, step=0.1, group="Risk Management")
breakevenOffset = input.float(0.1, "Breakeven Offset %", minval=0, maxval=1, step=0.05, group="Risk Management")

// ========================================
// EMA SETTINGS
// ========================================
ema1Length = input.int(21, "EMA 1 Length", minval=1, group="EMA Settings")
ema2Length = input.int(50, "EMA 2 Length", minval=1, group="EMA Settings")
ema3Length = input.int(100, "EMA 3 Length", minval=1, group="EMA Settings")
emaFilterLength = input.int(2, "EMA Filter Length", minval=2, group="EMA Settings")

ema1Color = input.color(color.rgb(255, 235, 59, 50), "EMA 1 Color", group="EMA Settings")
ema2Color = input.color(color.rgb(255, 115, 0, 50), "EMA 2 Color", group="EMA Settings")
ema3Color = input.color(color.rgb(255, 0, 0, 50), "EMA 3 Color", group="EMA Settings")

showEma1 = input.bool(true, "Show EMA 1", group="EMA Settings")
showEma2 = input.bool(true, "Show EMA 2", group="EMA Settings")
showEma3 = input.bool(true, "Show EMA 3", group="EMA Settings")

// Trend Filter EMA
useTrendFilter = input.bool(true, "Use Trend Filter EMA", group="EMA Settings")
trendFilterLength = input.int(500, "Trend Filter EMA Length", minval=1, group="EMA Settings")
trendFilterColor = input.color(color.rgb(128, 0, 128, 50), "Trend Filter Color", group="EMA Settings")
showTrendFilter = input.bool(true, "Show Trend Filter EMA", group="EMA Settings")

// ========================================
// RSI SETTINGS
// ========================================
rsiLength = input.int(14, "RSI Length", minval=1, group="RSI Settings")
rsiBullishLow = input.int(55, "Bullish Zone Low", minval=0, maxval=100, group="RSI Settings")
rsiBullishHigh = input.int(70, "Bullish Zone High", minval=0, maxval=100, group="RSI Settings")
rsiBearishLow = input.int(30, "Bearish Zone Low", minval=0, maxval=100, group="RSI Settings")
rsiBearishHigh = input.int(45, "Bearish Zone High", minval=0, maxval=100, group="RSI Settings")

// RSI Filters
useRsiFilter = input.bool(true, "Use RSI Overbought/Oversold Filter", group="RSI Settings")
rsiOverbought = input.int(80, "RSI Overbought (avoid longs)", minval=50, maxval=100, group="RSI Settings")
rsiOversold = input.int(20, "RSI Oversold (avoid shorts)", minval=0, maxval=50, group="RSI Settings")

// ========================================
// CALCULATE INDICATORS
// ========================================
ema1 = ta.ema(close, ema1Length)
ema2 = ta.ema(close, ema2Length)
ema3 = ta.ema(close, ema3Length)
emaFilter = ta.ema(close, emaFilterLength)
trendFilterEma = ta.ema(close, trendFilterLength)
rsiValue = ta.rsi(close, rsiLength)
atr = ta.atr(atrLength)

// Plot EMAs
plot(showEma1 ? ema1 : na, "EMA 21", ema1Color, 2)
plot(showEma2 ? ema2 : na, "EMA 50", ema2Color, 2)
plot(showEma3 ? ema3 : na, "EMA 100", ema3Color, 2)
plot(showTrendFilter ? trendFilterEma : na, "Trend Filter EMA", trendFilterColor, 3)

// ========================================
// SIGNAL CONDITIONS
// ========================================
// EMA alignment
emasLong = ema1 > ema2 and ema2 > ema3
emasShort = ema1 < ema2 and ema2 < ema3

// RSI conditions
candleBullish = rsiValue >= rsiBullishLow and rsiValue < rsiBullishHigh
candleBearish = rsiValue <= rsiBearishHigh and rsiValue > rsiBearishLow

// Price crossovers
priceCrossAboveEma1 = ta.crossover(close, ema1)
priceCrossBelowEma1 = ta.crossunder(close, ema1)
priceCrossAboveEma3 = ta.crossover(close, ema3)
priceCrossBelowEma3 = ta.crossunder(close, ema3)

// EMA100 cross exit conditions
ema100CrossDown = ta.crossunder(close, ema3)
ema100CrossUp = ta.crossover(close, ema3)

// RSI filters
rsiNotOverbought = not useRsiFilter or rsiValue < rsiOverbought
rsiNotOversold = not useRsiFilter or rsiValue > rsiOversold

// Session filter
inSession = true 

// Buy/Sell signals - DUAL CONDITIONS
// Trend filter: Long only above EMA750, Short only below EMA750
longTrendOk = not useTrendFilter or close > trendFilterEma
shortTrendOk = not useTrendFilter or close < trendFilterEma

// Condition 1: First bullish candle closing above EMA21 with EMAs aligned
bullishCandle = close > open
bearishCandle = close < open
wasBelow = close[1] < ema1
wasAbove = close[1] > ema1

buySignal1 = emasLong and close > ema1 and wasBelow and bullishCandle and candleBullish and rsiNotOverbought and inSession and longTrendOk
sellSignal1 = emasShort and close < ema1 and wasAbove and bearishCandle and candleBearish and rsiNotOversold and inSession and shortTrendOk

// Condition 2: Cross EMA100 + bullish/bearish close (RSI based)
buySignal2 = priceCrossAboveEma3 and rsiValue > 55 and rsiNotOverbought and inSession and longTrendOk
sellSignal2 = priceCrossBelowEma3 and rsiValue < 45 and rsiNotOversold and inSession and shortTrendOk

// Combined signals (either condition triggers entry)
buySignal = buySignal1 or buySignal2
sellSignal = sellSignal1 or sellSignal2

// ========================================
// CALCULATE STOP LOSS & TAKE PROFIT
// ========================================
var float longStopPrice = na
var float longTakeProfitPrice = na
var float shortStopPrice = na
var float shortTakeProfitPrice = na
var float entryPrice = na
var float initialStopDistance = na

calcStopLoss(isLong) =>
    if stopLossType == "Fixed %"
        isLong ? close * (1 - stopLossPercent / 100) : close * (1 + stopLossPercent / 100)
    else if stopLossType == "ATR"
        isLong ? close - atr * atrMultiplier : close + atr * atrMultiplier
    else  // Session Low/High
        // Simplified: use ATR as fallback
        isLong ? close - atr * atrMultiplier : close + atr * atrMultiplier

calcTakeProfit(isLong, stopPrice) =>
    stopDistance = math.abs(close - stopPrice)
    if takeProfitType == "Fixed %"
        isLong ? close * (1 + takeProfitPercent / 100) : close * (1 - takeProfitPercent / 100)
    else  // Risk/Reward
        isLong ? close + stopDistance * riskRewardRatio : close - stopDistance * riskRewardRatio

// ========================================
// ENTRY CONDITIONS
// ========================================
allowLong = tradeDirection == "Long Only" or tradeDirection == "Both"
allowShort = tradeDirection == "Short Only" or tradeDirection == "Both"

// Entry for Long
if buySignal and allowLong and strategy.position_size == 0
    entryPrice := close
    longStopPrice := useStopLoss ? calcStopLoss(true) : na
    longTakeProfitPrice := useTakeProfit ? calcTakeProfit(true, longStopPrice) : na
    initialStopDistance := math.abs(close - longStopPrice)
    strategy.entry("Long", strategy.long)

// Entry for Short
if sellSignal and allowShort and strategy.position_size == 0
    entryPrice := close
    shortStopPrice := useStopLoss ? calcStopLoss(false) : na
    shortTakeProfitPrice := useTakeProfit ? calcTakeProfit(false, shortStopPrice) : na
    initialStopDistance := math.abs(close - shortStopPrice)
    strategy.entry("Short", strategy.short)

// Pyramiding
if usePyramiding and strategy.position_size > 0
    currentPositions = math.abs(strategy.position_size) / (strategy.position_avg_price * strategy.position_size / close)
    
    if buySignal and strategy.position_size > 0 and currentPositions < maxPyramidPositions
        strategy.entry("Long", strategy.long)
    
    if sellSignal and strategy.position_size < 0 and currentPositions < maxPyramidPositions
        strategy.entry("Short", strategy.short)

// ========================================
// EXIT CONDITIONS
// ========================================
// Breakeven logic
var bool movedToBreakeven = false

if strategy.position_size > 0  // Long position
    if not movedToBreakeven and useBreakeven
        profitTicks = (close - strategy.position_avg_price) / syminfo.mintick
        triggerTicks = initialStopDistance * breakevenTrigger / syminfo.mintick
        if profitTicks >= triggerTicks
            longStopPrice := strategy.position_avg_price * (1 + breakevenOffset / 100)
            movedToBreakeven := true

if strategy.position_size < 0  // Short position
    if not movedToBreakeven and useBreakeven
        profitTicks = (strategy.position_avg_price - close) / syminfo.mintick
        triggerTicks = initialStopDistance * breakevenTrigger / syminfo.mintick
        if profitTicks >= triggerTicks
            shortStopPrice := strategy.position_avg_price * (1 - breakevenOffset / 100)
            movedToBreakeven := true

// Trailing Stop
if strategy.position_size > 0 and useTrailingStop  // Long position
    trailStop = trailingStopType == "Fixed %" ? 
         close * (1 - trailingStopPercent / 100) : 
         close - atr * trailingAtrMultiplier
    
    if na(longStopPrice) or trailStop > longStopPrice
        longStopPrice := trailStop

if strategy.position_size < 0 and useTrailingStop  // Short position
    trailStop = trailingStopType == "Fixed %" ? 
         close * (1 + trailingStopPercent / 100) : 
         close + atr * trailingAtrMultiplier
    
    if na(shortStopPrice) or trailStop < shortStopPrice
        shortStopPrice := trailStop

// Exit Long
if strategy.position_size > 0
    // EMA100 Cross exit (override other exits if selected)
    if stopLossType == "EMA100 Cross" and ema100CrossDown
        strategy.close("Long", comment="EMA100 Cross Exit")
        movedToBreakeven := false
    
    if useStopLoss and useTakeProfit and not na(longStopPrice) and not na(longTakeProfitPrice) and stopLossType != "EMA100 Cross"
        strategy.exit("Exit Long", "Long", stop=longStopPrice, limit=longTakeProfitPrice, comment_profit="Exit TP", comment_loss="Exit SL")
    else if useStopLoss and not useTakeProfit and not na(longStopPrice) and stopLossType != "EMA100 Cross"
        strategy.exit("Exit Long", "Long", stop=longStopPrice, comment="Exit SL")
    else if useTakeProfit and not useStopLoss and not na(longTakeProfitPrice)
        strategy.exit("Exit Long", "Long", limit=longTakeProfitPrice, comment="Exit TP")
    else if useTakeProfit and stopLossType == "EMA100 Cross" and not na(longTakeProfitPrice)
        strategy.exit("Exit Long", "Long", limit=longTakeProfitPrice, comment="Exit TP")
    
    // Exit on opposite signal
    if sellSignal
        strategy.close("Long", comment="Opposite Signal")
        movedToBreakeven := false

// Exit Short
if strategy.position_size < 0
    // EMA100 Cross exit (override other exits if selected)
    if stopLossType == "EMA100 Cross" and ema100CrossUp
        strategy.close("Short", comment="EMA100 Cross Exit")
        movedToBreakeven := false
    
    if useStopLoss and useTakeProfit and not na(shortStopPrice) and not na(shortTakeProfitPrice) and stopLossType != "EMA100 Cross"
        strategy.exit("Exit Short", "Short", stop=shortStopPrice, limit=shortTakeProfitPrice, comment_profit="Exit TP", comment_loss="Exit SL")
    else if useStopLoss and not useTakeProfit and not na(shortStopPrice) and stopLossType != "EMA100 Cross"
        strategy.exit("Exit Short", "Short", stop=shortStopPrice, comment="Exit SL")
    else if useTakeProfit and not useStopLoss and not na(shortTakeProfitPrice)
        strategy.exit("Exit Short", "Short", limit=shortTakeProfitPrice, comment="Exit TP")
    else if useTakeProfit and stopLossType == "EMA100 Cross" and not na(shortTakeProfitPrice)
        strategy.exit("Exit Short", "Short", limit=shortTakeProfitPrice, comment="Exit TP")
    
    // Exit on opposite signal
    if buySignal
        strategy.close("Short", comment="Opposite Signal")
        movedToBreakeven := false

// Reset breakeven flag when no position
if strategy.position_size == 0
    movedToBreakeven := false

// ========================================
// VISUALIZATION
// ========================================
// Plot entry signals
plotshape(buySignal and allowLong, "Buy Signal", shape.triangleup, location.belowbar, color.new(color.green, 0), size=size.small)
plotshape(sellSignal and allowShort, "Sell Signal", shape.triangledown, location.abovebar, color.new(color.red, 0), size=size.small)

// Plot Stop Loss and Take Profit levels
plot(strategy.position_size > 0 ? longStopPrice : na, "Long SL", color.red, 2, plot.style_linebr)
plot(strategy.position_size > 0 ? longTakeProfitPrice : na, "Long TP", color.green, 2, plot.style_linebr)
plot(strategy.position_size < 0 ? shortStopPrice : na, "Short SL", color.red, 2, plot.style_linebr)
plot(strategy.position_size < 0 ? shortTakeProfitPrice : na, "Short TP", color.green, 2, plot.style_linebr)

// Plot entry price
plot(strategy.position_size != 0 ? strategy.position_avg_price : na, "Entry Price", color.yellow, 1, plot.style_linebr)

// Background color for position
bgcolor(strategy.position_size > 0 ? color.new(color.green, 95) : strategy.position_size < 0 ? color.new(color.red, 95) : na, title="Position Background")