
This strategy is a trend following trading system that combines multiple Simple Moving Averages (SMA) with the Stochastic oscillator. It executes trades when market trends are clearly defined by establishing price zones and trend identification conditions. The strategy employs a dynamic stop-loss mechanism that adjusts position management based on market movements, both protecting profits and avoiding premature exits.
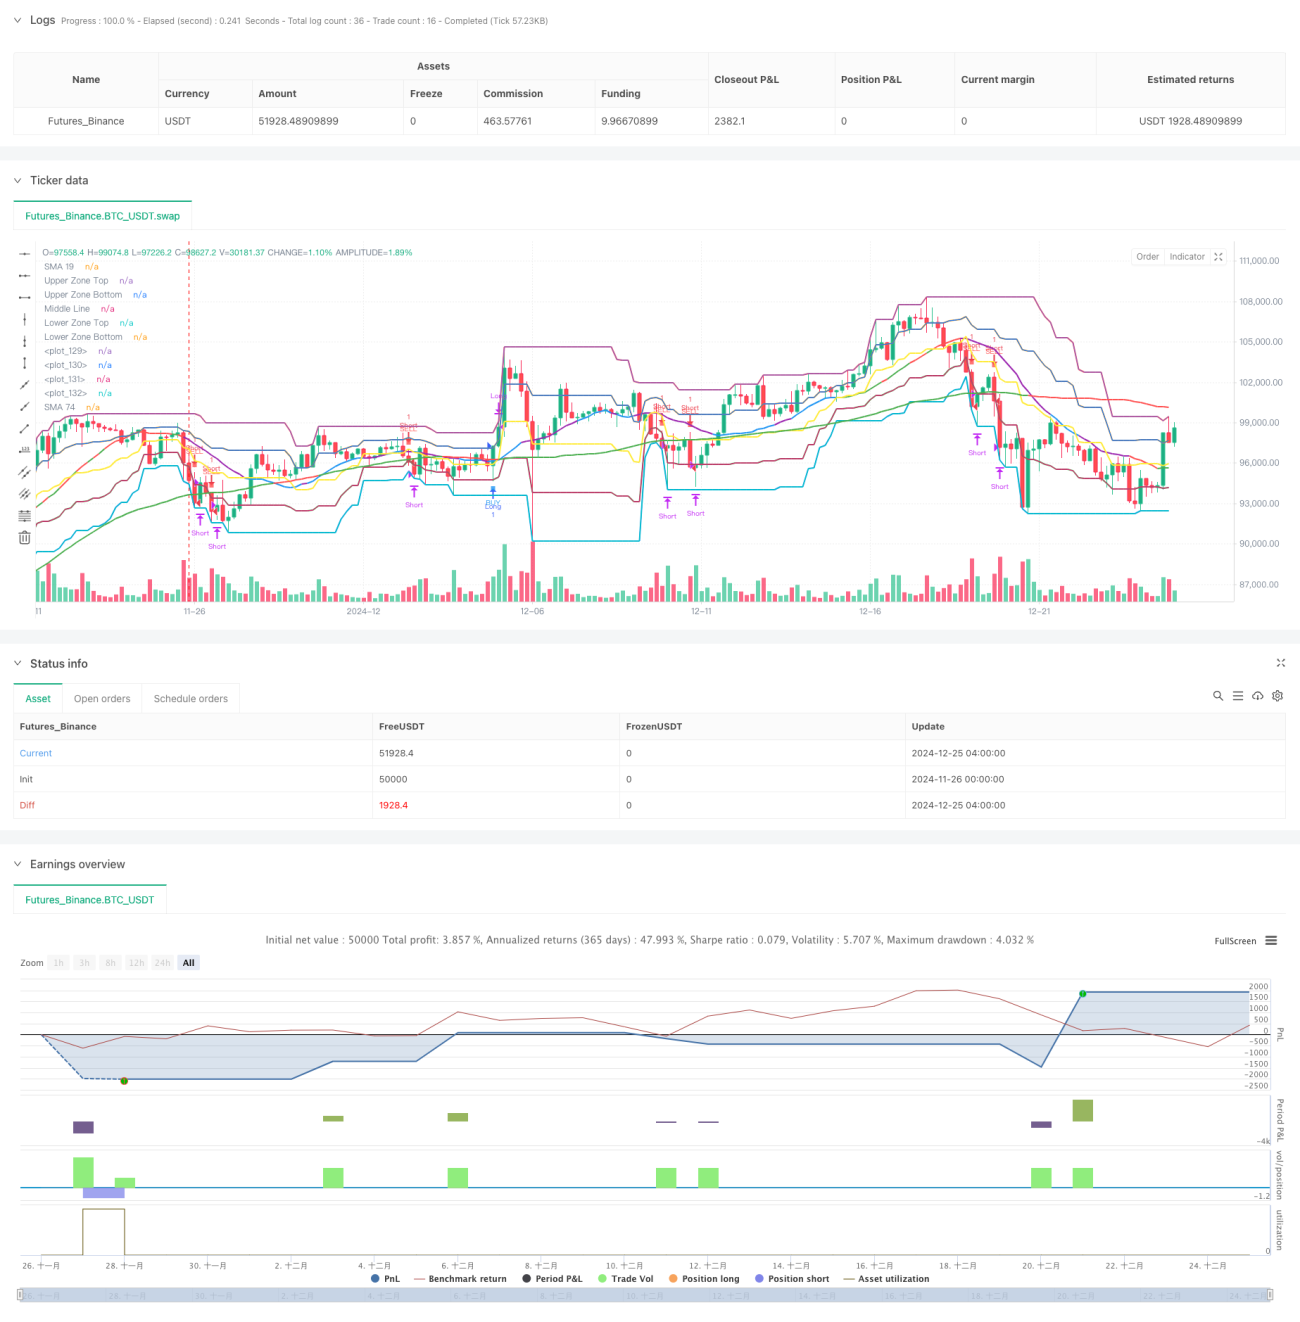
The strategy is built on several core components: 1. Dual SMA System: Uses 19-period and 74-period SMAs for trend determination 2. Price Zones: Divides price range into 5 levels for market strength assessment 3. Stochastic Oscillator: Employs 60-period stochastic for overbought/oversold conditions 4. Trend Confirmation: Uses three consecutive candles to confirm trend continuation 5. Entry Conditions: Enters when price crosses 74-period SMA and is within specified price zones 6. Stop-Loss Mechanism: Implements trailing stops with trend-based exits
This strategy builds a comprehensive trading system by combining multiple technical indicators, featuring strong trend-following capabilities and risk management mechanisms. While it may face challenges in certain market conditions, continuous optimization and refinement can help maintain stable performance across different market environments. Traders are advised to control position sizes, set appropriate stop-losses, and adjust parameters according to market conditions when implementing the strategy in live trading.
/*backtest
start: 2024-11-26 00:00:00
end: 2024-12-25 08:00:00
period: 4h
basePeriod: 4h
exchanges: [{"eid":"Futures_Binance","currency":"BTC_USDT"}]
*/
//@version=5
strategy("Purple SMA Strategy", overlay=true)
// === INPUTS ===
zoneLength = input.int(20, "Price Zone Length", minval=5)
tickSize = input.float(1.0, "Tick Size for Hard Stop")
hardStopTicks = input.int(50, "Hard Stop Loss in Ticks")
// === CALCULATE ZONES ===
h = ta.highest(high, zoneLength)
l = ta.lowest(low, zoneLength)
priceRange = h - l
lvl5 = h
lvl4 = l + (priceRange * 0.75) // Orange line
lvl3 = l + (priceRange * 0.50) // Yellow line
lvl2 = l + (priceRange * 0.25) // Green line
lvl1 = l
// === INDICATORS ===
sma19 = ta.sma(close, 19)
sma74 = ta.sma(close, 74)
// === CANDLE COLOR CONDITIONS ===
isGreenCandle = close > open
isRedCandle = close < open
// === CONTINUOUS TREND DETECTION ===
isThreeGreenCandles = close > open and close[1] > open[1] and close[2] > open[2]
isThreeRedCandles = close < open and close[1] < open[1] and close[2] < open[2]
var bool inGreenTrend = false
var bool inRedTrend = false
// Update trends
if isThreeGreenCandles
inGreenTrend := true
inRedTrend := false
if isThreeRedCandles
inRedTrend := true
inGreenTrend := false
if (inGreenTrend and isRedCandle) or (inRedTrend and isGreenCandle)
inGreenTrend := false
inRedTrend := false
// === STOCHASTIC CONDITIONS ===
k = ta.stoch(close, high, low, 60)
d = ta.sma(k, 10)
isOverbought = d >= 80
isOversold = d <= 20
stochUp = d > d[1]
stochDown = d < d[1]
// === SMA COLOR LOGIC ===
sma19Color = if isOverbought and stochUp
color.green
else if isOverbought and stochDown
color.red
else if isOversold and stochUp
color.green
else if isOversold and stochDown
color.red
else if stochUp
color.blue
else if stochDown
color.purple
else
color.gray
sma74Color = sma74 < sma19 ? color.green : color.red
// === CROSSING CONDITIONS ===
crossUpSMA = ta.crossover(close, sma74)
crossDownSMA = ta.crossunder(close, sma74)
// === ENTRY CONDITIONS ===
buyCondition = crossUpSMA and close > lvl4
sellCondition = crossDownSMA and close < lvl2
// === POSITION MANAGEMENT ===
var float stopLevel = na
var bool xMode = false
// Entry and Stop Loss
if buyCondition
strategy.entry(id="Long", direction=strategy.long)
stopLevel := close - (hardStopTicks * tickSize)
xMode := false
if sellCondition
strategy.entry(id="Short", direction=strategy.short)
stopLevel := close + (hardStopTicks * tickSize)
xMode := false
// Update stops based on X's
if strategy.position_size != 0 and (inGreenTrend or inRedTrend)
xMode := true
if strategy.position_size > 0 // Long position
stopLevel := low
else // Short position
stopLevel := high
// Exit logic
if strategy.position_size > 0 // Long position
if low <= stopLevel
strategy.close(id="Long")
else if xMode and not (inGreenTrend or inRedTrend)
strategy.close(id="Long")
if strategy.position_size < 0 // Short position
if high >= stopLevel
strategy.close(id="Short")
else if xMode and not (inGreenTrend or inRedTrend)
strategy.close(id="Short")
// === PLOTTING ===
plot(sma19, "SMA 19", color=sma19Color, linewidth=2)
plot(sma74, "SMA 74", color=sma74Color, linewidth=2)
plot(lvl5, "Upper Zone Top", color=color.red, linewidth=2)
plot(lvl4, "Upper Zone Bottom", color=color.orange, linewidth=2)
plot(lvl3, "Middle Line", color=color.yellow, linewidth=2)
plot(lvl2, "Lower Zone Top", color=color.green, linewidth=2)
plot(lvl1, "Lower Zone Bottom", color=color.blue, linewidth=2)
// Plot X signals
plotshape(inGreenTrend, title="Bullish Line", style=shape.xcross, location=location.belowbar, color=color.white, size=size.tiny)
plotshape(inRedTrend, title="Bearish Line", style=shape.xcross, location=location.abovebar, color=color.white, size=size.tiny)
// Zone fills
var p1 = plot(lvl5, display=display.none)
var p2 = plot(lvl4, display=display.none)
var p3 = plot(lvl2, display=display.none)
var p4 = plot(lvl1, display=display.none)
fill(p1, p2, color=color.new(color.red, 90))
fill(p3, p4, color=color.new(color.green, 90))
// Plot entry signals
plotshape(buyCondition, title="Buy", style=shape.square, location=location.belowbar, color=color.new(color.blue, 20), size=size.tiny, text="BUY", textcolor=color.blue)
plotshape(sellCondition, title="Sell", style=shape.square, location=location.abovebar, color=color.new(color.red, 20), size=size.tiny, text="SELL", textcolor=color.red)