Dynamic Trend-Following EMA-ADX Multi-Level Take-Profit Strategy

Overview
This strategy is a trend-following trading system that combines EMA and ADX indicators with multi-level take-profit and trailing stop-loss mechanisms for optimized money management. It uses EMA for trend direction determination, ADX for trend strength filtering, and implements a three-tiered take-profit mechanism for batch profit-taking, while using ATR for dynamic stop-loss adjustment to control risk.
Strategy Principles
The core logic includes several key components:
- Uses 50-period EMA to determine trend direction, entering long when price crosses above EMA and short when crossing below
- Filters weak trends using 14-period ADX, confirming valid trends when ADX>20
- Calculates dynamic stop-loss positions based on 14-period ATR, setting stops at low-1ATR for longs and high+1ATR for shorts
- Implements a three-tiered take-profit mechanism:
- First tier: 30% position closes at 1x ATR
- Second tier: 50% position closes at 2x ATR
- Third tier: 20% position uses 3x ATR trailing stop
- Automatically closes all remaining positions when price reaches second-tier take-profit level
Strategy Advantages
- Multi-level take-profit design secures profits while maintaining exposure to larger moves
- Trailing stop mechanism adapts to market volatility, providing dynamic risk control
- ADX filtering effectively avoids false signals in ranging markets
- EMA and price crossovers provide clear entry signals
- Batch profit-taking reduces emotional volatility, supporting long-term strategy execution
Strategy Risks
- May result in frequent trading and increased costs in ranging markets
- EMA as a lagging indicator might be slow to react in rapid reversals
- Fixed ADX threshold may need adjustment in different market conditions
- Multi-level take-profit might reduce position size too early in strong trends
Mitigation measures:
- Dynamically adjust ADX threshold based on market cycles
- Consider adding trend confirmation indicators
- Optimize take-profit ratio parameters more precisely
Strategy Optimization Directions
- Incorporate volume indicators for enhanced trend confirmation
- Implement dynamic ADX thresholds based on market volatility
- Optimize position allocation ratios for take-profit levels
- Add trend strength classification with corresponding take-profit strategies
- Consider incorporating seasonality and market cycle factors
Summary
This is a well-structured trend-following strategy with clear logic, balancing returns and risks through multi-level take-profits and dynamic stop-losses. The strategy design adheres to basic quantitative trading principles, offering good scalability and optimization potential. Through appropriate parameter adjustment and optimization upgrades, this strategy has the potential to maintain stable performance across different market conditions.
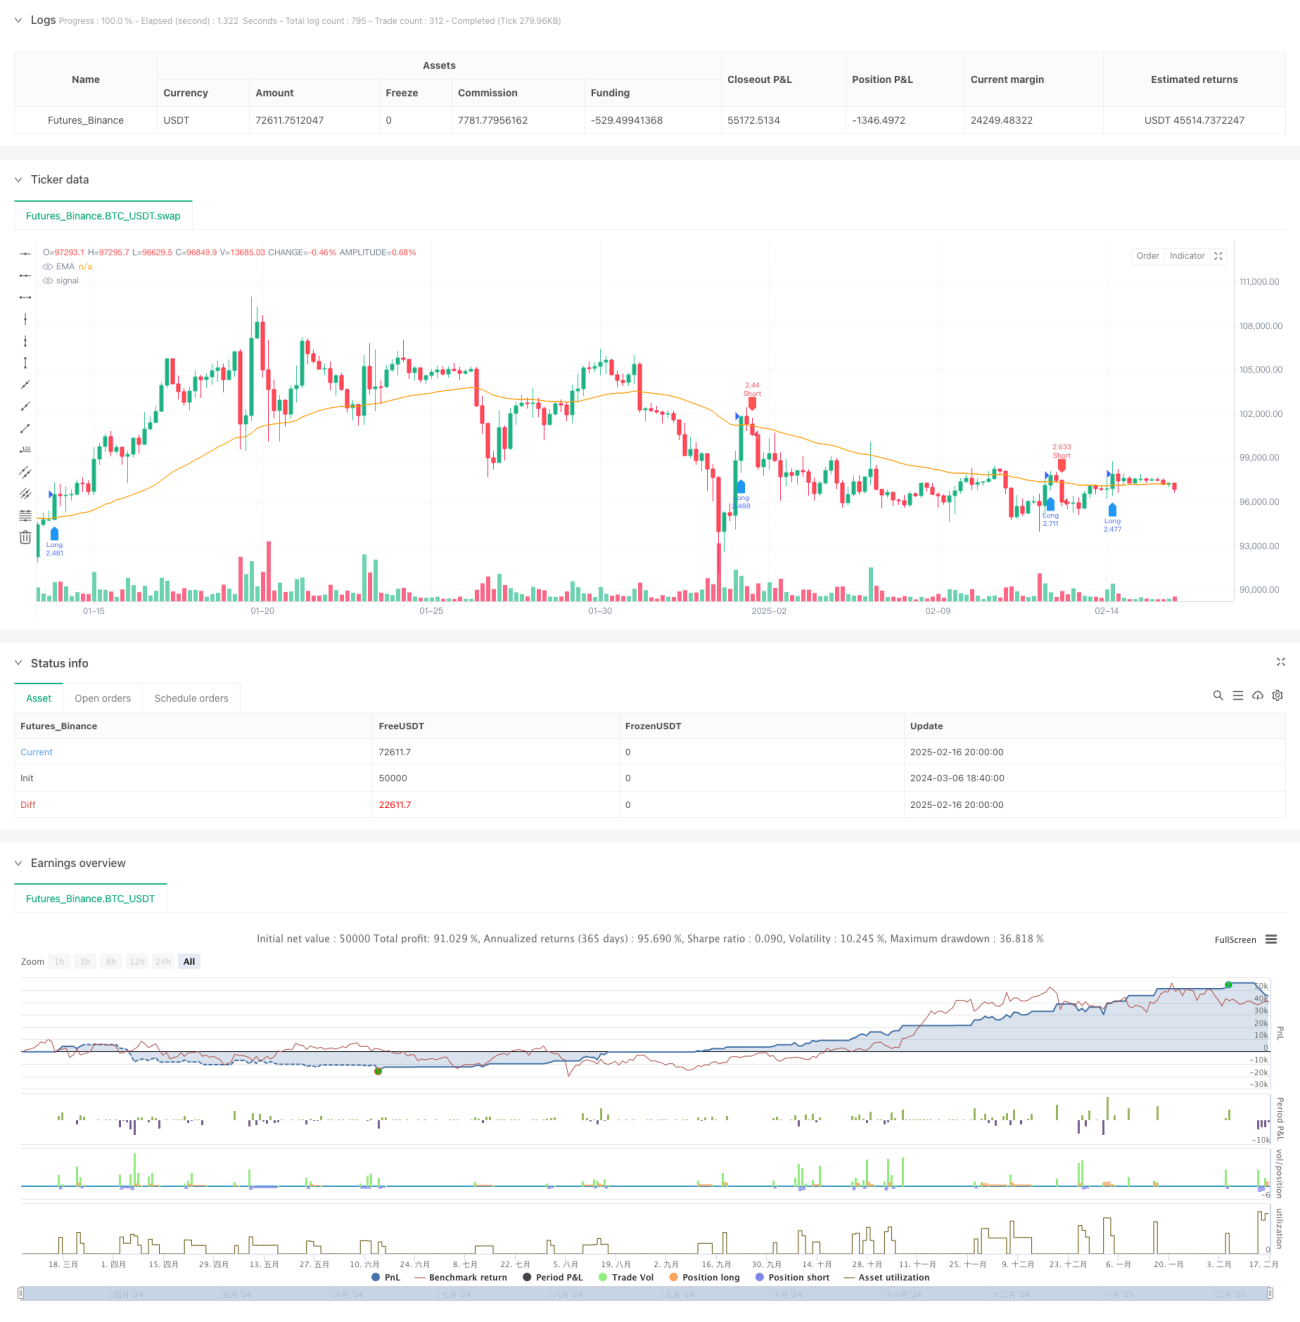
/*backtest
start: 2024-03-06 18:40:00
end: 2025-02-17 00:00:00
period: 4h
basePeriod: 4h
exchanges: [{"eid":"Futures_Binance","currency":"BTC_USDT"}]
*/

//@version=6
strategy("BTC Optimized Strategy v6", overlay=true, default_qty_type=strategy.percent_of_equity, default_qty_value=250)

// === 參數設定 ===- 1