Multi-Timeframe VWAP and EMA Breakout Trading Strategy

VWAP EMA ATR RR TP SL
Created on: 2025-02-20 13:25:02 Modified on: 2025-02-20 13:25:02
Copy: 2 Number of hits: 451
avatar of ianzeng123 ianzeng123
2
Follow
319
Followers

 Multi-Timeframe VWAP and EMA Breakout Trading Strategy  Multi-Timeframe VWAP and EMA Breakout Trading Strategy

Overview

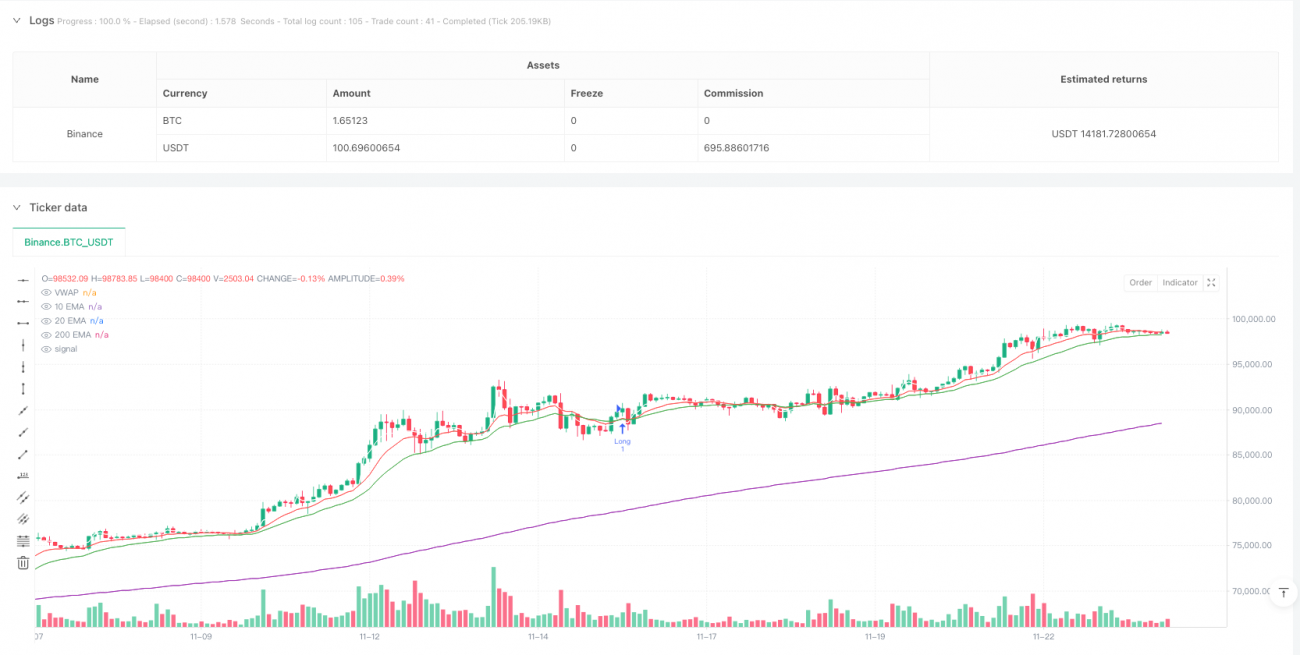
This is a trading strategy that combines Volume Weighted Average Price (VWAP) and multiple-timeframe Exponential Moving Averages (EMA). The strategy is designed for intraday trading, particularly suitable for 15-minute timeframes. It determines market trends and trading opportunities by analyzing price relationships with VWAP and different period EMAs, incorporating volume information.

Strategy Principles

The strategy utilizes 10-period, 20-period, and 200-period EMAs, along with VWAP as core indicators. Trading signals are generated based on the following conditions: - Long entry conditions: Price must be above VWAP, 200EMA, 10EMA, and 20EMA; current candle closes above open; VWAP above 200EMA; 10EMA above 20EMA, and 20EMA above VWAP. - Short entry conditions: Reverse conditions of long entries. - Stop-loss: Uses 10-period low (for longs) or high (for shorts) plus/minus ATR value. - Profit targets: Sets two targets using 1:2 and 1:3 risk-reward ratios.

Strategy Advantages

  1. Multiple confirmation mechanism: Improves signal reliability through the combination of multiple technical indicators.
  2. Dynamic risk management: ATR-based dynamic stop-loss adapts to market volatility changes.
  3. Clear profit objectives: Fixed risk-reward ratios facilitate risk control for traders.
  4. Trend following with momentum: Combines different period moving averages to capture both trends and short-term opportunities.

Strategy Risks

  1. Lag risk: EMA and VWAP are lagging indicators, potentially slow to react to rapid market reversals.
  2. Choppy market risk: May generate excessive false breakout signals during consolidation phases.
  3. Money management risk: Fixed risk-reward ratios might not suit all market conditions.
  4. Transaction cost impact: Frequent trading may result in high transaction costs.

Strategy Optimization Directions

  1. Implement volatility filter: Add ATR percentage threshold to avoid trading in low volatility environments.
  2. Optimize time filtering: Set optimal trading time windows based on specific market characteristics.
  3. Dynamic risk-reward adjustment: Adjust profit targets based on market volatility.
  4. Add volume confirmation: Set minimum volume thresholds to improve breakout reliability.
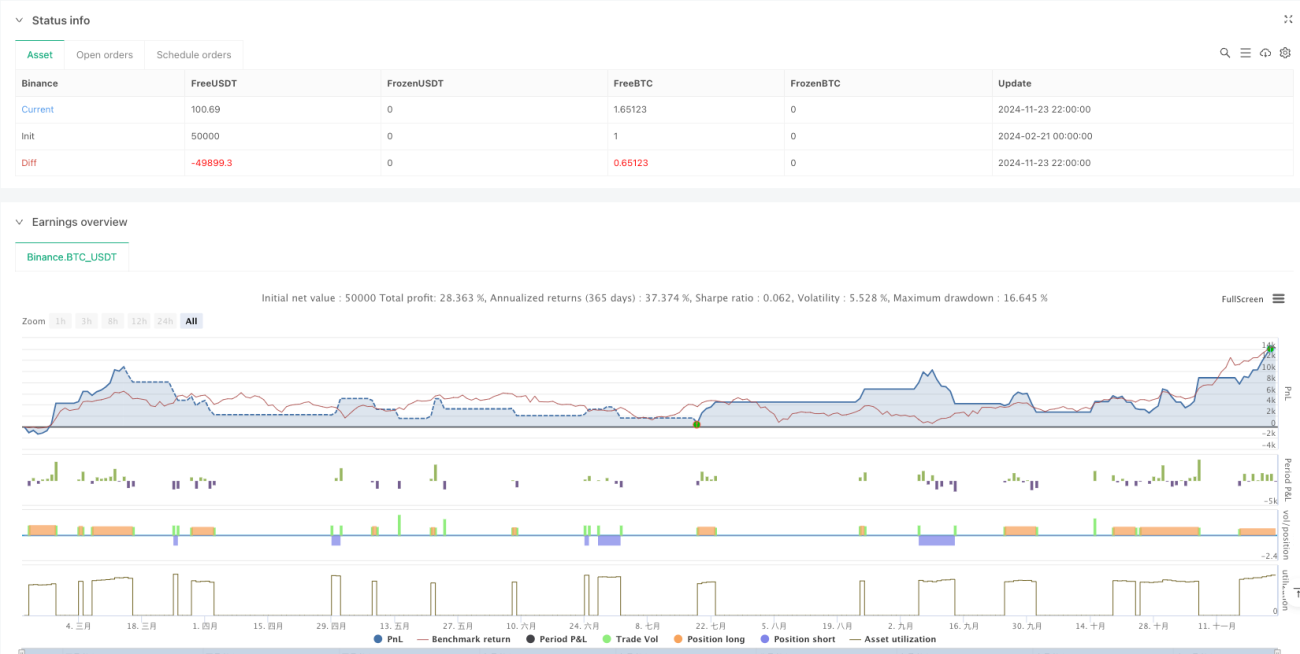
Summary

This strategy builds a comprehensive trading system by combining multiple technical indicators. Its core strengths lie in the multiple confirmation mechanism and robust risk management system. While there are inherent lag risks, the suggested optimization directions can further enhance strategy stability and profitability. The strategy is particularly suitable for intraday traders but requires parameter optimization based on specific market characteristics.

Strategy source code
/*backtest
start: 2024-02-21 00:00:00
end: 2024-11-24 00:00:00
period: 2h
basePeriod: 2h
exchanges: [{"eid":"Binance","currency":"BTC_USDT"}]
*/

//@version=5
strategy("VWAP EMA Breakout", overlay=true)

// Define Indicators
ema10 = ta.ema(close, 10)
ema20 = ta.ema(close, 20)
ema200 = ta.ema(close, 200)
vwap = ta.vwap(close)
atr = ta.atr(14)

// Price Conditions (Long)
priceAboveVWAP200EMA = close > vwap and close > ema200 and close > ema10 and close > ema20
bullishCandle = close > open

// Additional Conditions for VWAP and EMA Relationships (Long)
vwapAbove200EMA = vwap > ema200
emaConditions = ema10 > ema20 and ema20 > vwap and vwap > ema200

// Entry Conditions (Long)
longCondition = priceAboveVWAP200EMA and bullishCandle and vwapAbove200EMA and emaConditions

// Stop-Loss & Take-Profit (Long)
swingLow = ta.lowest(low, 10)
stopLossLong = swingLow - atr
riskLong = close - stopLossLong
takeProfitLong2 = close + (riskLong * 2) // 1:2 RR
takeProfitLong3 = close + (riskLong * 3) // 1:3 RR

// Execute Long Trade
if longCondition
    strategy.entry("Long", strategy.long)
    strategy.exit("TP 1:2", from_entry="Long", limit=takeProfitLong2, stop=stopLossLong)
    strategy.exit("TP 1:3", from_entry="Long", limit=takeProfitLong3, stop=stopLossLong)

// Price Conditions (Short)
priceBelowVWAP200EMA = close < vwap and close < ema200 and close < ema10 and close < ema20
bearishCandle = close < open

// Additional Conditions for VWAP and EMA Relationships (Short)
vwapBelow200EMA = vwap < ema200
emaConditionsShort = ema10 < ema20 and ema20 < vwap and vwap < ema200

// Entry Conditions (Short)
shortCondition = priceBelowVWAP200EMA and bearishCandle and vwapBelow200EMA and emaConditionsShort

// Stop-Loss & Take-Profit (Short)
swingHigh = ta.highest(high, 10)
stopLossShort = swingHigh + atr
riskShort = stopLossShort - close
takeProfitShort2 = close - (riskShort * 2) // 1:2 RR
takeProfitShort3 = close - (riskShort * 3) // 1:3 RR

// Execute Short Trade
if shortCondition
    strategy.entry("Short", strategy.short)
    strategy.exit("TP 1:2", from_entry="Short", limit=takeProfitShort2, stop=stopLossShort)
    strategy.exit("TP 1:3", from_entry="Short", limit=takeProfitShort3, stop=stopLossShort)

// Plot Indicators
plot(ema10, color=color.red, title="10 EMA")
plot(ema20, color=color.green, title="20 EMA")
plot(ema200, color=color.purple, title="200 EMA")
plot(vwap, color=color.white, title="VWAP")