Multi-Tiered Target and Trailing Stop Strategy
HEIKIN ASHI HA TARGET ZONE Trailing Stop PYRAMIDING BREAK-EVEN risk management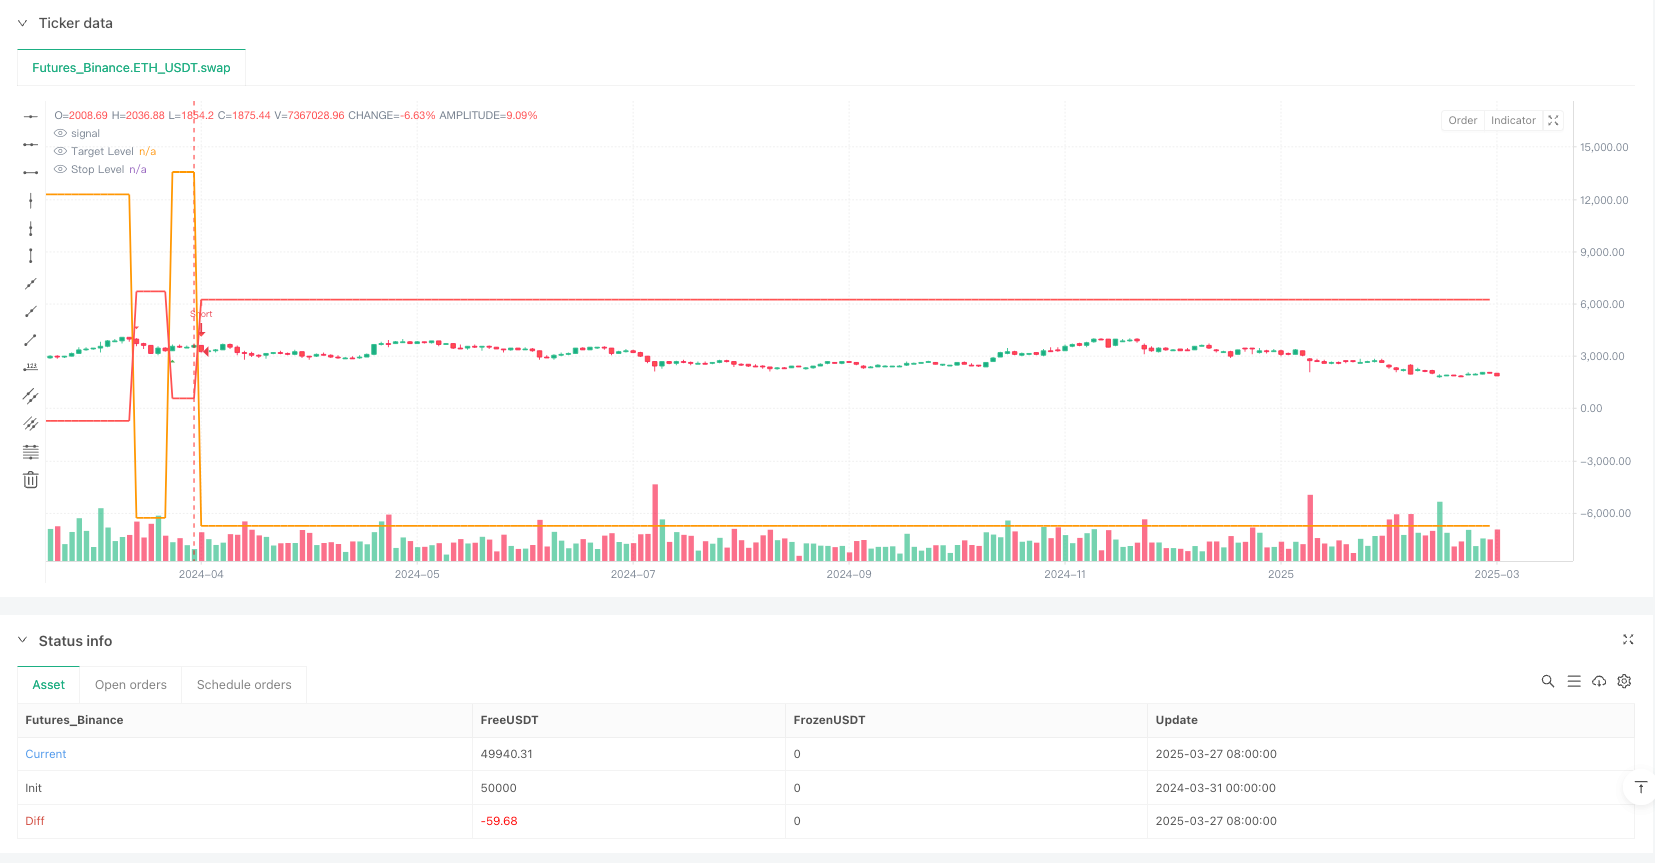
Overview
The Multi-Tiered Target and Trailing Stop Strategy is a trend-following system based on Heikin Ashi chart patterns, designed to capture market momentum while protecting profits. The strategy allows for initial entries and second entries (pyramiding), each with independent profit targets and stop-loss settings. It employs dynamic target zones to extend profit potential and implements a flexible trailing stop system that locks in profits as price moves in the favorable direction.
Strategy Principles
The strategy operates based on several key principles:
Heikin Ashi Candle Signals: Uses Heikin Ashi candles to filter market noise and identify trends. Long signals are triggered when the current HA close is higher than the HA open and higher than the previous HA close; short signals are the opposite.
Two-Tiered Entry System:
- First Entry: Based on initial HA signals with predefined targets and stop levels
- Second Entry: Allows additional entries after the first target is hit if the market continues to show favorable HA signals
Breakeven Protection: When the first target is achieved, the strategy automatically moves the stop level to the entry price (breakeven point), ensuring the trade cannot result in a loss
Target Zone Concept: When price approaches the target level (within a predefined threshold), the strategy activates a “target zone” and increases the target level to capture more potential profit
Trailing Stop Mechanism:
- First Entry Trailing: After reaching the initial target, stop points trail behind the highest/lowest price at a fixed distance
- Second Entry Trailing: Separate trailing parameters for pyramiding portions
State Tracking: The strategy maintains multiple variables to track trade direction, price extremes, whether the first target has been hit, and whether the price is currently in a target zone
Strategy Advantages
Comprehensive Risk Management: The strategy provides multi-layered risk management through preset stops, breakeven protection, and trailing stops, protecting capital from significant drawdowns.
Pyramiding Opportunities: By allowing second entries, the strategy can increase position size in confirmed trends, enhancing profit potential while not increasing overall risk since the first trade is already locked at breakeven.
Dynamic Profit Capture: The target zone and target increase features allow the strategy to automatically extend profit targets in strong markets rather than exiting strong trends prematurely.
Highly Customizable: The strategy offers extensive parameter settings, allowing traders to adjust according to market conditions, instrument characteristics, and personal risk preferences.
Automated Execution: Once parameters are set, the strategy executes all entries, exits, and stop adjustments, eliminating emotional trading impact.
Visual Feedback: The strategy includes clear visualization components showing target levels, stop levels, and status indicators, making it easy for traders to monitor trade progress.
Strategy Risks
Parameter Sensitivity: Strategy performance is highly dependent on parameter settings. Inappropriate target or stop parameters could lead to premature exits from good trades or exposure to excessive drawdowns. This risk can be mitigated through historical backtesting and market-specific parameter optimization.
Slippage Risk: Particularly during trailing stop executions, market gaps or low liquidity can cause actual execution prices to differ from ideal stop levels. Consider adding slippage buffers or using more conservative trailing parameters to reduce this risk.
Overtrading with Repeated Entries: Enabling second entries might lead to overtrading in choppy markets. Implementing additional filter conditions or time restrictions for second entries can reduce such instances.
Market Regime Risk: While the strategy performs well in trending markets, it may underperform in ranging markets or markets with sudden reversals. Combining the strategy with market regime filters can improve overall effectiveness.
Computational Intensity: The strategy tracks multiple variables and states, potentially causing execution delays on some platforms. Optimizing code and simplifying certain calculations can improve performance.
Strategy Optimization Directions
Add Trend Filters: Integrating trend indicators (such as moving averages, ADX, or trend strength indicators) can improve entry quality by only trading in confirmed trend directions. This would reduce false signals in choppy markets.
Introduce Time-Based Conditions: Adding time windows or cooling-off periods for second entries to prevent overtrading or frequent in-and-out of the same trend in short timeframes.
Volatility Adjustments: Dynamically adjusting target and stop parameters based on market volatility (such as ATR) enables the strategy to adapt to different market conditions. This would make stop and target levels more proportional to current market characteristics.
Enhance Heikin Ashi Logic: The current HA determination is relatively simple and could be enhanced by considering multiple HA candle formations or HA momentum indicators for improved signal quality.
Add Partial Profit Locking: Implement a staged profit-taking feature that allows closing portions of positions at specific profit levels while letting the remainder run, balancing profit protection and potential gain maximization.
Optimize Target Zone Logic: The current target zone uses fixed increment steps. Consider a dynamic target adjustment algorithm based on market volatility or recent price movement patterns to better adapt to changing market conditions.
Summary
The Multi-Tiered Target and Trailing Stop Strategy is a comprehensive trading system that combines Heikin Ashi trend identification, dynamic target management, second entry opportunities, and multi-level risk control. The primary strength of the strategy lies in its flexible profit extension mechanisms and strict risk management framework, making it suitable for capturing significant moves in trending markets.
While the strategy provides a robust framework, its effectiveness still depends on proper parameter adjustment and market conditions. By adding market regime filters, volatility adjustment mechanisms, and more sophisticated entry confirmation logic, the strategy can be further enhanced in robustness and adaptability. Ultimately, this strategy represents a balance—attempting to maximize trend capture while protecting trading capital through systematic risk control.
/*backtest
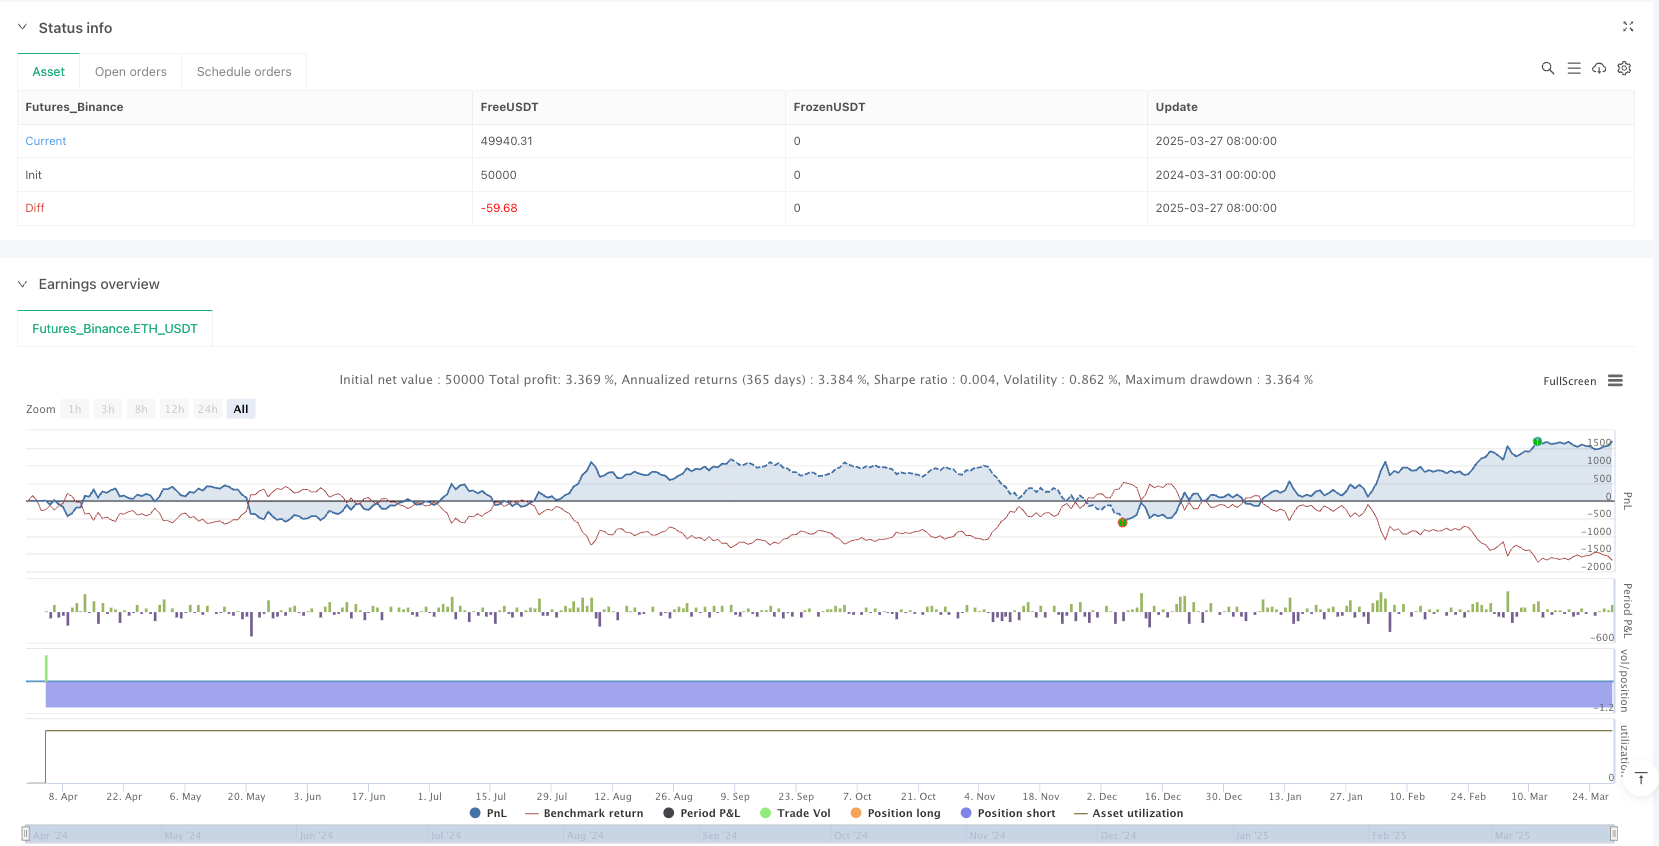
start: 2024-03-31 00:00:00
end: 2025-03-29 08:00:00
period: 2d
basePeriod: 2d
exchanges: [{"eid":"Futures_Binance","currency":"ETH_USDT"}]
*/
//@version=6
strategy("Algo Trading v1 | SUNNY GUHA By OIESU", overlay=true, margin_long=100, margin_short=100, pyramiding=100)
// ———— USER INPUTS ———— //
// First Entry Settings
float initialTarget = input.float(10000, "First Entry: Target ($)", minval=1, tooltip="First target level")
float initialStopLoss = input.float(3000, "First Entry: Stop Loss ($)", minval=1, tooltip="Initial stop loss distance")
bool useTrailFirst = input.bool(true, "First Entry: Enable Trail", tooltip="Enable trailing features after first target hit")
float profitTrailStepFirst = input.float(1500, "First Entry: Trail Amount ($)", minval=1, tooltip="Trail amount after first target hit")
bool useTargetZoneFirst = input.bool(true, "First Entry: Enable Target Zone", tooltip="Enable target zone feature")
float targetZoneThresholdFirst = input.float(1000, "First Entry: Target Zone Threshold ($)", minval=1, tooltip="Distance to activate target zone")
float targetIncreaseStepFirst = input.float(2000, "First Entry: Target Increase ($)", minval=1, tooltip="Amount to increase target")
// Second Entry Settings
bool enableSecondEntries = input.bool(true, "Enable Second Entries", tooltip="Allow re-entries after first target hit")
float secondTarget = input.float(5000, "Second Entry: Target ($)", minval=1, tooltip="Target for second entries")
float secondStopLoss = input.float(2000, "Second Entry: Stop Loss ($)", minval=1, tooltip="Stop loss for second entries")
bool useTrailSecond = input.bool(true, "Second Entry: Enable Trail", tooltip="Enable trailing for second entries")
float profitTrailStepSecond = input.float(1500, "Second Entry: Trail Amount ($)", minval=1, tooltip="Trail amount for second entries")
bool useTargetZoneSecond = input.bool(true, "Second Entry: Enable Target Zone", tooltip="Enable target zone")
float targetZoneThresholdSecond = input.float(1000, "Second Entry: Target Zone Threshold ($)", minval=1)
float targetIncreaseStepSecond = input.float(2000, "Second Entry: Target Increase ($)", minval=1)
// ———— HEIKIN-ASHI CALCULATIONS ———— //
var float haOpen = na
var float haClose = na
var float haHigh = na
var float haLow = na
haClose := (open + high + low + close)/4
haOpen := na(haOpen[1]) ? (open + close)/2 : (haOpen[1] + haClose[1])/2
haHigh := math.max(high, math.max(haOpen, haClose))
haLow := math.min(low, math.min(haOpen, haClose))
// ———— TRACKING VARIABLES ———— //
var float highestPrice = na // Tracks highest price for long positions
var float lowestPrice = na // Tracks lowest price for short positions
var float basePrice = na // Entry price for position
var float targetLevel = na // Current target level
var float stopLevel = na // Current stop level
var bool firstTargetHit = false // Indicates if first target was hit
var string tradeDirection = "none" // Current trade direction
var bool isSecondEntry = false // Tracks if current position is a second entry
var bool inTargetZone = false // Tracks if price is in target zone
// ———— SIGNAL DETECTION ———— //
bullish = haClose > haOpen and haClose > haClose[1]
bearish = haClose < haOpen and haClose < haClose[1]
// Entry conditions - only allow second entries if enabled and after first target hit
longCondition = bullish and (tradeDirection != "long" or (enableSecondEntries and firstTargetHit))
shortCondition = bearish and (tradeDirection != "short" or (enableSecondEntries and firstTargetHit))
// Position Management - Long Positions
if strategy.position_size > 0
highestPrice := math.max(high, nz(highestPrice, high))
if isSecondEntry
// Second Entry Management
inTargetZone := useTargetZoneSecond and high >= targetLevel - targetZoneThresholdSecond
if inTargetZone and useTargetZoneSecond
targetLevel := targetLevel + targetIncreaseStepSecond
if useTrailSecond
stopLevel := math.max(stopLevel, highestPrice - profitTrailStepSecond)
if low <= stopLevel
strategy.close_all("Second Entry Stop")
basePrice := na
targetLevel := na
stopLevel := na
highestPrice := na
lowestPrice := na
firstTargetHit := false
isSecondEntry := false
inTargetZone := false
tradeDirection := "none"
else
// First Entry Management - improved profit locking
if not firstTargetHit and high >= basePrice + initialTarget
// First target hit - ALWAYS lock profit at break-even
firstTargetHit := true
stopLevel := basePrice // Move stop to break-even
targetLevel := useTrailFirst ? high + targetIncreaseStepFirst : basePrice + initialTarget
else if firstTargetHit
// Only modify target if trailing is enabled
if useTrailFirst
inTargetZone := useTargetZoneFirst and high >= targetLevel - targetZoneThresholdFirst
if inTargetZone and useTargetZoneFirst
targetLevel := targetLevel + targetIncreaseStepFirst
// Trail stop-loss but never below break-even
stopLevel := math.max(basePrice, highestPrice - profitTrailStepFirst)
else
// Before first target hit
targetLevel := basePrice + initialTarget
stopLevel := basePrice - initialStopLoss
// Exit on stop hit - this could only be at break-even or better after first target
if low <= stopLevel
strategy.close_all("First Entry Stop")
basePrice := na
targetLevel := na
stopLevel := na
highestPrice := na
lowestPrice := na
firstTargetHit := false
isSecondEntry := false
inTargetZone := false
tradeDirection := "none"
// Position Management - Short Positions
if strategy.position_size < 0
lowestPrice := math.min(low, nz(lowestPrice, low))
if isSecondEntry
// Second Entry Management
inTargetZone := useTargetZoneSecond and low <= targetLevel + targetZoneThresholdSecond
if inTargetZone and useTargetZoneSecond
targetLevel := targetLevel - targetIncreaseStepSecond
if useTrailSecond
stopLevel := math.min(stopLevel, lowestPrice + profitTrailStepSecond)
if high >= stopLevel
strategy.close_all("Second Entry Stop")
basePrice := na
targetLevel := na
stopLevel := na
highestPrice := na
lowestPrice := na
firstTargetHit := false
isSecondEntry := false
inTargetZone := false
tradeDirection := "none"
else
// First Entry Management - improved profit locking
if not firstTargetHit and low <= basePrice - initialTarget
// First target hit - ALWAYS lock profit at break-even
firstTargetHit := true
stopLevel := basePrice // Move stop to break-even
targetLevel := useTrailFirst ? low - targetIncreaseStepFirst : basePrice - initialTarget
else if firstTargetHit
// Only modify target if trailing is enabled
if useTrailFirst
inTargetZone := useTargetZoneFirst and low <= targetLevel + targetZoneThresholdFirst
if inTargetZone and useTargetZoneFirst
targetLevel := targetLevel - targetIncreaseStepFirst
// Trail stop-loss but never above break-even
stopLevel := math.min(basePrice, lowestPrice + profitTrailStepFirst)
else
// Before first target hit
targetLevel := basePrice - initialTarget
stopLevel := basePrice + initialStopLoss
// Exit on stop hit - this could only be at break-even or better after first target
if high >= stopLevel
strategy.close_all("First Entry Stop")
basePrice := na
targetLevel := na
stopLevel := na
highestPrice := na
lowestPrice := na
firstTargetHit := false
isSecondEntry := false
inTargetZone := false
tradeDirection := "none"
// New Position Entry
if strategy.position_size == 0
if longCondition
tradeDirection := "long"
basePrice := close
targetLevel := basePrice + (firstTargetHit ? secondTarget : initialTarget)
stopLevel := basePrice - (firstTargetHit ? secondStopLoss : initialStopLoss)
highestPrice := high
isSecondEntry := firstTargetHit
strategy.entry("Long", strategy.long)
else if shortCondition
tradeDirection := "short"
basePrice := close
targetLevel := basePrice - (firstTargetHit ? secondTarget : initialTarget)
stopLevel := basePrice + (firstTargetHit ? secondStopLoss : initialStopLoss)
lowestPrice := low
isSecondEntry := firstTargetHit
strategy.entry("Short", strategy.short)
// ———— VISUALIZATION ———— //
// Entry signals
plotshape(longCondition and (strategy.position_size == 0), title="Buy", style=shape.triangleup, location=location.belowbar, color=color.green, size=size.small)
plotshape(shortCondition and (strategy.position_size == 0), title="Sell", style=shape.triangledown, location=location.abovebar, color=color.red, size=size.small)
// Target and stop levels with clearer colors
plot(targetLevel, title="Target Level", color=color.orange, linewidth=2)
plot(stopLevel, title="Stop Level", color=color.red, linewidth=2)
// Break-even level - shown prominently after first target hit
plot(strategy.position_size != 0 and firstTargetHit ? basePrice : na, title="Break-Even Level", color=color.green, linewidth=2, style=plot.style_linebr)
// Debug plots for state tracking
plotchar(firstTargetHit, title="First Target Hit", char="T", location=location.top, color=color.yellow, size=size.tiny)
plotchar(isSecondEntry, title="Second Entry", char="2", location=location.top, color=color.white, size=size.tiny)
plotchar(useTrailFirst and firstTargetHit, title="Trail Active", char="→", location=location.top, color=color.blue, size=size.tiny)
plotchar(inTargetZone, title="Target Zone", char="Z", location=location.top, color=color.fuchsia, size=size.tiny)