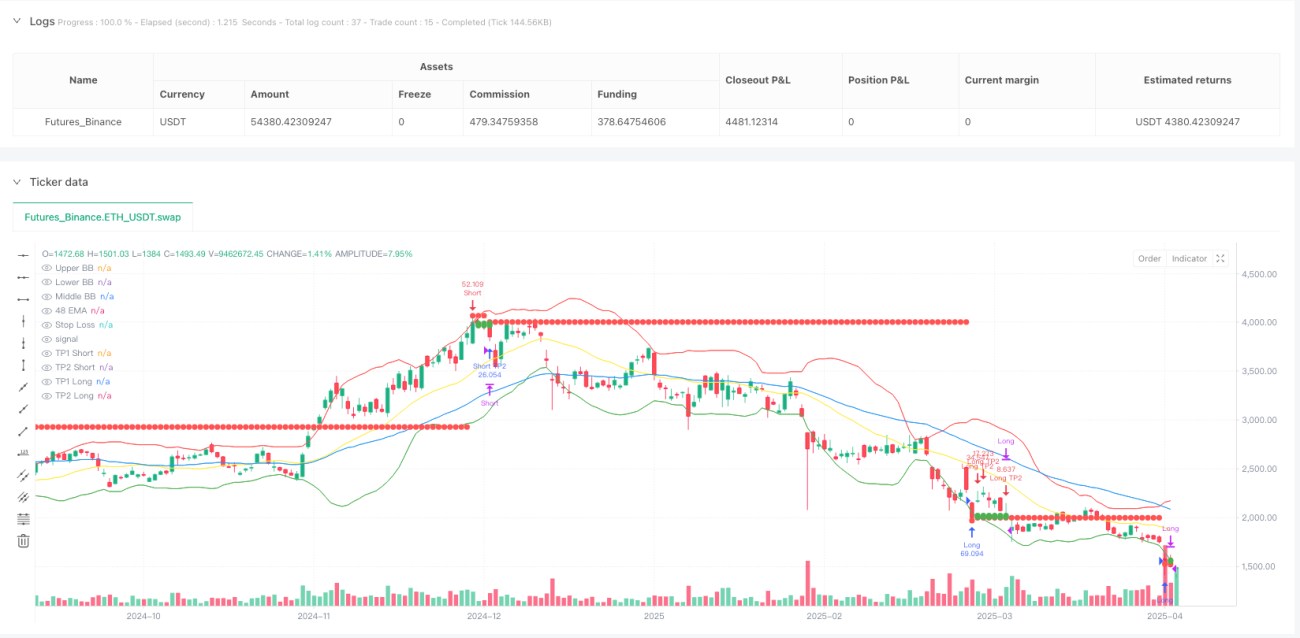
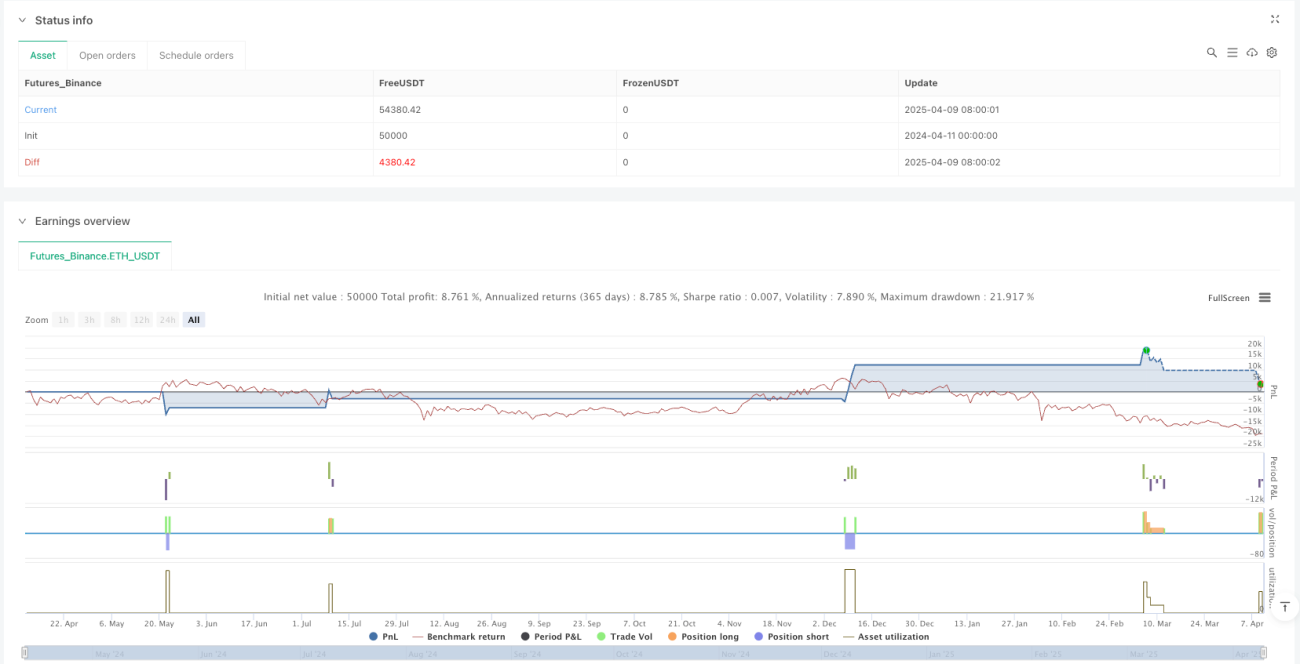
The Multi-Indicator Confirmation EMA Breakout with DCA and Dynamic Take Profit Strategy is an advanced scalping system that combines technical analysis with Dollar Cost Averaging (DCA). This strategy utilizes multiple technical indicators including EMA 48, RSI 14, MACD, and Bollinger Bands to confirm potential entry points while implementing a structured position management approach with predefined risk controls. The core of the strategy is to identify crossover points between price and EMA, confirmed by RSI, MACD, and Bollinger Bands, combined with higher timeframe analysis to avoid false signals, employing a three-tier DCA strategy for averaging down, and using multi-level take-profit and dynamic stop-loss mechanisms to protect profits.
The strategy is based on multiple technical indicator confirmations, including the following key components:
Entry Condition System:
Dynamic Position Management:
Intelligent Profit-Taking Mechanism:
Deep code analysis reveals that the strategy also includes a smart peak and trough identification system that tracks the last 5 oscillation points of both price and RSI to detect divergence patterns. The higher timeframe confirmation system analyzes support and resistance zones on the daily chart to avoid false signals on lower timeframes.
Deep analysis of the strategy code reveals the following significant advantages:
Multi-Layer Confirmation System: Through the synergistic action of multiple technical indicators, the possibility of false signals is greatly reduced, improving the win rate of trades. The combined use of EMA, RSI, MACD, and Bollinger Bands ensures high-quality entry points.
Intelligent Fund Management: The 1-2-6 DCA ratio method allows for both cost averaging in market volatility and limiting overall risk exposure. Initial risk is limited to only 1-3% of the account, ensuring that even in worst-case scenarios, catastrophic losses are avoided.
Dynamic Stop-Loss Protection: The stop-loss mechanism adjusts as the trade progresses, particularly moving to breakeven after securing partial profits, effectively balancing the need to protect profits while giving trades room to breathe.
Staged Profit-Taking Strategy: By closing 25% and 50% of the position at 0.5% and 1% profit levels respectively, the strategy can lock in partial profits while maintaining a position to capture larger market moves, achieving a balance between risk and reward.
Higher Timeframe Confirmation: Using support and resistance levels from higher timeframes to filter trading signals reduces the impact of noise and false breakouts common on lower timeframes.
Despite its sophisticated design, the strategy has several risk factors that need attention:
Parameter Sensitivity: The strategy’s performance is highly dependent on multiple parameter settings, including EMA period, RSI thresholds, and DCA levels. Small changes in these parameters may lead to significant differences in trading results, requiring careful optimization and backtesting.
Extreme Volatility Risk: Despite the DCA mechanism, during severe market volatility, prices may rapidly exceed all set stop-loss points, resulting in actual losses exceeding expectations. For this risk, consider using stricter initial position sizing or pausing trading during high volatility periods.
Compounding Effect of Consecutive Losses: Even with limited risk per trade, consecutive losses can still lead to significant equity curve drawdowns. It’s advisable to implement additional overall risk controls such as daily or weekly maximum loss limits.
Complexity of RSI Divergence Identification: The detection of RSI divergence in the code relies on the accuracy of historical data and may not be reliable under certain market conditions. Consider using more advanced statistical methods to confirm divergence signals.
Dependency on Market Liquidity: In markets with lower liquidity, large DCA orders may face slippage issues, affecting the overall efficiency of the strategy. This strategy should be limited to use in highly liquid markets.
Based on deep analysis of the code, here are several directions for strategy optimization:
Dynamic Parameter Adjustment: Introduce dynamic parameter adjustment mechanisms based on market volatility. For example, automatically increase RSI threshold requirements during high volatility periods, or adjust EMA length to adapt to different market cycles. Such adaptive mechanisms can improve the strategy’s robustness across different market environments.
Enhanced Divergence Detection: The current RSI divergence detection is relatively simple. It can be improved by introducing more complex algorithms to enhance accuracy, such as using Fisher-transformed RSI or adding volume confirmation. This will reduce false signals and improve strategy accuracy.
Intelligent Profit Optimization: The current fixed profit points can be improved to dynamic profit points based on market volatility. For example, setting higher profit targets during high volatility periods and lower targets during low volatility periods to adapt to changing market conditions.
Fund Management Refinement: Optimize the DCA ratio and trigger points, adjusting dynamically based on market structure and current trend strength. For example, adopt more aggressive DCA ratios in strong trends and more conservative ones in weak trends.
Trading Time Optimization: Introduce time filters based on volume and volatility to avoid trading during low activity periods. This can be achieved by analyzing historical data to determine optimal trading time windows.
The Multi-Indicator Confirmation EMA Breakout with DCA and Dynamic Take Profit Strategy is a well-designed scalping system that cleverly combines multiple technical analysis tools with advanced fund management techniques. Through the coordinated work of indicators like EMA, RSI, MACD, and Bollinger Bands, the strategy can identify high-probability entry points while using structured DCA methods and dynamic stop-loss/take-profit mechanisms to manage risk and lock in profits.
While the strategy has notable advantages, including strict risk control, multi-layer confirmation systems, and intelligent profit-taking mechanisms, users should still be vigilant about parameter sensitivity and risks from extreme market volatility. By implementing the suggested optimization measures such as dynamic parameter adjustment, enhanced divergence detection, and intelligent profit optimization, the robustness and profitability of the strategy can be further improved.
For traders, this strategy is best applied in markets with sufficient liquidity and should undergo thorough historical backtesting and parameter optimization before use. With careful implementation and continuous monitoring and adjustment, this multi-layered trading system can become a powerful tool in a scalper’s arsenal.
/*backtest
start: 2024-04-11 00:00:00
end: 2025-04-10 00:00:00
period: 1d
basePeriod: 1d
exchanges: [{"eid":"Futures_Binance","currency":"ETH_USDT"}]
*/
//@version=6
strategy("Scalping Strategy with DCA - V2", overlay=true, margin_long=100, margin_short=100)
// Input parameters
emaLength = input.int(48, title="EMA Length", minval=1, group="Main Indicators")
rsiLength = input.int(14, title="RSI Length", minval=1, group="Main Indicators")
macdShortLength = input.int(12, title="MACD Short Length", minval=1, group="Main Indicators")
macdLongLength = input.int(30, title="MACD Long Length", minval=1, group="Main Indicators")
macdSignalLength = input.int(9, title="MACD Signal Length", minval=1, group="Main Indicators")
bbLength = input.int(20, title="Bollinger Bands Length", group="Main Indicators")
bbMult = input.float(2.0, title="Bollinger Bands Multiplier", group="Main Indicators")
// Risk management parameters
initialRiskPercent = input.float(1.0, title="Initial Risk % of Account", minval=0.1, maxval=3.0, step=0.1, group="Risk Management")
stopLossPercent = input.float(1.5, title="Stop Loss % (Unboosted)", minval=0.5, maxval=3.0, step=0.1, group="Risk Management")
fixedSLPercent = input.float(1.3, title="Fixed SL % after full DCA", minval=0.1, maxval=5.0, step=0.1, group="Risk Management")
takeProfitPercent1 = input.float(0.5, title="First Take Profit % (25% Volume)", minval=0.1, group="Risk Management")
takeProfitPercent2 = input.float(1.0, title="Second Take Profit % (50% Volume)", minval=0.1, group="Risk Management")
// DCA parameters
enableDCA = input.bool(true, title="Enable DCA", group="DCA Settings")
dcaLevel1 = input.float(1.0, title="DCA Level 1 % Drop", minval=0.1, group="DCA Settings")
dcaLevel2 = input.float(2.0, title="DCA Level 2 % Drop", minval=0.1, group="DCA Settings")
// Higher Timeframe parameters
higherTF = input.timeframe("D", title="Higher Timeframe for Confirmation", group="Advanced Settings")
useHTFConfirmation = input.bool(true, title="Use Higher Timeframe Confirmation", group="Advanced Settings")
// Debug parameters
showLabels = input.bool(true, title="Show Entry/Exit Labels", group="Visual")
showSL = input.bool(true, title="Show Stop Loss Lines", group="Visual")
showTP = input.bool(true, title="Show Take Profit Lines", group="Visual")
// Calculate indicators
ema = ta.ema(close, emaLength)
rsi = ta.rsi(close, rsiLength)
[macdLine, signalLine, _] = ta.macd(close, macdShortLength, macdLongLength, macdSignalLength)
[middle, upper, lower] = ta.bb(close, bbLength, bbMult)
// Variables for tracking peaks and troughs
var priceHighs = array.new_float(0)
var priceLows = array.new_float(0)
var rsiHighs = array.new_float(0)
var rsiLows = array.new_float(0)
// Track last 5 peaks and troughs for both price and RSI
pivot_high = ta.pivothigh(high, 2, 2)
if not na(pivot_high)
array.push(priceHighs, pivot_high)
if array.size(priceHighs) > 5
array.shift(priceHighs)
pivot_low = ta.pivotlow(low, 2, 2)
if not na(pivot_low)
array.push(priceLows, pivot_low)
if array.size(priceLows) > 5
array.shift(priceLows)
rsi_pivot_high = ta.pivothigh(rsi, 2, 2)
if not na(rsi_pivot_high)
array.push(rsiHighs, rsi_pivot_high)
if array.size(rsiHighs) > 5
array.shift(rsiHighs)
rsi_pivot_low = ta.pivotlow(rsi, 2, 2)
if not na(rsi_pivot_low)
array.push(rsiLows, rsi_pivot_low)
if array.size(rsiLows) > 5
array.shift(rsiLows)
// Check for RSI divergence
rsiDivergenceBullish = array.size(priceLows) >= 5 and array.size(rsiLows) >= 5 and array.get(priceLows, array.size(priceLows) - 1) < array.get(priceLows, array.size(priceLows) - 5) and array.get(rsiLows, array.size(rsiLows) - 1) > array.get(rsiLows, array.size(rsiLows) - 5)
rsiDivergenceBearish = array.size(priceHighs) >= 5 and array.size(rsiHighs) >= 5 and array.get(priceHighs, array.size(priceHighs) - 1) > array.get(priceHighs, array.size(priceHighs) - 5) and array.get(rsiHighs, array.size(rsiHighs) - 1) < array.get(rsiHighs, array.size(rsiHighs) - 5)
// Check if price is near previous high/low (Rule #4)
isNearPrevHigh = array.size(priceHighs) >= 2 and math.abs(high - array.get(priceHighs, array.size(priceHighs) - 2)) / array.get(priceHighs, array.size(priceHighs) - 2) < 0.01
isNearPrevLow = array.size(priceLows) >= 2 and math.abs(low - array.get(priceLows, array.size(priceLows) - 2)) / array.get(priceLows, array.size(priceLows) - 2) < 0.01
// Higher timeframe confirmation (Rule #10)
// Get pivot points from higher timeframe
htf_is_pivot_low = request.security(syminfo.tickerid, higherTF, not na(ta.pivotlow(low, 2, 2)), barmerge.gaps_off, barmerge.lookahead_off)
htf_is_pivot_high = request.security(syminfo.tickerid, higherTF, not na(ta.pivothigh(high, 2, 2)), barmerge.gaps_off, barmerge.lookahead_off)
// Count pivots in higher timeframe to check if this is the 2nd pivot
var htf_pivot_low_count = 0
var htf_pivot_high_count = 0
if htf_is_pivot_low
htf_pivot_low_count := htf_pivot_low_count + 1
htf_pivot_low_count := math.min(htf_pivot_low_count, 10) // Prevent unlimited counting
if htf_is_pivot_high
htf_pivot_high_count := htf_pivot_high_count + 1
htf_pivot_high_count := math.min(htf_pivot_high_count, 10) // Prevent unlimited counting
// Reset counts after a while to maintain relevance
if not htf_is_pivot_low and not htf_is_pivot_high and bar_index % 100 == 0
htf_pivot_low_count := 0
htf_pivot_high_count := 0
// Check if this is the 2nd pivot in higher timeframe
isHTFSecondPivotLow = htf_is_pivot_low and htf_pivot_low_count == 2
isHTFSecondPivotHigh = htf_is_pivot_high and htf_pivot_high_count == 2
// Check crossing of Bollinger Bands
crossUpperBand = ta.crossover(close, upper)
crossLowerBand = ta.crossunder(close, lower)
// Entry conditions refined with higher timeframe confirmation
longCondition = close > ema and close[1] <= ema[1] and rsi > 60 and macdLine > signalLine and isNearPrevLow and rsiDivergenceBullish and (not useHTFConfirmation or isHTFSecondPivotLow)
shortCondition = close < ema and close[1] >= ema[1] and rsi < 40 and macdLine < signalLine and isNearPrevHigh and rsiDivergenceBearish and (not useHTFConfirmation or isHTFSecondPivotHigh)
// Additional entry conditions when price crosses Bollinger Bands (Rule #11)
longBBCondition = crossLowerBand and rsi < 30
shortBBCondition = crossUpperBand and rsi > 70
// Calculate position sizes for DCA
initialSize = strategy.equity * initialRiskPercent / 100 / 9 // Initial sizing according to the 1-2-6 rule
dca1Size = initialSize * 2
dca2Size = initialSize * 6
// Calculate SL in money terms (Rule #3)
slMoneyAmount = strategy.equity * initialRiskPercent / 100 * stopLossPercent / 100
// Variables to track DCA levels
var float longEntryPrice = 0.0
var float shortEntryPrice = 0.0
var int longDCACount = 0
var int shortDCACount = 0
var float stopLossLevel = 0.0
var float takeProfit1Level = 0.0
var float takeProfit2Level = 0.0
var float slMoneyValue = 0.0
// Close partial positions at take profit levels
if strategy.position_size > 0
if close >= takeProfit1Level and takeProfit1Level > 0 and strategy.position_size == initialSize + (longDCACount > 0 ? dca1Size : 0) + (longDCACount > 1 ? dca2Size : 0)
strategy.order("Long TP1", strategy.short, qty=strategy.position_size * 0.25)
if showLabels
label.new(bar_index, high, "TP1 (25%)", color=color.green, textcolor=color.white, style=label.style_label_down)
if close >= takeProfit2Level and takeProfit2Level > 0 and strategy.position_size > initialSize * 0.25
strategy.order("Long TP2", strategy.short, qty=strategy.position_size * 0.5)
stopLossLevel := longEntryPrice // Move SL to breakeven after TP2
if showLabels
label.new(bar_index, high, "TP2 (50%) & SL→BE", color=color.green, textcolor=color.white, style=label.style_label_down)
if strategy.position_size < 0
if close <= takeProfit1Level and takeProfit1Level > 0 and math.abs(strategy.position_size) == initialSize + (shortDCACount > 0 ? dca1Size : 0) + (shortDCACount > 1 ? dca2Size : 0)
strategy.order("Short TP1", strategy.long, qty=math.abs(strategy.position_size) * 0.25)
if showLabels
label.new(bar_index, low, "TP1 (25%)", color=color.red, textcolor=color.white, style=label.style_label_up)
if close <= takeProfit2Level and takeProfit2Level > 0 and math.abs(strategy.position_size) > initialSize * 0.25
strategy.order("Short TP2", strategy.long, qty=math.abs(strategy.position_size) * 0.5)
stopLossLevel := shortEntryPrice // Move SL to breakeven after TP2
if showLabels
label.new(bar_index, low, "TP2 (50%) & SL→BE", color=color.red, textcolor=color.white, style=label.style_label_up)
// DCA Logic
if enableDCA and strategy.position_size > 0 and longDCACount < 2
if close < longEntryPrice * (1 - dcaLevel1/100) and longDCACount == 0
strategy.entry("Long DCA1", strategy.long, qty=dca1Size)
longDCACount := 1
if showLabels
label.new(bar_index, low, "DCA1", color=color.blue, textcolor=color.white, style=label.style_label_up)
if close < longEntryPrice * (1 - dcaLevel2/100) and longDCACount == 1
strategy.entry("Long DCA2", strategy.long, qty=dca2Size)
longDCACount := 2
// Update SL to fixed percentage after full DCA (Rule #6)
stopLossLevel := longEntryPrice * (1 - fixedSLPercent/100)
if showLabels
label.new(bar_index, low, "DCA2 & SL Update", color=color.blue, textcolor=color.white, style=label.style_label_up)
if enableDCA and strategy.position_size < 0 and shortDCACount < 2
if close > shortEntryPrice * (1 + dcaLevel1/100) and shortDCACount == 0
strategy.entry("Short DCA1", strategy.short, qty=dca1Size)
shortDCACount := 1
if showLabels
label.new(bar_index, high, "DCA1", color=color.purple, textcolor=color.white, style=label.style_label_down)
if close > shortEntryPrice * (1 + dcaLevel2/100) and shortDCACount == 1
strategy.entry("Short DCA2", strategy.short, qty=dca2Size)
shortDCACount := 2
// Update SL to fixed percentage after full DCA (Rule #6)
stopLossLevel := shortEntryPrice * (1 + fixedSLPercent/100)
if showLabels
label.new(bar_index, high, "DCA2 & SL Update", color=color.purple, textcolor=color.white, style=label.style_label_down)
// Entry with initial position
if longCondition or longBBCondition
strategy.close("Short")
strategy.entry("Long", strategy.long, qty=initialSize)
longEntryPrice := close
longDCACount := 0
shortDCACount := 0
// Set SL based on money value (not percentage)
slMoneyValue := slMoneyAmount
// Convert to price level - simplified version
stopLossLevel := close * (1 - stopLossPercent/100)
takeProfit1Level := close * (1 + takeProfitPercent1/100)
takeProfit2Level := close * (1 + takeProfitPercent2/100)
if showLabels
label.new(bar_index, low, "LONG", color=color.green, textcolor=color.white, style=label.style_label_up)
if shortCondition or shortBBCondition
strategy.close("Long")
strategy.entry("Short", strategy.short, qty=initialSize)
shortEntryPrice := close
longDCACount := 0
shortDCACount := 0
// Set SL based on money value (not percentage)
slMoneyValue := slMoneyAmount
// Convert to price level - simplified version
stopLossLevel := close * (1 + stopLossPercent/100)
takeProfit1Level := close * (1 - takeProfitPercent1/100)
takeProfit2Level := close * (1 - takeProfitPercent2/100)
if showLabels
label.new(bar_index, high, "SHORT", color=color.red, textcolor=color.white, style=label.style_label_down)
// Stop Loss
if strategy.position_size > 0 and low <= stopLossLevel
strategy.close("Long")
if showLabels
label.new(bar_index, low, "SL", color=color.red, textcolor=color.white, style=label.style_label_up)
if strategy.position_size < 0 and high >= stopLossLevel
strategy.close("Short")
if showLabels
label.new(bar_index, high, "SL", color=color.red, textcolor=color.white, style=label.style_label_down)
// Market cap and holder % check can't be done directly in TradingView, but we display a reminder
if strategy.position_size != 0 and bar_index % 100 == 0
label.new(bar_index, close, "Remember: Only trade coins with large market cap and >7% holder ratio",
color=color.yellow, textcolor=color.black, style=label.style_label_left)
// Plot indicators - these must be at the global scope in Pine Script v6
plot(ema, color=color.blue, title="48 EMA")
plot(upper, color=color.red, title="Upper BB")
plot(lower, color=color.green, title="Lower BB")
plot(middle, color=color.yellow, title="Middle BB")
// Plot stop loss and take profit levels - conditions need to be part of the plot function in v6
plotSL = showSL and stopLossLevel > 0 ? stopLossLevel : na
plot(plotSL, color=color.red, style=plot.style_circles, linewidth=2, title="Stop Loss")
// TP for long positions
plotTP1Long = showTP and strategy.position_size > 0 and takeProfit1Level > 0 ? takeProfit1Level : na
plot(plotTP1Long, color=color.green, style=plot.style_circles, linewidth=1, title="TP1 Long")
plotTP2Long = showTP and strategy.position_size > 0 and takeProfit2Level > 0 ? takeProfit2Level : na
plot(plotTP2Long, color=color.green, style=plot.style_circles, linewidth=2, title="TP2 Long")
// TP for short positions
plotTP1Short = showTP and strategy.position_size < 0 and takeProfit1Level > 0 ? takeProfit1Level : na
plot(plotTP1Short, color=color.green, style=plot.style_circles, linewidth=1, title="TP1 Short")
plotTP2Short = showTP and strategy.position_size < 0 and takeProfit2Level > 0 ? takeProfit2Level : na
plot(plotTP2Short, color=color.green, style=plot.style_circles, linewidth=2, title="TP2 Short")
// Additional table with strategy information
if barstate.islastconfirmedhistory
var table infoTable = table.new(position=position.top_right, columns=2, rows=5, bgcolor=color.new(color.black, 70), frame_width=1)
table.cell(infoTable, 0, 0, "Strategy:", bgcolor=color.new(color.blue, 90), text_color=color.white)
table.cell(infoTable, 1, 0, "Scalping with DCA", text_color=color.white)
table.cell(infoTable, 0, 1, "Initial Risk:", bgcolor=color.new(color.blue, 90), text_color=color.white)
table.cell(infoTable, 1, 1, str.tostring(initialRiskPercent, "#.##") + "% of account", text_color=color.white)
table.cell(infoTable, 0, 2, "DCA Ratio:", bgcolor=color.new(color.blue, 90), text_color=color.white)
table.cell(infoTable, 1, 2, "1-2-6", text_color=color.white)
table.cell(infoTable, 0, 3, "SL After DCA:", bgcolor=color.new(color.blue, 90), text_color=color.white)
table.cell(infoTable, 1, 3, str.tostring(fixedSLPercent, "#.##") + "%", text_color=color.white)
table.cell(infoTable, 0, 4, "REMINDERS:", bgcolor=color.new(color.red, 90), text_color=color.white)
table.cell(infoTable, 1, 4, "Only trade coins with market cap and >7% holder ratio", text_color=color.white)