
Overview
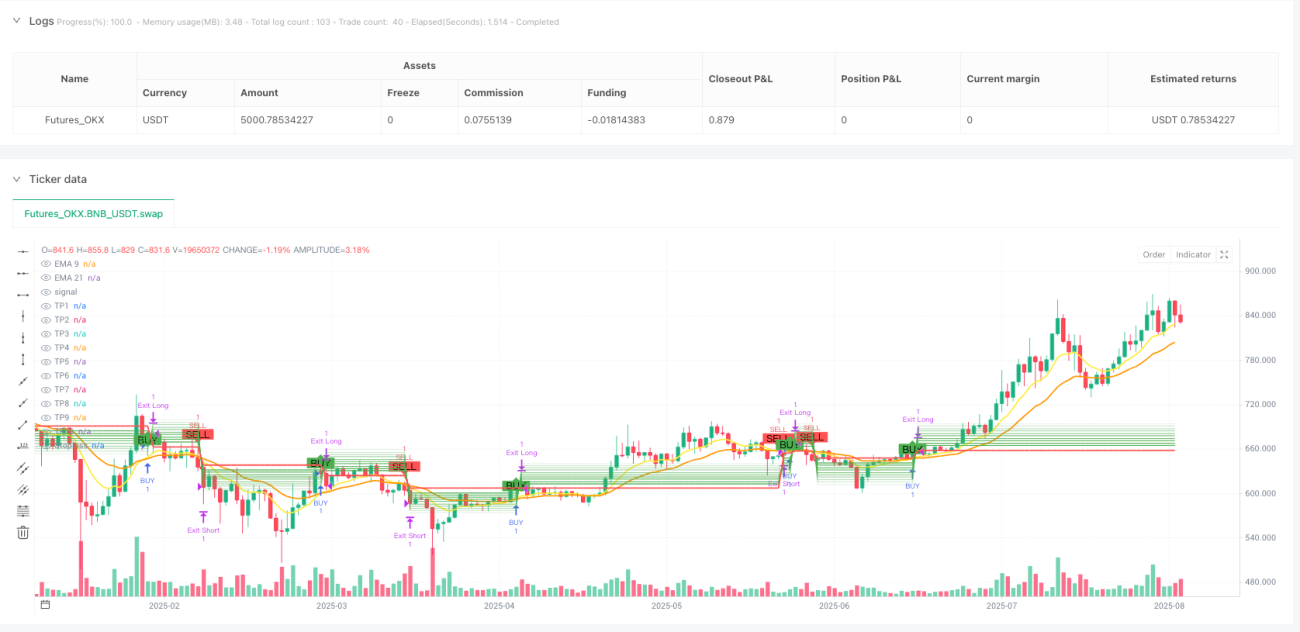
The Dual EMA Multi-Target Trading Strategy is a quantitative trading system based on crossover signals between short-term and long-term Exponential Moving Averages (EMA). This strategy utilizes the crossover of 9-period and 21-period EMAs as entry signals, while simultaneously setting up to 10 profit targets and a stop loss point to achieve risk management and profit maximization. The strategy supports both long and short trading: entering long positions when the short-term EMA crosses above the long-term EMA, entering short positions when the short-term EMA crosses below the long-term EMA, and exiting on reverse crossovers.
Strategy Principles
The core principle of this strategy is based on an EMA crossover system, implemented as follows:
- Calculate two EMAs: a fast EMA (9-period) and a slow EMA (21-period)
- Generate a long signal when the fast EMA crosses above the slow EMA
- Generate a short signal when the fast EMA crosses below the slow EMA
- After entry, the strategy automatically calculates 10 tiered target levels (TP1-TP10) and a stop loss level based on entry price
- The strategy applies the same percentage settings for both long and short positions, but in opposite directions
- For long positions, stop loss is set 0.5% below entry price, with profit targets ranging from 0.5% to 5.0% above entry price
- For short positions, stop loss is set 0.5% above entry price, with profit targets ranging from 0.5% to 5.0% below entry price
- The strategy also exits positions when a reverse crossover signal occurs
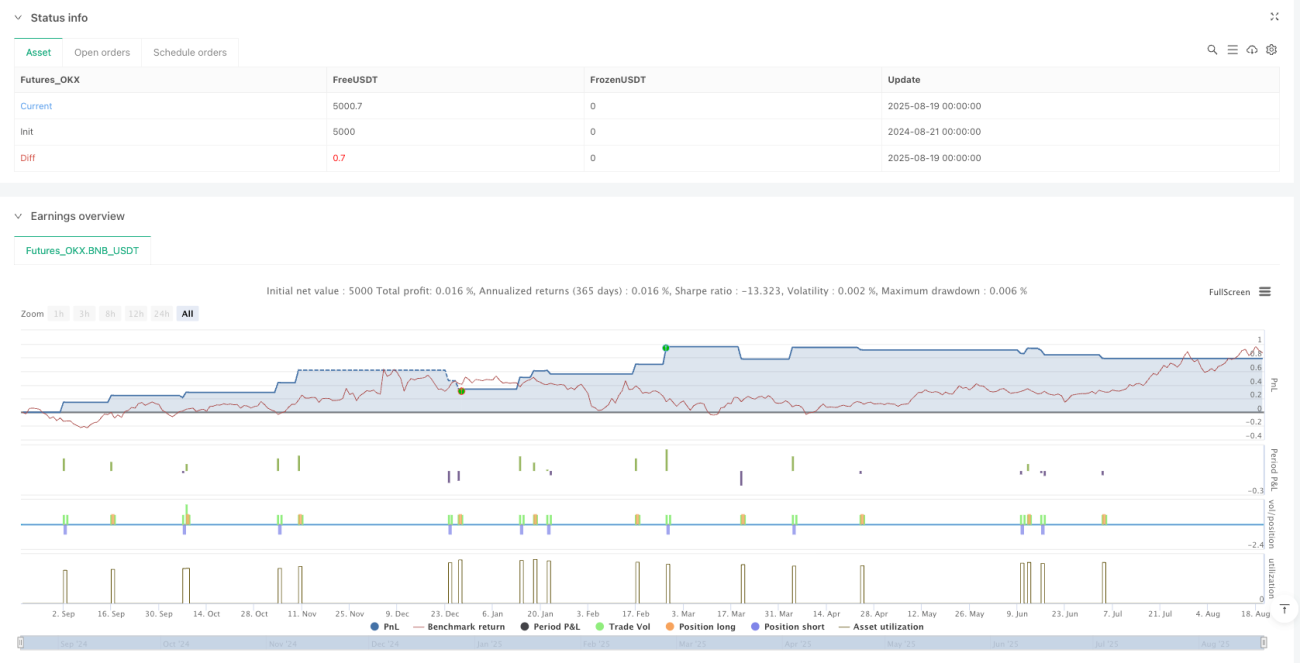
The strategy employs a systematic risk management approach, using 10% of account equity for each trade by default, with an initial capital of 100,000, and prohibits pyramiding.
Strategy Advantages
- Simple and Effective Entry Signals: EMA crossovers are widely used and validated trading signals that are easy to understand and implement. The 9/21 period parameter setting effectively captures medium to short-term trends.
- Multi-Target Profit Management: Setting 10 tiered profit targets allows traders to secure profits at different price levels, both locking in partial profits and allowing profits to extend as far as possible.
- Strict Risk Control: Each trade has a clearly defined stop loss point, limiting the maximum loss percentage per trade and effectively controlling risk.
- Visual Assistance: The strategy clearly marks all entry signals, stop loss levels, and target levels on the chart, helping traders intuitively understand market conditions.
- Bidirectional Trading Capability: The strategy supports both long and short trading, enabling opportunity seeking in various market environments.
- Parameter Adjustability: All key parameters (including EMA periods, stop loss percentage, profit targets) can be customized through inputs, increasing the strategy's flexibility.
- Full Automation: Strategy execution is fully automated, from signal identification to entry, setting stop losses and profit targets, to exit, requiring no manual intervention.
Strategy Risks
- False Breakout Risk: EMA crossover systems are prone to false signals in oscillating markets, potentially leading to frequent trades and losses. The strategy lacks filters to distinguish between strong and weak signals.
- Tight Stop Loss: The default stop loss setting of 0.5% may be too tight in more volatile markets or instruments, easily triggered by market noise.
- Single Indicator Dependence: The strategy relies solely on EMA crossovers as entry signals, without combining other technical indicators or market conditions for confirmation, increasing the risk of misjudgment.
- Fixed Capital Management: Each trade uses a fixed 10% of account equity, without dynamically adjusting based on market volatility or signal strength, which may not be optimal.
- Lack of Market Environment Recognition: The strategy does not distinguish between trending and oscillating markets, generating signals even in market environments not suitable for EMA crossover systems.
- Limited Exit Strategy: Although multiple profit targets are set, the strategy actually only closes positions at the first target level (TP1) or exits on reverse crossovers, not implementing true partial profit-taking.
To mitigate these risks, it is recommended to introduce additional filtering conditions, such as trend strength indicators, and consider dynamically adjusting stop loss and target level settings based on market volatility.
Strategy Optimization Directions
- Add Filters: Introduce additional technical indicators as filters, such as ADX (Average Directional Index) to confirm trend strength, or RSI (Relative Strength Index) to avoid trading in overbought/oversold areas.
- Dynamic Stop Loss: Change the fixed percentage stop loss to a volatility-based dynamic stop loss, such as using ATR (Average True Range) multiplied by a coefficient to set the stop loss distance.
- Implement True Multi-Target Profit-Taking: Modify the strategy code to implement partial position closing at different target levels, rather than closing the entire position at the first target level. This requires breaking each trade into multiple smaller positions.
- Add Trend Recognition Mechanism: Add trend recognition logic to only open positions when the trend direction is clear, avoiding frequent trading in oscillating markets.
- Optimize Capital Management: Dynamically adjust the percentage of funds used for each trade based on signal strength, market volatility, or drawdown situations, rather than using a fixed 10%.
- Add Time Filters: Avoid trading during high volatility periods at market open and close, or avoid important economic data release periods.
- Introduce Trailing Stops: Move the stop loss point to breakeven or a more favorable position after price moves a certain distance in the favorable direction, protecting existing profits.
- Add Counter-Trend Protection: In extreme market conditions, add contrary indicators as warning signals to avoid continuing to hold positions during severe market reversals.
Through these optimizations, the strategy's robustness and profitability can be significantly improved, reducing the frequency of drawdowns and losing trades.
Conclusion
The Dual EMA Multi-Target Trading Strategy is a clearly structured, logically simple quantitative trading system based on classic EMA crossover signals, supplemented with multi-target profit management and stop loss settings. The strategy is suitable for medium to short-term trend trading and performs well in clearly trending markets.
Although relatively simple in design, the strategy contains the core elements of trading strategies: entry signals, exit conditions, stop loss management, and profit targets. The main advantages of the strategy lie in its clear operation, ease of understanding and execution, as well as good visualization support.
However, the strategy also has limitations such as reliance on a single indicator, lack of market environment recognition, and inflexible capital management. There is considerable room for optimization by adding trend filters, improving stop loss mechanisms, implementing true partial profit-taking, and enhancing capital management methods.
For traders, this strategy can serve as a basic framework that can be personalized and optimized according to individual risk preferences and trading instrument characteristics to achieve better trading results.
- 1