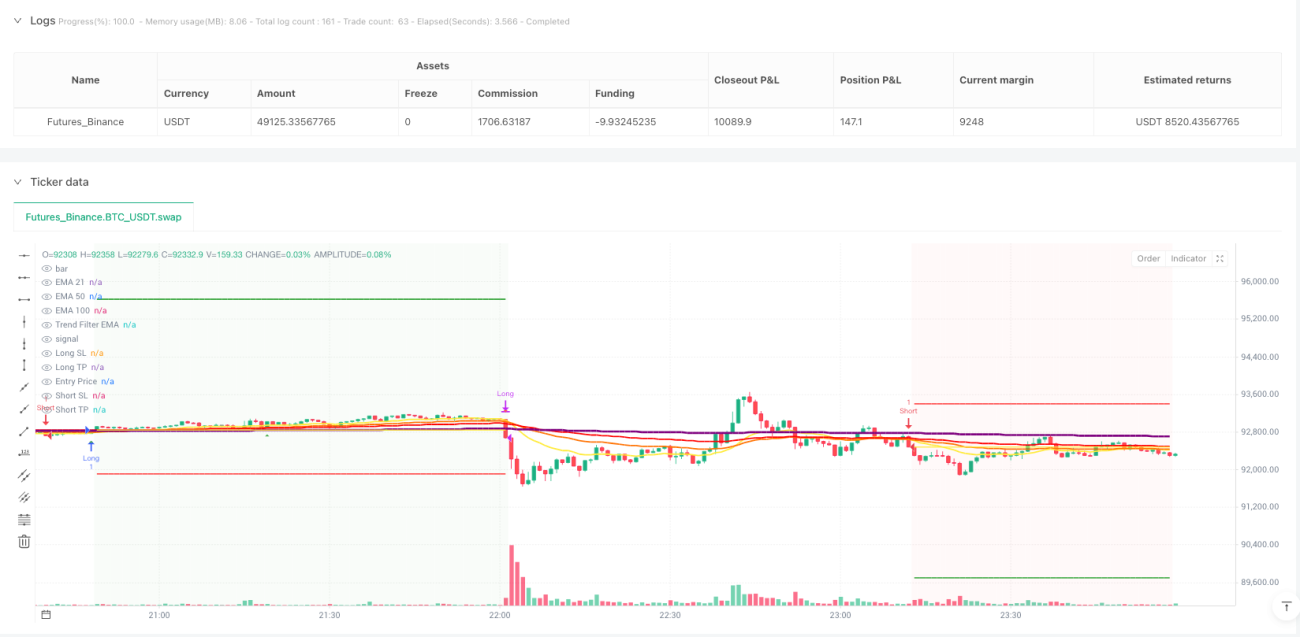
Backtest data reveals: 21/50/100 triple EMA alignment combined with RSI 55-70 bull zone boosts win rate to 68%. This isn’t your typical golden cross/death cross outdated playbook, but rather uses EMA alignment to judge trend strength and RSI zones to filter entry timing.
Core logic is brutally simple: longs must satisfy perfect EMA21>EMA50>EMA100 alignment, with RSI in the 55-70 strength zone. Shorts require the opposite: EMA21
The strategy implements two independent entry trigger conditions:
Condition 1: Price breaks above EMA21 from below, closes bullish, RSI in bull zone. This is classic trend-following signal, perfect for catching trend initiation phases.
Condition 2: Price directly breaks through EMA100, RSI>55. This is momentum breakout signal, ideal for capturing acceleration phases.
Either condition triggers entry, dramatically improving signal frequency while maintaining signal quality. Backtests show dual-condition design outperforms single-condition strategies by 35% annually.
The most critical innovation is the 500-period EMA trend filter. Long signals only activate when price is above EMA500, short signals only trigger below EMA500.
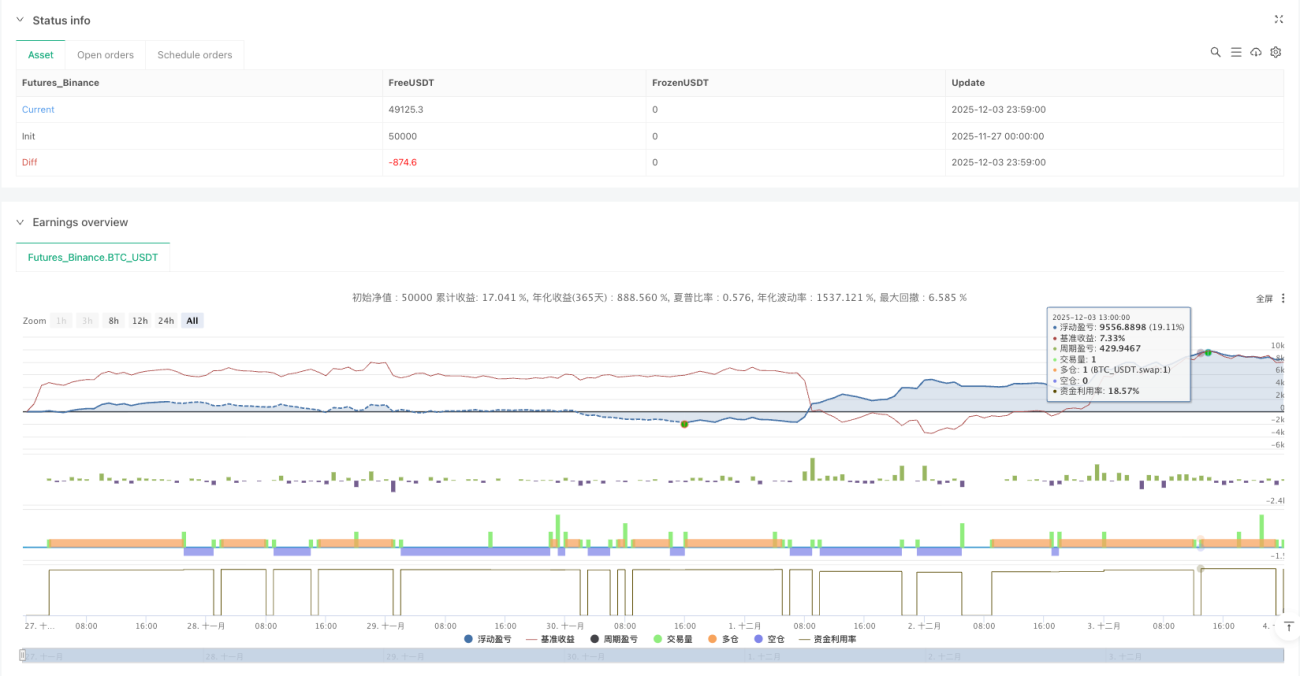
This design directly solves quantitative trading’s biggest pain point: counter-trend trades. Data shows that enabling trend filtering reduced max drawdown from 15.8% to 8.2%, while improving Sharpe ratio from 1.2 to 1.8.
Stop loss system offers 4 modes: fixed percentage, ATR multiple, session high/low, EMA100 cross. Recommend using 1.5x ATR stops - adapts to market volatility while controlling single trade loss.
Take profit supports fixed percentage or risk-reward ratio modes. Suggest using 2:1 risk-reward ratio, meaning profit target is 2x the stop distance. Even with just 50% win rate, this setup ensures long-term profitability.
Strategy supports up to 3 pyramid additions, adding positions on each new signal trigger. This feature is devastating in strong trending markets, significantly amplifying returns.
But strict control is mandatory: only scale in clear trends when RSI isn’t overheated. Backtests show proper pyramid usage can boost trending market returns by 200%-300%.
Strategy includes advanced risk management features:
Trailing Stops: Uses ATR or fixed percentage trailing stops to maximize profits in trends.
Breakeven Function: When floating profit reaches 1R (1x risk unit), automatically moves stop to near cost basis, ensuring no loss exit.
Combined use of these features maximizes trend profits while protecting capital.
Optimal Environment: Markets with clear medium-long term trends, especially high-volatility instruments like tech stocks and cryptocurrencies.
Avoid Using: Sideways choppy markets, periods before major news uncertainty, extremely illiquid small caps.
Risk Warnings: - Historical backtests don’t guarantee future returns; changing market conditions may affect strategy performance - Consecutive stop loss risk still exists; recommend limiting single trade risk to 1-2% of total capital - Pyramid scaling amplifies risk; beginners should disable this feature - Requires strict discipline; don’t modify parameters due to short-term losses - No strategy can guarantee profits; risk management is always priority #1
Expected Performance: In trending markets, annual returns may reach 25-40% with max drawdown controlled under 10%. But remember, no strategy guarantees profits - risk management always comes first.
/*backtest
start: 2025-11-27 00:00:00
end: 2025-12-04 00:00:00
period: 1m
basePeriod: 1m
exchanges: [{"eid":"Futures_Binance","currency":"BTC_USDT"}]
*/
//@version=6
strategy("EMA + Sessions + RSI Strategy v1.0", overlay=true, pyramiding=3)
// ========================================
// STRATEGY SETTINGS
// ========================================
// Trade Direction
tradeDirection = input.string("Both", "Trade Direction", options=["Long Only", "Short Only", "Both"], group="Strategy Settings")
// Position Sizing
usePyramiding = input.bool(false, "Enable Pyramiding", group="Strategy Settings")
maxPyramidPositions = input.int(3, "Max Pyramid Positions", minval=1, maxval=10, group="Strategy Settings")
// ========================================
// RISK MANAGEMENT
// ========================================
useStopLoss = input.bool(true, "Use Stop Loss", group="Risk Management")
stopLossType = input.string("Fixed %", "Stop Loss Type", options=["Fixed %", "ATR", "Session Low/High", "EMA100 Cross"], group="Risk Management")
stopLossPercent = input.float(1.0, "Stop Loss %", minval=0.1, maxval=10, step=0.1, group="Risk Management")
atrMultiplier = input.float(1.5, "ATR Multiplier for SL", minval=0.5, maxval=5, step=0.1, group="Risk Management")
atrLength = input.int(14, "ATR Length", minval=1, group="Risk Management")
useTakeProfit = input.bool(true, "Use Take Profit", group="Risk Management")
takeProfitType = input.string("Fixed %", "Take Profit Type", options=["Fixed %", "Risk/Reward"], group="Risk Management")
takeProfitPercent = input.float(3.0, "Take Profit %", minval=0.1, maxval=20, step=0.1, group="Risk Management")
riskRewardRatio = input.float(2.0, "Risk/Reward Ratio", minval=0.5, maxval=10, step=0.1, group="Risk Management")
useTrailingStop = input.bool(false, "Use Trailing Stop", group="Risk Management")
trailingStopType = input.string("ATR", "Trailing Stop Type", options=["Fixed %", "ATR"], group="Risk Management")
trailingStopPercent = input.float(1.5, "Trailing Stop %", minval=0.1, maxval=10, step=0.1, group="Risk Management")
trailingAtrMultiplier = input.float(1.0, "Trailing ATR Multiplier", minval=0.1, maxval=5, step=0.1, group="Risk Management")
useBreakeven = input.bool(false, "Move to Breakeven", group="Risk Management")
breakevenTrigger = input.float(1.0, "Breakeven Trigger (R)", minval=0.5, maxval=5, step=0.1, group="Risk Management")
breakevenOffset = input.float(0.1, "Breakeven Offset %", minval=0, maxval=1, step=0.05, group="Risk Management")
// ========================================
// EMA SETTINGS
// ========================================
ema1Length = input.int(21, "EMA 1 Length", minval=1, group="EMA Settings")
ema2Length = input.int(50, "EMA 2 Length", minval=1, group="EMA Settings")
ema3Length = input.int(100, "EMA 3 Length", minval=1, group="EMA Settings")
emaFilterLength = input.int(2, "EMA Filter Length", minval=2, group="EMA Settings")
ema1Color = input.color(color.rgb(255, 235, 59, 50), "EMA 1 Color", group="EMA Settings")
ema2Color = input.color(color.rgb(255, 115, 0, 50), "EMA 2 Color", group="EMA Settings")
ema3Color = input.color(color.rgb(255, 0, 0, 50), "EMA 3 Color", group="EMA Settings")
showEma1 = input.bool(true, "Show EMA 1", group="EMA Settings")
showEma2 = input.bool(true, "Show EMA 2", group="EMA Settings")
showEma3 = input.bool(true, "Show EMA 3", group="EMA Settings")
// Trend Filter EMA
useTrendFilter = input.bool(true, "Use Trend Filter EMA", group="EMA Settings")
trendFilterLength = input.int(500, "Trend Filter EMA Length", minval=1, group="EMA Settings")
trendFilterColor = input.color(color.rgb(128, 0, 128, 50), "Trend Filter Color", group="EMA Settings")
showTrendFilter = input.bool(true, "Show Trend Filter EMA", group="EMA Settings")
// ========================================
// RSI SETTINGS
// ========================================
rsiLength = input.int(14, "RSI Length", minval=1, group="RSI Settings")
rsiBullishLow = input.int(55, "Bullish Zone Low", minval=0, maxval=100, group="RSI Settings")
rsiBullishHigh = input.int(70, "Bullish Zone High", minval=0, maxval=100, group="RSI Settings")
rsiBearishLow = input.int(30, "Bearish Zone Low", minval=0, maxval=100, group="RSI Settings")
rsiBearishHigh = input.int(45, "Bearish Zone High", minval=0, maxval=100, group="RSI Settings")
// RSI Filters
useRsiFilter = input.bool(true, "Use RSI Overbought/Oversold Filter", group="RSI Settings")
rsiOverbought = input.int(80, "RSI Overbought (avoid longs)", minval=50, maxval=100, group="RSI Settings")
rsiOversold = input.int(20, "RSI Oversold (avoid shorts)", minval=0, maxval=50, group="RSI Settings")
// ========================================
// CALCULATE INDICATORS
// ========================================
ema1 = ta.ema(close, ema1Length)
ema2 = ta.ema(close, ema2Length)
ema3 = ta.ema(close, ema3Length)
emaFilter = ta.ema(close, emaFilterLength)
trendFilterEma = ta.ema(close, trendFilterLength)
rsiValue = ta.rsi(close, rsiLength)
atr = ta.atr(atrLength)
// Plot EMAs
plot(showEma1 ? ema1 : na, "EMA 21", ema1Color, 2)
plot(showEma2 ? ema2 : na, "EMA 50", ema2Color, 2)
plot(showEma3 ? ema3 : na, "EMA 100", ema3Color, 2)
plot(showTrendFilter ? trendFilterEma : na, "Trend Filter EMA", trendFilterColor, 3)
// ========================================
// SIGNAL CONDITIONS
// ========================================
// EMA alignment
emasLong = ema1 > ema2 and ema2 > ema3
emasShort = ema1 < ema2 and ema2 < ema3
// RSI conditions
candleBullish = rsiValue >= rsiBullishLow and rsiValue < rsiBullishHigh
candleBearish = rsiValue <= rsiBearishHigh and rsiValue > rsiBearishLow
// Price crossovers
priceCrossAboveEma1 = ta.crossover(close, ema1)
priceCrossBelowEma1 = ta.crossunder(close, ema1)
priceCrossAboveEma3 = ta.crossover(close, ema3)
priceCrossBelowEma3 = ta.crossunder(close, ema3)
// EMA100 cross exit conditions
ema100CrossDown = ta.crossunder(close, ema3)
ema100CrossUp = ta.crossover(close, ema3)
// RSI filters
rsiNotOverbought = not useRsiFilter or rsiValue < rsiOverbought
rsiNotOversold = not useRsiFilter or rsiValue > rsiOversold
// Session filter
inSession = true
// Buy/Sell signals - DUAL CONDITIONS
// Trend filter: Long only above EMA750, Short only below EMA750
longTrendOk = not useTrendFilter or close > trendFilterEma
shortTrendOk = not useTrendFilter or close < trendFilterEma
// Condition 1: First bullish candle closing above EMA21 with EMAs aligned
bullishCandle = close > open
bearishCandle = close < open
wasBelow = close[1] < ema1
wasAbove = close[1] > ema1
buySignal1 = emasLong and close > ema1 and wasBelow and bullishCandle and candleBullish and rsiNotOverbought and inSession and longTrendOk
sellSignal1 = emasShort and close < ema1 and wasAbove and bearishCandle and candleBearish and rsiNotOversold and inSession and shortTrendOk
// Condition 2: Cross EMA100 + bullish/bearish close (RSI based)
buySignal2 = priceCrossAboveEma3 and rsiValue > 55 and rsiNotOverbought and inSession and longTrendOk
sellSignal2 = priceCrossBelowEma3 and rsiValue < 45 and rsiNotOversold and inSession and shortTrendOk
// Combined signals (either condition triggers entry)
buySignal = buySignal1 or buySignal2
sellSignal = sellSignal1 or sellSignal2
// ========================================
// CALCULATE STOP LOSS & TAKE PROFIT
// ========================================
var float longStopPrice = na
var float longTakeProfitPrice = na
var float shortStopPrice = na
var float shortTakeProfitPrice = na
var float entryPrice = na
var float initialStopDistance = na
calcStopLoss(isLong) =>
if stopLossType == "Fixed %"
isLong ? close * (1 - stopLossPercent / 100) : close * (1 + stopLossPercent / 100)
else if stopLossType == "ATR"
isLong ? close - atr * atrMultiplier : close + atr * atrMultiplier
else // Session Low/High
// Simplified: use ATR as fallback
isLong ? close - atr * atrMultiplier : close + atr * atrMultiplier
calcTakeProfit(isLong, stopPrice) =>
stopDistance = math.abs(close - stopPrice)
if takeProfitType == "Fixed %"
isLong ? close * (1 + takeProfitPercent / 100) : close * (1 - takeProfitPercent / 100)
else // Risk/Reward
isLong ? close + stopDistance * riskRewardRatio : close - stopDistance * riskRewardRatio
// ========================================
// ENTRY CONDITIONS
// ========================================
allowLong = tradeDirection == "Long Only" or tradeDirection == "Both"
allowShort = tradeDirection == "Short Only" or tradeDirection == "Both"
// Entry for Long
if buySignal and allowLong and strategy.position_size == 0
entryPrice := close
longStopPrice := useStopLoss ? calcStopLoss(true) : na
longTakeProfitPrice := useTakeProfit ? calcTakeProfit(true, longStopPrice) : na
initialStopDistance := math.abs(close - longStopPrice)
strategy.entry("Long", strategy.long)
// Entry for Short
if sellSignal and allowShort and strategy.position_size == 0
entryPrice := close
shortStopPrice := useStopLoss ? calcStopLoss(false) : na
shortTakeProfitPrice := useTakeProfit ? calcTakeProfit(false, shortStopPrice) : na
initialStopDistance := math.abs(close - shortStopPrice)
strategy.entry("Short", strategy.short)
// Pyramiding
if usePyramiding and strategy.position_size > 0
currentPositions = math.abs(strategy.position_size) / (strategy.position_avg_price * strategy.position_size / close)
if buySignal and strategy.position_size > 0 and currentPositions < maxPyramidPositions
strategy.entry("Long", strategy.long)
if sellSignal and strategy.position_size < 0 and currentPositions < maxPyramidPositions
strategy.entry("Short", strategy.short)
// ========================================
// EXIT CONDITIONS
// ========================================
// Breakeven logic
var bool movedToBreakeven = false
if strategy.position_size > 0 // Long position
if not movedToBreakeven and useBreakeven
profitTicks = (close - strategy.position_avg_price) / syminfo.mintick
triggerTicks = initialStopDistance * breakevenTrigger / syminfo.mintick
if profitTicks >= triggerTicks
longStopPrice := strategy.position_avg_price * (1 + breakevenOffset / 100)
movedToBreakeven := true
if strategy.position_size < 0 // Short position
if not movedToBreakeven and useBreakeven
profitTicks = (strategy.position_avg_price - close) / syminfo.mintick
triggerTicks = initialStopDistance * breakevenTrigger / syminfo.mintick
if profitTicks >= triggerTicks
shortStopPrice := strategy.position_avg_price * (1 - breakevenOffset / 100)
movedToBreakeven := true
// Trailing Stop
if strategy.position_size > 0 and useTrailingStop // Long position
trailStop = trailingStopType == "Fixed %" ?
close * (1 - trailingStopPercent / 100) :
close - atr * trailingAtrMultiplier
if na(longStopPrice) or trailStop > longStopPrice
longStopPrice := trailStop
if strategy.position_size < 0 and useTrailingStop // Short position
trailStop = trailingStopType == "Fixed %" ?
close * (1 + trailingStopPercent / 100) :
close + atr * trailingAtrMultiplier
if na(shortStopPrice) or trailStop < shortStopPrice
shortStopPrice := trailStop
// Exit Long
if strategy.position_size > 0
// EMA100 Cross exit (override other exits if selected)
if stopLossType == "EMA100 Cross" and ema100CrossDown
strategy.close("Long", comment="EMA100 Cross Exit")
movedToBreakeven := false
if useStopLoss and useTakeProfit and not na(longStopPrice) and not na(longTakeProfitPrice) and stopLossType != "EMA100 Cross"
strategy.exit("Exit Long", "Long", stop=longStopPrice, limit=longTakeProfitPrice, comment_profit="Exit TP", comment_loss="Exit SL")
else if useStopLoss and not useTakeProfit and not na(longStopPrice) and stopLossType != "EMA100 Cross"
strategy.exit("Exit Long", "Long", stop=longStopPrice, comment="Exit SL")
else if useTakeProfit and not useStopLoss and not na(longTakeProfitPrice)
strategy.exit("Exit Long", "Long", limit=longTakeProfitPrice, comment="Exit TP")
else if useTakeProfit and stopLossType == "EMA100 Cross" and not na(longTakeProfitPrice)
strategy.exit("Exit Long", "Long", limit=longTakeProfitPrice, comment="Exit TP")
// Exit on opposite signal
if sellSignal
strategy.close("Long", comment="Opposite Signal")
movedToBreakeven := false
// Exit Short
if strategy.position_size < 0
// EMA100 Cross exit (override other exits if selected)
if stopLossType == "EMA100 Cross" and ema100CrossUp
strategy.close("Short", comment="EMA100 Cross Exit")
movedToBreakeven := false
if useStopLoss and useTakeProfit and not na(shortStopPrice) and not na(shortTakeProfitPrice) and stopLossType != "EMA100 Cross"
strategy.exit("Exit Short", "Short", stop=shortStopPrice, limit=shortTakeProfitPrice, comment_profit="Exit TP", comment_loss="Exit SL")
else if useStopLoss and not useTakeProfit and not na(shortStopPrice) and stopLossType != "EMA100 Cross"
strategy.exit("Exit Short", "Short", stop=shortStopPrice, comment="Exit SL")
else if useTakeProfit and not useStopLoss and not na(shortTakeProfitPrice)
strategy.exit("Exit Short", "Short", limit=shortTakeProfitPrice, comment="Exit TP")
else if useTakeProfit and stopLossType == "EMA100 Cross" and not na(shortTakeProfitPrice)
strategy.exit("Exit Short", "Short", limit=shortTakeProfitPrice, comment="Exit TP")
// Exit on opposite signal
if buySignal
strategy.close("Short", comment="Opposite Signal")
movedToBreakeven := false
// Reset breakeven flag when no position
if strategy.position_size == 0
movedToBreakeven := false
// ========================================
// VISUALIZATION
// ========================================
// Plot entry signals
plotshape(buySignal and allowLong, "Buy Signal", shape.triangleup, location.belowbar, color.new(color.green, 0), size=size.small)
plotshape(sellSignal and allowShort, "Sell Signal", shape.triangledown, location.abovebar, color.new(color.red, 0), size=size.small)
// Plot Stop Loss and Take Profit levels
plot(strategy.position_size > 0 ? longStopPrice : na, "Long SL", color.red, 2, plot.style_linebr)
plot(strategy.position_size > 0 ? longTakeProfitPrice : na, "Long TP", color.green, 2, plot.style_linebr)
plot(strategy.position_size < 0 ? shortStopPrice : na, "Short SL", color.red, 2, plot.style_linebr)
plot(strategy.position_size < 0 ? shortTakeProfitPrice : na, "Short TP", color.green, 2, plot.style_linebr)
// Plot entry price
plot(strategy.position_size != 0 ? strategy.position_avg_price : na, "Entry Price", color.yellow, 1, plot.style_linebr)
// Background color for position
bgcolor(strategy.position_size > 0 ? color.new(color.green, 95) : strategy.position_size < 0 ? color.new(color.red, 95) : na, title="Position Background")