Stratégie de croisement de moyennes mobiles doubles Momentum

Aperçu
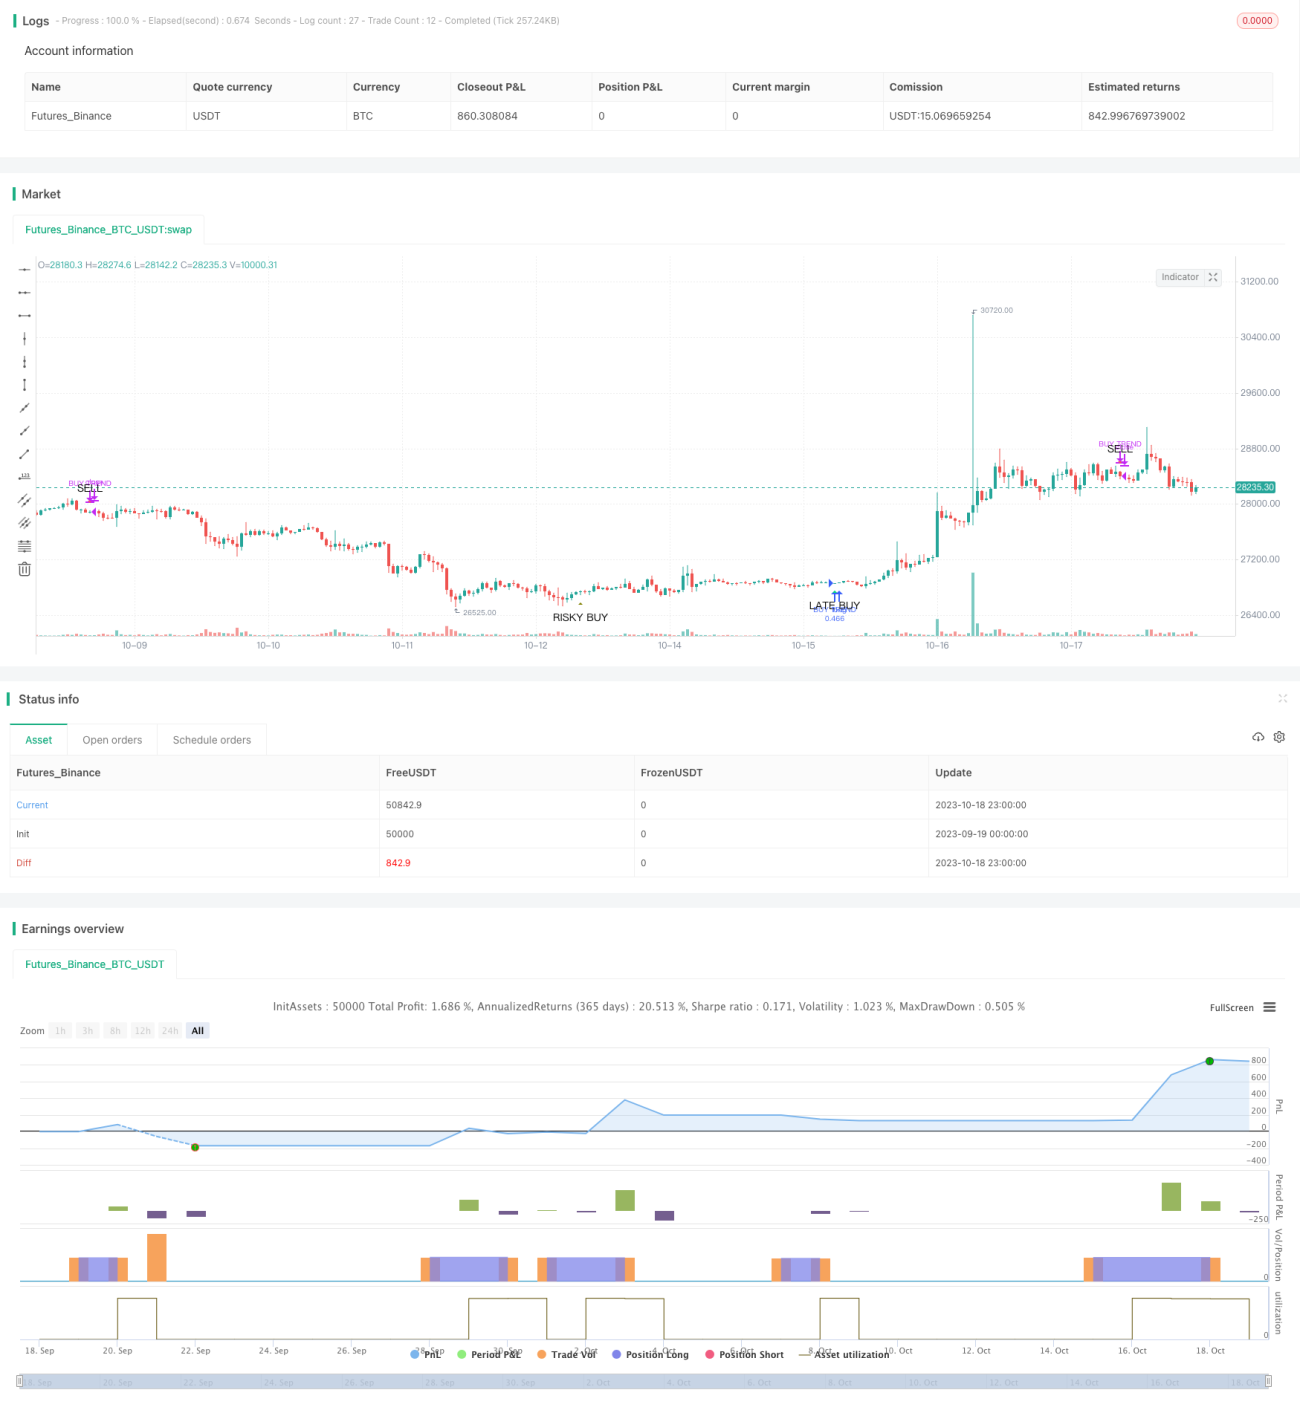
Cette stratégie utilise la croisée des lignes pour déterminer la direction de la dynamique des prix, en complément de la fourche dorée pour déterminer la tendance globale, permettant le suivi de la tendance.
Principe de stratégie
La stratégie utilise l'intersection des deux lignes de mesure EMA et SMA pour juger de la direction de la dynamique des prix. L'EMA réagit plus rapidement et la réaction SMA est plus stable.
En outre, la stratégie utilise également la croisée des SMA à cycle rapide et des SMA à cycle lent pour juger de la direction de la tendance globale. Lorsqu'un SMA à cycle rapide traverse un SMA à cycle lent, c'est une fourche dorée, jugée comme une tendance à la hausse à long terme; lorsqu'un SMA à cycle rapide traverse un SMA à cycle lent, c'est une fourche morte, jugée comme une tendance à la baisse à long terme.
La stratégie est jugée comme une opportunité de surenchère lorsqu'elle traverse le SMA sur l'EMA. Si c'est une fourche dorée, cela indique que la surenchère n'a pas seulement un soutien dynamique à court terme, mais aussi en accord avec la tendance à long terme, ce qui est une bonne opportunité de surenchère; si c'est une fourche morte, cela indique que la surenchère n'a que un soutien dynamique à court terme, ce qui n'est pas en accord avec la tendance à long terme, ce qui est une opportunité de surenchère plus risquée.
Analyse des avantages
- Le croisement des moyennes pour déterminer le mouvement et la direction des prix
- En tenant compte des dynamiques à court terme et des tendances à long terme
- Signal de confirmation à double indicateur, plus fiable
- Adaptable à différentes périodes en ajustant les paramètres de la moyenne
- Configurable pour afficher des signaux de transaction spécifiques, l'interface est personnalisable
Analyse des risques
- Le décalage de la ligne moyenne peut entraîner une perte des meilleurs points d'achat et de vente
- Les SMA à cycle fixe ne peuvent pas refléter les variations de prix en temps réel
- Une moyenne à longue et courte périodes peut générer un faux signal de croisement
- Le risque d'augmentation de capital à long terme
Le risque peut être réduit en combinant des signaux de confirmation avec d'autres indicateurs, en optimisant les paramètres de cycle de la moyenne, ou en définissant un stop-loss.
Direction d'optimisation
- Ajouter des filtres sur d'autres indicateurs tels que le volume des transactions, les bandes de Brent, etc.
- Augmentation des stratégies de réduction des pertes
- Optimiser le paramètre de périodicité moyenne
- Optimisation de la gestion des fonds
- Considérer un ajustement en temps réel du ratio de position
Résumer
Cette stratégie est une stratégie de suivi de tendance plus stable et plus fiable dans l'ensemble. Elle prend en compte à la fois la dynamique des prix à court terme et la direction de la tendance à long terme, formant un signal de transaction par la croisée des courbes. Par rapport à une seule stratégie de courbe, elle est associée à une confirmation de double indicateur.
- 1