Aperçu
Cette stratégie est une stratégie de trading quantitative qui combine l’indicateur Bull Bear Power avec un système de prise de bénéfices dynamique à plusieurs niveaux basé sur les centiles de volume. Cette stratégie construit un système de trading hautement adaptatif et à risque contrôlé en analysant des données multidimensionnelles telles que le prix, le volume et la dynamique. La logique principale consiste à utiliser la valeur standardisée Z-Score de l’indicateur BBP comme condition de déclenchement des signaux de trading et à combiner l’analyse des centiles de volume pour ajuster dynamiquement le niveau de take-profit, permettant ainsi une compréhension précise des différents états de volatilité du marché.
Principe de stratégie
Le calcul principal de la stratégie comprend les éléments clés suivants :
- Calcul de l’indicateur BBP : Mesurez la comparaison du pouvoir de marché en calculant la somme de la différence entre le prix le plus élevé et l’EMA (bull power) et la différence entre le prix le plus bas et l’EMA (bear power).
- Normalisation du score Z : La valeur BBP est normalisée pour déterminer le niveau d’écart de la force actuelle du marché.
- Analyse du volume : calculez le volume actuel par rapport à la moyenne mobile pour déterminer l’activité du marché.
- Analyse quantile : calculez les quantiles historiques de prix et de volume pour la distribution de probabilité des conditions de marché.
- Take Profit dynamique : ajustez dynamiquement la distance de take profit en fonction du score complet de l’ATR, du centile de volume et du centile de prix.
Avantages stratégiques
- Analyse multidimensionnelle : prise en compte complète de la dynamique des prix, du volume et de la position sur le marché pour fournir une perspective de marché plus complète.
- Forte adaptabilité : Grâce au mécanisme de prise de bénéfices ajusté de manière dynamique, il peut s’adapter à différents environnements de marché.
- Diversification des risques : adopter une stratégie de prise de bénéfices à plusieurs niveaux pour réaliser des bénéfices à différents niveaux de prix.
- Avantage de probabilité : grâce au Z-Score et à l’analyse quantile, il présente un avantage statistiquement significatif.
- Extensibilité : le cadre politique présente une bonne extensibilité et de nouvelles dimensions d’analyse peuvent être ajoutées selon les besoins.
Risque stratégique
- Sensibilité des paramètres : les stratégies contiennent plusieurs paramètres et doivent être optimisées pour différents environnements de marché.
- Dépendance à l’environnement du marché : peut produire de mauvais résultats pendant les périodes de volatilité extrême ou de changements de tendance.
- Glissement d’exécution : les ordres de prise de bénéfices à plusieurs niveaux peuvent être confrontés à un glissement d’exécution, affectant les rendements réels.
- Complexité informatique : le calcul en temps réel de plusieurs indicateurs peut entraîner une certaine charge système.
- Risque de faux signaux : de faux signaux de trading peuvent être générés dans un marché latéral.
Direction d’optimisation
- Adaptation des paramètres : introduire des méthodes d’apprentissage automatique pour obtenir une optimisation automatique des paramètres.
- Prédiction du marché : ajoutez un module de classification de l’environnement de marché pour identifier à l’avance les environnements commerciaux défavorables.
- Optimisation du stop loss : introduire un mécanisme de stop loss dynamique pour améliorer la précision du contrôle des risques.
- Filtrage du signal : ajoutez un filtre de force de tendance pour réduire les faux signaux.
- Gestion des positions : optimiser l’algorithme d’allocation des positions et améliorer l’efficacité de l’utilisation du capital.
Résumer
Cette stratégie combine l’indicateur BBP traditionnel avec des méthodes d’analyse quantitative modernes pour construire un système de trading avec une base théorique solide et une forte praticité. Grâce à des prises de bénéfices à plusieurs niveaux et à des mécanismes d’ajustement dynamiques, un meilleur équilibre entre rendements et risques est atteint. Bien qu’il existe un certain degré de difficulté dans l’optimisation des paramètres, l’évolutivité du cadre stratégique offre suffisamment de place pour une optimisation ultérieure. Dans la pratique, il est conseillé aux traders de procéder à des ajustements ciblés en fonction des caractéristiques spécifiques du marché et de leurs propres préférences en matière de risque.
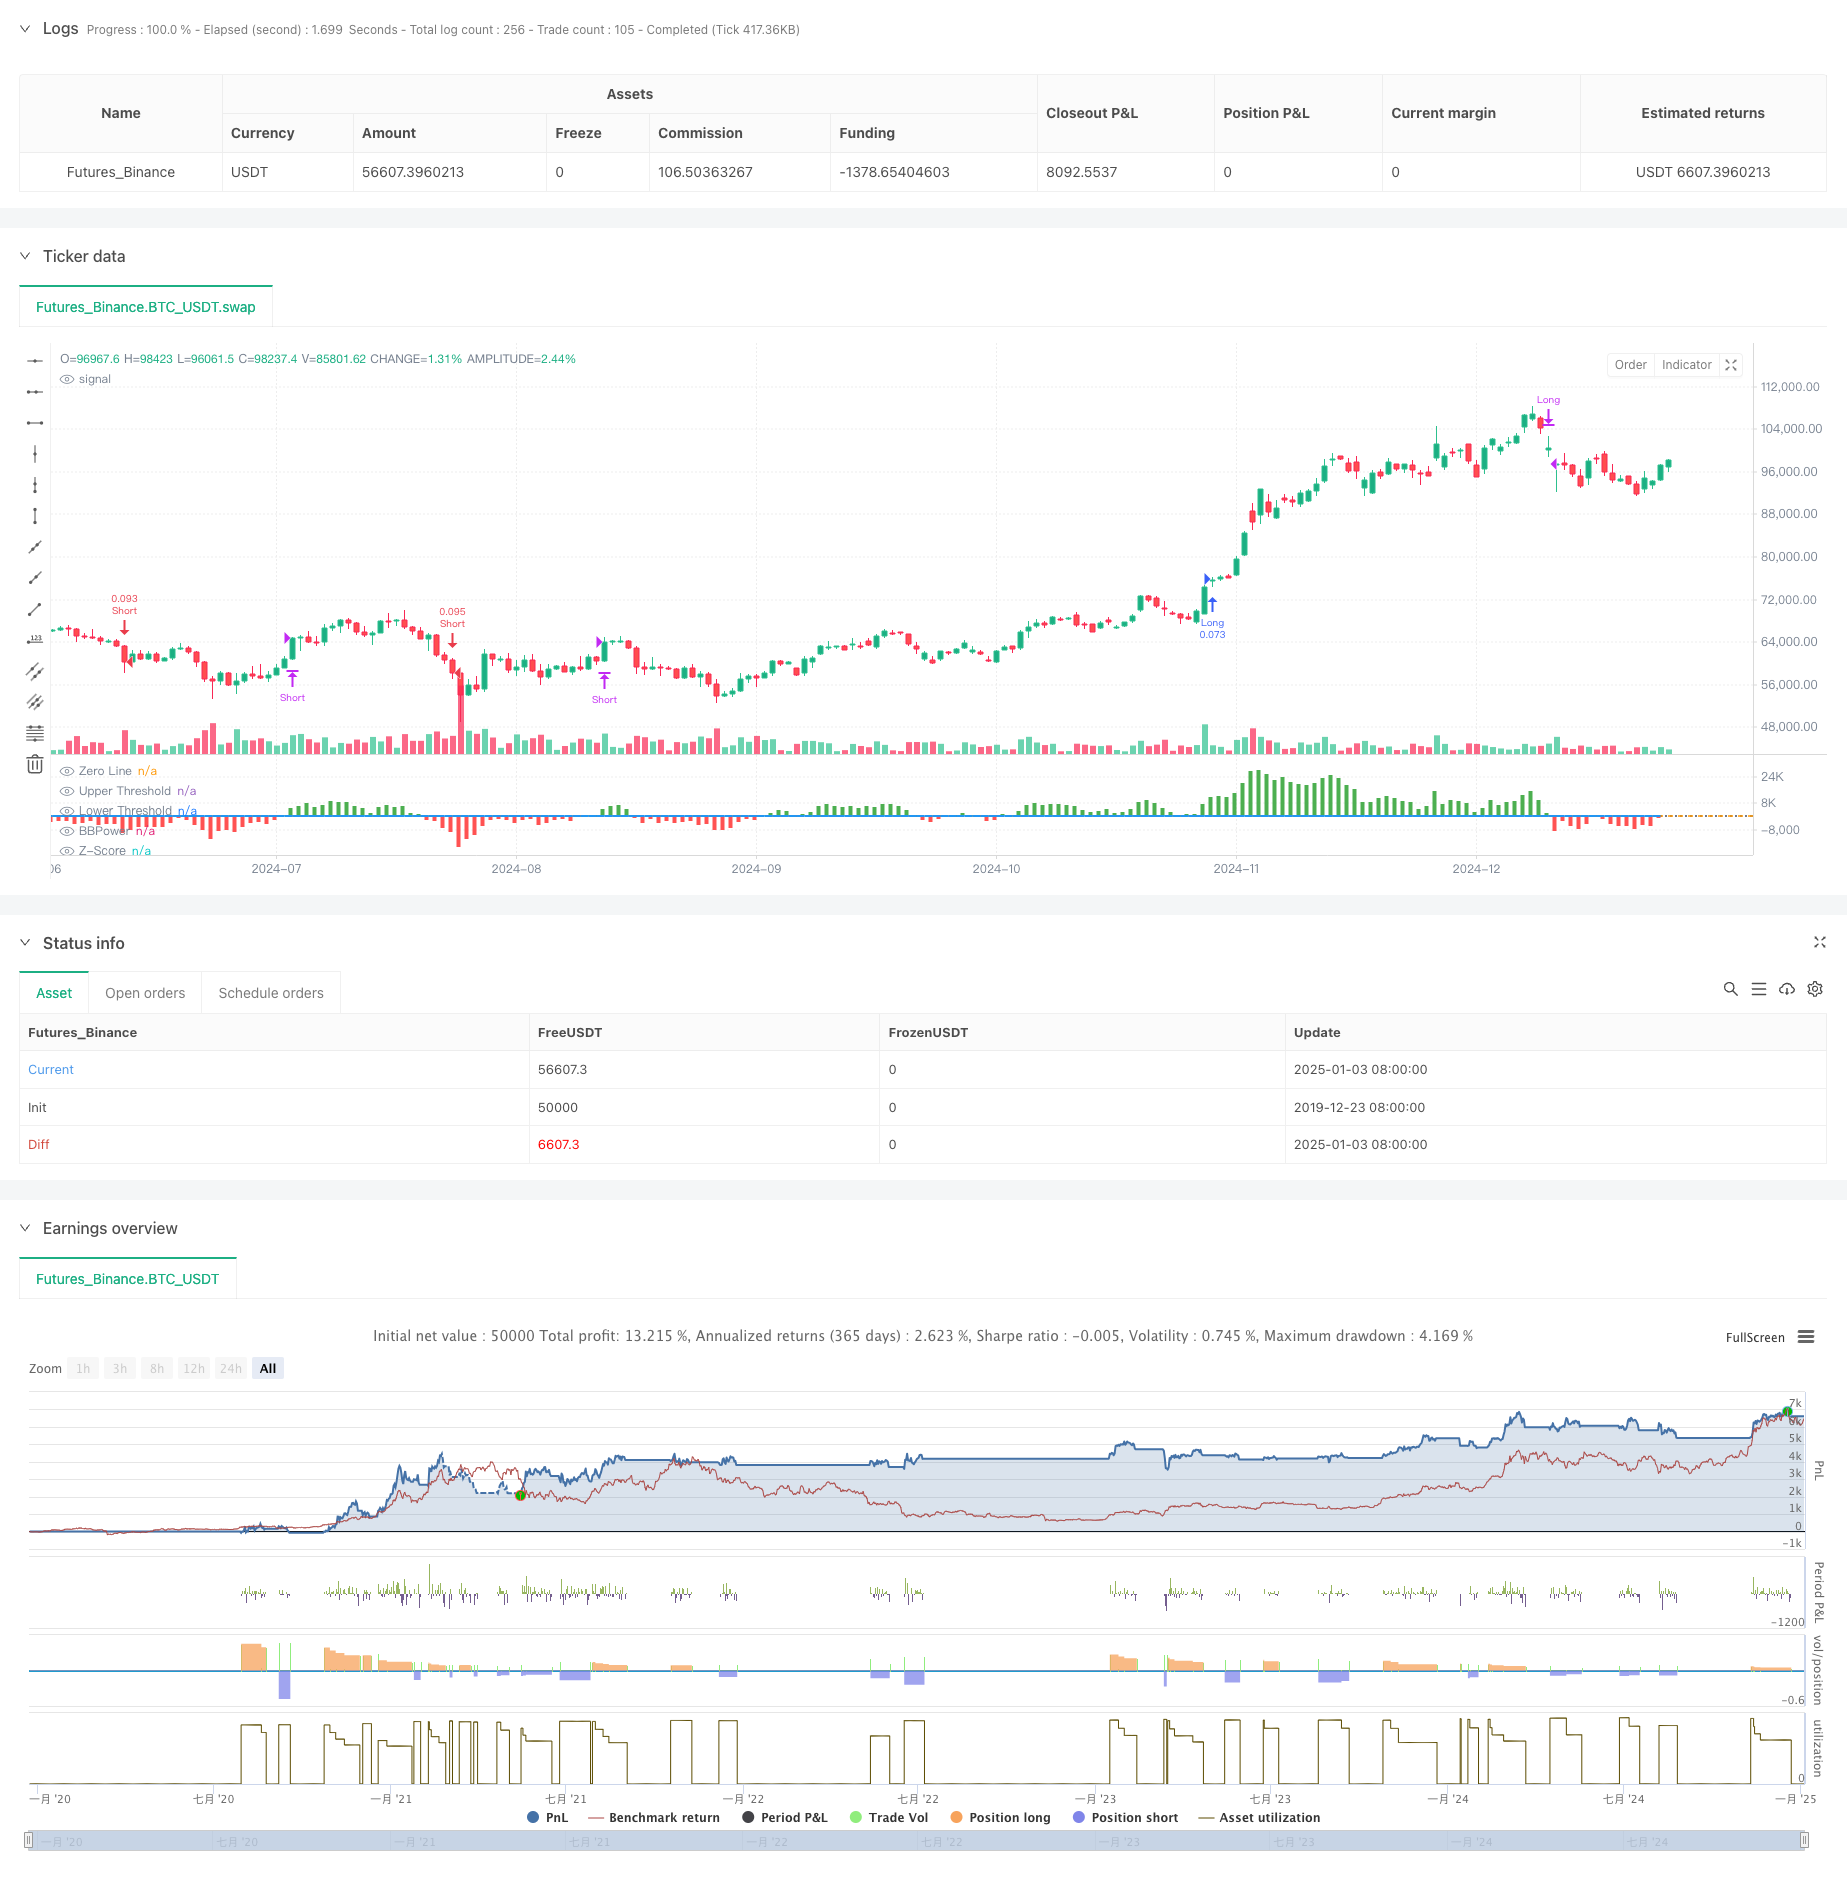
/*backtest
start: 2019-12-23 08:00:00
end: 2025-01-04 08:00:00
period: 1d
basePeriod: 1d
exchanges: [{"eid":"Futures_Binance","currency":"BTC_USDT"}]
*/

// This Pine Script™ code is subject to the terms of the Mozilla Public License 2.0 at https://mozilla.org/MPL/2.0/
// © PresentTrading

// The BBP Strategy with Volume-Percentile TP by PresentTrading emerges as a sophisticated approach that integrates multiple analytical layers to enhance trading precision and profitability.
// Unlike traditional strategies that rely solely on price movements or volume indicators, this strategy synergizes Bollinger Bands Power (BBP) with volume percentile analysis to determine optimal entry and exit points. Additionally, it employs a dynamic take-profit mechanism based on ATR (Average True Range) multipliers adjusted by volume and percentile factors, ensuring adaptability to varying market conditions.
// This multi-faceted approach not only enhances signal accuracy but also optimizes risk management, setting it apart from conventional trading methodologies.

//@version=5
strategy("BBP Strategy with Volume-Percentile TP - Strategy [presentTrading] ", overlay=false, precision=3, commission_value= 0.1, commission_type=strategy.commission.percent, slippage= 1, currency=currency.USD, default_qty_type = strategy.percent_of_equity, default_qty_value = 10, initial_capital=10000)


// ————————
// Bull Bear Power Strategy Settings
// ————————
lengthInput = input.int(21, "EMA Length")
zLength     = input.int(252, "Z-Score Length")
zThreshold  = input.float(1.618, "Z-Score Threshold")

// ————————
// Take Profit Settings
// ————————
tp_group = "Take Profit Settings"
// Enable/disable take profit function
useTP = input.bool(true, "Use Take Profit", group=tp_group)

// === ATR Base Settings ===
// ATR calculation period for determining base price movement range
baseAtrLength = input.int(20, "ATR Period", minval=1, group=tp_group, tooltip="ATR period for calculating base price movement range. Shorter periods are more sensitive to recent volatility")

// === Take Profit Multiplier Settings ===
// First take profit ATR multiplier, usually the most conservative target
atrMult1 = input.float(1.618, "TP1 ATR Multiplier", minval=0.1, step=0.1, group=tp_group, tooltip="First take profit level ATR multiplier, recommended 1.5-2.0")
// Second take profit ATR multiplier, medium profit target
atrMult2 = input.float(2.382, "TP2 ATR Multiplier", minval=0.1, step=0.1, group=tp_group, tooltip="Second take profit level ATR multiplier, recommended 2.5-3.0")
// Third take profit ATR multiplier, most aggressive target
atrMult3 = input.float(3.618, "TP3 ATR Multiplier", minval=0.1, step=0.1, group=tp_group, tooltip="Third take profit level ATR multiplier, recommended 4.0-5.0")

// === Position Size Allocation ===
// First take profit position size, usually larger for securing basic profits
tp1_size = input.float(13, "TP1 Position %", minval=1, maxval=100, group=tp_group, tooltip="Position size percentage for first take profit, recommended 30-40%")
// Second take profit position size, medium allocation
tp2_size = input.float(13, "TP2 Position %", minval=1, maxval=100, group=tp_group, tooltip="Position size percentage for second take profit, recommended 30-40%")
// Third take profit position size, usually smaller for catching larger moves
tp3_size = input.float(13, "TP3 Position %", minval=1, maxval=100, group=tp_group, tooltip="Position size percentage for third take profit, recommended 20-30%")

// ————————
// Volume Analysis Settings
// ————————
vol_group = "Volume Analysis Settings"
// Volume MA period for determining relative volume levels
vol_period = input.int(100, "Volume MA Period", minval=1, group=vol_group, tooltip="Period for calculating volume moving average, recommended 20-30")

// === Volume Level Thresholds ===
// High volume threshold relative to MA
vol_high = input.float(2.0, "High Volume Multiplier", minval=1.0, step=0.1, group=vol_group, tooltip="High volume threshold multiplier, typically 2x MA or above")
// Medium volume threshold
vol_med = input.float(1.5, "Medium Volume Multiplier", minval=1.0, step=0.1, group=vol_group, tooltip="Medium volume threshold multiplier, typically around 1.5x MA")
// Low volume threshold
vol_low = input.float(1.0, "Low Volume Multiplier", minval=0.5, step=0.1, group=vol_group, tooltip="Low volume threshold multiplier, typically around 1x MA")

// === Volume Adjustment Factors ===
// High volume adjustment factor, usually extends take profit targets
vol_high_mult = input.float(1.5, "High Volume Factor", minval=0.1, step=0.1, group=vol_group, tooltip="Take profit adjustment factor for high volume")
// Medium volume adjustment factor
vol_med_mult = input.float(1.3, "Medium Volume Factor", minval=0.1, step=0.1, group=vol_group, tooltip="Take profit adjustment factor for medium volume")
// Low volume adjustment factor
vol_low_mult = input.float(1.0, "Low Volume Factor", minval=0.1, step=0.1, group=vol_group, tooltip="Take profit adjustment factor for low volume")

// ————————
// Percentile Analysis Settings
// ————————
perc_group = "Percentile Analysis Settings"
// Percentile calculation period for evaluating price position
perc_period = input.int(100, "Percentile Period", minval=20, group=perc_group, tooltip="Historical period for percentile calculations, recommended 100-200")

// === Percentile Thresholds ===
// High percentile threshold, typically indicates relative high levels
perc_high = input.float(90, "High Percentile", minval=50, maxval=100, group=perc_group, tooltip="High level percentile threshold, typically above 90")
// Medium percentile threshold
perc_med = input.float(80, "Medium Percentile", minval=50, maxval=100, group=perc_group, tooltip="Medium level percentile threshold, typically around 80")
// Low percentile threshold
perc_low = input.float(70, "Low Percentile", minval=0, maxval=100, group=perc_group, tooltip="Low level percentile threshold, typically around 70")

// === Percentile Adjustment Factors ===
// High percentile adjustment factor
perc_high_mult = input.float(1.5, "High Percentile Factor", minval=0.1, step=0.1, group=perc_group, tooltip="Take profit adjustment factor for high percentile levels")
// Medium percentile adjustment factor
perc_med_mult = input.float(1.3, "Medium Percentile Factor", minval=0.1, step=0.1, group=perc_group, tooltip="Take profit adjustment factor for medium percentile levels")
// Low percentile adjustment factor
perc_low_mult = input.float(1.0, "Low Percentile Factor", minval=0.1, step=0.1, group=perc_group, tooltip="Take profit adjustment factor for low percentile levels")


// ————————
// Core Bull Bear Power Calculations
// ————————
emaClose  = ta.ema(close, lengthInput)
bullPower = high - emaClose
bearPower = low  - emaClose
bbp       = bullPower + bearPower

bbp_mean  = ta.sma(bbp, zLength)
bbp_std   = ta.stdev(bbp, zLength)
zscore    = (bbp - bbp_mean) / bbp_std

// ————————
// Volume & Percentile Analysis
// ————————
// 成交量分析
vol_sma = ta.sma(volume, vol_period)
vol_mult = volume / vol_sma

// 百分位數計算
calcPercentile(src) =>
    var values = array.new_float(0)
    array.unshift(values, src)
    if array.size(values) > perc_period
        array.pop(values)
    array.size(values) > 0 ? array.percentrank(values, array.size(values)-1) * 100 : 50

price_perc = calcPercentile(close)
vol_perc = calcPercentile(volume)

// 止盈動態調整系數計算
getTpFactor() =>
    vol_score = vol_mult > vol_high ? vol_high_mult : vol_mult > vol_med ? vol_med_mult : vol_mult > vol_low ? vol_low_mult : 0.8
    price_score = price_perc > perc_high ? perc_high_mult :price_perc > perc_med ? perc_med_mult :price_perc > perc_low ? perc_low_mult : 0.8
    math.avg(vol_score, price_score)

// ————————
// Entry/Exit Logic
// ————————
longCondition  = ta.crossover(zscore,  zThreshold)
shortCondition = ta.crossunder(zscore, -zThreshold)
exitLongCondition  = ta.crossunder(zscore, 0)
exitShortCondition = ta.crossover(zscore,  0)

if (barstate.isconfirmed)
    if longCondition
        strategy.entry("Long", strategy.long)
    if shortCondition
        strategy.entry("Short", strategy.short)
    if exitLongCondition
        strategy.close("Long")
    if exitShortCondition
        strategy.close("Short")

// ————————
// Take Profit Execution
// ————————
if useTP and strategy.position_size != 0
    base_move = ta.atr(baseAtrLength)
    tp_factor = getTpFactor()
    is_long = strategy.position_size > 0
    entry_price = strategy.position_avg_price

    if is_long
        tp1_price = entry_price + (base_move * atrMult1 * tp_factor)
        tp2_price = entry_price + (base_move * atrMult2 * tp_factor)
        tp3_price = entry_price + (base_move * atrMult3 * tp_factor)

        strategy.exit("TP1", "Long", qty_percent=tp1_size, limit=tp1_price)
        strategy.exit("TP2", "Long", qty_percent=tp2_size, limit=tp2_price)
        strategy.exit("TP3", "Long", qty_percent=tp3_size, limit=tp3_price)
    else
        tp1_price = entry_price - (base_move * atrMult1 * tp_factor)
        tp2_price = entry_price - (base_move * atrMult2 * tp_factor)
        tp3_price = entry_price - (base_move * atrMult3 * tp_factor)

        strategy.exit("TP1", "Short", qty_percent=tp1_size, limit=tp1_price)
        strategy.exit("TP2", "Short", qty_percent=tp2_size, limit=tp2_price)
        strategy.exit("TP3", "Short", qty_percent=tp3_size, limit=tp3_price)

// ————————
// Plotting
// ————————
plot(bbp, color=bbp >= 0 ? color.new(color.green, 0) : color.new(color.red, 0),
     title="BBPower", style=plot.style_columns)
hline(0, "Zero Line", color=color.gray, linestyle=hline.style_dotted)
plot(zscore, title="Z-Score", color=color.blue, linewidth=2)
hline(zThreshold, "Upper Threshold", color=color.orange, linestyle=hline.style_dashed)
hline(-zThreshold, "Lower Threshold", color=color.orange, linestyle=hline.style_dashed)