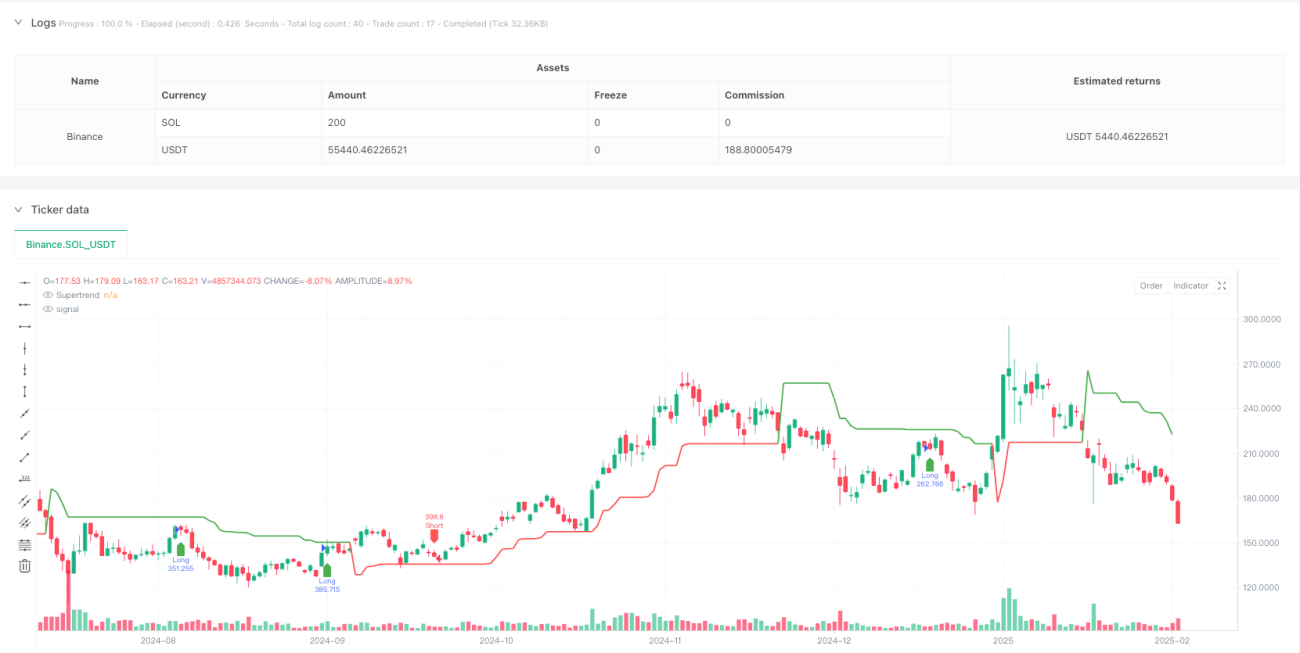
Stratégie de trading de tendance adaptative par fusion multi-indicateurs

Aperçu
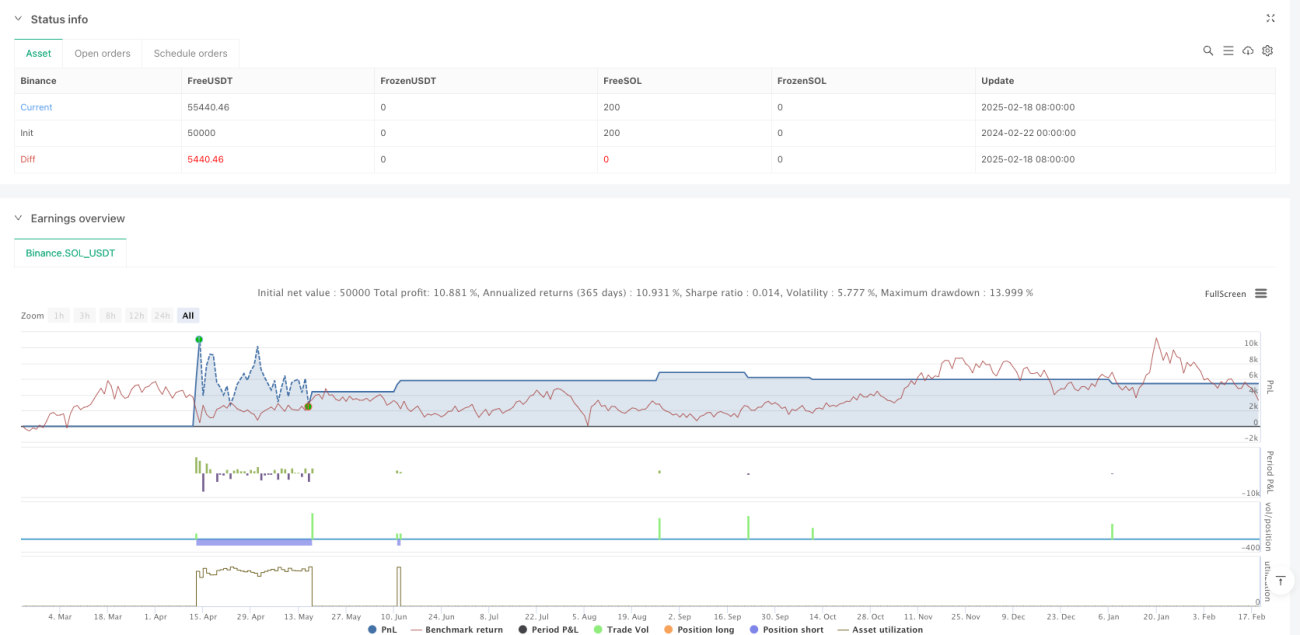
La stratégie est un système de trading de suivi de tendance auto-adaptatif qui intègre plusieurs indicateurs techniques. Il combine le système de confirmation de signal par une ligne uniforme (EMA), l'indicateur de dynamique (RSI), l'indicateur de tendance (MACD) et le SuperTrend, et est équipé d'un mécanisme de gestion du risque bien développé, comprenant des fonctions telles que l'arrêt, la suspension et l'arrêt mobile. La stratégie est conçue en tenant pleinement compte de la volatilité du marché et améliore la stabilité et la fiabilité des transactions grâce à un filtrage et à un contrôle du risque de plusieurs signaux.
Principe de stratégie
La stratégie utilise des mécanismes de confirmation de signaux à plusieurs niveaux:
- Détermination de la direction de la tendance initiale par la croisée des EMAs de 9 et 21 cycles
- Utilisez le RSI ((14) pour filtrer les surachats et les surventes, les signaux d'achat nécessitent un RSI> 40 et < 70, les signaux de vente nécessitent un RSI < 60 et > 30
- L'indicateur MACD vérifie la dynamique de la tendance, exigeant que la ligne de signal soit alignée avec la ligne MACD
- L'indicateur SuperTrend fournit une confirmation de tendance supplémentaire
- Le contrôle des risques est effectué avec 5% de stop loss, 10% de stop loss, 2% de stop loss tracking et 1% de point de garantie.
Le signal de transaction est déclenché lorsque toutes les conditions sont réunies, ce qui réduit le risque de fausse rupture.
Avantages stratégiques
- Le mécanisme de confirmation de signaux multiples réduit considérablement les fausses interférences
- Système de contrôle des risques, comprenant des arrêts fixes, des arrêts mobiles et des arrêts de garantie
- Les stratégies ont une bonne adaptabilité pour s'adapter à différents environnements de marché
- Logistique d'entrée et de sortie claire, facile à comprendre et à maintenir
- La logique des transactions a une bonne base théorique, chaque indicateur a sa fonction spécifique
Risque stratégique
- La confirmation de signaux multiples peut entraîner la perte d'occasions de négociation importantes
- Les stop-loss fixes peuvent ne pas être suffisamment flexibles dans des marchés très volatils
- L'optimisation des paramètres peut conduire à un surajustement des données historiques
- Plusieurs indicateurs pourraient générer des signaux de confusion sur le marché horizontal
Les solutions comprennent: l'ajustement dynamique des paramètres de stop-loss, l'introduction d'indicateurs de volatilité, la réoptimisation périodique des paramètres, etc.
Orientation de l'optimisation de la stratégie
- Mise en place d'un mécanisme d'adaptation des paramètres en fonction de la dynamique des fluctuations du marché
- Augmentation des indicateurs de chiffre d'affaires comme outil de confirmation auxiliaire
- Optimisation des mécanismes de coupe des pertes, introduction de coupe dynamique basée sur ATR
- Ajout d'un module d'identification de l'environnement du marché qui utilise une combinaison de paramètres différente dans différentes conditions de marché
- Développer un système d'optimisation paramétrique basé sur l'apprentissage automatique
Résumer
La stratégie est construite sur un système de négociation robuste, grâce à une collaboration synchrone d'indicateurs techniques multidimensionnels. Un mécanisme de contrôle des risques parfait et une logique de négociation claire lui confèrent une bonne praticité. Bien qu'il existe un certain espace d'optimisation, le cadre de base de la stratégie a une base théorique solide, qui devrait encore améliorer son efficacité de négociation par une optimisation et une amélioration continues.
/*backtest
start: 2024-02-22 00:00:00
end: 2025-02-19 08:00:00
period: 1d
basePeriod: 1d
exchanges: [{"eid":"Binance","currency":"SOL_USDT"}]
*/

//@version=5
strategy("Optimized BTC Trading Strategy v2", overlay=true, default_qty_type=strategy.percent_of_equity, default_qty_value=100, commission_type=strategy.commission.percent, commission_value=0.1)

// Input parameters- 1