Pelacakan tren multi-periode dan strategi manajemen volatilitas ATR

Ringkasan
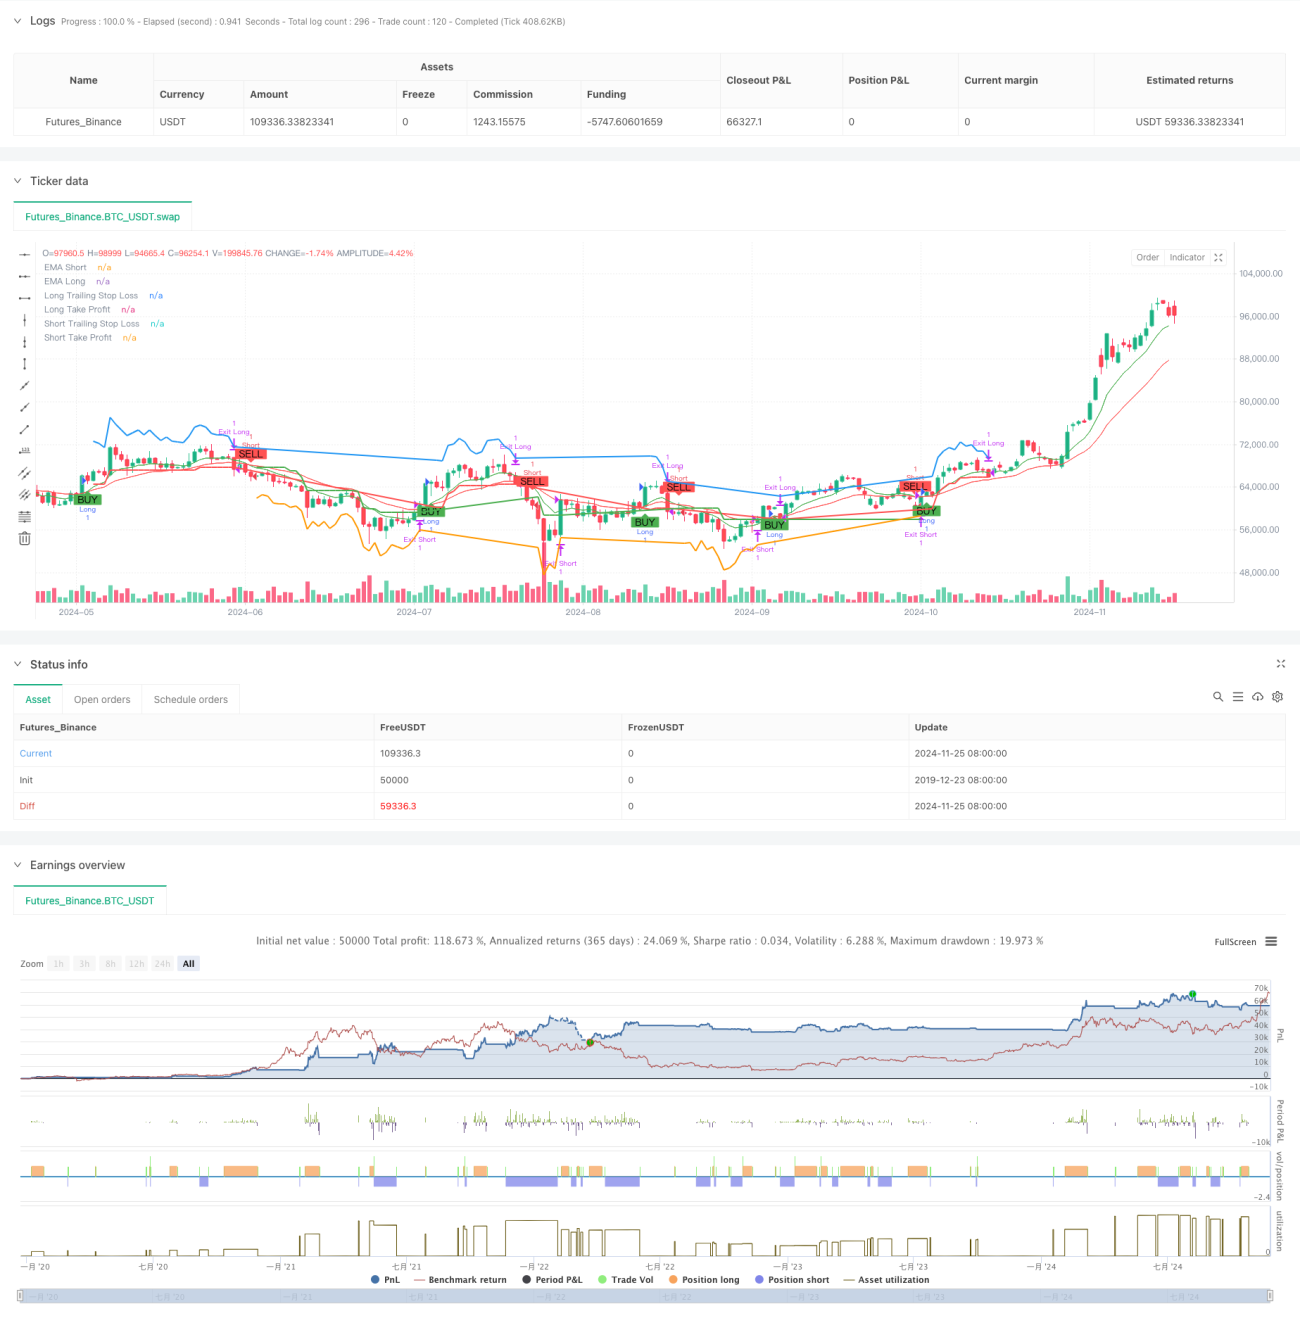
Ini adalah strategi pelacakan tren yang menggabungkan analisis multi-siklus dan manajemen volatilitas. Inti dari strategi ini adalah arah tren yang diputuskan oleh penilaian silang dua-equilibrium, filter overbought dan oversold melalui indikator RSI, pengenalan EMA periode waktu yang lebih tinggi untuk mengkonfirmasi tren keseluruhan, dan menggunakan indikator ATR untuk mengelola stop loss dan profit target secara dinamis.
Prinsip Strategi
Logika perdagangan inti dari strategi ini terdiri dari beberapa bagian utama:
- Identifikasi tren: Menggunakan persilangan EMA periode pendek dan periode panjang untuk mengidentifikasi perubahan tren, menghasilkan sinyal do lebih ketika EMA jangka pendek melewati EMA jangka panjang, menghasilkan sinyal do lebih ketika EMA jangka panjang melewati.
- Konfirmasi tren: memperkenalkan EMA periode waktu yang lebih tinggi sebagai filter tren, hanya diizinkan untuk melakukan lebih banyak ketika harga berada di atas EMA periode yang lebih tinggi, dan sebaliknya diizinkan untuk melakukan lebih sedikit.
- Filter volatilitas: menggunakan indikator RSI untuk menilai overbought dan oversold, untuk mencegah masuk ke pasar dengan terlalu banyak mengejar dan memblokir penurunan.
- Manajemen Posisi: Berdasarkan ATR yang mengatur target stop loss dan profit secara dinamis, posisi stop loss disesuaikan secara otomatis dengan perubahan harga, melindungi keuntungan dan kerugian.
- Perlindungan multi-dimensi: Strategi untuk membangun sistem keputusan perdagangan yang lengkap melalui penggunaan komposit dari beberapa indikator teknis.
Keunggulan Strategis
- Keandalan sinyal yang tinggi: Dengan penggunaan kombinasi dari beberapa indikator teknis, keandalan sinyal perdagangan meningkat secara signifikan.
- Pengendalian risiko yang sempurna: Menggunakan skema stop loss dinamis berbasis ATR, dapat menyesuaikan posisi stop loss sesuai dengan volatilitas pasar.
- Akurasi trend capture: menggunakan metode analisis multi-siklus, meningkatkan akurasi penilaian terhadap tren utama.
- Fleksibilitas target keuntungan: Pengaturan take-profit juga didasarkan pada penyesuaian dinamis ATR, yang tidak akan meninggalkan permainan terlalu dini sambil menjamin keuntungan.
- Adaptif: Parameter strategi dapat disesuaikan dan dapat beradaptasi dengan berbagai kondisi pasar.
Risiko Strategis
- Risiko pasar yang bergoyang: Perdagangan yang sering dapat menyebabkan kerugian dalam situasi yang bergoyang.
- Risiko slippage: Pada periode fluktuasi yang kuat, harga transaksi aktual mungkin jauh berbeda dengan harga teoretis.
- Risiko terobosan palsu: mungkin terjadi pembalikan setelah terobosan jangka pendek, yang menyebabkan terobosan berhenti.
- Sensitivitas parameter: Kombinasi parameter yang berbeda memiliki pengaruh besar terhadap kinerja strategi dan perlu diuji secara penuh.
Arah optimasi strategi
- Identifikasi lingkungan pasar: Anda dapat menambahkan indikator kekuatan tren, secara otomatis menurunkan posisi atau menghentikan perdagangan di pasar yang bergoyang.
- Optimasi waktu masuk: dapat menggabungkan indikator lalu lintas untuk meningkatkan keandalan sinyal masuk.
- Penyesuaian parameter dinamis: Periode EMA dan ATR dapat disesuaikan secara otomatis sesuai dengan fluktuasi pasar.
- Slogan untuk membangun gudang secara batch: Anda dapat merancang mekanisme untuk membangun dan mengurangi gudang secara batch untuk mengurangi risiko titik harga tunggal.
- Optimalisasi manajemen posisi: dapat menyesuaikan ukuran kepemilikan berdasarkan risiko akun dan dinamika volatilitas pasar.
Meringkaskan
Ini adalah strategi pelacakan tren yang dirancang dengan baik, dengan analisis multi-siklus dan manajemen volatilitas, untuk mencapai karakteristik risiko-penghasilan yang lebih baik. Keunggulan inti dari strategi ini adalah kombinasi organik dari beberapa indikator teknis, yang menjamin keandalan perdagangan dan pengendalian risiko yang efektif. Meskipun ada beberapa risiko potensial, kinerja keseluruhan strategi masih dapat ditingkatkan dengan optimasi dan perbaikan berkelanjutan.
- 1