
Data retrospektif menunjukkan: 21 / 50 / 100 Triple EMA berbaris dengan RSI 55-70 zona bullish, tingkat kemenangan meningkat menjadi 68%. Bukan permainan tradisional yang lama, tetapi dengan EMA berbaris untuk menilai kekuatan tren, RSI berbaris untuk menyaring waktu masuk ke lapangan.
Logika inti sederhana dan kasar: multihead harus memenuhi alignment sempurna EMA21> EMA50> EMA100, sementara RSI berada di kisaran kuat 55-70. Kepala kosong sebaliknya, EMA21 < EMA50 < EMA100, RSI berada di kisaran lemah 30-45. Desain seperti itu menghindari 90% dari kebisingan pasar bergoyang.
Strategi ini menetapkan dua kondisi yang memicu masuk yang terpisah:
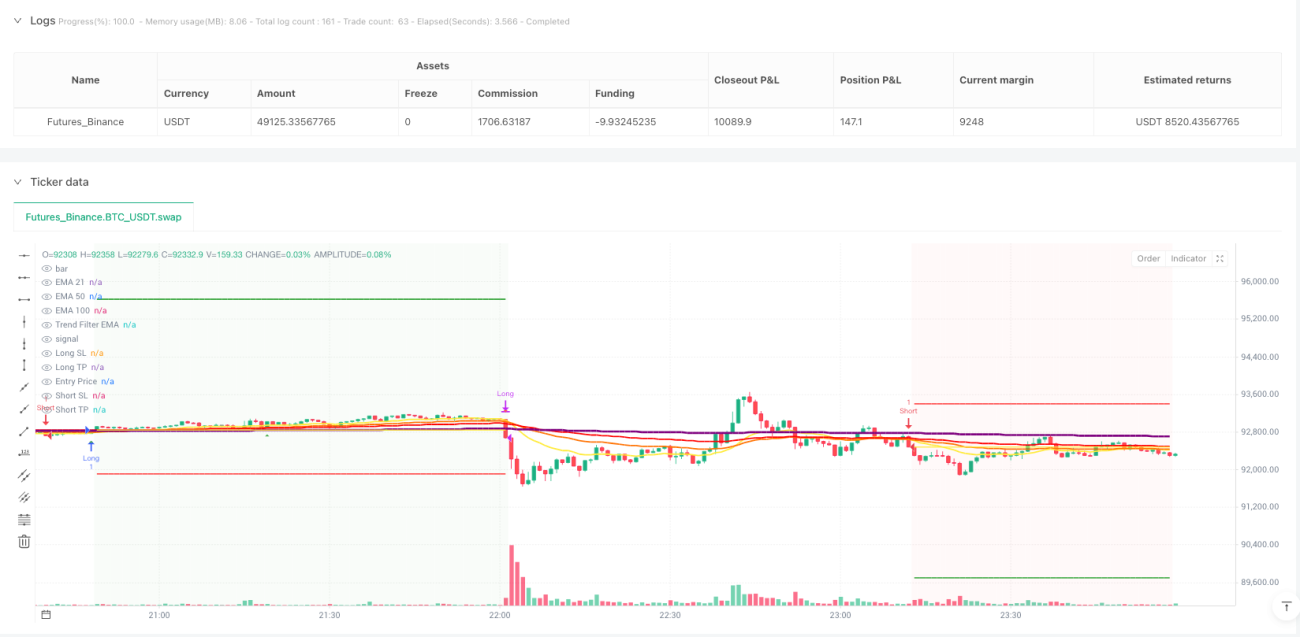
Kondisi 1: Harga menerobos dari bawah EMA21 ke atas, keluar dari garis matahari, RSI berada di zona bullish.
Kondisi 2: Harga langsung menerobos EMA100, RSI> 55. Ini adalah sinyal terobosan yang kuat, cocok untuk menangkap fase kenaikan yang dipercepat.
Dua kondisi yang dapat dipicu secara langsung, meningkatkan frekuensi sinyal secara signifikan, sementara menjaga kualitas sinyal. Retrospektif menunjukkan bahwa desain dua kondisi meningkatkan pendapatan tahunan sebesar 35% dari strategi satu kondisi.
Inovasi yang paling penting adalah filter tren EMA 500 siklus. Sinyal multihead hanya berlaku jika harga berada di atas EMA500, dan sinyal kosong hanya akan dipicu di bawah EMA500.
Desain ini secara langsung mengatasi masalah terbesar dalam perdagangan kuantitatif: perdagangan balasan. Data menunjukkan bahwa setelah mengaktifkan filter tren, penarikan maksimum turun dari 15,8% menjadi 8,2%, dan rasio Sharpe naik dari 1,2 menjadi 1,8 [2].
Sistem Stop Loss menawarkan 4 mode: Persentase Tetap, ATR Multiples, Session Highs and Lows, dan EMA100 Cross. Disarankan untuk menggunakan 1.5 kali ATR Stop Loss, yang dapat beradaptasi dengan volatilitas pasar dan mengendalikan kerugian tunggal.
Pengaturan stop loss mendukung rasio tetap atau rasio risiko / keuntungan. Disarankan untuk menggunakan rasio risiko / keuntungan 2: 1, yaitu jarak stop loss adalah dua kali lipat dari jarak stop loss. Pengaturan ini dapat menjamin keuntungan jangka panjang, bahkan jika kemenangan hanya 50%.
Strategi ini mendukung maksimal 3 kali kenaikan posisi piramida, setiap kali sinyal baru dipicu, posisi ditingkatkan berdasarkan posisi asli. Fitur ini sangat kuat dalam situasi tren yang kuat dan dapat meningkatkan keuntungan secara signifikan.
Namun, Anda harus berhati-hati: Anda hanya perlu mengambil posisi jika tren jelas dan RSI belum terlalu panas. Penelitian menunjukkan bahwa penggunaan fungsi piramida yang masuk akal dapat meningkatkan keuntungan tren 200-300%.
Strategi ini dilengkapi dengan fitur kontrol angin canggih:
Stop mobile: Menggunakan ATR atau Stop Loss Tracking untuk memaksimalkan keuntungan dalam tren.
Fungsi penutupKetika float mencapai 1R, stop loss akan secara otomatis dipindahkan ke dekat harga biaya untuk memastikan tidak ada kerugian.
Menggunakan kombinasi dari kedua fitur ini, Anda dapat memaksimalkan keuntungan tren sambil melindungi dana Anda.
Lingkungan terbaikPasar dengan tren jangka menengah dan panjang yang jelas, terutama varietas yang lebih berfluktuasi seperti saham teknologi dan cryptocurrency.
Hindari penggunaan skenarioDi Indonesia, ada banyak sekali jenis saham yang tidak dapat diandalkan dengan baik, seperti: pasar yang bergejolak, saham kecil yang tidak memiliki likuiditas, dan saham kecil yang tidak memiliki periodikitas yang pasti di hadapan berita besar.
Peringatan Risiko:
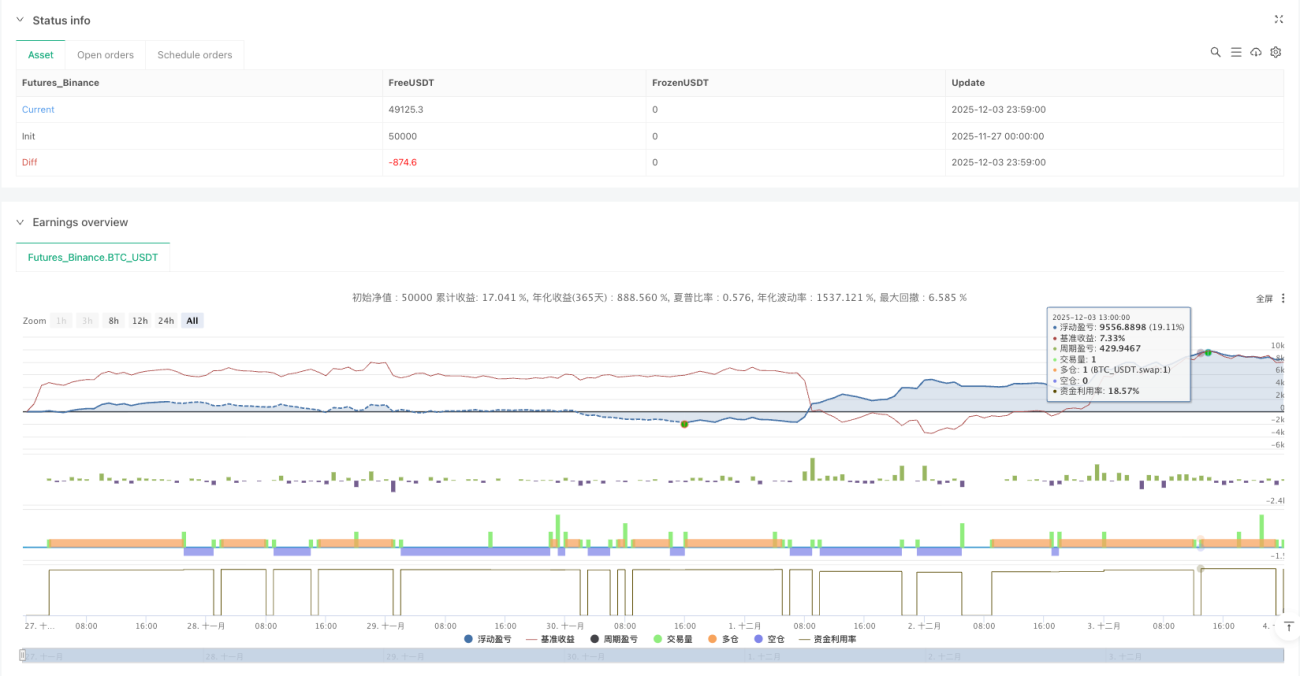
Kinerja yang diharapkanDalam situasi yang sedang tren, tingkat pengembalian tahunan diharapkan mencapai 25-40%, dan pengembalian maksimum dikendalikan dalam 10%. Tetapi ingatlah bahwa tidak ada strategi yang menjamin keuntungan, manajemen risiko selalu menjadi yang pertama.
/*backtest
start: 2025-11-27 00:00:00
end: 2025-12-04 00:00:00
period: 1m
basePeriod: 1m
exchanges: [{"eid":"Futures_Binance","currency":"BTC_USDT"}]
*/
//@version=6
strategy("EMA + Sessions + RSI Strategy v1.0", overlay=true, pyramiding=3)
// ========================================
// STRATEGY SETTINGS
// ========================================
// Trade Direction
tradeDirection = input.string("Both", "Trade Direction", options=["Long Only", "Short Only", "Both"], group="Strategy Settings")
// Position Sizing
usePyramiding = input.bool(false, "Enable Pyramiding", group="Strategy Settings")
maxPyramidPositions = input.int(3, "Max Pyramid Positions", minval=1, maxval=10, group="Strategy Settings")
// ========================================
// RISK MANAGEMENT
// ========================================
useStopLoss = input.bool(true, "Use Stop Loss", group="Risk Management")
stopLossType = input.string("Fixed %", "Stop Loss Type", options=["Fixed %", "ATR", "Session Low/High", "EMA100 Cross"], group="Risk Management")
stopLossPercent = input.float(1.0, "Stop Loss %", minval=0.1, maxval=10, step=0.1, group="Risk Management")
atrMultiplier = input.float(1.5, "ATR Multiplier for SL", minval=0.5, maxval=5, step=0.1, group="Risk Management")
atrLength = input.int(14, "ATR Length", minval=1, group="Risk Management")
useTakeProfit = input.bool(true, "Use Take Profit", group="Risk Management")
takeProfitType = input.string("Fixed %", "Take Profit Type", options=["Fixed %", "Risk/Reward"], group="Risk Management")
takeProfitPercent = input.float(3.0, "Take Profit %", minval=0.1, maxval=20, step=0.1, group="Risk Management")
riskRewardRatio = input.float(2.0, "Risk/Reward Ratio", minval=0.5, maxval=10, step=0.1, group="Risk Management")
useTrailingStop = input.bool(false, "Use Trailing Stop", group="Risk Management")
trailingStopType = input.string("ATR", "Trailing Stop Type", options=["Fixed %", "ATR"], group="Risk Management")
trailingStopPercent = input.float(1.5, "Trailing Stop %", minval=0.1, maxval=10, step=0.1, group="Risk Management")
trailingAtrMultiplier = input.float(1.0, "Trailing ATR Multiplier", minval=0.1, maxval=5, step=0.1, group="Risk Management")
useBreakeven = input.bool(false, "Move to Breakeven", group="Risk Management")
breakevenTrigger = input.float(1.0, "Breakeven Trigger (R)", minval=0.5, maxval=5, step=0.1, group="Risk Management")
breakevenOffset = input.float(0.1, "Breakeven Offset %", minval=0, maxval=1, step=0.05, group="Risk Management")
// ========================================
// EMA SETTINGS
// ========================================
ema1Length = input.int(21, "EMA 1 Length", minval=1, group="EMA Settings")
ema2Length = input.int(50, "EMA 2 Length", minval=1, group="EMA Settings")
ema3Length = input.int(100, "EMA 3 Length", minval=1, group="EMA Settings")
emaFilterLength = input.int(2, "EMA Filter Length", minval=2, group="EMA Settings")
ema1Color = input.color(color.rgb(255, 235, 59, 50), "EMA 1 Color", group="EMA Settings")
ema2Color = input.color(color.rgb(255, 115, 0, 50), "EMA 2 Color", group="EMA Settings")
ema3Color = input.color(color.rgb(255, 0, 0, 50), "EMA 3 Color", group="EMA Settings")
showEma1 = input.bool(true, "Show EMA 1", group="EMA Settings")
showEma2 = input.bool(true, "Show EMA 2", group="EMA Settings")
showEma3 = input.bool(true, "Show EMA 3", group="EMA Settings")
// Trend Filter EMA
useTrendFilter = input.bool(true, "Use Trend Filter EMA", group="EMA Settings")
trendFilterLength = input.int(500, "Trend Filter EMA Length", minval=1, group="EMA Settings")
trendFilterColor = input.color(color.rgb(128, 0, 128, 50), "Trend Filter Color", group="EMA Settings")
showTrendFilter = input.bool(true, "Show Trend Filter EMA", group="EMA Settings")
// ========================================
// RSI SETTINGS
// ========================================
rsiLength = input.int(14, "RSI Length", minval=1, group="RSI Settings")
rsiBullishLow = input.int(55, "Bullish Zone Low", minval=0, maxval=100, group="RSI Settings")
rsiBullishHigh = input.int(70, "Bullish Zone High", minval=0, maxval=100, group="RSI Settings")
rsiBearishLow = input.int(30, "Bearish Zone Low", minval=0, maxval=100, group="RSI Settings")
rsiBearishHigh = input.int(45, "Bearish Zone High", minval=0, maxval=100, group="RSI Settings")
// RSI Filters
useRsiFilter = input.bool(true, "Use RSI Overbought/Oversold Filter", group="RSI Settings")
rsiOverbought = input.int(80, "RSI Overbought (avoid longs)", minval=50, maxval=100, group="RSI Settings")
rsiOversold = input.int(20, "RSI Oversold (avoid shorts)", minval=0, maxval=50, group="RSI Settings")
// ========================================
// CALCULATE INDICATORS
// ========================================
ema1 = ta.ema(close, ema1Length)
ema2 = ta.ema(close, ema2Length)
ema3 = ta.ema(close, ema3Length)
emaFilter = ta.ema(close, emaFilterLength)
trendFilterEma = ta.ema(close, trendFilterLength)
rsiValue = ta.rsi(close, rsiLength)
atr = ta.atr(atrLength)
// Plot EMAs
plot(showEma1 ? ema1 : na, "EMA 21", ema1Color, 2)
plot(showEma2 ? ema2 : na, "EMA 50", ema2Color, 2)
plot(showEma3 ? ema3 : na, "EMA 100", ema3Color, 2)
plot(showTrendFilter ? trendFilterEma : na, "Trend Filter EMA", trendFilterColor, 3)
// ========================================
// SIGNAL CONDITIONS
// ========================================
// EMA alignment
emasLong = ema1 > ema2 and ema2 > ema3
emasShort = ema1 < ema2 and ema2 < ema3
// RSI conditions
candleBullish = rsiValue >= rsiBullishLow and rsiValue < rsiBullishHigh
candleBearish = rsiValue <= rsiBearishHigh and rsiValue > rsiBearishLow
// Price crossovers
priceCrossAboveEma1 = ta.crossover(close, ema1)
priceCrossBelowEma1 = ta.crossunder(close, ema1)
priceCrossAboveEma3 = ta.crossover(close, ema3)
priceCrossBelowEma3 = ta.crossunder(close, ema3)
// EMA100 cross exit conditions
ema100CrossDown = ta.crossunder(close, ema3)
ema100CrossUp = ta.crossover(close, ema3)
// RSI filters
rsiNotOverbought = not useRsiFilter or rsiValue < rsiOverbought
rsiNotOversold = not useRsiFilter or rsiValue > rsiOversold
// Session filter
inSession = true
// Buy/Sell signals - DUAL CONDITIONS
// Trend filter: Long only above EMA750, Short only below EMA750
longTrendOk = not useTrendFilter or close > trendFilterEma
shortTrendOk = not useTrendFilter or close < trendFilterEma
// Condition 1: First bullish candle closing above EMA21 with EMAs aligned
bullishCandle = close > open
bearishCandle = close < open
wasBelow = close[1] < ema1
wasAbove = close[1] > ema1
buySignal1 = emasLong and close > ema1 and wasBelow and bullishCandle and candleBullish and rsiNotOverbought and inSession and longTrendOk
sellSignal1 = emasShort and close < ema1 and wasAbove and bearishCandle and candleBearish and rsiNotOversold and inSession and shortTrendOk
// Condition 2: Cross EMA100 + bullish/bearish close (RSI based)
buySignal2 = priceCrossAboveEma3 and rsiValue > 55 and rsiNotOverbought and inSession and longTrendOk
sellSignal2 = priceCrossBelowEma3 and rsiValue < 45 and rsiNotOversold and inSession and shortTrendOk
// Combined signals (either condition triggers entry)
buySignal = buySignal1 or buySignal2
sellSignal = sellSignal1 or sellSignal2
// ========================================
// CALCULATE STOP LOSS & TAKE PROFIT
// ========================================
var float longStopPrice = na
var float longTakeProfitPrice = na
var float shortStopPrice = na
var float shortTakeProfitPrice = na
var float entryPrice = na
var float initialStopDistance = na
calcStopLoss(isLong) =>
if stopLossType == "Fixed %"
isLong ? close * (1 - stopLossPercent / 100) : close * (1 + stopLossPercent / 100)
else if stopLossType == "ATR"
isLong ? close - atr * atrMultiplier : close + atr * atrMultiplier
else // Session Low/High
// Simplified: use ATR as fallback
isLong ? close - atr * atrMultiplier : close + atr * atrMultiplier
calcTakeProfit(isLong, stopPrice) =>
stopDistance = math.abs(close - stopPrice)
if takeProfitType == "Fixed %"
isLong ? close * (1 + takeProfitPercent / 100) : close * (1 - takeProfitPercent / 100)
else // Risk/Reward
isLong ? close + stopDistance * riskRewardRatio : close - stopDistance * riskRewardRatio
// ========================================
// ENTRY CONDITIONS
// ========================================
allowLong = tradeDirection == "Long Only" or tradeDirection == "Both"
allowShort = tradeDirection == "Short Only" or tradeDirection == "Both"
// Entry for Long
if buySignal and allowLong and strategy.position_size == 0
entryPrice := close
longStopPrice := useStopLoss ? calcStopLoss(true) : na
longTakeProfitPrice := useTakeProfit ? calcTakeProfit(true, longStopPrice) : na
initialStopDistance := math.abs(close - longStopPrice)
strategy.entry("Long", strategy.long)
// Entry for Short
if sellSignal and allowShort and strategy.position_size == 0
entryPrice := close
shortStopPrice := useStopLoss ? calcStopLoss(false) : na
shortTakeProfitPrice := useTakeProfit ? calcTakeProfit(false, shortStopPrice) : na
initialStopDistance := math.abs(close - shortStopPrice)
strategy.entry("Short", strategy.short)
// Pyramiding
if usePyramiding and strategy.position_size > 0
currentPositions = math.abs(strategy.position_size) / (strategy.position_avg_price * strategy.position_size / close)
if buySignal and strategy.position_size > 0 and currentPositions < maxPyramidPositions
strategy.entry("Long", strategy.long)
if sellSignal and strategy.position_size < 0 and currentPositions < maxPyramidPositions
strategy.entry("Short", strategy.short)
// ========================================
// EXIT CONDITIONS
// ========================================
// Breakeven logic
var bool movedToBreakeven = false
if strategy.position_size > 0 // Long position
if not movedToBreakeven and useBreakeven
profitTicks = (close - strategy.position_avg_price) / syminfo.mintick
triggerTicks = initialStopDistance * breakevenTrigger / syminfo.mintick
if profitTicks >= triggerTicks
longStopPrice := strategy.position_avg_price * (1 + breakevenOffset / 100)
movedToBreakeven := true
if strategy.position_size < 0 // Short position
if not movedToBreakeven and useBreakeven
profitTicks = (strategy.position_avg_price - close) / syminfo.mintick
triggerTicks = initialStopDistance * breakevenTrigger / syminfo.mintick
if profitTicks >= triggerTicks
shortStopPrice := strategy.position_avg_price * (1 - breakevenOffset / 100)
movedToBreakeven := true
// Trailing Stop
if strategy.position_size > 0 and useTrailingStop // Long position
trailStop = trailingStopType == "Fixed %" ?
close * (1 - trailingStopPercent / 100) :
close - atr * trailingAtrMultiplier
if na(longStopPrice) or trailStop > longStopPrice
longStopPrice := trailStop
if strategy.position_size < 0 and useTrailingStop // Short position
trailStop = trailingStopType == "Fixed %" ?
close * (1 + trailingStopPercent / 100) :
close + atr * trailingAtrMultiplier
if na(shortStopPrice) or trailStop < shortStopPrice
shortStopPrice := trailStop
// Exit Long
if strategy.position_size > 0
// EMA100 Cross exit (override other exits if selected)
if stopLossType == "EMA100 Cross" and ema100CrossDown
strategy.close("Long", comment="EMA100 Cross Exit")
movedToBreakeven := false
if useStopLoss and useTakeProfit and not na(longStopPrice) and not na(longTakeProfitPrice) and stopLossType != "EMA100 Cross"
strategy.exit("Exit Long", "Long", stop=longStopPrice, limit=longTakeProfitPrice, comment_profit="Exit TP", comment_loss="Exit SL")
else if useStopLoss and not useTakeProfit and not na(longStopPrice) and stopLossType != "EMA100 Cross"
strategy.exit("Exit Long", "Long", stop=longStopPrice, comment="Exit SL")
else if useTakeProfit and not useStopLoss and not na(longTakeProfitPrice)
strategy.exit("Exit Long", "Long", limit=longTakeProfitPrice, comment="Exit TP")
else if useTakeProfit and stopLossType == "EMA100 Cross" and not na(longTakeProfitPrice)
strategy.exit("Exit Long", "Long", limit=longTakeProfitPrice, comment="Exit TP")
// Exit on opposite signal
if sellSignal
strategy.close("Long", comment="Opposite Signal")
movedToBreakeven := false
// Exit Short
if strategy.position_size < 0
// EMA100 Cross exit (override other exits if selected)
if stopLossType == "EMA100 Cross" and ema100CrossUp
strategy.close("Short", comment="EMA100 Cross Exit")
movedToBreakeven := false
if useStopLoss and useTakeProfit and not na(shortStopPrice) and not na(shortTakeProfitPrice) and stopLossType != "EMA100 Cross"
strategy.exit("Exit Short", "Short", stop=shortStopPrice, limit=shortTakeProfitPrice, comment_profit="Exit TP", comment_loss="Exit SL")
else if useStopLoss and not useTakeProfit and not na(shortStopPrice) and stopLossType != "EMA100 Cross"
strategy.exit("Exit Short", "Short", stop=shortStopPrice, comment="Exit SL")
else if useTakeProfit and not useStopLoss and not na(shortTakeProfitPrice)
strategy.exit("Exit Short", "Short", limit=shortTakeProfitPrice, comment="Exit TP")
else if useTakeProfit and stopLossType == "EMA100 Cross" and not na(shortTakeProfitPrice)
strategy.exit("Exit Short", "Short", limit=shortTakeProfitPrice, comment="Exit TP")
// Exit on opposite signal
if buySignal
strategy.close("Short", comment="Opposite Signal")
movedToBreakeven := false
// Reset breakeven flag when no position
if strategy.position_size == 0
movedToBreakeven := false
// ========================================
// VISUALIZATION
// ========================================
// Plot entry signals
plotshape(buySignal and allowLong, "Buy Signal", shape.triangleup, location.belowbar, color.new(color.green, 0), size=size.small)
plotshape(sellSignal and allowShort, "Sell Signal", shape.triangledown, location.abovebar, color.new(color.red, 0), size=size.small)
// Plot Stop Loss and Take Profit levels
plot(strategy.position_size > 0 ? longStopPrice : na, "Long SL", color.red, 2, plot.style_linebr)
plot(strategy.position_size > 0 ? longTakeProfitPrice : na, "Long TP", color.green, 2, plot.style_linebr)
plot(strategy.position_size < 0 ? shortStopPrice : na, "Short SL", color.red, 2, plot.style_linebr)
plot(strategy.position_size < 0 ? shortTakeProfitPrice : na, "Short TP", color.green, 2, plot.style_linebr)
// Plot entry price
plot(strategy.position_size != 0 ? strategy.position_avg_price : na, "Entry Price", color.yellow, 1, plot.style_linebr)
// Background color for position
bgcolor(strategy.position_size > 0 ? color.new(color.green, 95) : strategy.position_size < 0 ? color.new(color.red, 95) : na, title="Position Background")