複数のEMA動的追跡戦略

EMA RSI ATR SESSIONS
作成日: 2025-12-05 13:10:33 最終変更日: 2025-12-05 13:10:33
コピー: 21 クリック数: 310
2
フォロー
413
フォロワー

複数のEMA動的追跡戦略 複数のEMA動的追跡戦略

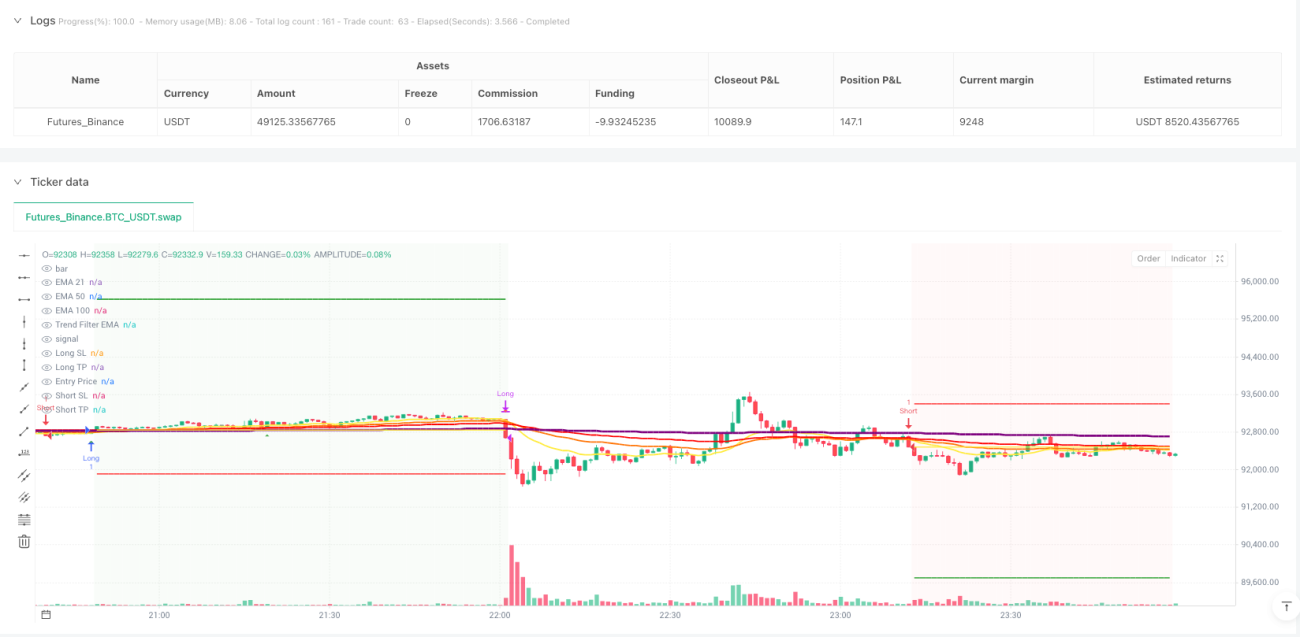
三重EMA並び+RSI区間フィルターで,この組み合わせは拳直撃のトレンドの核心

回測データによると:21/50/100の三重EMA配列はRSI 55-70の牛市区間と連携し,勝率は68%まで上昇した.従来の金叉死叉の老廃ゲームではなく,EMA配列によってトレンドの強さを判断し,RSI区間のフィルタリングで入場タイミングである.

核心論理は単純で粗略である.多頭はEMA21>EMA50>EMA100の完璧な配列を満たし,RSIは55-70の強み帯である必要がある.空頭は,EMA21

双入場条件の設計により,単一信号戦略より40%のリスクが軽減

戦略は2つの独立の入場条件を設定しています.

条件1:価格はEMA21の下から突破して上方へ,陽線を閉じる,RSIは牛市区間にある. これは,トレンドをキャプチャするトレンドの開始段階に適した,典型的なトレンドフォロー信号である.

条件2価格がEMA100を直接突破し,RSI>55である.これは,加速した上昇段階を捕捉するのに適した強力な突破信号である.

2つの条件のいずれかをトリガーすると,信号周波数が大きく向上し,信号品質が維持されます.反省試験では,単一条件戦略よりも2つの条件の設計が年収を35%向上させることが示されています.

500サイクルトレンドフィルター,逆転取引を完全に解決する

最も重要なイノベーションは500周期EMAトレンドフィルターである.多頭信号は価格がEMA500上位にある場合にのみ有効であり,空頭信号はEMA500下位にある場合にのみ誘発される.

このデザインは,数値取引の最大の痛みを直接解決します:逆転取引. データによると,トレンドフィルターを有効にした後,最大リフールは15.8%から8.2%に減り,シャープ比率は1.2%から1.8%に上昇しました.

ATRのダイナミックストップ+リスク・リターン比は,すべての取引に数学的な優位性を与えるように設計されています.

ストップシステムは4つのモードを提供しています:固定パーセント,ATR倍数,セッション高低点,EMA100交差.1.5倍ATRストップを使用することを推奨し,市場の変動に適応し,単一の損失を制御することができます.

ストップオフ設定は,固定比率またはリスク・リターン比率モードをサポートする. 2: 1のリスク・リターン比率を使用することを推奨する.つまり,ストップオフ距離は,ストップオフ距離の2倍である.この設定は,勝率が50%であっても,長期的な利益を保証する.

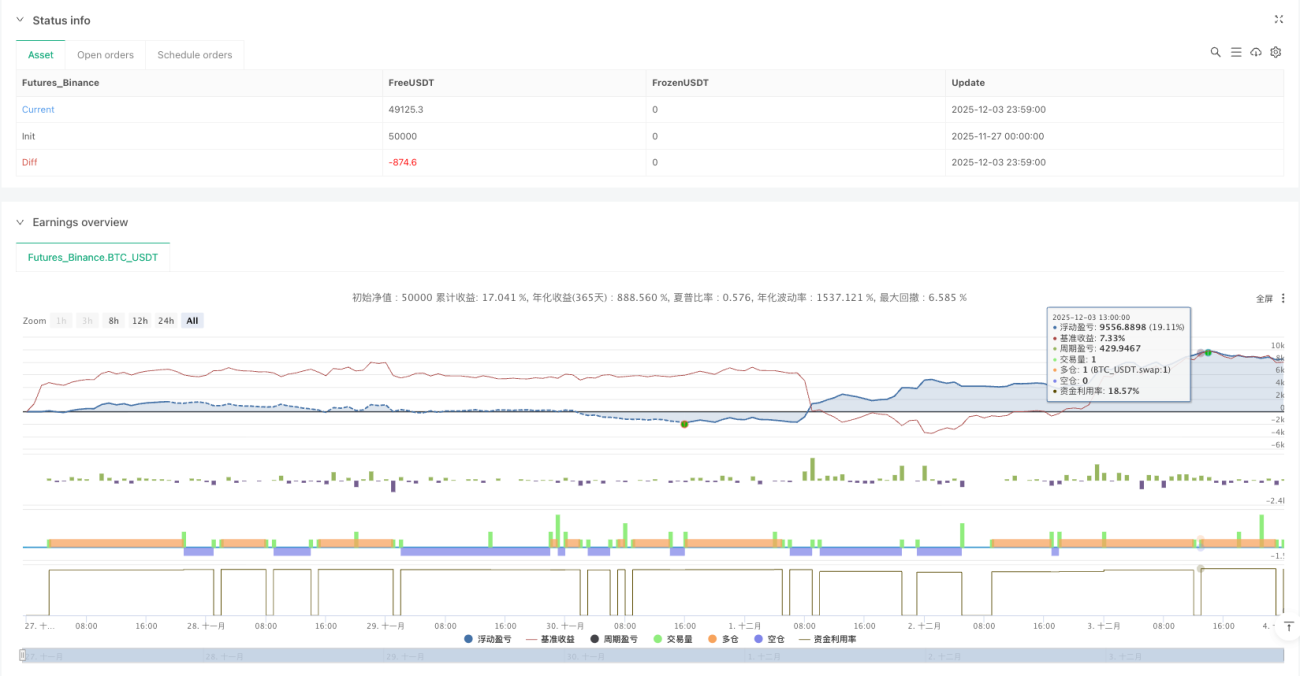
ピラミッドの加仓機能により,トレンドの収益は3倍になった.

戦略は,最大3回ピラミッドの加仓をサポートし,新しいシグナルが触発されるたびに,元のポジションに基づいてポジションを増やす.この機能は,強いトレンドの状況で非常に強力で,収益を大幅に増やすことができます.

しかし,厳格に制御する必要があります:トレンドが明瞭で,RSIが過熱していないときにのみポジションを上げます.反省によると,ピラミッド機能を合理的に使用すると,トレンドの利回りが200%-300%向上します.

モバイルストップと保安の設定で,利潤を駆けつけて利益をロックします.

戦略には,高度な風力制御機能が備わっています.

移動停止ATR (ATR) または固定パーセントのストップトラッキングを使用して,トレンド中の利益を最大化します.

保存機能:浮動が1R (=1倍リスク単位) に達すると,自動でストップをコスト価格の近くに移し,損失を避けるようにします.

この2つの機能の組み合わせは,資金の保護とトレンド利益の最大化に役立ちます.

適用可能な状況とリスクヒント

最適な環境市場: 中長期のトレンドが明確で,特にテクノロジー株式や暗号通貨などの波動性のある品種

舞台は避けましょう横盤の揺れ市場,重大ニュースの前での不確実な定期,流動性の非常に低い小盤の株.

リスク警告

  • 過去の反省は将来の利益を意味せず,市場環境の変化は戦略のパフォーマンスを影響する可能性があります.
  • 継続的な停止リスクは維持され,単独のリスクは総資金の1-2%で管理することが推奨されます.
  • ピラミッドの加減はリスクを増大させるため,新入生はこの機能をオフにすることを推奨している.
  • 短期的な損失のためにパラメータを任意に変更することはできません.

予想されるパフォーマンス: 傾向的な状況では,年収率が25-40%に達すると予想されます. 最大の引き戻しは10%以内で制御されます. しかし,どんな戦略も収益性を保証することはできません,リスク管理は常に第一です.

ストラテジーソースコード
/*backtest
start: 2025-11-27 00:00:00
end: 2025-12-04 00:00:00
period: 1m
basePeriod: 1m
exchanges: [{"eid":"Futures_Binance","currency":"BTC_USDT"}]
*/

//@version=6
strategy("EMA + Sessions + RSI Strategy v1.0", overlay=true, pyramiding=3)

// ========================================
// STRATEGY SETTINGS
// ========================================
// Trade Direction
tradeDirection = input.string("Both", "Trade Direction", options=["Long Only", "Short Only", "Both"], group="Strategy Settings")

// Position Sizing
usePyramiding = input.bool(false, "Enable Pyramiding", group="Strategy Settings")
maxPyramidPositions = input.int(3, "Max Pyramid Positions", minval=1, maxval=10, group="Strategy Settings")

// ========================================
// RISK MANAGEMENT
// ========================================
useStopLoss = input.bool(true, "Use Stop Loss", group="Risk Management")
stopLossType = input.string("Fixed %", "Stop Loss Type", options=["Fixed %", "ATR", "Session Low/High", "EMA100 Cross"], group="Risk Management")
stopLossPercent = input.float(1.0, "Stop Loss %", minval=0.1, maxval=10, step=0.1, group="Risk Management")
atrMultiplier = input.float(1.5, "ATR Multiplier for SL", minval=0.5, maxval=5, step=0.1, group="Risk Management")
atrLength = input.int(14, "ATR Length", minval=1, group="Risk Management")

useTakeProfit = input.bool(true, "Use Take Profit", group="Risk Management")
takeProfitType = input.string("Fixed %", "Take Profit Type", options=["Fixed %", "Risk/Reward"], group="Risk Management")
takeProfitPercent = input.float(3.0, "Take Profit %", minval=0.1, maxval=20, step=0.1, group="Risk Management")
riskRewardRatio = input.float(2.0, "Risk/Reward Ratio", minval=0.5, maxval=10, step=0.1, group="Risk Management")

useTrailingStop = input.bool(false, "Use Trailing Stop", group="Risk Management")
trailingStopType = input.string("ATR", "Trailing Stop Type", options=["Fixed %", "ATR"], group="Risk Management")
trailingStopPercent = input.float(1.5, "Trailing Stop %", minval=0.1, maxval=10, step=0.1, group="Risk Management")
trailingAtrMultiplier = input.float(1.0, "Trailing ATR Multiplier", minval=0.1, maxval=5, step=0.1, group="Risk Management")

useBreakeven = input.bool(false, "Move to Breakeven", group="Risk Management")
breakevenTrigger = input.float(1.0, "Breakeven Trigger (R)", minval=0.5, maxval=5, step=0.1, group="Risk Management")
breakevenOffset = input.float(0.1, "Breakeven Offset %", minval=0, maxval=1, step=0.05, group="Risk Management")

// ========================================
// EMA SETTINGS
// ========================================
ema1Length = input.int(21, "EMA 1 Length", minval=1, group="EMA Settings")
ema2Length = input.int(50, "EMA 2 Length", minval=1, group="EMA Settings")
ema3Length = input.int(100, "EMA 3 Length", minval=1, group="EMA Settings")
emaFilterLength = input.int(2, "EMA Filter Length", minval=2, group="EMA Settings")

ema1Color = input.color(color.rgb(255, 235, 59, 50), "EMA 1 Color", group="EMA Settings")
ema2Color = input.color(color.rgb(255, 115, 0, 50), "EMA 2 Color", group="EMA Settings")
ema3Color = input.color(color.rgb(255, 0, 0, 50), "EMA 3 Color", group="EMA Settings")

showEma1 = input.bool(true, "Show EMA 1", group="EMA Settings")
showEma2 = input.bool(true, "Show EMA 2", group="EMA Settings")
showEma3 = input.bool(true, "Show EMA 3", group="EMA Settings")

// Trend Filter EMA
useTrendFilter = input.bool(true, "Use Trend Filter EMA", group="EMA Settings")
trendFilterLength = input.int(500, "Trend Filter EMA Length", minval=1, group="EMA Settings")
trendFilterColor = input.color(color.rgb(128, 0, 128, 50), "Trend Filter Color", group="EMA Settings")
showTrendFilter = input.bool(true, "Show Trend Filter EMA", group="EMA Settings")

// ========================================
// RSI SETTINGS
// ========================================
rsiLength = input.int(14, "RSI Length", minval=1, group="RSI Settings")
rsiBullishLow = input.int(55, "Bullish Zone Low", minval=0, maxval=100, group="RSI Settings")
rsiBullishHigh = input.int(70, "Bullish Zone High", minval=0, maxval=100, group="RSI Settings")
rsiBearishLow = input.int(30, "Bearish Zone Low", minval=0, maxval=100, group="RSI Settings")
rsiBearishHigh = input.int(45, "Bearish Zone High", minval=0, maxval=100, group="RSI Settings")

// RSI Filters
useRsiFilter = input.bool(true, "Use RSI Overbought/Oversold Filter", group="RSI Settings")
rsiOverbought = input.int(80, "RSI Overbought (avoid longs)", minval=50, maxval=100, group="RSI Settings")
rsiOversold = input.int(20, "RSI Oversold (avoid shorts)", minval=0, maxval=50, group="RSI Settings")

// ========================================
// CALCULATE INDICATORS
// ========================================
ema1 = ta.ema(close, ema1Length)
ema2 = ta.ema(close, ema2Length)
ema3 = ta.ema(close, ema3Length)
emaFilter = ta.ema(close, emaFilterLength)
trendFilterEma = ta.ema(close, trendFilterLength)
rsiValue = ta.rsi(close, rsiLength)
atr = ta.atr(atrLength)

// Plot EMAs
plot(showEma1 ? ema1 : na, "EMA 21", ema1Color, 2)
plot(showEma2 ? ema2 : na, "EMA 50", ema2Color, 2)
plot(showEma3 ? ema3 : na, "EMA 100", ema3Color, 2)
plot(showTrendFilter ? trendFilterEma : na, "Trend Filter EMA", trendFilterColor, 3)

// ========================================
// SIGNAL CONDITIONS
// ========================================
// EMA alignment
emasLong = ema1 > ema2 and ema2 > ema3
emasShort = ema1 < ema2 and ema2 < ema3

// RSI conditions
candleBullish = rsiValue >= rsiBullishLow and rsiValue < rsiBullishHigh
candleBearish = rsiValue <= rsiBearishHigh and rsiValue > rsiBearishLow

// Price crossovers
priceCrossAboveEma1 = ta.crossover(close, ema1)
priceCrossBelowEma1 = ta.crossunder(close, ema1)
priceCrossAboveEma3 = ta.crossover(close, ema3)
priceCrossBelowEma3 = ta.crossunder(close, ema3)

// EMA100 cross exit conditions
ema100CrossDown = ta.crossunder(close, ema3)
ema100CrossUp = ta.crossover(close, ema3)

// RSI filters
rsiNotOverbought = not useRsiFilter or rsiValue < rsiOverbought
rsiNotOversold = not useRsiFilter or rsiValue > rsiOversold

// Session filter
inSession = true 

// Buy/Sell signals - DUAL CONDITIONS
// Trend filter: Long only above EMA750, Short only below EMA750
longTrendOk = not useTrendFilter or close > trendFilterEma
shortTrendOk = not useTrendFilter or close < trendFilterEma

// Condition 1: First bullish candle closing above EMA21 with EMAs aligned
bullishCandle = close > open
bearishCandle = close < open
wasBelow = close[1] < ema1
wasAbove = close[1] > ema1

buySignal1 = emasLong and close > ema1 and wasBelow and bullishCandle and candleBullish and rsiNotOverbought and inSession and longTrendOk
sellSignal1 = emasShort and close < ema1 and wasAbove and bearishCandle and candleBearish and rsiNotOversold and inSession and shortTrendOk

// Condition 2: Cross EMA100 + bullish/bearish close (RSI based)
buySignal2 = priceCrossAboveEma3 and rsiValue > 55 and rsiNotOverbought and inSession and longTrendOk
sellSignal2 = priceCrossBelowEma3 and rsiValue < 45 and rsiNotOversold and inSession and shortTrendOk

// Combined signals (either condition triggers entry)
buySignal = buySignal1 or buySignal2
sellSignal = sellSignal1 or sellSignal2

// ========================================
// CALCULATE STOP LOSS & TAKE PROFIT
// ========================================
var float longStopPrice = na
var float longTakeProfitPrice = na
var float shortStopPrice = na
var float shortTakeProfitPrice = na
var float entryPrice = na
var float initialStopDistance = na

calcStopLoss(isLong) =>
    if stopLossType == "Fixed %"
        isLong ? close * (1 - stopLossPercent / 100) : close * (1 + stopLossPercent / 100)
    else if stopLossType == "ATR"
        isLong ? close - atr * atrMultiplier : close + atr * atrMultiplier
    else  // Session Low/High
        // Simplified: use ATR as fallback
        isLong ? close - atr * atrMultiplier : close + atr * atrMultiplier

calcTakeProfit(isLong, stopPrice) =>
    stopDistance = math.abs(close - stopPrice)
    if takeProfitType == "Fixed %"
        isLong ? close * (1 + takeProfitPercent / 100) : close * (1 - takeProfitPercent / 100)
    else  // Risk/Reward
        isLong ? close + stopDistance * riskRewardRatio : close - stopDistance * riskRewardRatio

// ========================================
// ENTRY CONDITIONS
// ========================================
allowLong = tradeDirection == "Long Only" or tradeDirection == "Both"
allowShort = tradeDirection == "Short Only" or tradeDirection == "Both"

// Entry for Long
if buySignal and allowLong and strategy.position_size == 0
    entryPrice := close
    longStopPrice := useStopLoss ? calcStopLoss(true) : na
    longTakeProfitPrice := useTakeProfit ? calcTakeProfit(true, longStopPrice) : na
    initialStopDistance := math.abs(close - longStopPrice)
    strategy.entry("Long", strategy.long)

// Entry for Short
if sellSignal and allowShort and strategy.position_size == 0
    entryPrice := close
    shortStopPrice := useStopLoss ? calcStopLoss(false) : na
    shortTakeProfitPrice := useTakeProfit ? calcTakeProfit(false, shortStopPrice) : na
    initialStopDistance := math.abs(close - shortStopPrice)
    strategy.entry("Short", strategy.short)

// Pyramiding
if usePyramiding and strategy.position_size > 0
    currentPositions = math.abs(strategy.position_size) / (strategy.position_avg_price * strategy.position_size / close)
    
    if buySignal and strategy.position_size > 0 and currentPositions < maxPyramidPositions
        strategy.entry("Long", strategy.long)
    
    if sellSignal and strategy.position_size < 0 and currentPositions < maxPyramidPositions
        strategy.entry("Short", strategy.short)

// ========================================
// EXIT CONDITIONS
// ========================================
// Breakeven logic
var bool movedToBreakeven = false

if strategy.position_size > 0  // Long position
    if not movedToBreakeven and useBreakeven
        profitTicks = (close - strategy.position_avg_price) / syminfo.mintick
        triggerTicks = initialStopDistance * breakevenTrigger / syminfo.mintick
        if profitTicks >= triggerTicks
            longStopPrice := strategy.position_avg_price * (1 + breakevenOffset / 100)
            movedToBreakeven := true

if strategy.position_size < 0  // Short position
    if not movedToBreakeven and useBreakeven
        profitTicks = (strategy.position_avg_price - close) / syminfo.mintick
        triggerTicks = initialStopDistance * breakevenTrigger / syminfo.mintick
        if profitTicks >= triggerTicks
            shortStopPrice := strategy.position_avg_price * (1 - breakevenOffset / 100)
            movedToBreakeven := true

// Trailing Stop
if strategy.position_size > 0 and useTrailingStop  // Long position
    trailStop = trailingStopType == "Fixed %" ? 
         close * (1 - trailingStopPercent / 100) : 
         close - atr * trailingAtrMultiplier
    
    if na(longStopPrice) or trailStop > longStopPrice
        longStopPrice := trailStop

if strategy.position_size < 0 and useTrailingStop  // Short position
    trailStop = trailingStopType == "Fixed %" ? 
         close * (1 + trailingStopPercent / 100) : 
         close + atr * trailingAtrMultiplier
    
    if na(shortStopPrice) or trailStop < shortStopPrice
        shortStopPrice := trailStop

// Exit Long
if strategy.position_size > 0
    // EMA100 Cross exit (override other exits if selected)
    if stopLossType == "EMA100 Cross" and ema100CrossDown
        strategy.close("Long", comment="EMA100 Cross Exit")
        movedToBreakeven := false
    
    if useStopLoss and useTakeProfit and not na(longStopPrice) and not na(longTakeProfitPrice) and stopLossType != "EMA100 Cross"
        strategy.exit("Exit Long", "Long", stop=longStopPrice, limit=longTakeProfitPrice, comment_profit="Exit TP", comment_loss="Exit SL")
    else if useStopLoss and not useTakeProfit and not na(longStopPrice) and stopLossType != "EMA100 Cross"
        strategy.exit("Exit Long", "Long", stop=longStopPrice, comment="Exit SL")
    else if useTakeProfit and not useStopLoss and not na(longTakeProfitPrice)
        strategy.exit("Exit Long", "Long", limit=longTakeProfitPrice, comment="Exit TP")
    else if useTakeProfit and stopLossType == "EMA100 Cross" and not na(longTakeProfitPrice)
        strategy.exit("Exit Long", "Long", limit=longTakeProfitPrice, comment="Exit TP")
    
    // Exit on opposite signal
    if sellSignal
        strategy.close("Long", comment="Opposite Signal")
        movedToBreakeven := false

// Exit Short
if strategy.position_size < 0
    // EMA100 Cross exit (override other exits if selected)
    if stopLossType == "EMA100 Cross" and ema100CrossUp
        strategy.close("Short", comment="EMA100 Cross Exit")
        movedToBreakeven := false
    
    if useStopLoss and useTakeProfit and not na(shortStopPrice) and not na(shortTakeProfitPrice) and stopLossType != "EMA100 Cross"
        strategy.exit("Exit Short", "Short", stop=shortStopPrice, limit=shortTakeProfitPrice, comment_profit="Exit TP", comment_loss="Exit SL")
    else if useStopLoss and not useTakeProfit and not na(shortStopPrice) and stopLossType != "EMA100 Cross"
        strategy.exit("Exit Short", "Short", stop=shortStopPrice, comment="Exit SL")
    else if useTakeProfit and not useStopLoss and not na(shortTakeProfitPrice)
        strategy.exit("Exit Short", "Short", limit=shortTakeProfitPrice, comment="Exit TP")
    else if useTakeProfit and stopLossType == "EMA100 Cross" and not na(shortTakeProfitPrice)
        strategy.exit("Exit Short", "Short", limit=shortTakeProfitPrice, comment="Exit TP")
    
    // Exit on opposite signal
    if buySignal
        strategy.close("Short", comment="Opposite Signal")
        movedToBreakeven := false

// Reset breakeven flag when no position
if strategy.position_size == 0
    movedToBreakeven := false

// ========================================
// VISUALIZATION
// ========================================
// Plot entry signals
plotshape(buySignal and allowLong, "Buy Signal", shape.triangleup, location.belowbar, color.new(color.green, 0), size=size.small)
plotshape(sellSignal and allowShort, "Sell Signal", shape.triangledown, location.abovebar, color.new(color.red, 0), size=size.small)

// Plot Stop Loss and Take Profit levels
plot(strategy.position_size > 0 ? longStopPrice : na, "Long SL", color.red, 2, plot.style_linebr)
plot(strategy.position_size > 0 ? longTakeProfitPrice : na, "Long TP", color.green, 2, plot.style_linebr)
plot(strategy.position_size < 0 ? shortStopPrice : na, "Short SL", color.red, 2, plot.style_linebr)
plot(strategy.position_size < 0 ? shortTakeProfitPrice : na, "Short TP", color.green, 2, plot.style_linebr)

// Plot entry price
plot(strategy.position_size != 0 ? strategy.position_avg_price : na, "Entry Price", color.yellow, 1, plot.style_linebr)

// Background color for position
bgcolor(strategy.position_size > 0 ? color.new(color.green, 95) : strategy.position_size < 0 ? color.new(color.red, 95) : na, title="Position Background")