デュアルパストレンドキャッチャー

EMA MACD VOLUME PINBAR RESISTANCE
作成日: 2025-12-17 15:38:19 最終変更日: 2026-02-10 17:52:23
コピー: 16 クリック数: 360
2
フォロー
421
フォロワー

デュアルパストレンドキャッチャー デュアルパストレンドキャッチャー

これは普通のEMA戦略ではなく,双方向の精密狙撃システムです.

単一のEMAゴールドフォークは不要です. このMNO二段階戦略は,トレンド取引を2つの全く異なるルートに分割します.MOU突破ルートとKAKUリコールルートです.

核心的な論理は単純です: 5/13/26 三重EMAゴールド配列はトレンドの方向性を確認し,市場状況に応じて異なる入場時間を選択します. すべての突破は追及に値するものではなく,すべての反発はコピーされるものではありません.

MOU突破路:大成交量協調 MACDゼロ軸近くの金叉

MOU経路は2つの状況に分かれます.第一は,クラシックな抵抗突破の後,再調整の入場であり,再調整幅が5%~15%の間で要求され,突破の無力を示すには浅すぎ,偽突破を示すには深すぎます.第二は,直接突破の入場ですが,条件はより厳しいです.

突破確認には,閉盤価格が前期抵抗値の0.3%以上で,K線実体が過去20サイクル平均実体より20%以上大きいことが必要である.この設計は,偽突破信号の90%をフィルタリングする.

成交量倍数設定は1.3倍から3.0倍の間である。1.3倍以下は突破力の欠如を示し,3.0倍以上は往々にしてニュース面の刺激であり,その後の疲労の可能性が高い。

KAKU リコールパス:8つの基本条件+3つの最終確認

KAKUは厳格なバージョンで,候補者プールに入るために8つの基本条件を満たす必要があります.それから,3つの最終的な確認を通す必要があります:針脚K線形状,MACDはゼロ軸上方金叉,強い成交量 ((1.5倍以上) 〜).

このデザインの理念は明確である:最も強いトレンドの中で最も安全な回調の買い点を探すのみである.歴史的な回顧は,KAKU信号の勝利率が75%以上であることを示しているが,MOUよりも60%低い頻度で発生している.

針足K線の判定基準は下影線長≥実体2倍であり,閉盘価格≥開盘価格である.この形は,強烈な回調で成功率が最も高い。

風力制御設計:2%止1%止損,最大保有30サイクル

ストップ・ストップ・ロスの比率2:1は保守的に見えますが,30サイクルを伴う強制平仓は,実際には時間コストをコントロールしています.データによると,30サイクル以上を保有したポジションは,最終的に利益を得ている場合でも,年収率は著しく低下しています.

この戦略の最大のリスクは,波動市場である.価格がEMA26の近くで繰り返し波動すると,大量に偽信号が生じます.財務報告シーズンと重大イベントの前後を避けて,明確なトレンド市場で使用することをお勧めします.

パラメータ調整の推奨:指標の変動率に応じて取引量倍数調整

高波動率の標識 (成長株など) に対して,取引量倍数を1.2-2.5倍に下げるのが推奨されている.低波動率の標識 (大盤ブループランなど) に対して,1.5-3.5倍に上げる.

MACDゼロ軸の値0.2は日線レベルに最適化されており,4時間または1時間レベルを使用する場合,0.1または0.05に調整することが推奨されている.

調節幅5%-15%は,標識の特性に合わせて調整することも必要である.高いベータ標識は3%-20%まで緩められ,低いベータ標識は4%-12%まで緊縮される.

戦闘用:KAKU信号を優先し,MOUを補足する

KAKUとMOUの信号が同時に出た場合,KAKUを優先する.最高品質の信号のみを望む場合は”,KAKUのみモード”に設定し,信号の数が減るが品質が高くなることを期待する.

この戦略は頻繁なトレーダーには適しません.平均すると,毎月2〜3つの高品質の信号しかありません. しかし,各信号のリスク調整後のリターンは,市場平均よりも明らかに優れています.

覚えておいてください: 過去の反転は将来の利益を意味するものではなく,いかなる戦略にも連続的な損失の可能性があります. 厳格にストップを執行し,単一のポジションを総資金の10%を超えないように管理してください.

ストラテジーソースコード
/*backtest
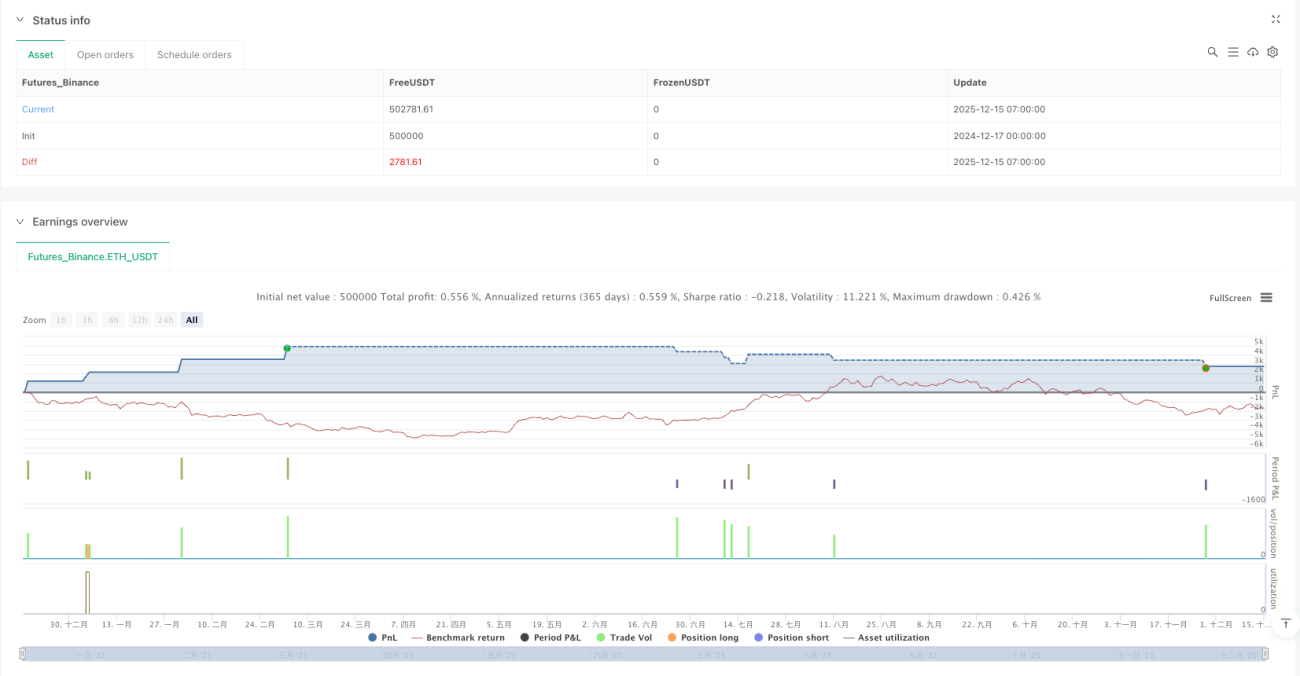
start: 2024-12-17 00:00:00
end: 2025-12-15 08:00:00
period: 1h
basePeriod: 1h
exchanges: [{"eid":"Futures_Binance","currency":"ETH_USDT","balance":500000}]
*/

//@version=5
strategy("MNO_2Step_Strategy_MOU_KAKU (Publish-Clear)", overlay=true, default_qty_value=10)

// =========================
// Inputs
// =========================
emaSLen      = input.int(5,  "EMA Short (5)")
emaMLen      = input.int(13, "EMA Mid (13)")
emaLLen      = input.int(26, "EMA Long (26)")

macdFast     = input.int(12, "MACD Fast")
macdSlow     = input.int(26, "MACD Slow")
macdSignal   = input.int(9,  "MACD Signal")
macdZeroTh   = input.float(0.2, "MOU: MACD near-zero threshold", step=0.05)

volLookback  = input.int(5,  "Volume MA days", minval=1)
volMinRatio  = input.float(1.3, "MOU: Volume ratio min", step=0.1)
volStrong    = input.float(1.5, "Strong volume ratio (Breakout/KAKU)", step=0.1)
volMaxRatio  = input.float(3.0, "Volume ratio max (filter)", step=0.1)

wickBodyMult = input.float(2.0, "Pinbar: lowerWick >= body*x", step=0.1)

pivotLen     = input.int(20, "Resistance lookback", minval=5)
pullMinPct   = input.float(5.0,  "Pullback min (%)", step=0.1)
pullMaxPct   = input.float(15.0, "Pullback max (%)", step=0.1)
breakLookbackBars = input.int(5, "Pullback route: valid bars after break", minval=1)

// --- Breakout route 
useBreakoutRoute     = input.bool(true, "Enable MOU Breakout Route (no pullback)")
breakConfirmPct      = input.float(0.3, "Break confirm: close > R*(1+%)", step=0.1)
bigBodyLookback      = input.int(20, "Break candle body MA length", minval=5)
bigBodyMult          = input.float(1.2, "Break candle: body >= MA*mult", step=0.1)
requireCloseNearHigh = input.bool(true, "Break candle: close near high")
closeNearHighPct     = input.float(25.0, "Close near high threshold (% of range)", step=1.0)
allowMACDAboveZeroInstead = input.bool(true, "Breakout route: allow MACD GC above zero instead")


showEMA        = input.bool(true,  "Plot EMAs")
showMouLabels  = input.bool(true,  "Show MOU/MOU-B labels")
showKakuLabels = input.bool(true,  "Show KAKU labels")
showDebugTbl   = input.bool(true,  "Show debug table (last bar)")
showStatusLbl  = input.bool(true,  "Show status label (last bar always)")

locChoice = input.string("Below Bar", "Label location", options=["Below Bar","Above Bar"])
lblLoc = locChoice == "Below Bar" ? location.belowbar : location.abovebar

// =========================

// =========================
enableTPSL   = input.bool(true, "Enable TP/SL")
tpPct        = input.float(2.0, "Take Profit (%)", step=0.1, minval=0.1) // ←投稿クリア向けに近め
slPct        = input.float(1.0, "Stop Loss (%)",  step=0.1, minval=0.1) // ←投稿クリア向けに近め
maxHoldBars  = input.int(30, "Max bars in trade (force close)", minval=1)

entryMode = input.string("MOU or KAKU", "Entry trigger", options=["KAKU only","MOU or KAKU"])


publishAssist = input.bool(true, "Publish Assist (safety entry if 0 trades)")

// =========================
// EMA
// =========================
emaS = ta.ema(close, emaSLen)
emaM = ta.ema(close, emaMLen)
emaL = ta.ema(close, emaLLen)

plot(showEMA ? emaS : na, color=color.new(color.yellow, 0), title="EMA 5")
plot(showEMA ? emaM : na, color=color.new(color.blue,   0), title="EMA 13")
plot(showEMA ? emaL : na, color=color.new(color.orange, 0), title="EMA 26")

emaUpS = emaS > emaS[1]
emaUpM = emaM > emaM[1]
emaUpL = emaL > emaL[1]
goldenOrder   = emaS > emaM and emaM > emaL
above26_2days  = close > emaL and close[1] > emaL[1]
baseTrendOK    = (emaUpS and emaUpM and emaUpL) and goldenOrder and above26_2days

// =========================
// MACD
// =========================
[macdLine, macdSig, macdHist] = ta.macd(close, macdFast, macdSlow, macdSignal)

macdGC          = ta.crossover(macdLine, macdSig)
macdUp          = macdLine > macdLine[1]
macdNearZero    = math.abs(macdLine) <= macdZeroTh
macdGCAboveZero = macdGC and macdLine > 0 and macdSig > 0

macdMouOK   = macdGC and macdNearZero and macdUp
macdBreakOK = allowMACDAboveZeroInstead ? (macdMouOK or macdGCAboveZero) : macdMouOK

// =========================
// Volume
// =========================
volMA    = ta.sma(volume, volLookback)
volRatio = volMA > 0 ? (volume / volMA) : na

volumeMouOK    = volRatio >= volMinRatio and volRatio <= volMaxRatio
volumeStrongOK = volRatio >= volStrong   and volRatio <= volMaxRatio

// =========================
// Candle patterns
// =========================
body      = math.abs(close - open)
upperWick = high - math.max(open, close)
lowerWick = math.min(open, close) - low

pinbar = (lowerWick >= wickBodyMult * body) and (lowerWick > upperWick) and (close >= open)
bullEngulf = close > open and close[1] < open[1] and close >= open[1] and open <= close[1]
bigBull = close > open and open < emaM and close > emaS and (body > ta.sma(body, 20))
candleOK = pinbar or bullEngulf or bigBull

// =========================
// Resistance / Pullback route
// =========================
res = ta.highest(high, pivotLen)

pullbackPct = res > 0 ? (res - close) / res * 100.0 : na
pullbackOK  = pullbackPct >= pullMinPct and pullbackPct <= pullMaxPct

brokeRes       = ta.crossover(close, res[1])
barsSinceBreak = ta.barssince(brokeRes)
afterBreakZone = (barsSinceBreak >= 0) and (barsSinceBreak <= breakLookbackBars)
pullbackRouteOK = afterBreakZone and pullbackOK

// =========================
// Breakout route 
// =========================
breakConfirm = close > res[1] * (1.0 + breakConfirmPct / 100.0)
bullBreak    = close > open
bodyMA    = ta.sma(body, bigBodyLookback)
bigBodyOK = bodyMA > 0 ? (body >= bodyMA * bigBodyMult) : false
rng = math.max(high - low, syminfo.mintick)
closeNearHighOK = not requireCloseNearHigh ? true : ((high - close) / rng * 100.0 <= closeNearHighPct)

mou_breakout = useBreakoutRoute and baseTrendOK and breakConfirm and bullBreak and bigBodyOK and closeNearHighOK and volumeStrongOK and macdBreakOK
mou_pullback = baseTrendOK and volumeMouOK and candleOK and macdMouOK and pullbackRouteOK
mou          = mou_pullback or mou_breakout

// =========================
// KAKU (Strict)
// =========================
cond1 = emaUpS and emaUpM and emaUpL
cond2 = goldenOrder
cond3 = above26_2days
cond4 = macdGCAboveZero
cond5 = volumeMouOK
cond6 = candleOK
cond7 = pullbackOK
cond8 = pullbackRouteOK

all8_strict = cond1 and cond2 and cond3 and cond4 and cond5 and cond6 and cond7 and cond8
final3      = pinbar and macdGCAboveZero and volumeStrongOK
kaku        = all8_strict and final3

// =========================
// Entry (strategy)
// =========================
entrySignal = entryMode == "KAKU only" ? kaku : (mou or kaku)
canEnter    = strategy.position_size == 0

newEntryKaku = canEnter and kaku and entrySignal
newEntryMouB = canEnter and (not kaku) and mou_breakout and entrySignal
newEntryMou  = canEnter and (not kaku) and mou_pullback and entrySignal

// --- Publish Assist
assistFast = ta.ema(close, 5)
assistSlow = ta.ema(close, 20)
assistEntry = publishAssist and strategy.closedtrades == 0 and canEnter and ta.crossover(assistFast, assistSlow)


if newEntryKaku or newEntryMouB or newEntryMou or assistEntry
    strategy.entry("LONG", strategy.long)

inPos = strategy.position_size > 0
tpPx  = inPos ? strategy.position_avg_price * (1.0 + tpPct/100.0) : na
slPx  = inPos ? strategy.position_avg_price * (1.0 - slPct/100.0) : na

if enableTPSL
    strategy.exit("TP/SL", from_entry="LONG", limit=tpPx, stop=slPx)

var int entryBar = na
if strategy.position_size > 0 and strategy.position_size[1] == 0
    entryBar := bar_index
if strategy.position_size == 0
    entryBar := na

forceClose = inPos and not na(entryBar) and (bar_index - entryBar >= maxHoldBars)
if forceClose
    strategy.close("LONG")

closedThisBar = (strategy.position_size[1] > 0) and (strategy.position_size == 0)

avgPrev = strategy.position_avg_price[1]
tpPrev  = avgPrev * (1.0 + tpPct/100.0)
slPrev  = avgPrev * (1.0 - slPct/100.0)

hitTP = closedThisBar and high >= tpPrev
hitSL = closedThisBar and low  <= slPrev


// =========================
// Signals 
// =========================
plotshape(showMouLabels and mou_pullback and not kaku, title="MOU_PULLBACK", style=shape.labelup, text="猛",
     color=color.new(color.lime, 0), textcolor=color.black, location=lblLoc, size=size.tiny)

plotshape(showMouLabels and mou_breakout and not kaku, title="MOU_BREAKOUT", style=shape.labelup, text="猛B",
     color=color.new(color.lime, 0), textcolor=color.black, location=lblLoc, size=size.tiny)

plotshape(showKakuLabels and kaku, title="KAKU", style=shape.labelup, text="確",
     color=color.new(color.yellow, 0), textcolor=color.black, location=lblLoc, size=size.small)

// =========================
// Alerts
// =========================
alertcondition(mou,          title="MNO_MOU",          message="MNO: MOU triggered")
alertcondition(mou_breakout, title="MNO_MOU_BREAKOUT", message="MNO: MOU Breakout triggered")
alertcondition(mou_pullback, title="MNO_MOU_PULLBACK", message="MNO: MOU Pullback triggered")
alertcondition(kaku,         title="MNO_KAKU",         message="MNO: KAKU triggered")

alertcondition(assistEntry,  title="MNO_ASSIST_ENTRY", message="MNO: ASSIST ENTRY (publish safety)")