개요
이 전략은 지수 이동 평균 (EMA) 과 상대적으로 약한 지수 (RSI) 의 교차를 결합한 자동화 된 거래 시스템입니다. 그것은 EMA의 빠른 선과 느린 선의 교차를 통해 트렌드 방향을 식별하고, RSI를 트렌드 확인 지표로 사용하며, 완전한 자금 관리 및 위험 제어 장치를 포함합니다. 시스템은 고정된 위험과 수익 목표를 사용하여 각 거래를 관리하며, 포지션 규모를 동적으로 계산하여 위험 일관성을 보장합니다.
전략 원칙
전략의 핵심 논리는 다음과 같은 핵심 요소에 기초합니다.
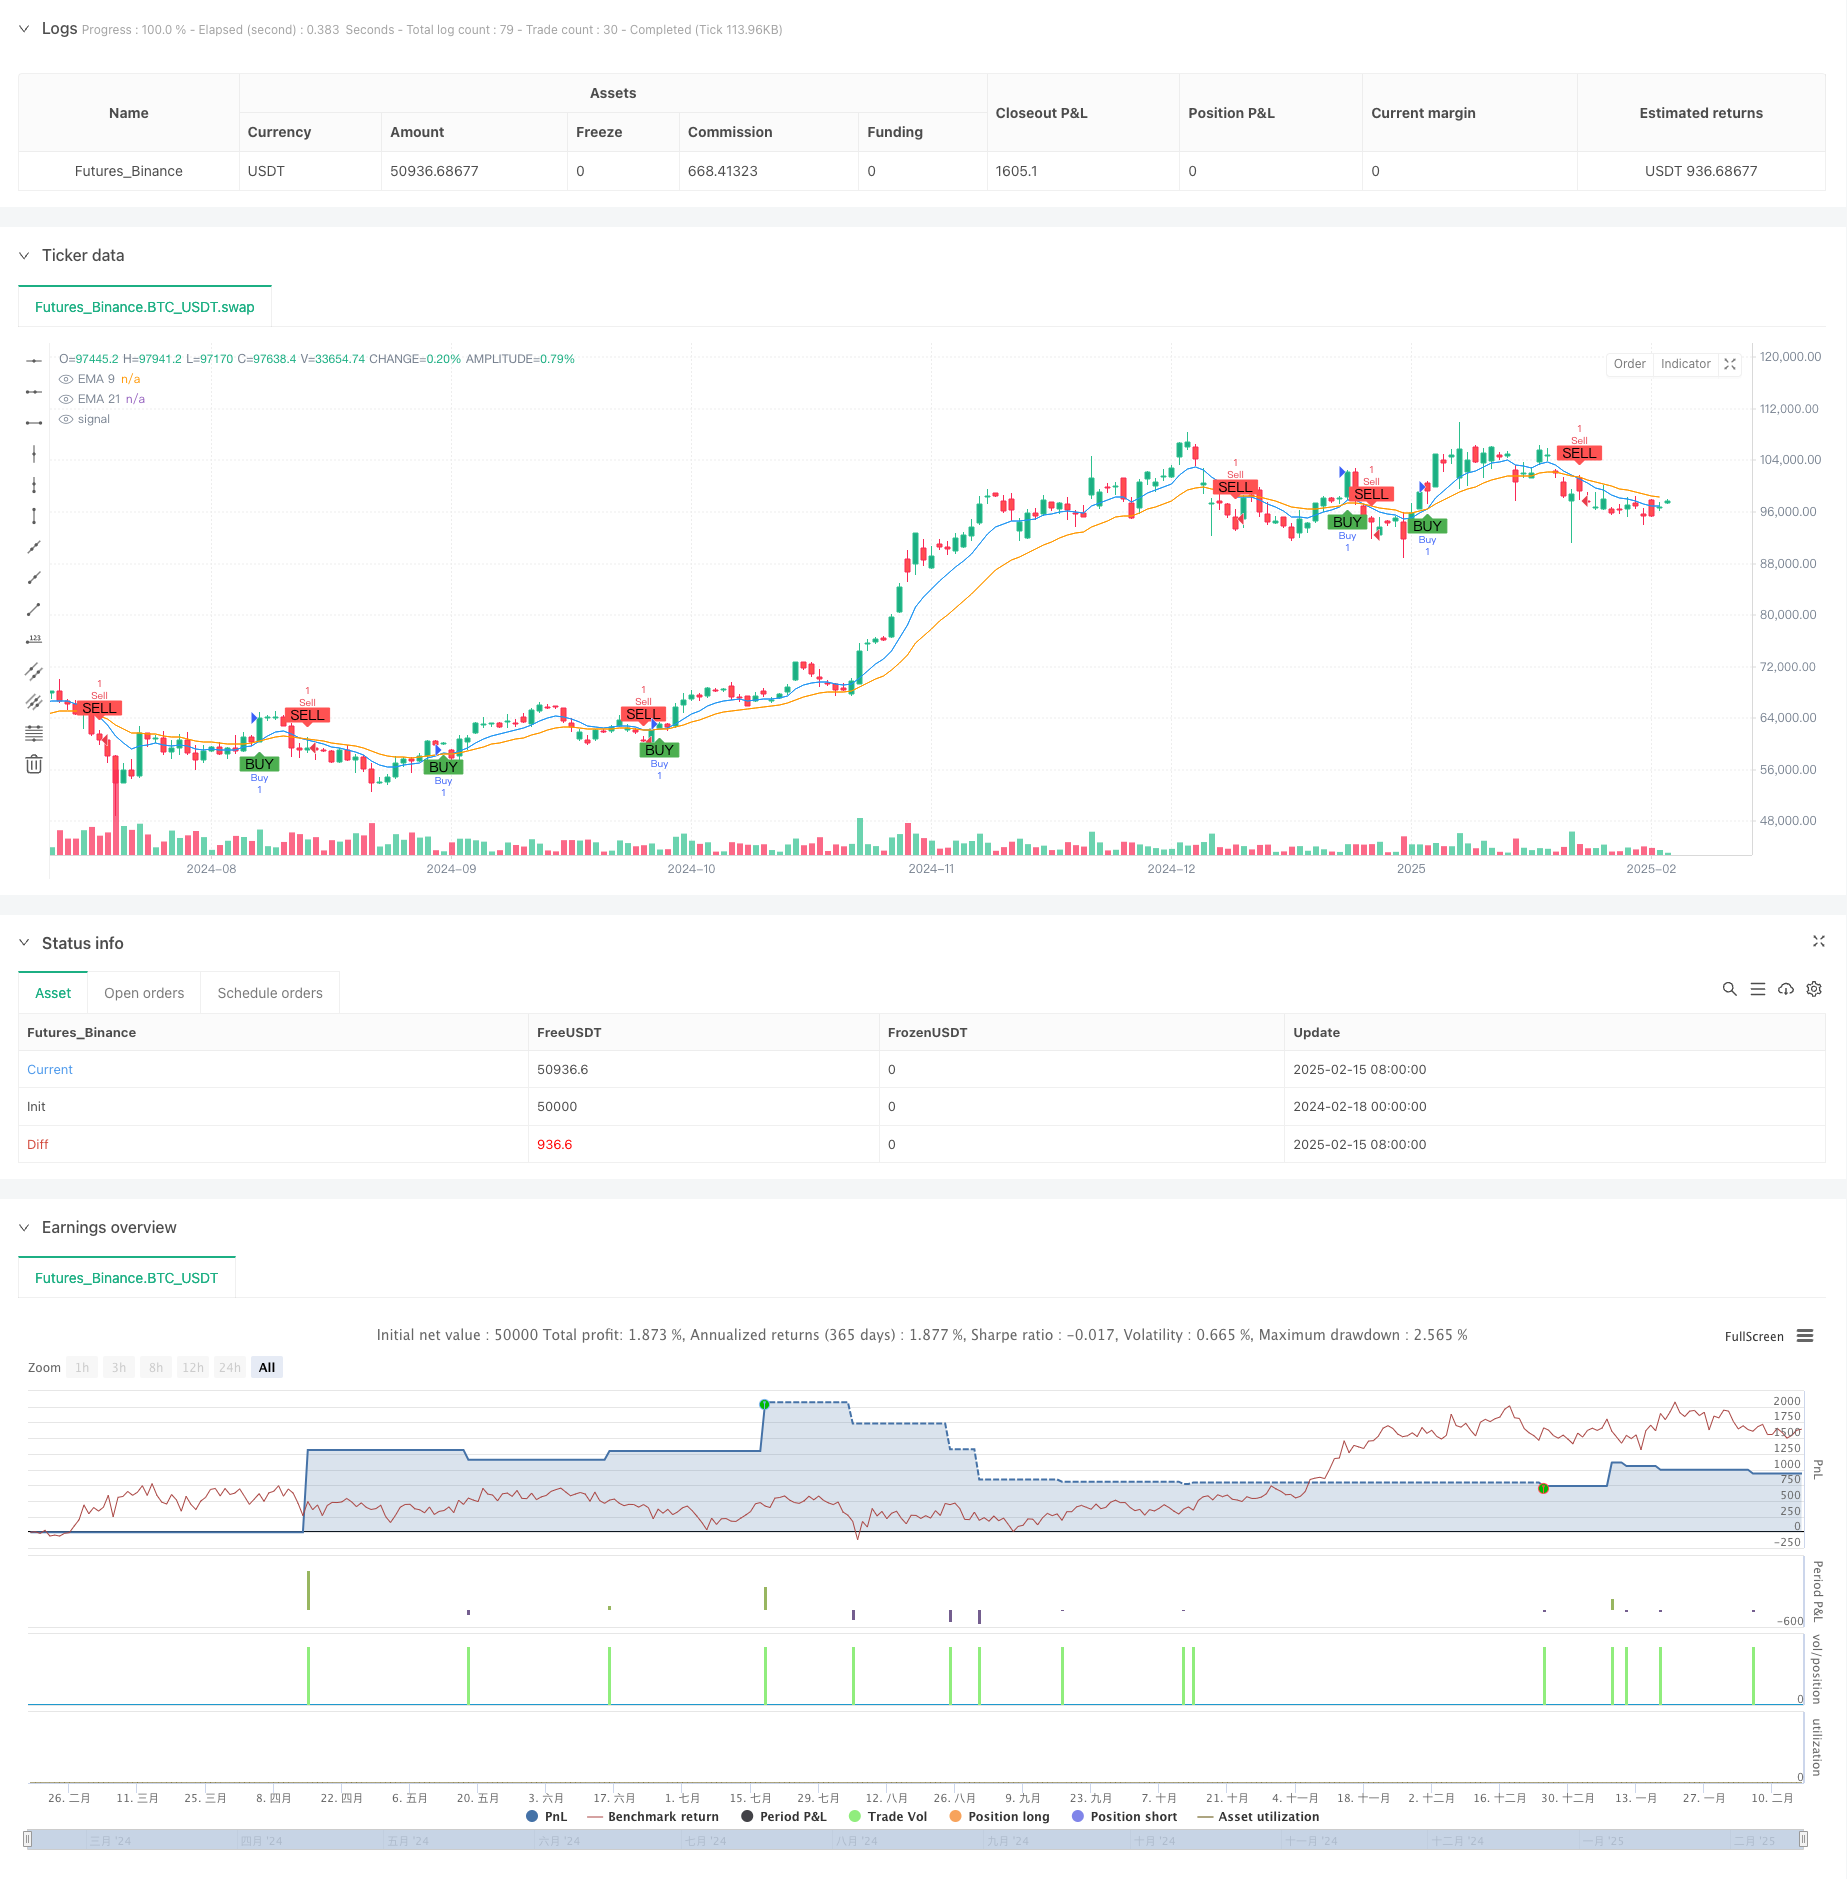
- 9주기 및 21주기 EMA를 사용하여 트렌드 전환점을 식별합니다. 빠른 라인에서 느린 라인을 뚫는 것은 상승 트렌드의 시작을 나타냅니다. 낮은 것은 하락 트렌드의 시작을 나타냅니다.
- RSI 지표는 트렌드 확인 도구로, 구매 신호가 발생했을 때 RSI> 50을 요구하고, 판매 신호가 발생했을 때 RSI< 50을 요구합니다.
- 리스크 관리 시스템은 거래당 최대 손실액을 1,000, 목표 수익률을 5,000로 설정하고 포지션 규모를 조정하여 고정된 리스크 수익률을 달성합니다.
- 시스템은 고정 점수 (~ 25 점) 의 중지 손실 설정을 채택하고, 위험 금액의 동성에 따라 포지션 개수를 계산합니다.
- 거래 실패 탐지 메커니즘은 손실을 막는 거래를 적시에 발견하고 실패 지점을 차트에 표시합니다.
전략적 이점
- 트렌드 추적과 동력 확인을 결합한 이중 검증 메커니즘으로 거래 신호의 신뢰도를 높여줍니다.
- 모든 거래에 대한 위험이 고정되어 있으며, 과도한 손실을 방지합니다.
- 명확한 리스크/이익 비율 설정 (~1: 5) 이 장기적인 수익에 도움이 됩니다.
- 자동화된 거래 수행 능력으로, 감정적 인 방해를 줄여줍니다.
- 실패한 거래의 시각적 표시는 전략 최적화 및 재검토 분석에 도움이 됩니다.
전략적 위험
- EMA 교차 전략은 흔들리는 시장에서 빈번한 잘못된 신호를 생성할 수 있다.
- 고정 점수 상쇄 손실은 유연하지 않을 수 있으며 변동성 변화에 적응하기 어려울 수 있습니다.
- 더 큰 리스크/수익비율 (1: 5) 은 승률을 떨어뜨릴 수 있다.
- RSI 지표는 극단적인 시장 조건에서 작동하지 않을 수 있습니다.
- 고정 거래 수치는 모든 시장 조건에 적합하지 않을 수 있습니다.
전략 최적화 방향
- ATR 기반의 동적 상쇄와 같은 적응적 상쇄 메커니즘을 도입
- 시장 변동성 필터를 추가하고 높은 변동성 동안 전략 매개 변수를 조정합니다.
- 보조 확인 도구로 거래량 지표를 추가하는 것을 고려하십시오.
- 동적 시계 조정 장치를 개발하여 시장 상황에 따라 적응합니다.
- 트렌드 확인 도구, MACD 또는 브린 띠를 더 많이 도입합니다.
요약하다
이 전략은 EMA와 RSI 지표의 교차를 결합하여 신호 생성, 위험 관리 및 거래 실행과 같은 중요한 요소를 포함하는 완전한 거래 시스템을 구축합니다. 최적화가 필요한 부분이 있지만 전체적인 프레임워크 설계는 합리적입니다. 특히 자금 관리 측면에서의 고려 사항은 신중합니다. 이 전략은 더 나은 최적화 및 개선으로 실제 거래에서 더 나은 성능을 낼 수 있습니다.
전략 소스 코드
/*backtest
start: 2024-02-18 00:00:00
end: 2025-02-16 08:00:00
period: 1d
basePeriod: 1d
exchanges: [{"eid":"Futures_Binance","currency":"BTC_USDT"}]
*/

// This Pine Script™ code is subject to the terms of the Mozilla Public License 2.0 at https://mozilla.org/MPL/2.0/
// © Lukhi24

//@version=6
strategy("Lukhi EMA Crossover_TWL Strategy" , overlay=true)

// Input Parameters
capital = 15000  // Capital: ₹15,000
risk_per_trade = 1000  // Risk per Trade: ₹1,000
target_per_trade = 5000  // Take Profit per Trade: ₹5,000
lot_size = input.int(1, title="Lot Size")  // Nifty option lot size (adjust as per your instrument)
stop_loss_distance = input.float(25, title="Stop Loss Distance (Points)")  // Fixed stop-loss in points (adjustable)

// EMA Parameters
short_ema_length = input.int(9, title="Short EMA Length")
long_ema_length = input.int(21, title="Long EMA Length")

// RSI Parameters
rsi_length = input.int(14, title="RSI Length")
rsi_overbought = input.float(70, title="RSI Overbought Level")
rsi_oversold = input.float(30, title="RSI Oversold Level")

// Calculations
ema_short = ta.ema(close, short_ema_length)
ema_long = ta.ema(close, long_ema_length)
rsi = ta.rsi(close, rsi_length)

// Buy and Sell Signals
buy_signal = ta.crossover(ema_short, ema_long) and rsi > 50
sell_signal = ta.crossunder(ema_short, ema_long) and rsi < 50

// Plot EMAs on the chart
plot(ema_short, color=color.blue, title="EMA 9")
plot(ema_long, color=color.orange, title="EMA 21")

// Risk Management: Position size based on stop-loss distance
position_size = risk_per_trade / stop_loss_distance

// Stop Loss and Take Profit Levels
long_stop_loss = close - stop_loss_distance
long_take_profit = close + (target_per_trade / position_size)

short_stop_loss = close + stop_loss_distance
short_take_profit = close - (target_per_trade / position_size)

// Strategy Logic: Entry, Stop Loss, and Take Profit
if (buy_signal)
    strategy.entry("Buy", strategy.long, qty=lot_size)
    strategy.exit("Exit Buy", "Buy", stop=long_stop_loss, limit=long_take_profit)

if (sell_signal)
    strategy.entry("Sell", strategy.short, qty=lot_size)
    strategy.exit("Exit Sell", "Sell", stop=short_stop_loss, limit=short_take_profit)

// Track Trade Result and Detect Failures
long_trade_loss = strategy.position_size > 0 and close <= long_stop_loss
short_trade_loss = strategy.position_size < 0 and close >= short_stop_loss

// Plot Buy and Sell signals on the chart
plotshape(buy_signal, location=location.belowbar, color=color.green, style=shape.labelup, title="Buy Signal", text="BUY")
plotshape(sell_signal, location=location.abovebar, color=color.red, style=shape.labeldown, title="Sell Signal", text="SELL")

// Plot Failure Signals
plotshape(long_trade_loss, location=location.belowbar, color=color.red, style=shape.cross, title="Long Trade Failed", text="Failed")
plotshape(short_trade_loss, location=location.abovebar, color=color.red, style=shape.cross, title="Short Trade Failed", text="Failed")