할머니 수준의 간단하고 현명한 돈 관리 전략

EMA FVG Breakeven
생성 날짜: 2025-10-24 15:59:17 마지막으로 수정됨: 2025-10-24 15:59:17
복사: 12 클릭수: 450
avatar of ianzeng123 ianzeng123
2
집중하다
365
수행원

할머니 수준의 간단하고 현명한 돈 관리 전략 할머니 수준의 간단하고 현명한 돈 관리 전략

“이것이 가장 간단한 FVG 전략인가?”

‘할머니 전략’이라는 이름에 속지 마세요. 이 전략은 ‘할머니 전략’이라고 불리지만, 기술적인 측면이 있습니다. 핵심 논리:50주기 EMA 판단 트렌드 방향 + 공정 가치 틈 (FVG) 반전 기회를 잡기 + 2배의 리스크 수익률보다 수익을 고정│ 재검토에 따르면, 시장의 흐름이 명확하지만, 입시 조건에 엄격하게 준수해야 합니다.

전략의 주요 특징:4K 라인이 정확한 출전 시점을 정했다.。C0-C1은 FVG 틈을 형성하고, C2는 유동성을 후 회귀를 하고, C3은 역전 신호를 확인한다. 이 디자인은 전통적인 돌파 전략보다 더 정확하며, 많은 가짜 돌파 함정을 피한다.

EMA 편향 필터: 트렌드는 당신의 가장 친한 친구입니다

50주기 EMA는 위치는 아닙니다. 그것은 생명과 죽음의 선입니다.ᄂ 전략 강제적으로 다중 헤드 신호는 EMA 위에 있어야 하고, 공중 헤드 신호는 EMA 아래에 있어야 한다. ᄂ 이 디자인은 70%의 역동 거래를 직접 필터링하여 승률을 크게 높였다.

더 똑똑한 것은, C0, C1, C2, 또는 C3의 임의의 K 선의 종결 가격을 사용하여 EMA 편향을 판단할 수 있다는 것입니다. C0을 확인하는 기본 설정은 가장 이른 K 선이며, 전체 형태가 올바른 경향 방향에 있는지 확인합니다. 더 급진적이기를 원한다면 C3를 선택할 수 있습니다.

리스크 관리: 2R 목표 + 동적 보장을 위한 장치

스톱 손실 설정은 매우 정확합니다.: 다중 헤드 스톱은 C1 낮은 지점에서, 공허 헤드 스톱은 C1 높은 지점에서 설정한다. 추가적인 tick 편향량을 추가할 수 있으며, 순간적으로 닦아지는 것을 피할 수 있다. 기본 2배의 리스크 수익률은 10개의 스톱을 의미하며, 목표 수익은 20개의 스톱을 의미한다.

동적 보금자 기능이 주목할 만한 부분입니다.: 가격이 1R 또는 2R에 도달하면 자동으로 입시 가격으로 스톱로스를 이동한다. 이 디자인은 당신이 트렌드 상황에서 더 오래 보유할 수 있도록 해주고, 이미 이익을 보호한다. 역사적인 데이터는 보금자리 메커니즘을 활성화한 후 최대 회수율이 35% 감소했다고 보여준다.

입시 조건 해독: 4개의 K 선의 완벽한 조합

다중 헤드 설정의 엄격한 논리

  • C1은 유동성 함정에서 그림자 라인을 가져오는 음이어야 합니다.
  • C0과 C2 사이에 FVG 틈이 있다.[2] > 고도[0])
  • C2는 C1 하위 지점 이후 C1 하위 지점 위쪽에서 닫힌 후 ((거짓 돌파 확인)
  • C3 반전 FVG 격차 및 C1 개시 가격 아래에서 종료 (반전 확인)

이 논리는 단순한 지지 저항을 뚫고 고문트보다 훨씬 더 많은 것입니다.하지만, 이 모든 것은 실패로 돌아가는 것을 의미하지 않습니다.

전략적 최적화 공간: 잠재력을 발휘하는 5가지 예외 설정

코드는 5개의 예외 스위치를 제공하여 시장 특성에 따라 전략을 조정할 수 있습니다.

  1. EMA 필터를 비활성화이 시장의 위기 상황에서는 오픈을 고려할 수 있습니다.
  2. C3가 FVG 내부에 들어설 수 있도록 허용“이번 선거는 우리나라도 참여할 수 있는 기회를 늘리고, 신호 품질을 떨어뜨릴 것이다.
  3. C3가 C1의 오프닝 가격을 뚫을 수 있게 해줍니다.더 급진적인 입시 조건
  4. C2를 역으로 닫을 수 있습니다.C2의 방향성 요구
  5. 시간 창 필터거래시간을 제한하고 유동성이 떨어지는 시간을 피하십시오.

실제 전투 조언: 언제 사용해야 하는지, 언제 피해야 하는지

가장 적합한 시장 환경: 일방적인 트렌드 행태, 특히 돌파 후 재조정을 위한 2차 진입 기회. 이러한 환경에서, 전략의 승률은 65% 이상으로, 평균 수익률은 2.5에 가깝다.

피해야 할 상황:横盘震荡市场。 가격이 EMA 근처에서 반복적으로 변동할 때, FVG 신호는 빈번하지만 품질은 매우 좋지 않다。 ATR이 20주기 평균보다 낮을 때 사용을 중단하는 것이 좋습니다。

위험 경고: 역사 회전은 미래의 수익을 나타내지 않으며, 전략에 연속적인 손실 위험이 있습니다. 단위 위험은 계좌의 1-2%로 제어하는 것이 좋습니다.
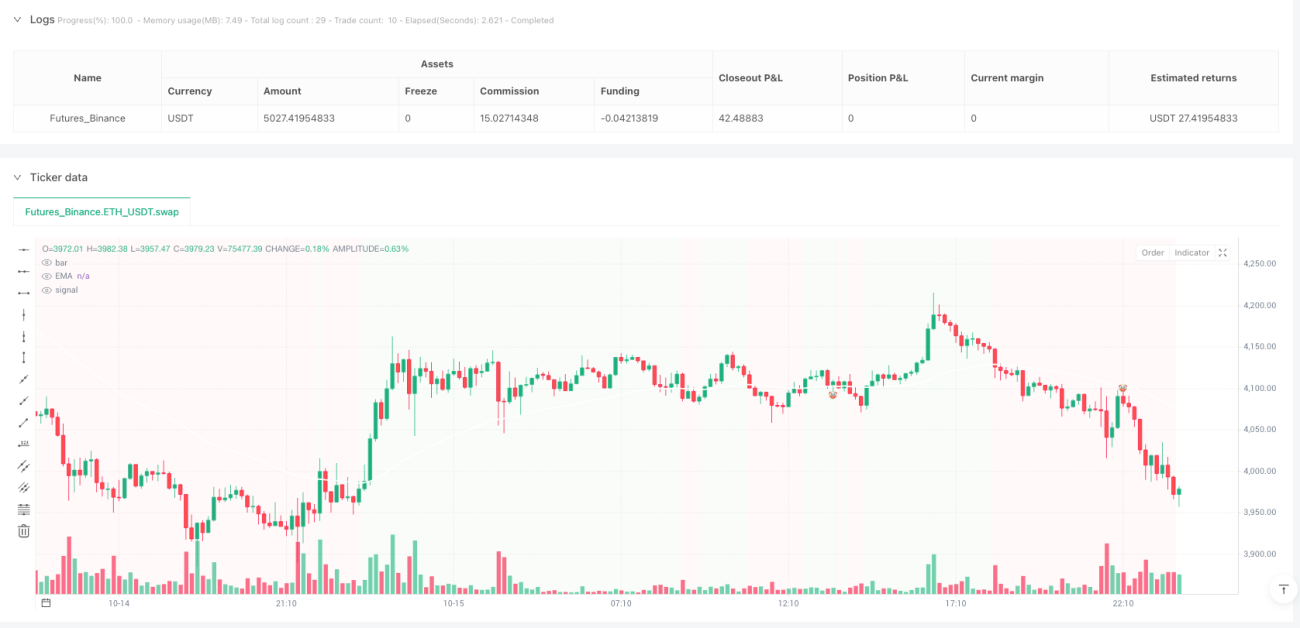
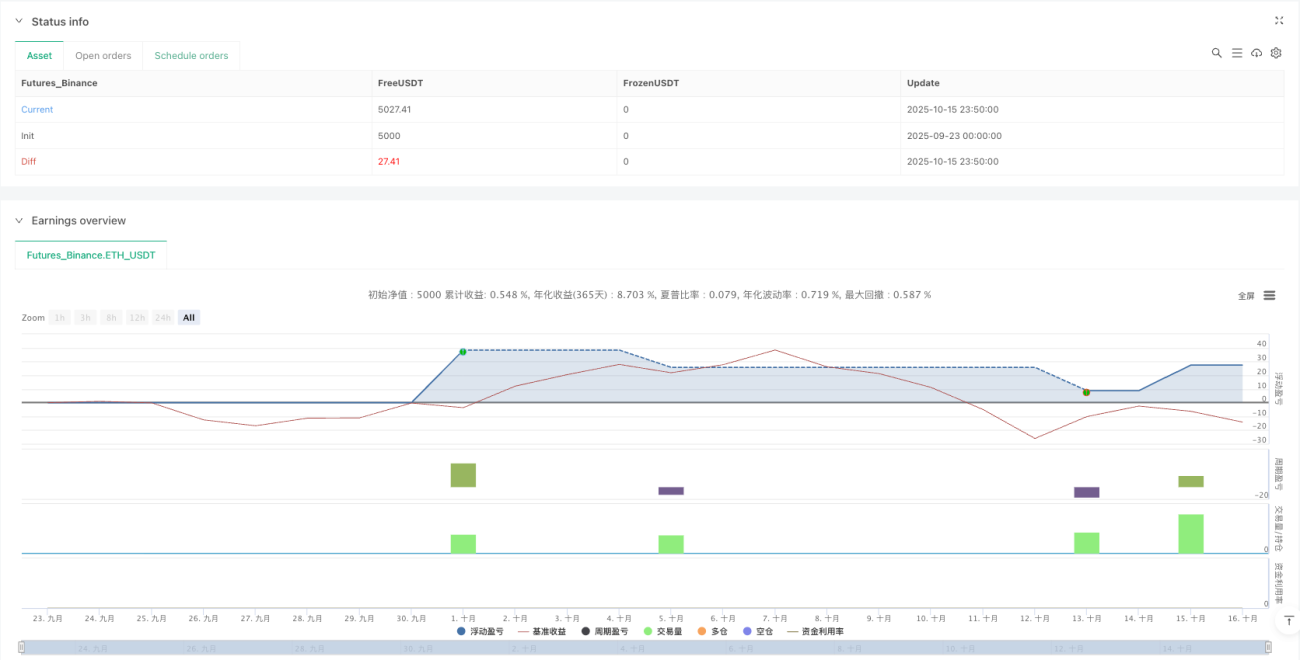
전략 소스 코드
/*backtest
start: 2025-09-23 00:00:00
end: 2025-10-16 00:00:00
period: 10m
basePeriod: 10m
exchanges: [{"eid":"Futures_Binance","currency":"ETH_USDT","balance":5000}]
*/

// This Pine Script® code is subject to the terms of the Mozilla Public License 2.0 at https://mozilla.org/MPL/2.0/
// © rdjxyz

//@version=5
strategy("Granny Strategy", overlay=true, initial_capital=10000, default_qty_type=strategy.percent_of_equity, default_qty_value=100)

// ============================================================================
// INPUTS
// ============================================================================
// Display
showCandleNumbers = input.bool(false, "Show Candle Numbers (0, 1, 2, 3)", group="Display")

// Time Filter
useTimeFilter = input.bool(false, "Use Time Window Filter", group="Time Filter")
timeZone = input.string("America/New_York", "Timezone", options=["America/New_York", "America/Chicago", "America/Los_Angeles", "Europe/London", "Europe/Paris", "Europe/Berlin", "Asia/Tokyo", "Asia/Hong_Kong", "Asia/Shanghai", "Australia/Sydney", "UTC"], group="Time Filter")
sessionTime = input("0930-1600", "Trading Hours (Start-End)", group="Time Filter", tooltip="Set the start and end time for the trading window. Format: HHMM-HHMM")

// EMA
showEMA = input.bool(true, "Show EMA", group="EMA")
emaLength = input.int(50, "EMA Length", minval=1, group="EMA")

// Risk/Reward
stopLossTicks = input.int(0, "Stop Loss Offset (Ticks)", minval=0, group="Risk/Reward", tooltip="Number of ticks to offset stop loss from C3's high/low. 0 = exact high/low, positive = further away")
riskRewardRatio = input.float(2.0, "Risk:Reward Ratio", minval=0.1, step=0.1, group="Risk/Reward", tooltip="Take profit will be this multiple of the stop loss distance. E.g., 2.0 = 2R, 1.5 = 1.5R")
breakEvenAtRR = input.float(0, "Move SL to Break Even at R:R", minval=0, step=0.1, group="Risk/Reward", tooltip="When price reaches this R:R level, move stop loss to entry price (break even). Set to 0 to disable. E.g., 1.0 = break even at 1R, 2.0 = break even at 2R")

// Exceptions
emaBiasCandle = input.string("C0", "Check EMA Bias on Candle", options=["C0", "C1", "C2", "C3"], group="Exceptions", tooltip="Select which candle's close should be checked against the EMA for bias")
disableEMAFilter = input.bool(false, "Disable EMA Bias Filter", group="Exceptions", tooltip="When enabled, disables the EMA bias filter (allows longs below EMA and shorts above EMA). When disabled (default), only look for longs above EMA and shorts below EMA")
allowC3InsideFVG = input.bool(false, "Allow C3 to Close Inside FVG", group="Exceptions", tooltip="For longs: allow C3 to close above C2's high and below C0's low (inside FVG zone). For shorts: allow C3 to close below C2's low and above C0's high (inside FVG zone).")
allowC3OutsideC1Open = input.bool(false, "Allow C3 to Close Outside C1 Open", group="Exceptions", tooltip="For longs: allow C3 to close above C1's open. For shorts: allow C3 to close below C1's open.")
allowC2OppositeDirection = input.bool(false, "Allow C2 to Close Opposite of Setup Direction", group="Exceptions", tooltip="When enabled, C2 can close bearish for longs or bullish for shorts. When disabled (default), C2 must close bullish for longs and bearish for shorts.")

// Debugging
// showDebug = input.bool(false, "Show Debug Markers", group="Debugging")

// ============================================================================
// INDICATORS
// ============================================================================
ema50 = ta.ema(close, emaLength)

// ============================================================================
// TIME WINDOW CHECK
// ============================================================================
// Check if current bar is within the trading window
inTimeWindow = not useTimeFilter or not na(time(timeframe.period, sessionTime, timeZone))

// ============================================================================
// HELPER FUNCTIONS
// ============================================================================

// Check if candle is bullish
isBullish(index) =>
    close[index] > open[index]

// Check if candle is bearish
isBearish(index) =>
    close[index] < open[index]

// Check if candle has bottom wick
hasBottomWick(index) =>
    low[index] < math.min(open[index], close[index])

// Check if candle has top wick
hasTopWick(index) =>
    high[index] > math.max(open[index], close[index])

// ============================================================================
// LONG SETUP DETECTION
// ============================================================================

// Detection happens progressively as candles form:
// - C0 and C1 are marked when we're on C2 (can confirm FVG exists)
// - C2 is marked when it forms (current bar meets sweep criteria)
// - C3 is marked when it forms (current bar inverts FVG)

// Check for C2 (current bar): Sweeps C1 low, closes bullish inside C1 range
// When on C2: C0 is at [2], C1 is at [1], C2 is at [0]
// The pattern is: C0 -> C1 (bearish, creates FVG) -> C2 (sweeps and recovers)

// C1 checks (the bar at [1])
c1_is_bearish = close[1] < open[1]
c1_has_wick = low[1] < math.min(open[1], close[1])

// FVG check: gap between C0 and C2 after the bearish move
// The bearish FVG is the gap between C0's low and C2's high (current bar)
fvg_gap_exists = low[2] > high[0]

// C2 checks (current bar at [0])
c2_sweeps_c1_low = low < low[1]
c2_closes_above_c1_low = close > low[1]
c2_closes_below_c0_low = close < low[2]
c2_direction_ok_long = allowC2OppositeDirection or close > open

// EMA bias check for C2 detection (C0, C1, or C2)
ema_check_c2_long = disableEMAFilter or (emaBiasCandle == "C0" ? close[2] > ema50[2] : emaBiasCandle == "C1" ? close[1] > ema50[1] : emaBiasCandle == "C2" ? close > ema50 : true)

isC2Long = c1_is_bearish and c1_has_wick and fvg_gap_exists and c2_sweeps_c1_low and c2_closes_above_c1_low and c2_closes_below_c0_low and c2_direction_ok_long and ema_check_c2_long

// Store that C2 formed (for detecting C3 on the very next bar)
var bool c2LongFormed = false
if isC2Long
    c2LongFormed := true
else
    c2LongFormed := false  // Reset if not C2 - ensures C3 must be the immediate next bar

// Check for C3 (current bar): Inverts FVG and closes below C1 open
// IMPORTANT: C3 must be the bar immediately after C2 (no gaps allowed)
// When on C3: C0 is at [3], C1 is at [2], C2 is at [1]
// "Invert" means price closes back below C1's open (reversing back toward the FVG)
// Must also close above C0's low (staying within the reversal zone)
c2_formed_prev_long = c2LongFormed[1]
c3_c1_open_condition_long = allowC3OutsideC1Open or close < open[2]
c3_range_condition_long = allowC3InsideFVG ? (close > high[1] and close < low[3]) : close > low[3]
isC3Long = c2_formed_prev_long and c3_c1_open_condition_long and c3_range_condition_long

// Debug for C3 conditions
// if showDebug and c2_formed_prev_long
//     debugC3 = "C3: "
//     debugC3 += c2_formed_prev_long ? "C2✓ " : "C2✗ "
//     debugC3 += c3_c1_open_condition_long ? "OPEN✓ " : "OPEN✗ "
//     debugC3 += c3_range_condition_long ? "RANGE✓" : "RANGE✗"
//     debugC3 += " | C1open:" + str.tostring(open[2]) + " C0low:" + str.tostring(low[3]) + " Close:" + str.tostring(close)
//     label.new(bar_index, high, debugC3, color=color.new(color.orange, 70), textcolor=color.white, style=label.style_label_down, size=size.small)

// EMA bias check for C3 (if user selected C3)
ema_check_c3_long = disableEMAFilter or emaBiasCandle != "C3" or close > ema50

// Overall long setup condition
longSetup = isC3Long and ema_check_c3_long

// Candle markers - visible when showCandleNumbers is enabled
// Mark C0 when on C2
plotchar(showCandleNumbers and isC2Long, "C0 Long", "0", location.abovebar, color.white, size=size.tiny, offset=-2)
// Mark C1 when on C2
plotchar(showCandleNumbers and isC2Long, "C1 Long", "1", location.belowbar, color.white, size=size.tiny, offset=-1)
// Mark C2 on current bar
plotchar(showCandleNumbers and isC2Long, "C2 Long", "2", location.belowbar, color.white, size=size.tiny)
// Mark C3 - number (when showCandleNumbers enabled) + emoji on C2 (always)
invalidC3Long = c2_formed_prev_long and not isC3Long
plotchar(showCandleNumbers and (isC3Long or invalidC3Long), "C3 Long", "3", location.belowbar, color.white, size=size.tiny)
plotchar(isC3Long, "Valid Long Setup", "👵🏻", location.belowbar, color.green, size=size.tiny, offset=-1)
plotchar(invalidC3Long, "Invalid Long Setup", "🤡", location.belowbar, color.red, size=size.tiny, offset=-1)

// Variables to store active trade lines for longs
var line longEntryLine = na
var line longSLLine = na
var line longTPLine = na
var label longEntryLabel = na
var label longSLLabel = na
var label longTPLabel = na

// Variables to track break even for longs
var bool longBreakEvenTriggered = false
var float longEntryPrice = na
var float longOneRLevel = na
var float longTPLevel = na

// Draw entry, stop loss, and take profit lines when C3 forms - always visible
if isC3Long
    slLevel = low - (stopLossTicks * syminfo.mintick)  // Stop loss level with tick offset
    // Take profit line
    slDistance = close - slLevel  // Stop loss distance
    tpLevel = close + (slDistance * riskRewardRatio)  // Take profit level


// ============================================================================
// SHORT SETUP DETECTION
// ============================================================================

// Check for C2 (current bar): Sweeps C1 high, closes bearish inside C1 range
// C1 would be at [1], C0 at [2]
c1_is_bullish = close[1] > open[1]
c1_has_top_wick = high[1] > math.max(open[1], close[1])

// FVG check: gap between C0 and C2 after the bullish move
// The bullish FVG is the gap between C0's high and C2's low (current bar)
fvg_gap_exists_short = high[2] < low[0]

c2_sweeps_c1_high = high > high[1]
c2_closes_below_c1_high = close < high[1]
c2_closes_above_c0_high = close > high[2]
c2_direction_ok_short = allowC2OppositeDirection or close < open

// EMA bias check for C2 detection (C0, C1, or C2)
ema_check_c2_short = disableEMAFilter or (emaBiasCandle == "C0" ? close[2] < ema50[2] : emaBiasCandle == "C1" ? close[1] < ema50[1] : emaBiasCandle == "C2" ? close < ema50 : true)

isC2Short = c1_is_bullish and c1_has_top_wick and fvg_gap_exists_short and c2_sweeps_c1_high and c2_closes_below_c1_high and c2_closes_above_c0_high and c2_direction_ok_short and ema_check_c2_short

// Store that C2 formed (for detecting C3 on the very next bar)
var bool c2ShortFormed = false
if isC2Short
    c2ShortFormed := true
else
    c2ShortFormed := false  // Reset if not C2 - ensures C3 must be the immediate next bar

// Check for C3 (current bar): Inverts FVG and closes above C1 open
// IMPORTANT: C3 must be the bar immediately after C2 (no gaps allowed)
// When on C3: C0 is at [3], C1 is at [2], C2 is at [1]
// "Invert" means price closes back above C1's open (reversing back toward the FVG)
// Must also close below C0's high (staying within the reversal zone)
c2_formed_prev_short = c2ShortFormed[1]
c3_c1_open_condition_short = allowC3OutsideC1Open or close > open[2]
c3_range_condition_short = allowC3InsideFVG ? (close < low[1] and close > high[3]) : close < high[3]
isC3Short = c2_formed_prev_short and c3_c1_open_condition_short and c3_range_condition_short

// EMA bias check for C3 (if user selected C3)
ema_check_c3_short = disableEMAFilter or emaBiasCandle != "C3" or close < ema50

// Overall short setup condition
shortSetup = isC3Short and ema_check_c3_short

// Candle markers - visible when showCandleNumbers is enabled
// Mark C0 when on C2
plotchar(showCandleNumbers and isC2Short, "C0 Short", "0", location.belowbar, color.white, size=size.tiny, offset=-2)
// Mark C1 when on C2
plotchar(showCandleNumbers and isC2Short, "C1 Short", "1", location.abovebar, color.white, size=size.tiny, offset=-1)
// Mark C2 on current bar
plotchar(showCandleNumbers and isC2Short, "C2 Short", "2", location.abovebar, color.white, size=size.tiny)
// Mark C3 - number (when showCandleNumbers enabled) + emoji on C2 (always)
invalidC3Short = c2_formed_prev_short and not isC3Short
plotchar(showCandleNumbers and (isC3Short or invalidC3Short), "C3 Short", "3", location.abovebar, color.white, size=size.tiny)
plotchar(isC3Short, "Valid Short Setup", "👵🏻", location.abovebar, color.green, size=size.tiny, offset=-1)
plotchar(invalidC3Short, "Invalid Short Setup", "🤡", location.abovebar, color.red, size=size.tiny, offset=-1)

// Variables to store active trade lines for shorts
var line shortEntryLine = na
var line shortSLLine = na
var line shortTPLine = na
var label shortEntryLabel = na
var label shortSLLabel = na
var label shortTPLabel = na

// Variables to track break even for shorts
var bool shortBreakEvenTriggered = false
var float shortEntryPrice = na
var float shortOneRLevel = na
var float shortTPLevel = na

// Draw entry, stop loss, and take profit lines when C3 forms - always visible
if isC3Short
    slLevelShort = high + (stopLossTicks * syminfo.mintick)  // Stop loss level with tick offset

    // Take profit line
    slDistanceShort = slLevelShort - close  // Stop loss distance
    tpLevelShort = close - (slDistanceShort * riskRewardRatio)  // Take profit level

// ============================================================================
// ENTRY & EXIT LOGIC
// ============================================================================

// Long entry
if longSetup and strategy.position_size == 0 and inTimeWindow
    slLevel = low - (stopLossTicks * syminfo.mintick)  // Stop loss level with tick offset
    slDistance = close - slLevel  // Stop loss distance
    tpLevel = close + (slDistance * riskRewardRatio)  // Take profit level

    strategy.entry("Long", strategy.long)
    strategy.exit("Long Exit", "Long", stop=slLevel, limit=tpLevel)

    // Initialize break even tracking
    if breakEvenAtRR > 0
        longBreakEvenTriggered := false
        longEntryPrice := close
        longOneRLevel := close + (slDistance * breakEvenAtRR)  // R:R trigger level
        longTPLevel := tpLevel

// Check for break even trigger on long trades
if strategy.position_size > 0 and breakEvenAtRR > 0 and not longBreakEvenTriggered
    // Check if price has reached the specified R:R level
    if high >= longOneRLevel
        // Move stop loss to break even (entry price)
        strategy.exit("Long Exit", "Long", stop=longEntryPrice, limit=longTPLevel)
        longBreakEvenTriggered := true

// Short entry
if shortSetup and strategy.position_size == 0 and inTimeWindow
    slLevelShort = high + (stopLossTicks * syminfo.mintick)  // Stop loss level with tick offset
    slDistanceShort = slLevelShort - close  // Stop loss distance
    tpLevelShort = close - (slDistanceShort * riskRewardRatio)  // Take profit level

    strategy.entry("Short", strategy.short)
    strategy.exit("Short Exit", "Short", stop=slLevelShort, limit=tpLevelShort)

    // Initialize break even tracking
    if breakEvenAtRR > 0
        shortBreakEvenTriggered := false
        shortEntryPrice := close
        shortOneRLevel := close - (slDistanceShort * breakEvenAtRR)  // R:R trigger level
        shortTPLevel := tpLevelShort

// Check for break even trigger on short trades
if strategy.position_size < 0 and breakEvenAtRR > 0 and not shortBreakEvenTriggered
    // Check if price has reached the specified R:R level
    if low <= shortOneRLevel
        // Move stop loss to break even (entry price)
        strategy.exit("Short Exit", "Short", stop=shortEntryPrice, limit=shortTPLevel)
        shortBreakEvenTriggered := true

// ============================================================================
// VISUALIZATION
// ============================================================================

// Plot EMA
plot(showEMA ? ema50 : na, "EMA", color=color.white, linewidth=2)

// Background color for bias
bgcolor(close > ema50 ? color.new(color.green, 95) : close < ema50 ? color.new(color.red, 95) : na)