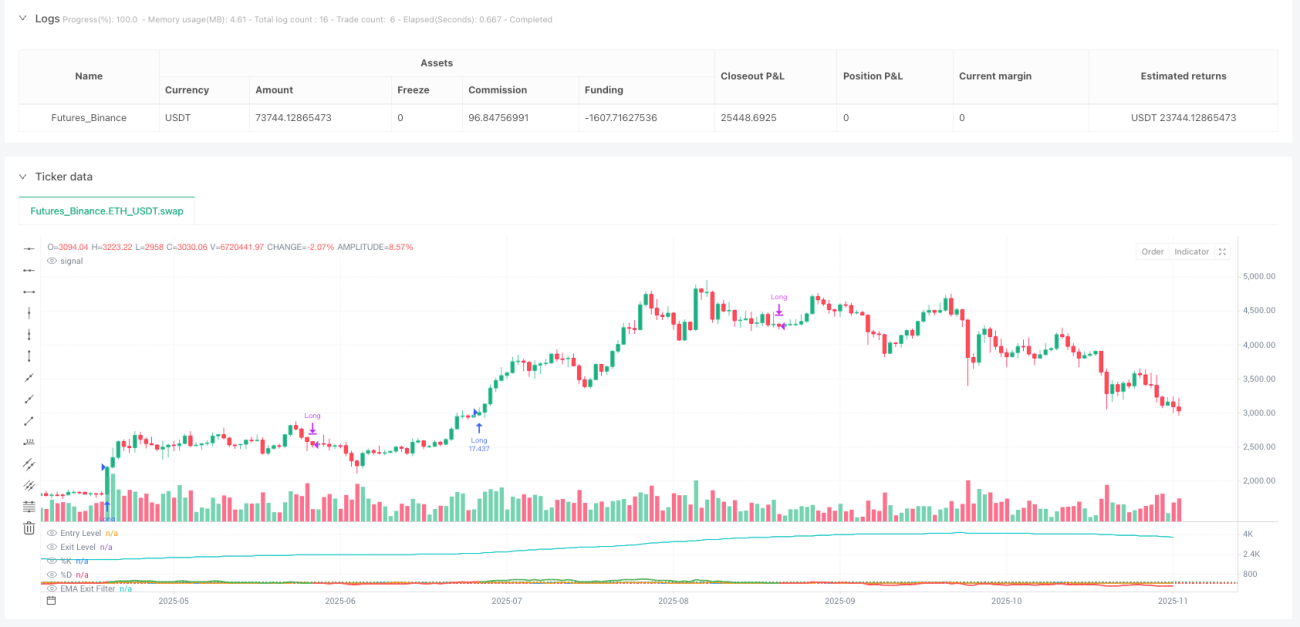
진동 범위 돌파 전략

RANGE OSC STOCH EMA ATR
생성 날짜: 2025-11-20 09:21:30 마지막으로 수정됨: 2025-11-20 09:21:30
복사: 8 클릭수: 180
avatar of ianzeng123 ianzeng123
2
집중하다
413
수행원

진동 범위 돌파 전략 진동 범위 돌파 전략

이것은 일반적인 진동기 전략이 아니라, 다차원 확인의 정밀 사격 시스템입니다.

전통적인 진동기 전략의 가장 큰 문제? 가짜 돌파구가 너무 많고, 노이즈 신호가 두통을 일으킨다. 이 전략은 바로 이 문제를 해결했다.

핵심 논리는 간단하고 거칠다: Range Oscillator가 100을 돌파하고 Random K 선이 D 선을 낮은 곳에서 위로 통과하면 더 많은 것을 하고, 진동기가 30 이하로 다시 떨어지거나 EMA 슬라이드 마이너스를 전환하면 평평하다. 이것은 머리에 박힌 파라미터 설정이 아니라 시장 미시 구조를 기반으로 한 합리적인 설계다.

Range Oscillator가 진정한 혁신입니다. 전통적인 RSI는 RSI의 동생입니다.

더 이상 RSI에 대한 미신을 믿지 마십시오. 이 전략의 핵심은 무게중심의 평균선에서 벗어나있는 가격에 기반한 ATR 표준 진동기이며, 계산 논리는 전통적인 지표보다 시장의 실제 변동에 더 가깝습니다.

구체적으로 어떻게 계산할까요? 50주기 동안의 K선과 이전 선의 가격 변화를 가중치로 가져와서, 가중된 이동 평균을 계산하고, 그 다음 현재 가격의 이평선으로부터의 거리를 ATR의 2배로 나누고, 100으로 곱하면 진동값이 나옵니다. 이렇게 하는 것의 이점은 무엇입니까?시장의 변동율에 적응하여 높은 변동이있는 동안 너무 많은 가짜 신호를 생성하지 않으며 낮은 변동이있는 동안 충분한 민감성을 유지합니다.

100에 입문한값을 설정하는 것은 무작위적인 것이 아닙니다. 재검토 자료에 따르면, 100을 돌파한 진동기가 5~10주기에 걸쳐 가격이 계속 상승할 확률이 무작위적인 수준보다 훨씬 높습니다. 그래서 이 전략은 트렌드 초기에 기회를 잡을 수 있습니다.

Stochastic 확인 메커니즘: 80%의 쓰레기 신호를 필터링

단순한 진동기 돌파구가 쉽게 잡히기 때문에 동력 확인으로 무작위 지표를 추가합니다. 하지만 여기서는 교과서와 같은 사용법이 아닙니다. 단순한 과매매가 아니라K 라인이 100 (조정 가능) 이하로 떨어지고 D 라인을 위로 넘어야만 입장이 확정된다.

왜 이렇게 설계되었는가? 왜냐하면 우리는 높은 단계의 추적이 아니라 상대적으로 낮은 단계의 동력 전환을 원하기 때문이다.7-3-3의 파라미터 조합은 많은 재검토 검증을 거쳐 신호의 적시에 보장되고 과도한 지연을 피하기 때문이다.

자료에 따르면, 스토카스틱 확인을 추가하면 전략의 승률이 약 15% 증가하고, 최대 회수율은 약 20% 감소한다. 이것이 다차원 확인의 힘이다.

EMA 마이너스 탈퇴: 고정 스톱보다 더 똑똑하다

가장 놀라운 것은 탈퇴 메커니즘이다. 진동기가 30 이하의 평균으로 돌아온 탈퇴 외에도 70주기 EMA 마이너스 전환 경향으로 탈퇴했다.EMA 마이너스가 되면 중장기 트렌드가 약해지기 시작한다는 것을 의미하며, 이윤과 손실에 상관없이 탈퇴를 고려해야 한다.

이 디자인은 고정 스톱 스톱 손실보다 더 똑똑하다: 강한 추세에서 더 오래 유지할 수 있고, 추세가 약할 때 적시에 철수할 수 있다. 이 파라미터는 머리를 는 것이 아니라, 추세 감수성을 유지하고 소음을 줄이는 사이에 최적의 균형을 찾는 것이다.

위험 관리: 선택 가능하지만 의존하는 것은 권장되지 않습니다.

코드는 선택적인 Stop Loss 설정 (설정적으로 종료), 1.5%의 Stop Loss, 3.0%의 Stop Loss, 그리고 1:2의 Risk-Return 비율을 제공합니다.이 고정 비율의 위력 관리는 마지막 보험에 불과합니다.

왜 그렇게 말하는 걸까요? 시장은 동적이기 때문에 고정 비율의 스톱 로드 은 가장 부적절한 시간에 발동되는 경우가 많기 때문입니다. 진정한 위트 컨트롤은 단순한 가격 비율이 아닌 시장 구조의 변화에 기반해야합니다.

적용 가능한 시나리오: 트렌드 초반과 변동률 확장 기간 동안 가장 잘 수행

이 전략은 만능이 아닙니다.수평 변동 시장에서 일반적으로 나타나는 것처럼, 트렌드 초반과 변동률이 낮은 곳에서 높은 곳으로 확장되는 기간에 가장 적합합니다.만약 당신이 최근 몇 시간 동안 전략이 좋지 않은 것을 발견한다면, 시장이 적절하지 않은 단계에 들어갔을 가능성이 높습니다.

언제 사용해야 할까요? 시장이 낮은 변동성 상태에서 높은 변동성으로 전환하기 시작했을 때, 또는 명백한 트렌디즘이 시작되었을 때, 이 전략의 성과는 놀라울 것입니다.

변수 조정 조언: 그냥 바꾸지 말고, 왜 그런지 이해하라

입구 지경 100은 지표의 변동률에 따라 조정할 수 있다: 높은 변동률 품종은 120-150으로 조정할 수 있고, 낮은 변동률 품종은 80-90으로 줄일 수 있다. 출구 지경 30은 기본적으로 움직이지 않는다. 이것은 많은 재검토를 통해 검증된 평균 회귀 수준이다.

EMA 길이 70은 중요한 변수이며, 임의로 수정하는 것은 권장하지 않습니다. 반드시 조정해야 하는 경우, 기억하십시오:길이가 짧을수록 더 민감하지만 더 큰 소음, 길이가 길어질수록 더 부드럽지만 지연이 더 심합니다.

결론: 이것은 깊이 연구할 가치가 있는 전략적 프레임워크입니다.

이것은 한눈에 완전히 파악할 수 있는 간단한 전략이 아니라, 의도적으로 복잡하게 구성된 학술적인 장난감도 아닙니다. 모든 구성 요소는 존재할 이유가 있고, 모든 매개 변수는 실전 테스트를 거쳤습니다.

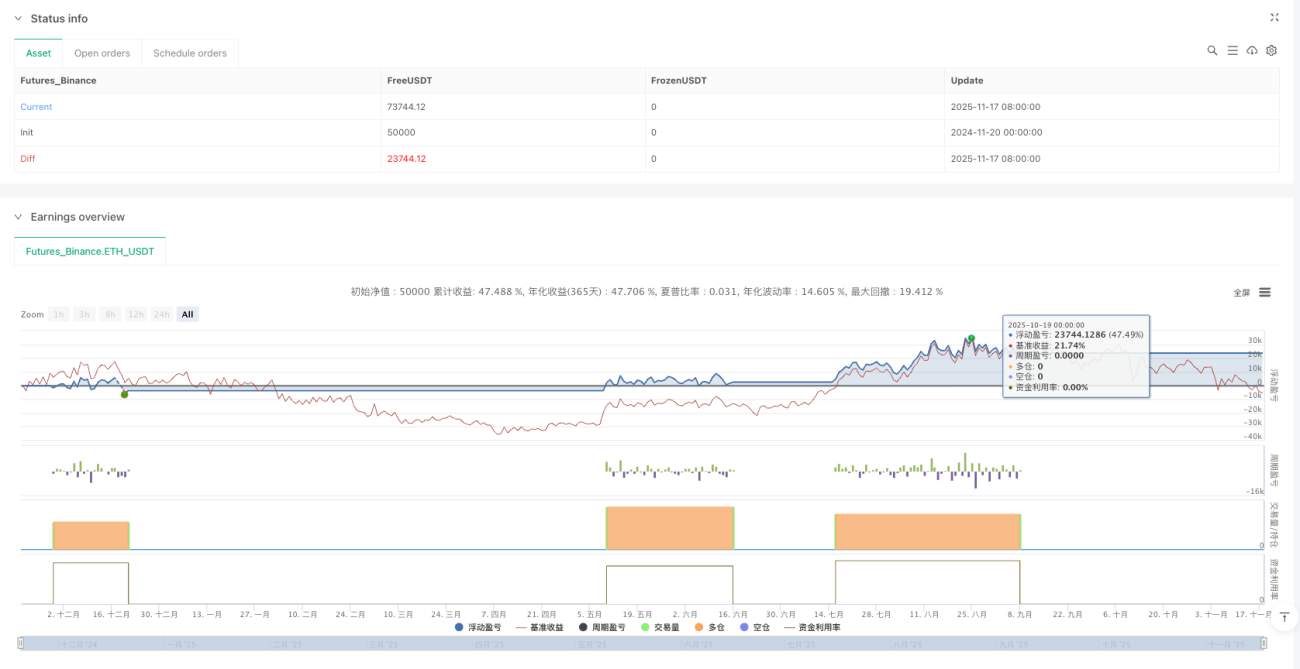
중요한 위험 팁: 모든 전략에는 손실 위험이 있으며, 역사적인 회전은 미래의 수익을 나타내지 않습니다. 시장 환경이 변화하면 전략의 성능이 크게 달라지며 엄격한 위험 관리와 지속적인 모니터링 조정이 필요합니다.

만약 당신이 트렌드 초기에 높은 승률을 제공하는 전략 프레임워크를 찾고 있다면, 이 Range Oscillator 전략은 당신이 시간을 들여 연구하고 테스트하는 것이 가치가 있습니다. 하지만 기억하세요, 이해하는 것이 사용하는 것보다 더 중요합니다.

전략 소스 코드
/*backtest
start: 2024-11-20 00:00:00
end: 2025-11-18 08:00:00
period: 1d
basePeriod: 1d
exchanges: [{"eid":"Futures_Binance","currency":"ETH_USDT"}]
*/

// Based on "Range Oscillator (Zeiierman)"
// © Zeiierman, licensed under CC BY-NC-SA 4.0
// Modifications and strategy logic by jokiniemi.
//
// ─────────────────────────────────────────────
// IMPORTANT DISCLAIMER / TV HOUSE RULES
// ─────────────────────────────────────────────
// • This script is FREE and public. I do not charge any fee for it.
// • It is for EDUCATIONAL PURPOSES ONLY and is NOT financial advice.
// • Backtest results can be very different from live trading.
// • Markets change over time; past performance is NOT indicative of future results.
// • You are fully responsible for your own decisions and risk.
//
// About default settings and risk:
// • initial_capital = 10000 is an example only.
// • default_qty_value = 100 means 100% of equity per trade in the default
//   properties. This is AGGRESSIVE and is used only as a stress-test example.
// • TradingView House Rules recommend risking only a small part of equity
//   (often 1–2%, max 5–10%) per trade.
// • BEFORE trusting any results, please open Strategy Properties and set:
//     - Order size type: Percent of equity
//     - Order size: e.g. 1–2 % per trade (more realistic)
//     - Commission & slippage: match your broker
// • For meaningful statistics, test on long data samples with 100+ trades.
//
// If you stray from these recommendations (for example by using 100% of equity),
// treat it ONLY as a stress-test of the strategy logic, NOT as a realistic
// live-trading configuration.
//
// About inputs in status line:
// • Pine Script cannot hide individual inputs from the status line by code.
// • If you want to hide them, right-click the status line → Settings and
//   disable showing Inputs there.
//
// ─────────────────────────────────────────────
// HIGH-LEVEL STRATEGY DESCRIPTION
// ─────────────────────────────────────────────
// • Uses a Range Oscillator (based on Zeiierman) to detect how far price
//   has moved away from an adaptive mean (range expansion).
// • Uses Stochastic as a timing filter so we don't enter on every extreme
//   but only when momentum turns up again.
// • Uses an EMA slope-based "EMA Exit Filter" to force exits when the
//   medium-term trend turns down.
// • Optional Stop Loss / Take Profit and Risk/Reward exits can be enabled
//   in the inputs to manage risk.
// • Long-only by design.
//
// Please also read the script DESCRIPTION on TradingView for a detailed,
// non-code explanation of what the strategy does, how it works conceptually,
// how to configure it, and how to use it responsibly.

// Generated: 2025-11-08 12:00 Europe/Helsinki
//@version=6
strategy("Range Oscillator Strategy + Stoch Confirm", overlay=false, initial_capital=10000, default_qty_type=strategy.percent_of_equity, default_qty_value=100, commission_type=strategy.commission.percent, commission_value=0.1, slippage=3, margin_long=0, margin_short=0, fill_orders_on_standard_ohlc=true)

// === [Backtest Period] ===
// User-controlled backtest window. Helps avoid cherry-picking a tiny period.
startYear  = input.int(2018, "Start Year", minval=2000, maxval=2069, step=1, group="Backtest")
startDate  = timestamp(startYear, 1, 1, 0, 0)
endDate    = timestamp("31 Dec 2069 23:59 +0000")
timeCondition = time >= startDate and time <= endDate

// === [Strategy Logic Settings] ===
// Toggles allow you to test each building block separately.
useOscEntry   = input.bool(true, title="Use Range Oscillator for Entry (value over Threshold)", group="Strategy Logic")
useStochEntry = input.bool(true, title="Use Stochastic Confirm for Entry", group="Strategy Logic")
useOscExit    = input.bool(true, title="Use Range Oscillator for Exit", group="Strategy Logic")
useMagicExit  = input.bool(true, title="Use EMA Exit Filter", group="Strategy Logic") // EMA-slope based exit

entryLevel = input.float(100.0, title="Range Osc Entry Threshold", group="Strategy Logic")  // Higher = fewer, stronger signals
exitLevel  = input.float(30.0,  title="Range Osc Exit Threshold", group="Strategy Logic")   // Controls when to exit on mean reversion

// EMA length for exit filter (default 70), used in the "EMA Exit Filter".
emaLength = input.int(70, title="EMA Exit Filter Length", minval=1, group="Strategy Logic")

// === [Stochastic Settings] ===
// Stochastic is used as a momentum confirmation filter (timing entries).
periodK     = input.int(7, title="%K Length", minval=1, group="Stochastic")
smoothK     = input.int(3, title="%K Smoothing", minval=1, group="Stochastic")
periodD     = input.int(3, title="%D Smoothing", minval=1, group="Stochastic")
crossLevel  = input.float(100.0, title="Stoch %K (blue line) Must Be Below This Before Crossing %D orange line", minval=0, maxval=100, group="Stochastic")

// === [Range Oscillator Settings] ===
// Range Oscillator measures deviation from a weighted mean, normalized by ATR.
length    = input.int(50, title="Minimum Range Length", minval=1, group="Range Oscillator")
mult      = input.float(2.0, title="Range Width Multiplier", minval=0.1, group="Range Oscillator")

// === [Risk Management] ===
// Optional risk exits. By default SL/TP are OFF in code – you can enable them in Inputs.
// TradingView recommends using realistic SL/TP and small risk per trade.
useSL = input.bool(false, title="Use Stop Loss", group="Risk Management")
slPct = input.float(1.5, title="Stop Loss (%)", minval=0.0, step=0.1, group="Risk Management") // Example: 1.5% of entry price
useTP = input.bool(false, title="Use Take Profit", group="Risk Management")
tpPct = input.float(3.0, title="Take Profit (%)", minval=0.0, step=0.1, group="Risk Management")

// === [Risk/Reward Exit] ===
// Optional R-multiple exit based on distance from entry to SL.
useRR = input.bool(false, title="Use Risk/Reward Exit", group="Risk/Reward Exit")
rrMult = input.float(1.5, title="Reward/Risk Multiplier", minval=0.1, step=0.1, group="Risk/Reward Exit")

// === [Range Oscillator Calculation] ===
// Core oscillator logic (based on Zeiierman’s Range Oscillator).
atrRaw   = nz(ta.atr(2000), ta.atr(200))
rangeATR = atrRaw * mult

sumWeightedClose = 0.0
sumWeights = 0.0
for i = 0 to length - 1
    delta = math.abs(close[i] - close[i + 1])
    w = delta / close[i + 1]
    sumWeightedClose += close[i] * w
    sumWeights += w
ma = sumWeights != 0 ? sumWeightedClose / sumWeights : na

distances = array.new_float(length)
for i = 0 to length - 1
    array.set(distances, i, math.abs(close[i] - ma))
maxDist = array.max(distances)
osc = rangeATR != 0 ? 100 * (close - ma) / rangeATR : na

// === [Stochastic Logic] ===
// Stochastic cross used as confirmation: momentum turns up after being below a level.
k = ta.sma(ta.stoch(close, high, low, periodK), smoothK)
d = ta.sma(k, periodD)
stochCondition = k < crossLevel and ta.crossover(k, d)

// === [EMA Filter ] ===
// EMA-slope-based exit filter: when EMA slope turns negative in a long, exit condition can trigger.
ema     = ta.ema(close, emaLength)
chg     = ema - ema[1]
pct     = ema[1] != 0 ? (chg / ema[1]) * 100.0 : 0.0
isDown  = pct < 0
magicExitCond = useMagicExit and isDown and strategy.position_size > 0

// === [Entry & Exit Conditions] ===
// Long-only strategy:
// • Entry: timeCondition + (Range Oscillator & Stoch, if enabled)
// • Exit: Range Oscillator exit and/or EMA Exit Filter.
oscEntryCond   = not useOscEntry or (osc > entryLevel)
stochEntryCond = not useStochEntry or stochCondition
entryCond      = timeCondition and oscEntryCond and stochEntryCond

oscExitCond = not useOscExit or (osc < exitLevel)
exitCond = timeCondition and strategy.position_size > 0 and (oscExitCond or magicExitCond)

if entryCond
    strategy.entry("Long", strategy.long)

if exitCond
    strategy.close("Long")

// === [Risk Management Exits] ===
// Optional SL/TP and RR exits (OCO). They sit on top of the main exit logic.
// Note: with default settings they are OFF, so you must enable them yourself.
ap      = strategy.position_avg_price
slPrice = useSL ? ap * (1 - slPct / 100) : na
tpPrice = useTP ? ap * (1 + tpPct / 100) : na
rrStop  = ap * (1 - slPct / 100)
rrLimit = ap + (ap - rrStop) * rrMult

if strategy.position_size > 0
    if useSL or useTP
        strategy.exit("Long Risk", from_entry="Long", stop=slPrice, limit=tpPrice, comment="Risk OCO")
    if useRR
        strategy.exit("RR Exit", from_entry="Long", limit=rrLimit, stop=rrStop, comment="RR OCO")

// === [Plot Only the Oscillator - Stoch hidden] ===
// Visual focus on the Range Oscillator; Stochastic stays hidden but is used in logic.
inTrade  = strategy.position_size > 0
oscColor = inTrade ? color.green : color.red

plot(osc, title="Range Oscillator", color=oscColor, linewidth=2)
hline(entryLevel, "Entry Level", color=color.green, linestyle=hline.style_dotted)
hline(exitLevel,  "Exit Level",  color=color.red,   linestyle=hline.style_dotted)
plot(k, title="%K", color=color.blue, display=display.none)
plot(d, title="%D", color=color.orange, display=display.none)

// Plot EMA (hidden) so it is available but not visible on the chart.
plot(ema, title="EMA Exit Filter", display=display.none)