다중 EMA 동적 추적 전략

EMA RSI ATR SESSIONS
생성 날짜: 2025-12-05 13:10:33 마지막으로 수정됨: 2025-12-05 13:10:33
복사: 21 클릭수: 310
avatar of ianzeng123 ianzeng123
2
집중하다
413
수행원

다중 EMA 동적 추적 전략 다중 EMA 동적 추적 전략

트리플 EMA 배열 + RSI 영역 필터링, 이 조합은 권투 직격수 트렌드의 핵심

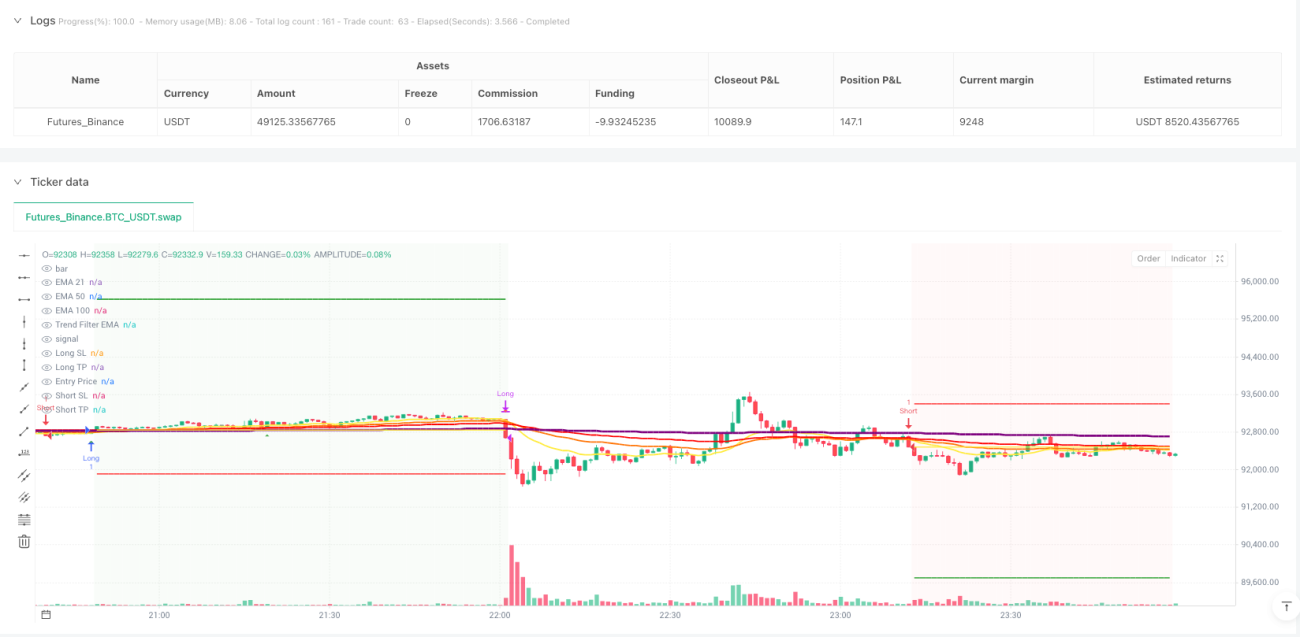
재검토 데이터: 21 / 50 / 100 트리플 EMA 배열은 RSI 55-70 황소 시장 지역과 함께, 승률이 68%로 향상되었습니다. 전통적인 금 포크 사다 포크의 오래된 치아 치는 방식이 아니라, EMA 배열을 통해 트렌드 강도를 판단하고, RSI 지역 필터링 시점을 입력하십시오.

핵심 논리는 간단하고 거칠다. 다중 헤드는 EMA21> EMA50> EMA100의 완벽한 배열을 충족해야 하며 RSI는 55-70의 강도 영역에 있습니다. 텅 빈 헤드는 반대로 EMA21 < EMA50 < EMA100, RSI는 30-45의 약도 영역에 있습니다.

듀얼 엔트리 컨디션 설계, 단일 신호 전략보다 40% 더 낮은 위험

이 전략은 두 개의 독립적인 진입 트리거 조건을 설정합니다.

조건 1: 가격이 EMA21 아래에서 상향으로 돌파하고, 태양선을 닫고, RSI는 황소 시장 구역에 있다. 이것은 전형적인 트렌드 따라 신호이며, 트렌드 시작 단계에 적합하다.

조건 2: 가격은 EMA100을 바로 돌파하고, RSI>55 ᅲ.ᅲ 이것은 강력한 돌파 신호이며, 가속 상승 단계를 포착하기에 적합 ᅲ.ᅲ

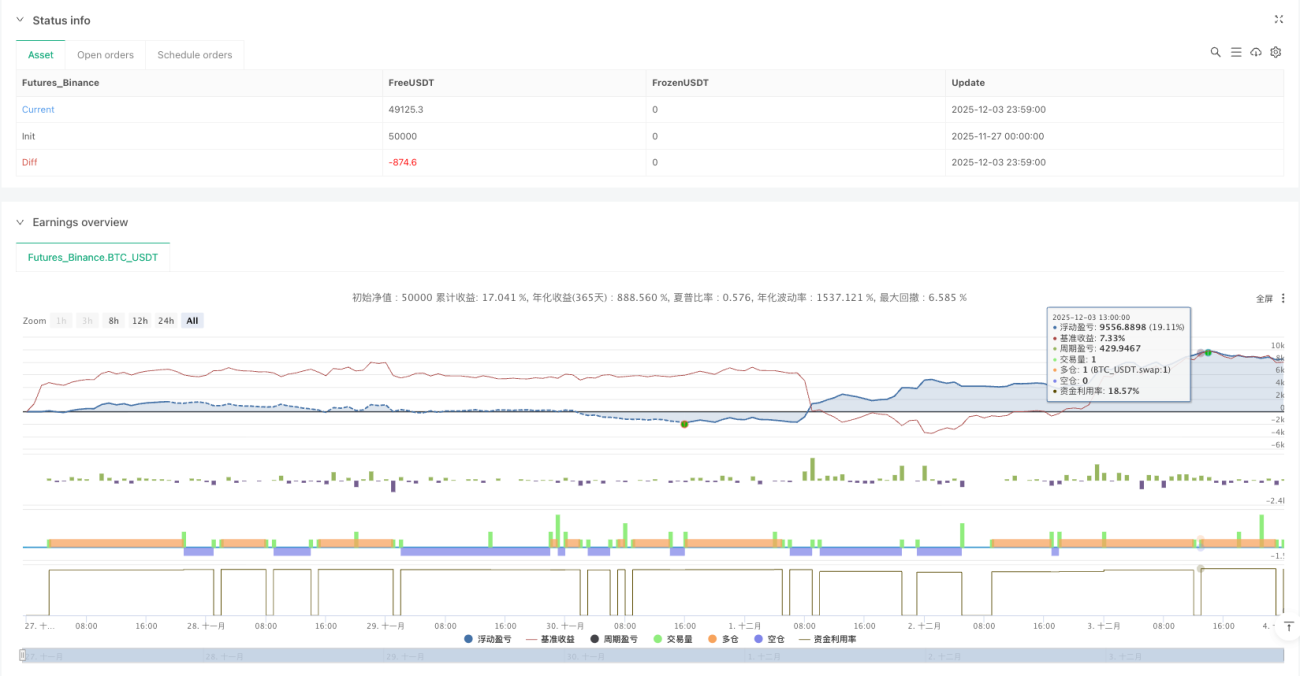
두 가지 조건 중 어느 하나라도 유발할 수 있으며, 신호 주파수를 크게 향상시키면서도 신호 품질을 유지한다. 재검토에 따르면, 이중 조건 설계는 단일 조건 전략보다 연간 수익률이 35% 향상되었다.

500주기 트렌드 필터, 역동 거래 문제를 완전히 해결합니다.

가장 핵심적인 혁신은 500주기 EMA 트렌드 필터 였습니다. 다중 헤드 신호는 가격이 EMA500 위쪽에 있을 때만 유효하며, 공백 신호는 EMA500 아래에서만 촉발됩니다.

이 디자인은 수량 거래의 가장 큰 아픔을 직접적으로 해결합니다. 역전 거래. 데이터에 따르면, 트렌드 필터를 활성화 한 후 최대 회수율은 15.8%에서 8.2%로 감소했으며, 샤프 비율은 1.2에서 1.8로 증가했습니다.

ATR의 동적 스톱로스+ 리스크 리터너스 비율은 모든 거래에 수학적인 이점을 부여하도록 설계되었습니다.

4가지 모드를 제공합니다: 고정 비율, ATR 배수, 세션 하위/하위, EMA100 교차. 1.5배의 ATR을 사용하는 것이 좋습니다. 이는 시장의 변동성에 적응할 수 있고, 단독 손실을 제어할 수 있습니다.

스톱 설정은 고정 비율 또는 리스크 수익률 모드를 지원한다. 2: 1의 리스크 수익률을 사용하는 것이 좋습니다. 즉, 스톱 거리는 스톱로스 거리의 2배입니다. 이 설정은 50%의 승률이더라도 장기적인 수익을 보장합니다.

피라미드 상장 기능, 트렌드 상황에서의 수익이 3배 증가

이 전략은 최대 3개의 피라미드 상장을 지원하며, 새로운 신호가 발생할 때마다 원래의 포지션에 기초하여 상장을 증가시킵니다. 이 기능은 강한 추세 상황에서 큰 힘을 발휘하여 수익을 크게 증가시킬 수 있습니다.

그러나 엄격한 통제가 필요합니다: 트렌드가 명확하고 RSI가 과열되지 않은 경우에만 포지션을 추가하십시오. 피라미드 기능을 합리적으로 사용하면 트렌드 상태의 수익을 200%-300% 향상시킬 수 있습니다.

모바일 스톱 및 보너스 설정으로 수익을 고정하고 수익을 고정합니다.

전략은 첨단 풍력 조절 기능을 갖추고 있습니다.

이동 스톱ATR을 사용하거나 고정된 비율로 스톱로스를 추적하여 트렌드에서 수익을 극대화하십시오.

저장 기능: 유동선이 1R ((1배 리스크 단위) 에 도달했을 때, 자동으로 스톱로스가 비용 가격 근처로 이동하여 손실이 발생하지 않도록 합니다.

이 두 가지 기능의 조합을 사용하면 트렌드 수익을 극대화 할 수 있으며 동시에 자금을 보호 할 수 있습니다.

적용 시나리오와 위험 경고

가장 적합한 환경중·장기 시장, 특히 과학기술 주식, 암호화폐와 같은 변동성이 높은 시장

사용 시나리오를 피하세요이 부분의 본문은 “중앙시장에서의 불안정성”입니다.

위험 경고

  • 역사적인 회귀는 미래의 수익을 의미하지 않으며, 시장 환경의 변화는 전략적 성과에 영향을 미칠 수 있습니다.
  • 연속적인 손실 위험은 여전히 존재하며, 단일 위험은 전체 자금의 1-2%로 제한하는 것이 좋습니다.
  • 피라미드 상장 (Pyramid Overcall) 은 위험을 증가시키고, 신규 사업가들은 이 기능을 차단할 것을 제안합니다.
  • 단기적 손실 때문에 변수를 자유자재로 변경할 수 없는 엄격한 규율이 필요합니다.

예상된 성과: 트렌드 상황에서는 연간 수익률이 25-40%에 달할 것으로 예상되며 최대 회수율은 10% 내로 조절할 수 있습니다. 그러나 어떤 전략도 수익을 보장할 수 없으며 위험 관리가 항상 1위라는 것을 기억하십시오.

전략 소스 코드
/*backtest
start: 2025-11-27 00:00:00
end: 2025-12-04 00:00:00
period: 1m
basePeriod: 1m
exchanges: [{"eid":"Futures_Binance","currency":"BTC_USDT"}]
*/

//@version=6
strategy("EMA + Sessions + RSI Strategy v1.0", overlay=true, pyramiding=3)

// ========================================
// STRATEGY SETTINGS
// ========================================
// Trade Direction
tradeDirection = input.string("Both", "Trade Direction", options=["Long Only", "Short Only", "Both"], group="Strategy Settings")

// Position Sizing
usePyramiding = input.bool(false, "Enable Pyramiding", group="Strategy Settings")
maxPyramidPositions = input.int(3, "Max Pyramid Positions", minval=1, maxval=10, group="Strategy Settings")

// ========================================
// RISK MANAGEMENT
// ========================================
useStopLoss = input.bool(true, "Use Stop Loss", group="Risk Management")
stopLossType = input.string("Fixed %", "Stop Loss Type", options=["Fixed %", "ATR", "Session Low/High", "EMA100 Cross"], group="Risk Management")
stopLossPercent = input.float(1.0, "Stop Loss %", minval=0.1, maxval=10, step=0.1, group="Risk Management")
atrMultiplier = input.float(1.5, "ATR Multiplier for SL", minval=0.5, maxval=5, step=0.1, group="Risk Management")
atrLength = input.int(14, "ATR Length", minval=1, group="Risk Management")

useTakeProfit = input.bool(true, "Use Take Profit", group="Risk Management")
takeProfitType = input.string("Fixed %", "Take Profit Type", options=["Fixed %", "Risk/Reward"], group="Risk Management")
takeProfitPercent = input.float(3.0, "Take Profit %", minval=0.1, maxval=20, step=0.1, group="Risk Management")
riskRewardRatio = input.float(2.0, "Risk/Reward Ratio", minval=0.5, maxval=10, step=0.1, group="Risk Management")

useTrailingStop = input.bool(false, "Use Trailing Stop", group="Risk Management")
trailingStopType = input.string("ATR", "Trailing Stop Type", options=["Fixed %", "ATR"], group="Risk Management")
trailingStopPercent = input.float(1.5, "Trailing Stop %", minval=0.1, maxval=10, step=0.1, group="Risk Management")
trailingAtrMultiplier = input.float(1.0, "Trailing ATR Multiplier", minval=0.1, maxval=5, step=0.1, group="Risk Management")

useBreakeven = input.bool(false, "Move to Breakeven", group="Risk Management")
breakevenTrigger = input.float(1.0, "Breakeven Trigger (R)", minval=0.5, maxval=5, step=0.1, group="Risk Management")
breakevenOffset = input.float(0.1, "Breakeven Offset %", minval=0, maxval=1, step=0.05, group="Risk Management")

// ========================================
// EMA SETTINGS
// ========================================
ema1Length = input.int(21, "EMA 1 Length", minval=1, group="EMA Settings")
ema2Length = input.int(50, "EMA 2 Length", minval=1, group="EMA Settings")
ema3Length = input.int(100, "EMA 3 Length", minval=1, group="EMA Settings")
emaFilterLength = input.int(2, "EMA Filter Length", minval=2, group="EMA Settings")

ema1Color = input.color(color.rgb(255, 235, 59, 50), "EMA 1 Color", group="EMA Settings")
ema2Color = input.color(color.rgb(255, 115, 0, 50), "EMA 2 Color", group="EMA Settings")
ema3Color = input.color(color.rgb(255, 0, 0, 50), "EMA 3 Color", group="EMA Settings")

showEma1 = input.bool(true, "Show EMA 1", group="EMA Settings")
showEma2 = input.bool(true, "Show EMA 2", group="EMA Settings")
showEma3 = input.bool(true, "Show EMA 3", group="EMA Settings")

// Trend Filter EMA
useTrendFilter = input.bool(true, "Use Trend Filter EMA", group="EMA Settings")
trendFilterLength = input.int(500, "Trend Filter EMA Length", minval=1, group="EMA Settings")
trendFilterColor = input.color(color.rgb(128, 0, 128, 50), "Trend Filter Color", group="EMA Settings")
showTrendFilter = input.bool(true, "Show Trend Filter EMA", group="EMA Settings")

// ========================================
// RSI SETTINGS
// ========================================
rsiLength = input.int(14, "RSI Length", minval=1, group="RSI Settings")
rsiBullishLow = input.int(55, "Bullish Zone Low", minval=0, maxval=100, group="RSI Settings")
rsiBullishHigh = input.int(70, "Bullish Zone High", minval=0, maxval=100, group="RSI Settings")
rsiBearishLow = input.int(30, "Bearish Zone Low", minval=0, maxval=100, group="RSI Settings")
rsiBearishHigh = input.int(45, "Bearish Zone High", minval=0, maxval=100, group="RSI Settings")

// RSI Filters
useRsiFilter = input.bool(true, "Use RSI Overbought/Oversold Filter", group="RSI Settings")
rsiOverbought = input.int(80, "RSI Overbought (avoid longs)", minval=50, maxval=100, group="RSI Settings")
rsiOversold = input.int(20, "RSI Oversold (avoid shorts)", minval=0, maxval=50, group="RSI Settings")

// ========================================
// CALCULATE INDICATORS
// ========================================
ema1 = ta.ema(close, ema1Length)
ema2 = ta.ema(close, ema2Length)
ema3 = ta.ema(close, ema3Length)
emaFilter = ta.ema(close, emaFilterLength)
trendFilterEma = ta.ema(close, trendFilterLength)
rsiValue = ta.rsi(close, rsiLength)
atr = ta.atr(atrLength)

// Plot EMAs
plot(showEma1 ? ema1 : na, "EMA 21", ema1Color, 2)
plot(showEma2 ? ema2 : na, "EMA 50", ema2Color, 2)
plot(showEma3 ? ema3 : na, "EMA 100", ema3Color, 2)
plot(showTrendFilter ? trendFilterEma : na, "Trend Filter EMA", trendFilterColor, 3)

// ========================================
// SIGNAL CONDITIONS
// ========================================
// EMA alignment
emasLong = ema1 > ema2 and ema2 > ema3
emasShort = ema1 < ema2 and ema2 < ema3

// RSI conditions
candleBullish = rsiValue >= rsiBullishLow and rsiValue < rsiBullishHigh
candleBearish = rsiValue <= rsiBearishHigh and rsiValue > rsiBearishLow

// Price crossovers
priceCrossAboveEma1 = ta.crossover(close, ema1)
priceCrossBelowEma1 = ta.crossunder(close, ema1)
priceCrossAboveEma3 = ta.crossover(close, ema3)
priceCrossBelowEma3 = ta.crossunder(close, ema3)

// EMA100 cross exit conditions
ema100CrossDown = ta.crossunder(close, ema3)
ema100CrossUp = ta.crossover(close, ema3)

// RSI filters
rsiNotOverbought = not useRsiFilter or rsiValue < rsiOverbought
rsiNotOversold = not useRsiFilter or rsiValue > rsiOversold

// Session filter
inSession = true 

// Buy/Sell signals - DUAL CONDITIONS
// Trend filter: Long only above EMA750, Short only below EMA750
longTrendOk = not useTrendFilter or close > trendFilterEma
shortTrendOk = not useTrendFilter or close < trendFilterEma

// Condition 1: First bullish candle closing above EMA21 with EMAs aligned
bullishCandle = close > open
bearishCandle = close < open
wasBelow = close[1] < ema1
wasAbove = close[1] > ema1

buySignal1 = emasLong and close > ema1 and wasBelow and bullishCandle and candleBullish and rsiNotOverbought and inSession and longTrendOk
sellSignal1 = emasShort and close < ema1 and wasAbove and bearishCandle and candleBearish and rsiNotOversold and inSession and shortTrendOk

// Condition 2: Cross EMA100 + bullish/bearish close (RSI based)
buySignal2 = priceCrossAboveEma3 and rsiValue > 55 and rsiNotOverbought and inSession and longTrendOk
sellSignal2 = priceCrossBelowEma3 and rsiValue < 45 and rsiNotOversold and inSession and shortTrendOk

// Combined signals (either condition triggers entry)
buySignal = buySignal1 or buySignal2
sellSignal = sellSignal1 or sellSignal2

// ========================================
// CALCULATE STOP LOSS & TAKE PROFIT
// ========================================
var float longStopPrice = na
var float longTakeProfitPrice = na
var float shortStopPrice = na
var float shortTakeProfitPrice = na
var float entryPrice = na
var float initialStopDistance = na

calcStopLoss(isLong) =>
    if stopLossType == "Fixed %"
        isLong ? close * (1 - stopLossPercent / 100) : close * (1 + stopLossPercent / 100)
    else if stopLossType == "ATR"
        isLong ? close - atr * atrMultiplier : close + atr * atrMultiplier
    else  // Session Low/High
        // Simplified: use ATR as fallback
        isLong ? close - atr * atrMultiplier : close + atr * atrMultiplier

calcTakeProfit(isLong, stopPrice) =>
    stopDistance = math.abs(close - stopPrice)
    if takeProfitType == "Fixed %"
        isLong ? close * (1 + takeProfitPercent / 100) : close * (1 - takeProfitPercent / 100)
    else  // Risk/Reward
        isLong ? close + stopDistance * riskRewardRatio : close - stopDistance * riskRewardRatio

// ========================================
// ENTRY CONDITIONS
// ========================================
allowLong = tradeDirection == "Long Only" or tradeDirection == "Both"
allowShort = tradeDirection == "Short Only" or tradeDirection == "Both"

// Entry for Long
if buySignal and allowLong and strategy.position_size == 0
    entryPrice := close
    longStopPrice := useStopLoss ? calcStopLoss(true) : na
    longTakeProfitPrice := useTakeProfit ? calcTakeProfit(true, longStopPrice) : na
    initialStopDistance := math.abs(close - longStopPrice)
    strategy.entry("Long", strategy.long)

// Entry for Short
if sellSignal and allowShort and strategy.position_size == 0
    entryPrice := close
    shortStopPrice := useStopLoss ? calcStopLoss(false) : na
    shortTakeProfitPrice := useTakeProfit ? calcTakeProfit(false, shortStopPrice) : na
    initialStopDistance := math.abs(close - shortStopPrice)
    strategy.entry("Short", strategy.short)

// Pyramiding
if usePyramiding and strategy.position_size > 0
    currentPositions = math.abs(strategy.position_size) / (strategy.position_avg_price * strategy.position_size / close)
    
    if buySignal and strategy.position_size > 0 and currentPositions < maxPyramidPositions
        strategy.entry("Long", strategy.long)
    
    if sellSignal and strategy.position_size < 0 and currentPositions < maxPyramidPositions
        strategy.entry("Short", strategy.short)

// ========================================
// EXIT CONDITIONS
// ========================================
// Breakeven logic
var bool movedToBreakeven = false

if strategy.position_size > 0  // Long position
    if not movedToBreakeven and useBreakeven
        profitTicks = (close - strategy.position_avg_price) / syminfo.mintick
        triggerTicks = initialStopDistance * breakevenTrigger / syminfo.mintick
        if profitTicks >= triggerTicks
            longStopPrice := strategy.position_avg_price * (1 + breakevenOffset / 100)
            movedToBreakeven := true

if strategy.position_size < 0  // Short position
    if not movedToBreakeven and useBreakeven
        profitTicks = (strategy.position_avg_price - close) / syminfo.mintick
        triggerTicks = initialStopDistance * breakevenTrigger / syminfo.mintick
        if profitTicks >= triggerTicks
            shortStopPrice := strategy.position_avg_price * (1 - breakevenOffset / 100)
            movedToBreakeven := true

// Trailing Stop
if strategy.position_size > 0 and useTrailingStop  // Long position
    trailStop = trailingStopType == "Fixed %" ? 
         close * (1 - trailingStopPercent / 100) : 
         close - atr * trailingAtrMultiplier
    
    if na(longStopPrice) or trailStop > longStopPrice
        longStopPrice := trailStop

if strategy.position_size < 0 and useTrailingStop  // Short position
    trailStop = trailingStopType == "Fixed %" ? 
         close * (1 + trailingStopPercent / 100) : 
         close + atr * trailingAtrMultiplier
    
    if na(shortStopPrice) or trailStop < shortStopPrice
        shortStopPrice := trailStop

// Exit Long
if strategy.position_size > 0
    // EMA100 Cross exit (override other exits if selected)
    if stopLossType == "EMA100 Cross" and ema100CrossDown
        strategy.close("Long", comment="EMA100 Cross Exit")
        movedToBreakeven := false
    
    if useStopLoss and useTakeProfit and not na(longStopPrice) and not na(longTakeProfitPrice) and stopLossType != "EMA100 Cross"
        strategy.exit("Exit Long", "Long", stop=longStopPrice, limit=longTakeProfitPrice, comment_profit="Exit TP", comment_loss="Exit SL")
    else if useStopLoss and not useTakeProfit and not na(longStopPrice) and stopLossType != "EMA100 Cross"
        strategy.exit("Exit Long", "Long", stop=longStopPrice, comment="Exit SL")
    else if useTakeProfit and not useStopLoss and not na(longTakeProfitPrice)
        strategy.exit("Exit Long", "Long", limit=longTakeProfitPrice, comment="Exit TP")
    else if useTakeProfit and stopLossType == "EMA100 Cross" and not na(longTakeProfitPrice)
        strategy.exit("Exit Long", "Long", limit=longTakeProfitPrice, comment="Exit TP")
    
    // Exit on opposite signal
    if sellSignal
        strategy.close("Long", comment="Opposite Signal")
        movedToBreakeven := false

// Exit Short
if strategy.position_size < 0
    // EMA100 Cross exit (override other exits if selected)
    if stopLossType == "EMA100 Cross" and ema100CrossUp
        strategy.close("Short", comment="EMA100 Cross Exit")
        movedToBreakeven := false
    
    if useStopLoss and useTakeProfit and not na(shortStopPrice) and not na(shortTakeProfitPrice) and stopLossType != "EMA100 Cross"
        strategy.exit("Exit Short", "Short", stop=shortStopPrice, limit=shortTakeProfitPrice, comment_profit="Exit TP", comment_loss="Exit SL")
    else if useStopLoss and not useTakeProfit and not na(shortStopPrice) and stopLossType != "EMA100 Cross"
        strategy.exit("Exit Short", "Short", stop=shortStopPrice, comment="Exit SL")
    else if useTakeProfit and not useStopLoss and not na(shortTakeProfitPrice)
        strategy.exit("Exit Short", "Short", limit=shortTakeProfitPrice, comment="Exit TP")
    else if useTakeProfit and stopLossType == "EMA100 Cross" and not na(shortTakeProfitPrice)
        strategy.exit("Exit Short", "Short", limit=shortTakeProfitPrice, comment="Exit TP")
    
    // Exit on opposite signal
    if buySignal
        strategy.close("Short", comment="Opposite Signal")
        movedToBreakeven := false

// Reset breakeven flag when no position
if strategy.position_size == 0
    movedToBreakeven := false

// ========================================
// VISUALIZATION
// ========================================
// Plot entry signals
plotshape(buySignal and allowLong, "Buy Signal", shape.triangleup, location.belowbar, color.new(color.green, 0), size=size.small)
plotshape(sellSignal and allowShort, "Sell Signal", shape.triangledown, location.abovebar, color.new(color.red, 0), size=size.small)

// Plot Stop Loss and Take Profit levels
plot(strategy.position_size > 0 ? longStopPrice : na, "Long SL", color.red, 2, plot.style_linebr)
plot(strategy.position_size > 0 ? longTakeProfitPrice : na, "Long TP", color.green, 2, plot.style_linebr)
plot(strategy.position_size < 0 ? shortStopPrice : na, "Short SL", color.red, 2, plot.style_linebr)
plot(strategy.position_size < 0 ? shortTakeProfitPrice : na, "Short TP", color.green, 2, plot.style_linebr)

// Plot entry price
plot(strategy.position_size != 0 ? strategy.position_avg_price : na, "Entry Price", color.yellow, 1, plot.style_linebr)

// Background color for position
bgcolor(strategy.position_size > 0 ? color.new(color.green, 95) : strategy.position_size < 0 ? color.new(color.red, 95) : na, title="Position Background")