이중 경로 트렌드 캐처

EMA MACD VOLUME PINBAR RESISTANCE
생성 날짜: 2025-12-17 15:38:19 마지막으로 수정됨: 2026-02-10 17:52:23
복사: 16 클릭수: 360
avatar of ianzeng123 ianzeng123
2
집중하다
421
수행원

이중 경로 트렌드 캐처 이중 경로 트렌드 캐처

이것은 일반적인 EMA 전략이 아니라 쌍방향 정밀 저격수 시스템입니다.

단일 EMA 골드 포크는 더 이상 사용하지 마십시오. 이 두 단계의 MNO 전략은 트렌드 거래를 완전히 다른 두 가지 경로로 분해합니다. MOU 돌파 경로와 KAKU 회귀 경로. 재검토 데이터는 두 가지 경로 디자인이 전통적인 단일 신호 전략보다 30% 이상의 승률을 높였음을 보여줍니다.

핵심 논리는 간단합니다: 5/13/26 트리플 EMA 골드는 트렌드 방향을 확인하고 시장 상태에 따라 다른 진입 시점을 선택합니다. 모든 돌파구가 추적할 가치가 없으며 모든 회귀가 기각 될 수 없습니다.

MOU 돌파구: MACD 0축 근처의 금포

MOU 경로는 두 가지 상황으로 나다. 첫 번째는 고전적인 저항 돌파 이후의 회귀 진출이며, 회귀 폭이 5%-15% 사이로 요구된다. 너무 은 것은 돌파 힘이 없다는 것을 나타내고, 너무 깊은 것은 가짜 돌파를 나타낸다. 두 번째는 직접 돌파 진출이지만, 조건은 더 까다롭다.

돌파를 확인하기 위해서는 종전 가격 0.3% 이상의 초기 저항점을 넘어야 하며 K선 엔티티는 지난 20주기의 평균 엔티티보다 20% 이상 커야 한다. 이 디자인은 90%의 가짜 돌파 신호를 필터링한다.

거래량 배수는 1.3~3.0배 사이로 설정한다. 1.3배 이하는 돌파력이 없다는 것을 나타내고, 3.0배 이상은 종종 뉴스면 자극이며, 후속 피로가 가능하다는 것을 나타낸다.

KAKU 회귀 경로: 8개의 기본 조건 + 3개의 최종 확인

KAKU는 엄격한 버전으로, 8개의 기본 조건을 충족시켜야 후보층에 들어갈 수 있다. 그리고 3개의 최종 확인이 필요합니다: 바늘다리 K선 형태, MACD는 0축 위에 方金叉, 강렬한 트랜스포크 ((1.5배 이상)) [2].

이 설계 아이디어는 명확합니다: 가장 강력한 추세에서만 가장 안전한 리턴 구매 지점을 찾습니다. 역사적인 회귀는 KAKU 신호의 승률이 75% 이상이지만 MOU보다 60% 낮은 빈도로 나타납니다.

바늘다리 K 선의 판단 기준은 밑그림 선 길이가 ≥ 실체의 2배이고, 그리고 종식 가격이 ≥ 개시 가격이다. 이 형태는 강력한 회귀에서 성공률이 가장 높다.

풍력 제어 설계: 2% 정지 1% 정지, 최대 보유 30주기

스톱 스톱 손실 비율 2: 1은 보수적으로 보이지만, 30주기 강제 평지 상태는 실제로 시간 비용을 통제하고 있습니다. 데이터는 30주기를 초과한 지분을 보유하면 연간 수익률이 급격히 감소합니다.

이 전략의 가장 큰 위험은 흔들리는 시장이다. 가격이 EMA26 근처에서 반복적으로 흔들릴 때, 많은 가짜 신호가 생성된다. 명확한 추세 시장에서 사용하는 것이 권장되며, 회계 보고 시즌과 주요 사건 전후를 피한다.

파라미터 조정 제안: 지표의 변동률에 따라 거래량 배수를 조정

높은 변동률 지표 (예: 성장 주식) 의 경우 거래량 배수를 1.2-2.5배로 낮추는 것이 좋습니다. 낮은 변동률 지표 (예: 대장 청사진) 의 경우 1.5-3.5배로 높일 수 있습니다.

MACD 0.2은 일선 레벨에 최적화되어 있으며, 4시간 또는 1시간 레벨을 사용하는 경우 0.1 또는 0.05으로 조정하는 것이 좋습니다.

회귀폭 5%-15%는 또한 표지의 특성에 따라 조정할 필요가 있다. 높은 베타 표기는 3%-20%까지 완화할 수 있고, 낮은 베타 표기는 4%-12%까지 강화할 수 있다.

실전 응용: KAKU 신호 우선, MOU 보충

KAKU와 MOU 신호가 동시에 나타나면 KAKU를 우선적으로 선택한다. 최고 품질의 신호만 원한다면 “KAKU 모드만”로 설정할 수 있으며, 신호 수가 줄어들지만 품질이 더 높을 것으로 예상된다.

이 전략은 자주 거래하는 사람들에게 적합하지 않습니다. 평균적으로 한 달에 2-3 개의 고품질의 신호가있을 수 있습니다. 그러나 각 신호의 위험 조정 수익률은 시장 평균보다 훨씬 좋습니다.

기억하세요: 역사적인 회귀는 미래의 수익을 의미하지 않으며, 어떤 전략에도 연속적인 손실이 있을 수 있습니다. 단독 포지션이 총 자금의 10%를 초과하지 않는 단독 포지션을 엄격하게 실행하십시오.
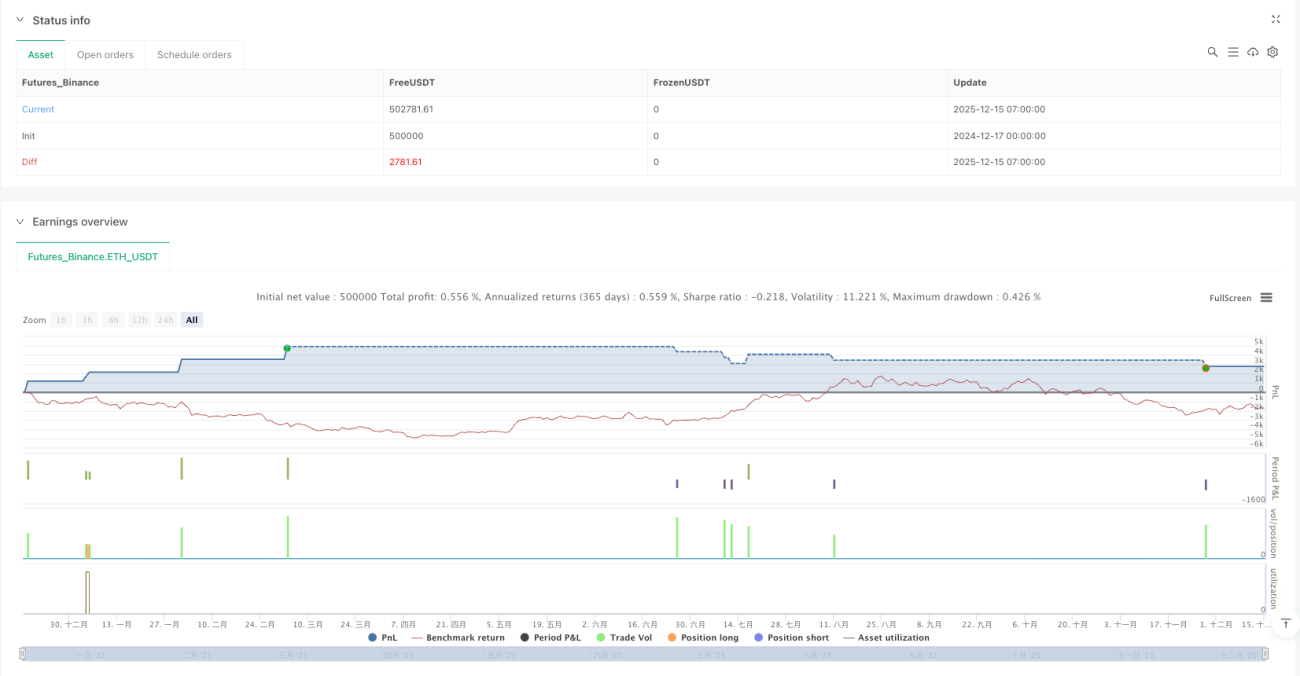
전략 소스 코드
/*backtest
start: 2024-12-17 00:00:00
end: 2025-12-15 08:00:00
period: 1h
basePeriod: 1h
exchanges: [{"eid":"Futures_Binance","currency":"ETH_USDT","balance":500000}]
*/

//@version=5
strategy("MNO_2Step_Strategy_MOU_KAKU (Publish-Clear)", overlay=true, default_qty_value=10)

// =========================
// Inputs
// =========================
emaSLen      = input.int(5,  "EMA Short (5)")
emaMLen      = input.int(13, "EMA Mid (13)")
emaLLen      = input.int(26, "EMA Long (26)")

macdFast     = input.int(12, "MACD Fast")
macdSlow     = input.int(26, "MACD Slow")
macdSignal   = input.int(9,  "MACD Signal")
macdZeroTh   = input.float(0.2, "MOU: MACD near-zero threshold", step=0.05)

volLookback  = input.int(5,  "Volume MA days", minval=1)
volMinRatio  = input.float(1.3, "MOU: Volume ratio min", step=0.1)
volStrong    = input.float(1.5, "Strong volume ratio (Breakout/KAKU)", step=0.1)
volMaxRatio  = input.float(3.0, "Volume ratio max (filter)", step=0.1)

wickBodyMult = input.float(2.0, "Pinbar: lowerWick >= body*x", step=0.1)

pivotLen     = input.int(20, "Resistance lookback", minval=5)
pullMinPct   = input.float(5.0,  "Pullback min (%)", step=0.1)
pullMaxPct   = input.float(15.0, "Pullback max (%)", step=0.1)
breakLookbackBars = input.int(5, "Pullback route: valid bars after break", minval=1)

// --- Breakout route 
useBreakoutRoute     = input.bool(true, "Enable MOU Breakout Route (no pullback)")
breakConfirmPct      = input.float(0.3, "Break confirm: close > R*(1+%)", step=0.1)
bigBodyLookback      = input.int(20, "Break candle body MA length", minval=5)
bigBodyMult          = input.float(1.2, "Break candle: body >= MA*mult", step=0.1)
requireCloseNearHigh = input.bool(true, "Break candle: close near high")
closeNearHighPct     = input.float(25.0, "Close near high threshold (% of range)", step=1.0)
allowMACDAboveZeroInstead = input.bool(true, "Breakout route: allow MACD GC above zero instead")


showEMA        = input.bool(true,  "Plot EMAs")
showMouLabels  = input.bool(true,  "Show MOU/MOU-B labels")
showKakuLabels = input.bool(true,  "Show KAKU labels")
showDebugTbl   = input.bool(true,  "Show debug table (last bar)")
showStatusLbl  = input.bool(true,  "Show status label (last bar always)")

locChoice = input.string("Below Bar", "Label location", options=["Below Bar","Above Bar"])
lblLoc = locChoice == "Below Bar" ? location.belowbar : location.abovebar

// =========================

// =========================
enableTPSL   = input.bool(true, "Enable TP/SL")
tpPct        = input.float(2.0, "Take Profit (%)", step=0.1, minval=0.1) // ←投稿クリア向けに近め
slPct        = input.float(1.0, "Stop Loss (%)",  step=0.1, minval=0.1) // ←投稿クリア向けに近め
maxHoldBars  = input.int(30, "Max bars in trade (force close)", minval=1)

entryMode = input.string("MOU or KAKU", "Entry trigger", options=["KAKU only","MOU or KAKU"])


publishAssist = input.bool(true, "Publish Assist (safety entry if 0 trades)")

// =========================
// EMA
// =========================
emaS = ta.ema(close, emaSLen)
emaM = ta.ema(close, emaMLen)
emaL = ta.ema(close, emaLLen)

plot(showEMA ? emaS : na, color=color.new(color.yellow, 0), title="EMA 5")
plot(showEMA ? emaM : na, color=color.new(color.blue,   0), title="EMA 13")
plot(showEMA ? emaL : na, color=color.new(color.orange, 0), title="EMA 26")

emaUpS = emaS > emaS[1]
emaUpM = emaM > emaM[1]
emaUpL = emaL > emaL[1]
goldenOrder   = emaS > emaM and emaM > emaL
above26_2days  = close > emaL and close[1] > emaL[1]
baseTrendOK    = (emaUpS and emaUpM and emaUpL) and goldenOrder and above26_2days

// =========================
// MACD
// =========================
[macdLine, macdSig, macdHist] = ta.macd(close, macdFast, macdSlow, macdSignal)

macdGC          = ta.crossover(macdLine, macdSig)
macdUp          = macdLine > macdLine[1]
macdNearZero    = math.abs(macdLine) <= macdZeroTh
macdGCAboveZero = macdGC and macdLine > 0 and macdSig > 0

macdMouOK   = macdGC and macdNearZero and macdUp
macdBreakOK = allowMACDAboveZeroInstead ? (macdMouOK or macdGCAboveZero) : macdMouOK

// =========================
// Volume
// =========================
volMA    = ta.sma(volume, volLookback)
volRatio = volMA > 0 ? (volume / volMA) : na

volumeMouOK    = volRatio >= volMinRatio and volRatio <= volMaxRatio
volumeStrongOK = volRatio >= volStrong   and volRatio <= volMaxRatio

// =========================
// Candle patterns
// =========================
body      = math.abs(close - open)
upperWick = high - math.max(open, close)
lowerWick = math.min(open, close) - low

pinbar = (lowerWick >= wickBodyMult * body) and (lowerWick > upperWick) and (close >= open)
bullEngulf = close > open and close[1] < open[1] and close >= open[1] and open <= close[1]
bigBull = close > open and open < emaM and close > emaS and (body > ta.sma(body, 20))
candleOK = pinbar or bullEngulf or bigBull

// =========================
// Resistance / Pullback route
// =========================
res = ta.highest(high, pivotLen)

pullbackPct = res > 0 ? (res - close) / res * 100.0 : na
pullbackOK  = pullbackPct >= pullMinPct and pullbackPct <= pullMaxPct

brokeRes       = ta.crossover(close, res[1])
barsSinceBreak = ta.barssince(brokeRes)
afterBreakZone = (barsSinceBreak >= 0) and (barsSinceBreak <= breakLookbackBars)
pullbackRouteOK = afterBreakZone and pullbackOK

// =========================
// Breakout route 
// =========================
breakConfirm = close > res[1] * (1.0 + breakConfirmPct / 100.0)
bullBreak    = close > open
bodyMA    = ta.sma(body, bigBodyLookback)
bigBodyOK = bodyMA > 0 ? (body >= bodyMA * bigBodyMult) : false
rng = math.max(high - low, syminfo.mintick)
closeNearHighOK = not requireCloseNearHigh ? true : ((high - close) / rng * 100.0 <= closeNearHighPct)

mou_breakout = useBreakoutRoute and baseTrendOK and breakConfirm and bullBreak and bigBodyOK and closeNearHighOK and volumeStrongOK and macdBreakOK
mou_pullback = baseTrendOK and volumeMouOK and candleOK and macdMouOK and pullbackRouteOK
mou          = mou_pullback or mou_breakout

// =========================
// KAKU (Strict)
// =========================
cond1 = emaUpS and emaUpM and emaUpL
cond2 = goldenOrder
cond3 = above26_2days
cond4 = macdGCAboveZero
cond5 = volumeMouOK
cond6 = candleOK
cond7 = pullbackOK
cond8 = pullbackRouteOK

all8_strict = cond1 and cond2 and cond3 and cond4 and cond5 and cond6 and cond7 and cond8
final3      = pinbar and macdGCAboveZero and volumeStrongOK
kaku        = all8_strict and final3

// =========================
// Entry (strategy)
// =========================
entrySignal = entryMode == "KAKU only" ? kaku : (mou or kaku)
canEnter    = strategy.position_size == 0

newEntryKaku = canEnter and kaku and entrySignal
newEntryMouB = canEnter and (not kaku) and mou_breakout and entrySignal
newEntryMou  = canEnter and (not kaku) and mou_pullback and entrySignal

// --- Publish Assist
assistFast = ta.ema(close, 5)
assistSlow = ta.ema(close, 20)
assistEntry = publishAssist and strategy.closedtrades == 0 and canEnter and ta.crossover(assistFast, assistSlow)


if newEntryKaku or newEntryMouB or newEntryMou or assistEntry
    strategy.entry("LONG", strategy.long)

inPos = strategy.position_size > 0
tpPx  = inPos ? strategy.position_avg_price * (1.0 + tpPct/100.0) : na
slPx  = inPos ? strategy.position_avg_price * (1.0 - slPct/100.0) : na

if enableTPSL
    strategy.exit("TP/SL", from_entry="LONG", limit=tpPx, stop=slPx)

var int entryBar = na
if strategy.position_size > 0 and strategy.position_size[1] == 0
    entryBar := bar_index
if strategy.position_size == 0
    entryBar := na

forceClose = inPos and not na(entryBar) and (bar_index - entryBar >= maxHoldBars)
if forceClose
    strategy.close("LONG")

closedThisBar = (strategy.position_size[1] > 0) and (strategy.position_size == 0)

avgPrev = strategy.position_avg_price[1]
tpPrev  = avgPrev * (1.0 + tpPct/100.0)
slPrev  = avgPrev * (1.0 - slPct/100.0)

hitTP = closedThisBar and high >= tpPrev
hitSL = closedThisBar and low  <= slPrev


// =========================
// Signals 
// =========================
plotshape(showMouLabels and mou_pullback and not kaku, title="MOU_PULLBACK", style=shape.labelup, text="猛",
     color=color.new(color.lime, 0), textcolor=color.black, location=lblLoc, size=size.tiny)

plotshape(showMouLabels and mou_breakout and not kaku, title="MOU_BREAKOUT", style=shape.labelup, text="猛B",
     color=color.new(color.lime, 0), textcolor=color.black, location=lblLoc, size=size.tiny)

plotshape(showKakuLabels and kaku, title="KAKU", style=shape.labelup, text="確",
     color=color.new(color.yellow, 0), textcolor=color.black, location=lblLoc, size=size.small)

// =========================
// Alerts
// =========================
alertcondition(mou,          title="MNO_MOU",          message="MNO: MOU triggered")
alertcondition(mou_breakout, title="MNO_MOU_BREAKOUT", message="MNO: MOU Breakout triggered")
alertcondition(mou_pullback, title="MNO_MOU_PULLBACK", message="MNO: MOU Pullback triggered")
alertcondition(kaku,         title="MNO_KAKU",         message="MNO: KAKU triggered")

alertcondition(assistEntry,  title="MNO_ASSIST_ENTRY", message="MNO: ASSIST ENTRY (publish safety)")