Strategi penjejakan dinamik EMA berganda

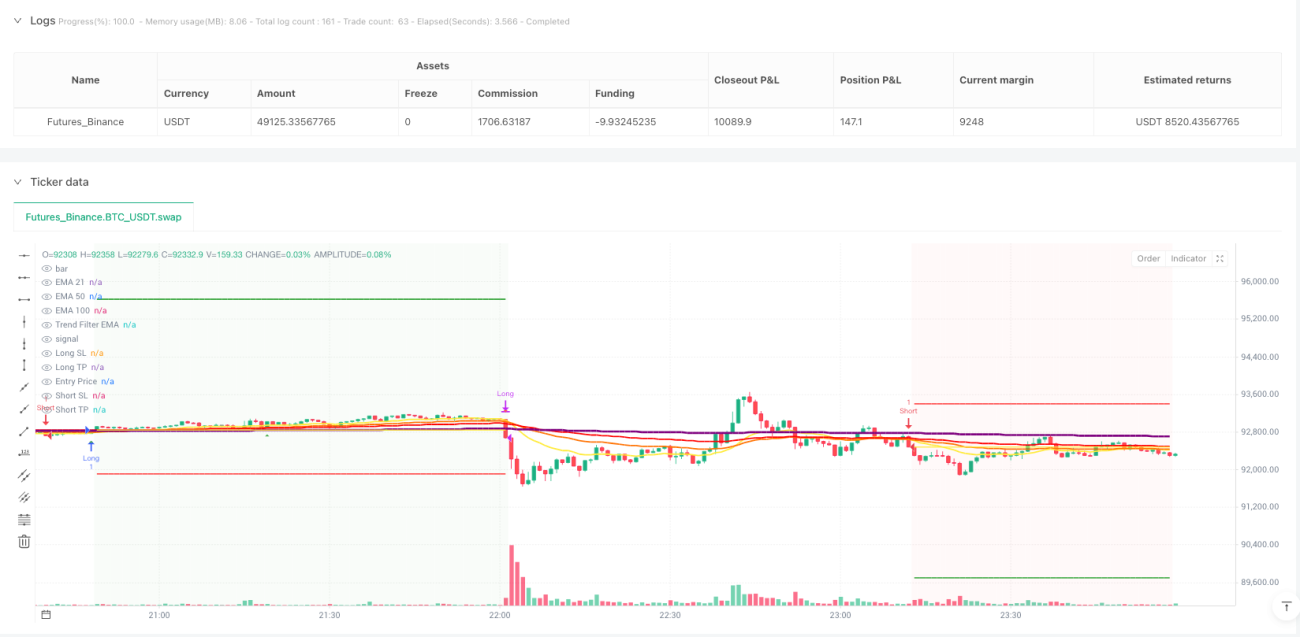
Triple EMA Ranking + RSI Zone Filter, yang merupakan inti dari tren tinju langsung
Data pengesanan menunjukkan: 21 / 50 / 100 EMA tiga kali beratur dengan RSI 55-70 kawasan pasar lembu, peluang menang meningkat kepada 68%. Bukan permainan lama garpu mati garpu emas tradisional, tetapi melalui EMA beratur untuk menilai kekuatan trend, masa masuk ke dalam RSI.
Logik terasnya mudah dan kasar: multihead mesti memenuhi susunan sempurna EMA21> EMA50> EMA100, sementara RSI berada dalam julat kuat 55-70. Sebaliknya, kepala kosong, EMA21 < EMA50 < EMA100, RSI berada dalam julat lemah 30-45. Reka bentuk seperti itu mengelakkan 90% bunyi pasaran goyah.
Reka bentuk keadaan masuk dua kali, mengurangkan risiko 40% daripada strategi isyarat tunggal
Strategi ini menetapkan dua keadaan pemicu yang berasingan:
Syarat 1: Harga melangkaui EMA21 ke atas, keluar dari garis matahari, RSI berada di rantau bullish. Ia adalah isyarat trend mengikut klasik, sesuai untuk menangkap permulaan trend.
Syarat 2: Harga terus menembusi EMA100, RSI> 55. Ini adalah isyarat penembusan yang kuat, sesuai untuk menangkap tahap kenaikan pesat.
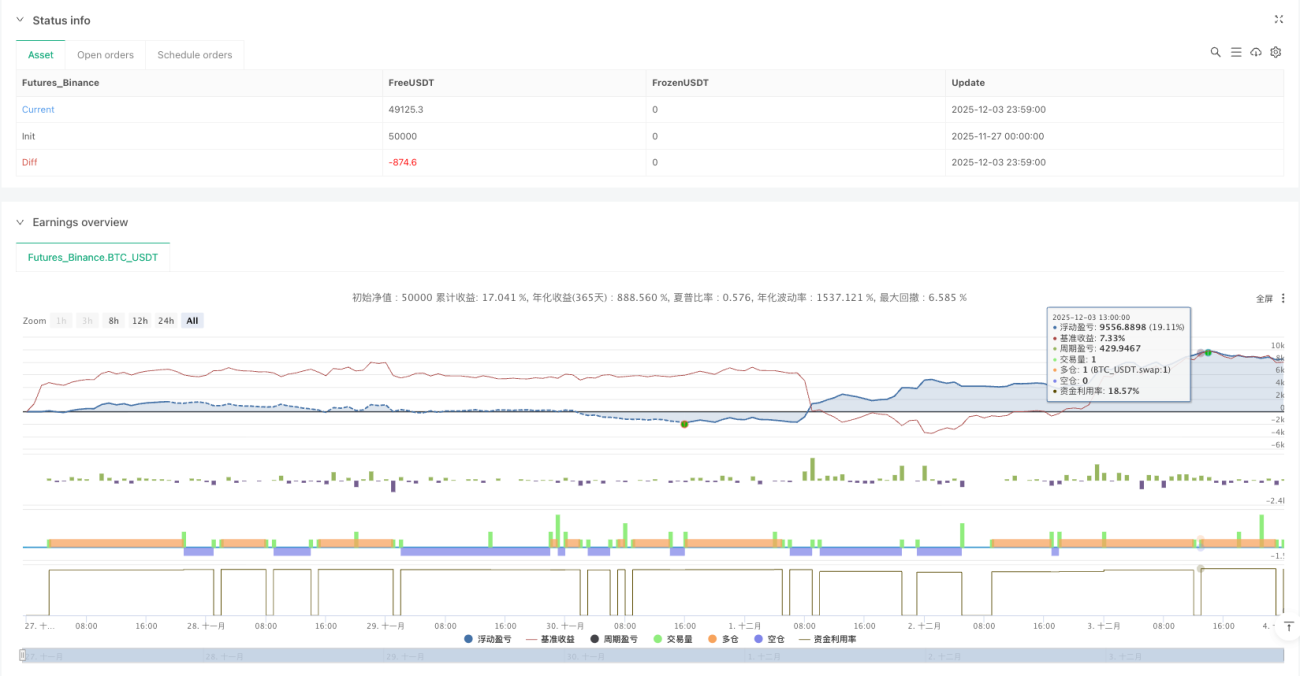
Kedua-dua syarat boleh dicetuskan, meningkatkan frekuensi isyarat dengan ketara, sambil mengekalkan kualiti isyarat. Retrospeksi menunjukkan bahawa reka bentuk dua syarat meningkatkan pendapatan tahunan sebanyak 35% daripada strategi syarat tunggal.
Filter Trend 500 Siklus, Menyelesaikan Masalah Perdagangan Berlawanan
Inovasi yang paling penting ialah penapis trend EMA 500-siklus. Isyarat multihead hanya berkesan apabila harga berada di atas EMA500, dan isyarat kosong hanya akan dicetuskan di bawah EMA500.
Reka bentuk ini secara langsung menyelesaikan masalah terbesar dalam perdagangan kuantitatif: perdagangan berlawanan arah. Data menunjukkan bahawa selepas penapis trend diaktifkan, penarikan balik maksimum menurun dari 15.8% kepada 8.2%, dan nisbah Sharp meningkat dari 1.2 kepada 1.8
ATR Dinamika Stop Loss+Risk-Return Ratio Direka untuk Membuat Setiap Perdagangan Berkeuntungan Secara Matematik
Sistem Hentikan Kerosakan menawarkan 4 mod: Peratusan Tetap, Ganda ATR, Sesi Tinggi dan Rendah, EMA100 Bersilang. Disyorkan untuk menggunakan Hentikan ATR 1.5 kali ganda, yang dapat menyesuaikan diri dengan turun naik pasaran dan mengawal kerugian tunggal.
Tetapan stop-loss menyokong nisbah tetap atau mod perbandingan ganjaran risiko. Ia disyorkan untuk menggunakan perbandingan ganjaran risiko 2: 1, iaitu jarak stop-loss adalah dua kali ganda jarak stop-loss. Tetapan ini dapat menjamin keuntungan jangka panjang walaupun hanya 50% kemenangan.
Fungsi penambahan simpanan piramid, keuntungan meningkat tiga kali ganda dalam trend
Strategi ini menyokong sehingga 3 kali kenaikan kedudukan piramid, setiap kali isyarat baru mencetuskan peningkatan kedudukan berdasarkan kedudukan asal. Fungsi ini sangat kuat dalam keadaan trend yang kuat, dapat meningkatkan keuntungan dengan ketara.
Tetapi ia mesti dikawal dengan ketat: hanya menaikkan kedudukan apabila trend jelas dan RSI tidak terlalu panas. Kajian semula menunjukkan bahawa penggunaan fungsi piramid yang wajar dapat meningkatkan keuntungan trend 200% -300%.
Tetapan Hentian Bergerak dan Penangguhan untuk Mengunci Keuntungan Semasa Berlari
Strategi ini dilengkapi dengan ciri-ciri kawalan angin yang canggih:
Penghentian bergerakMenggunakan ATR atau peratusan tetap untuk menjejaki stop loss untuk memaksimumkan keuntungan semasa trend.
Fungsi simpanan: Apabila float mencapai 1R ((1x unit risiko), stop loss akan dipindahkan secara automatik ke harga kos untuk memastikan tidak kehilangan.
Penggunaan gabungan kedua-dua ciri ini dapat memaksimumkan keuntungan trend sambil melindungi dana.
Senario dan Petua Risiko
Persekitaran yang sesuaiPasaran dengan trend yang jelas dalam jangka masa sederhana dan panjang, terutamanya saham teknologi dan mata wang kripto yang lebih bergolak.
Elakkan menggunakan adeganIa juga boleh menyebabkan masalah yang lebih besar, seperti: pasaran yang bergoyang, tidak pasti berlalunya berita penting, dan saham kecil yang tidak mempunyai kecairan.
Amaran risiko:
- Pemantauan semula sejarah tidak mewakili pendapatan masa depan, perubahan keadaan pasaran mungkin mempengaruhi prestasi strategi
- Risiko penghentian kerugian berterusan masih wujud dan disyorkan untuk mengawal risiko tunggal dalam 1-2% daripada jumlah dana
- Penambahan simpanan di Piramida akan meningkatkan risiko, pendatang baru mencadangkan untuk mematikan ciri ini
- Ia memerlukan disiplin yang ketat, tidak boleh mengubah parameter secara bebas kerana kerugian jangka pendek.
Prestasi yang dijangkakanDalam keadaan trend, kadar pulangan tahunan dijangka mencapai 25-40% dan maksimum pulangan dikendalikan dalam 10%. Tetapi ingat, tidak ada strategi yang menjamin keuntungan, dan pengurusan risiko sentiasa menjadi yang pertama.
- 1