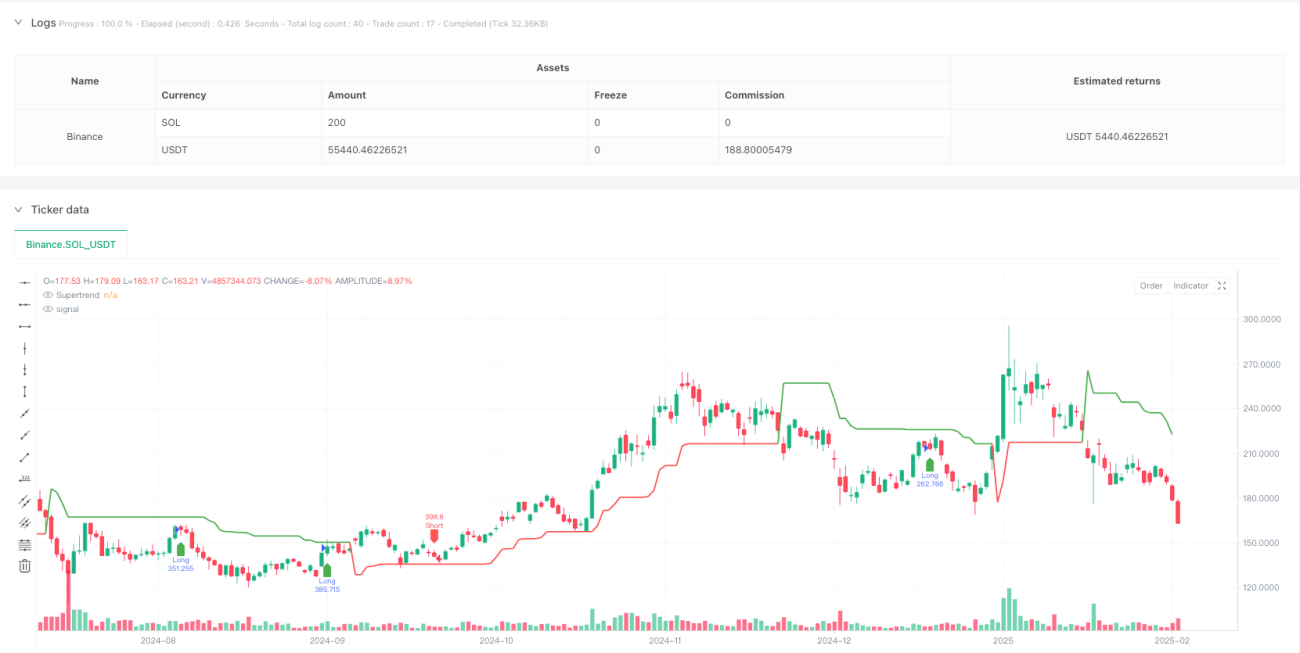
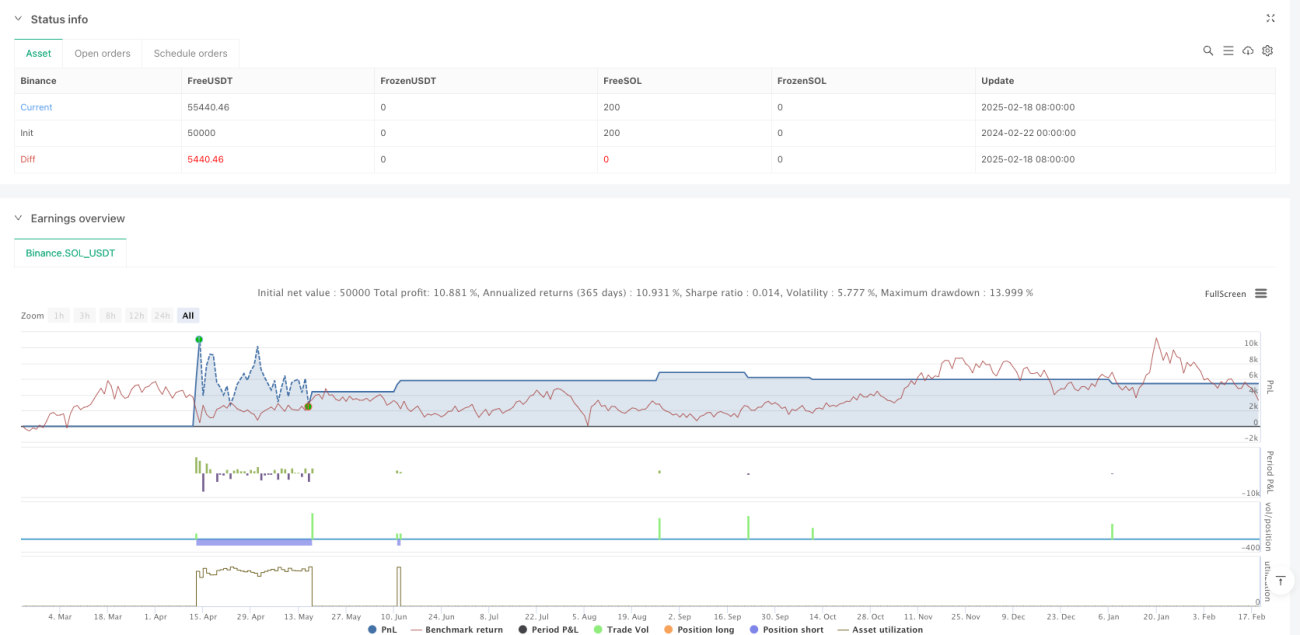
Estratégia de negociação de tendências adaptáveis de fusão multiindicador

Visão geral
A estratégia é um sistema de negociação de acompanhamento de tendências auto-adaptável que integra vários indicadores técnicos. Ele combina o sistema de equilíbrio (EMA), o indicador de momentum (RSI), o indicador de tendência (MACD) e o SuperTrend para a confirmação de sinais e está equipado com um mecanismo de gestão de risco completo, incluindo funções como stop loss, stop loss e stop loss móvel.
Princípio da estratégia
A estratégia usa um mecanismo de confirmação de sinais em várias camadas:
- Determinação da direção inicial da tendência através da interseção dos EMAs de 9 e 21 ciclos
- Usando o RSI ((14) para o filtro de sobrecompra e sobrevenda, os sinais de compra requerem RSI> 40 e <70, os sinais de venda requerem RSI<60 e> 30
- O indicador MACD verifica a dinâmica da tendência, exigindo que a linha de sinal coincida com a linha MACD
- O indicador SuperTrend fornece uma confirmação de tendência adicional
- Controle de risco com 5% de stop loss, 10% de stop loss, 2% de tracking stop loss e 1% de guardas
O sinal de negociação é acionado quando todas as condições são preenchidas ao mesmo tempo, reduzindo o risco de falhas.
Vantagens estratégicas
- Mecanismos de confirmação de múltiplos sinais reduzem significativamente a interferência de falso sinal
- Sistema de controlo de risco completo, incluindo stop loss fixo, stop loss móvel e stop loss de garantia
- Estratégias com boa adaptabilidade a diferentes contextos de mercado
- Logística de entrada e saída clara, fácil de entender e manter
- A lógica de negociação tem uma boa base teórica e cada indicador tem uma função específica
Risco estratégico
- A confirmação de múltiplos sinais pode levar a perder oportunidades importantes de negociação.
- No mercado de alta volatilidade, um stop loss fixo pode não ser suficientemente flexível
- A otimização de parâmetros pode levar ao overfitting de dados históricos
- Vários indicadores podem gerar sinais de confusão no mercado horizontal
As soluções incluem: ajuste dinâmico dos parâmetros de stop loss, introdução de indicadores de taxa de flutuação, otimização periódica dos parâmetros, etc.
Direção de otimização da estratégia
- Introdução de um mecanismo de parâmetros de adaptação, ajustando os parâmetros de acordo com a dinâmica da volatilidade do mercado
- Aumento dos indicadores de volume de transações como ferramenta auxiliar de confirmação
- Otimização do mecanismo de suspensão de perdas, introdução de suspensão dinâmica baseada em ATR
- Adição de módulos de identificação de cenários de mercado, usando diferentes combinações de parâmetros em diferentes condições de mercado
- Desenvolvimento de sistemas de otimização de parâmetros baseados em aprendizado de máquina
Resumir
A estratégia, por meio da colaboração de indicadores técnicos multidimensionais, constrói um sistema de negociação robusto. Um mecanismo de controle de risco perfeito e uma lógica de negociação clara tornam-na de boa prática. Embora haja algum espaço para otimização, a estrutura básica da estratégia possui uma base teórica sólida, e espera-se que a sua eficácia de negociação seja ainda melhorada através de otimização e melhoria contínuas.
/*backtest
start: 2024-02-22 00:00:00
end: 2025-02-19 08:00:00
period: 1d
basePeriod: 1d
exchanges: [{"eid":"Binance","currency":"SOL_USDT"}]
*/

//@version=5
strategy("Optimized BTC Trading Strategy v2", overlay=true, default_qty_type=strategy.percent_of_equity, default_qty_value=100, commission_type=strategy.commission.percent, commission_value=0.1)

// Input parameters- 1