
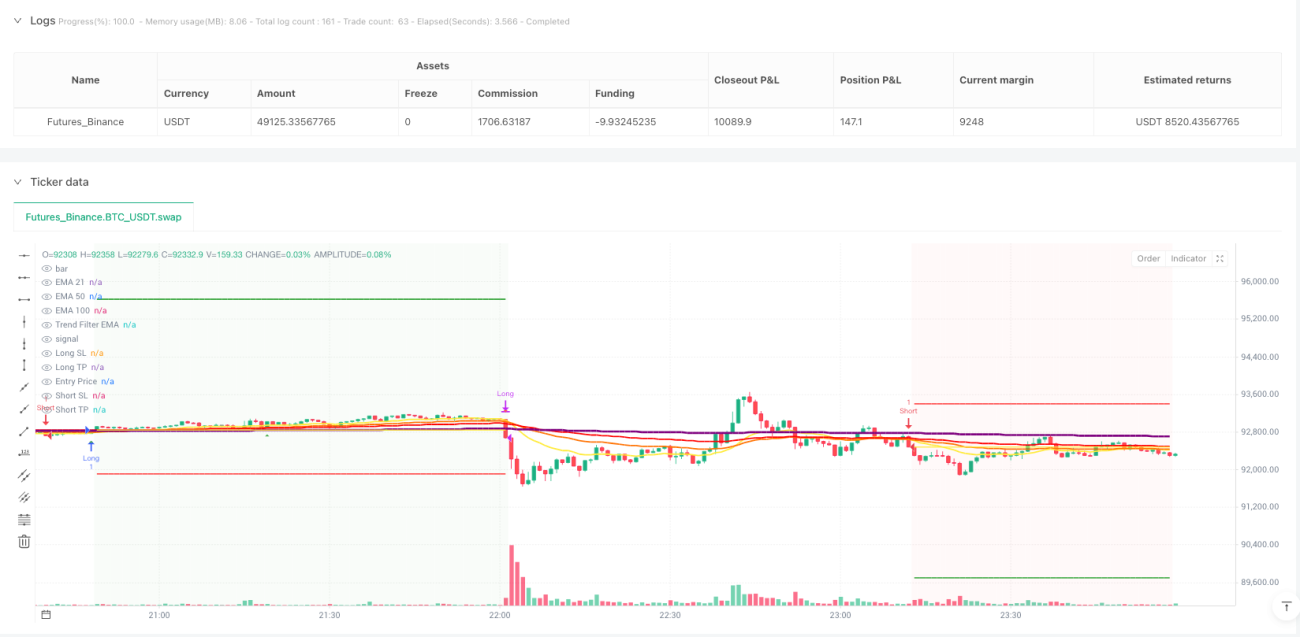
Отзывные данные показывают: Тройная EMA 21 / 50 / 100 сочетается с RSI 55-70 в районе бычьего рынка, и выигрышная вероятность повышается до 68%. Это не традиционная игра в старую игру с золотой форкой, а с помощью EMA, чтобы определить силу тренда, RSI фильтрует время входа на поле.
Основная логика простая и грубая: многоголовые должны удовлетворять идеальному сочетанию EMA21> EMA50> EMA100, в то время как RSI находится в сильной зоне 55-70. Пустые головы, наоборот, EMA21
Стратегия предусматривает два независимых условия для входа:
Условие 1: цена прорывается вверх от нижней части EMA21, заканчивается солнечный свет, RSI находится в районе бычьего рынка. Это классический сигнал следования тренду, подходящий для запуска тренда.
Условие 2: цена прямо пробивает EMA100, RSI> 55. Это сильный сигнал прорыва, подходящий для захвата ускоренной фазы роста.
Любое из двух условий может быть активировано, что значительно повышает частоту сигнала, сохраняя качество сигнала. Опрос показал, что двухусловное проектирование повышает годовую прибыль на 35% по сравнению с одноусловной стратегией.
Ключевым новшеством является фильтр тренда EMA на 500 циклов. Многоголовый сигнал действует только в том случае, если цена находится выше EMA500, а пустой сигнал - только в том случае, если цена находится ниже EMA500.
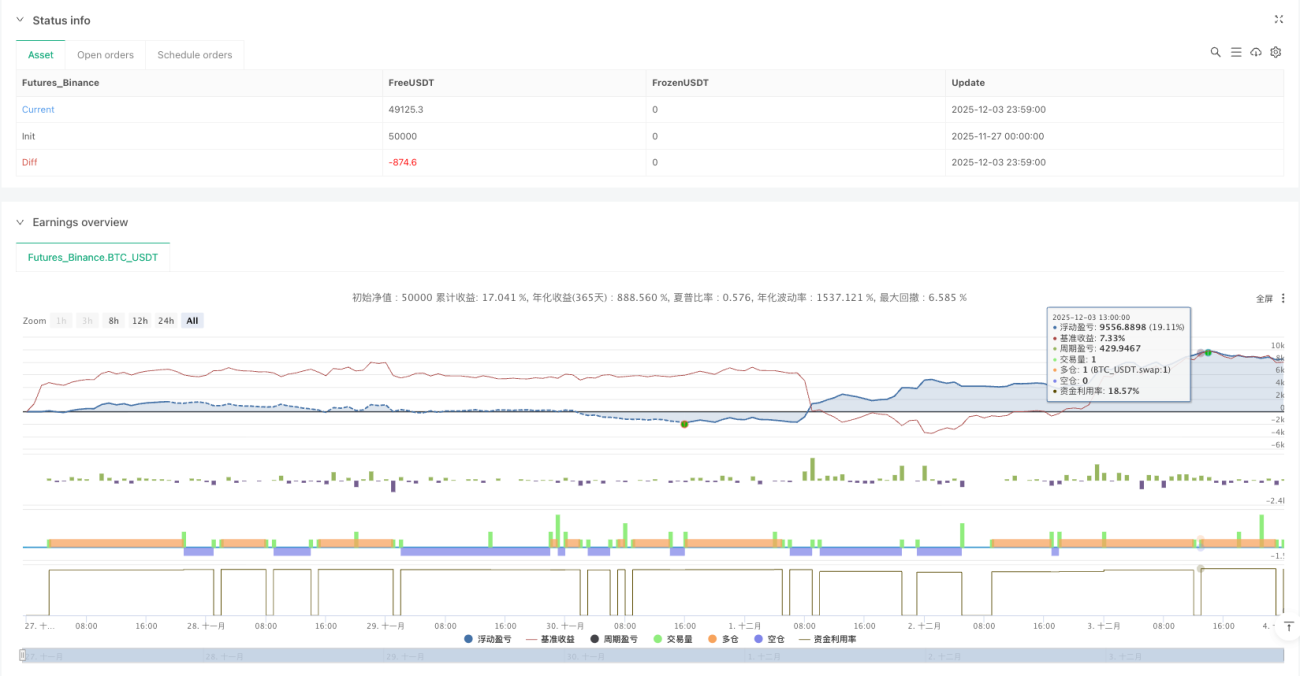
Данные показывают, что после включения фильтрации тенденций максимальный отход снизился с 15,8% до 8,2%, а коэффициент Шарпа вырос с 1,2 до 1,8.
Система сдерживания убытков предлагает 4 режима: фиксированный процент, ATR-множественный, сессионный максимум и минимум, EMA100 перекрестный. Рекомендуется использовать 1,5-кратный ATR-стоп, который может адаптироваться к волатильности рынка и контролировать одиночные убытки.
Стоп-старт настройки поддерживают фиксированный коэффициент или рисково-возмездный коэффициент. Рекомендуется использовать рисково-возмездный коэффициент 2:1, то есть стоп-старт расстояние в два раза больше, чем стоп-старт расстояние. Эта настройка может гарантировать долгосрочную прибыль, даже если выигрыш составляет только 50%.
Стратегия поддерживает до 3 пирамидных пополнений, при каждом новом сигнале увеличивается позиция на основе первоначальной позиции. Эта функция имеет большое значение в условиях сильного тренда и может значительно увеличить прибыль.
Однако следует соблюдать строгие правила: только при наличии четкой тенденции, когда RSI не перегревается, можно делать ставки. Опросы показывают, что разумное использование функции пирамиды может повысить прибыль от трендового курса на 200-300%.
В этой статье мы рассмотрим некоторые из них.
Двигательная остановкаСтремитесь увеличить прибыль в тренде, используя ATR или фиксированные процентные стопы.
Функция сохранения: когда волатильность достигает 1R ((1 раза больше единицы риска), автоматически переносится стоп-убыток вблизи стоимости, чтобы гарантировать, что убытки не уйдут.
Использование этих двух функций в сочетании позволяет максимально увеличить прибыль от тренда при одновременной защите капитала.
Оптимальная средаРынок с ясными тенденциями в среднесрочной и долгосрочной перспективе, в частности, такие волатильные рынки, как акции технологических компаний и криптовалюты.
Избегайте сценНапример, рыночные ценные бумаги, которые не имеют стабильного рынка ценных бумаг, могут оказаться неэффективными, если они не подвержены риску, связанному с высоким уровнем инфляции.
Предупреждение об опасности:
Ожидаемые результатыВ случае с трендовыми тенденциями, годовая доходность может достигать 25-40%, а максимальный вывод может быть в пределах 10%. Но помните, что никакая стратегия не гарантирует прибыльность, а управление рисками всегда на первом месте.
/*backtest
start: 2025-11-27 00:00:00
end: 2025-12-04 00:00:00
period: 1m
basePeriod: 1m
exchanges: [{"eid":"Futures_Binance","currency":"BTC_USDT"}]
*/
//@version=6
strategy("EMA + Sessions + RSI Strategy v1.0", overlay=true, pyramiding=3)
// ========================================
// STRATEGY SETTINGS
// ========================================
// Trade Direction
tradeDirection = input.string("Both", "Trade Direction", options=["Long Only", "Short Only", "Both"], group="Strategy Settings")
// Position Sizing
usePyramiding = input.bool(false, "Enable Pyramiding", group="Strategy Settings")
maxPyramidPositions = input.int(3, "Max Pyramid Positions", minval=1, maxval=10, group="Strategy Settings")
// ========================================
// RISK MANAGEMENT
// ========================================
useStopLoss = input.bool(true, "Use Stop Loss", group="Risk Management")
stopLossType = input.string("Fixed %", "Stop Loss Type", options=["Fixed %", "ATR", "Session Low/High", "EMA100 Cross"], group="Risk Management")
stopLossPercent = input.float(1.0, "Stop Loss %", minval=0.1, maxval=10, step=0.1, group="Risk Management")
atrMultiplier = input.float(1.5, "ATR Multiplier for SL", minval=0.5, maxval=5, step=0.1, group="Risk Management")
atrLength = input.int(14, "ATR Length", minval=1, group="Risk Management")
useTakeProfit = input.bool(true, "Use Take Profit", group="Risk Management")
takeProfitType = input.string("Fixed %", "Take Profit Type", options=["Fixed %", "Risk/Reward"], group="Risk Management")
takeProfitPercent = input.float(3.0, "Take Profit %", minval=0.1, maxval=20, step=0.1, group="Risk Management")
riskRewardRatio = input.float(2.0, "Risk/Reward Ratio", minval=0.5, maxval=10, step=0.1, group="Risk Management")
useTrailingStop = input.bool(false, "Use Trailing Stop", group="Risk Management")
trailingStopType = input.string("ATR", "Trailing Stop Type", options=["Fixed %", "ATR"], group="Risk Management")
trailingStopPercent = input.float(1.5, "Trailing Stop %", minval=0.1, maxval=10, step=0.1, group="Risk Management")
trailingAtrMultiplier = input.float(1.0, "Trailing ATR Multiplier", minval=0.1, maxval=5, step=0.1, group="Risk Management")
useBreakeven = input.bool(false, "Move to Breakeven", group="Risk Management")
breakevenTrigger = input.float(1.0, "Breakeven Trigger (R)", minval=0.5, maxval=5, step=0.1, group="Risk Management")
breakevenOffset = input.float(0.1, "Breakeven Offset %", minval=0, maxval=1, step=0.05, group="Risk Management")
// ========================================
// EMA SETTINGS
// ========================================
ema1Length = input.int(21, "EMA 1 Length", minval=1, group="EMA Settings")
ema2Length = input.int(50, "EMA 2 Length", minval=1, group="EMA Settings")
ema3Length = input.int(100, "EMA 3 Length", minval=1, group="EMA Settings")
emaFilterLength = input.int(2, "EMA Filter Length", minval=2, group="EMA Settings")
ema1Color = input.color(color.rgb(255, 235, 59, 50), "EMA 1 Color", group="EMA Settings")
ema2Color = input.color(color.rgb(255, 115, 0, 50), "EMA 2 Color", group="EMA Settings")
ema3Color = input.color(color.rgb(255, 0, 0, 50), "EMA 3 Color", group="EMA Settings")
showEma1 = input.bool(true, "Show EMA 1", group="EMA Settings")
showEma2 = input.bool(true, "Show EMA 2", group="EMA Settings")
showEma3 = input.bool(true, "Show EMA 3", group="EMA Settings")
// Trend Filter EMA
useTrendFilter = input.bool(true, "Use Trend Filter EMA", group="EMA Settings")
trendFilterLength = input.int(500, "Trend Filter EMA Length", minval=1, group="EMA Settings")
trendFilterColor = input.color(color.rgb(128, 0, 128, 50), "Trend Filter Color", group="EMA Settings")
showTrendFilter = input.bool(true, "Show Trend Filter EMA", group="EMA Settings")
// ========================================
// RSI SETTINGS
// ========================================
rsiLength = input.int(14, "RSI Length", minval=1, group="RSI Settings")
rsiBullishLow = input.int(55, "Bullish Zone Low", minval=0, maxval=100, group="RSI Settings")
rsiBullishHigh = input.int(70, "Bullish Zone High", minval=0, maxval=100, group="RSI Settings")
rsiBearishLow = input.int(30, "Bearish Zone Low", minval=0, maxval=100, group="RSI Settings")
rsiBearishHigh = input.int(45, "Bearish Zone High", minval=0, maxval=100, group="RSI Settings")
// RSI Filters
useRsiFilter = input.bool(true, "Use RSI Overbought/Oversold Filter", group="RSI Settings")
rsiOverbought = input.int(80, "RSI Overbought (avoid longs)", minval=50, maxval=100, group="RSI Settings")
rsiOversold = input.int(20, "RSI Oversold (avoid shorts)", minval=0, maxval=50, group="RSI Settings")
// ========================================
// CALCULATE INDICATORS
// ========================================
ema1 = ta.ema(close, ema1Length)
ema2 = ta.ema(close, ema2Length)
ema3 = ta.ema(close, ema3Length)
emaFilter = ta.ema(close, emaFilterLength)
trendFilterEma = ta.ema(close, trendFilterLength)
rsiValue = ta.rsi(close, rsiLength)
atr = ta.atr(atrLength)
// Plot EMAs
plot(showEma1 ? ema1 : na, "EMA 21", ema1Color, 2)
plot(showEma2 ? ema2 : na, "EMA 50", ema2Color, 2)
plot(showEma3 ? ema3 : na, "EMA 100", ema3Color, 2)
plot(showTrendFilter ? trendFilterEma : na, "Trend Filter EMA", trendFilterColor, 3)
// ========================================
// SIGNAL CONDITIONS
// ========================================
// EMA alignment
emasLong = ema1 > ema2 and ema2 > ema3
emasShort = ema1 < ema2 and ema2 < ema3
// RSI conditions
candleBullish = rsiValue >= rsiBullishLow and rsiValue < rsiBullishHigh
candleBearish = rsiValue <= rsiBearishHigh and rsiValue > rsiBearishLow
// Price crossovers
priceCrossAboveEma1 = ta.crossover(close, ema1)
priceCrossBelowEma1 = ta.crossunder(close, ema1)
priceCrossAboveEma3 = ta.crossover(close, ema3)
priceCrossBelowEma3 = ta.crossunder(close, ema3)
// EMA100 cross exit conditions
ema100CrossDown = ta.crossunder(close, ema3)
ema100CrossUp = ta.crossover(close, ema3)
// RSI filters
rsiNotOverbought = not useRsiFilter or rsiValue < rsiOverbought
rsiNotOversold = not useRsiFilter or rsiValue > rsiOversold
// Session filter
inSession = true
// Buy/Sell signals - DUAL CONDITIONS
// Trend filter: Long only above EMA750, Short only below EMA750
longTrendOk = not useTrendFilter or close > trendFilterEma
shortTrendOk = not useTrendFilter or close < trendFilterEma
// Condition 1: First bullish candle closing above EMA21 with EMAs aligned
bullishCandle = close > open
bearishCandle = close < open
wasBelow = close[1] < ema1
wasAbove = close[1] > ema1
buySignal1 = emasLong and close > ema1 and wasBelow and bullishCandle and candleBullish and rsiNotOverbought and inSession and longTrendOk
sellSignal1 = emasShort and close < ema1 and wasAbove and bearishCandle and candleBearish and rsiNotOversold and inSession and shortTrendOk
// Condition 2: Cross EMA100 + bullish/bearish close (RSI based)
buySignal2 = priceCrossAboveEma3 and rsiValue > 55 and rsiNotOverbought and inSession and longTrendOk
sellSignal2 = priceCrossBelowEma3 and rsiValue < 45 and rsiNotOversold and inSession and shortTrendOk
// Combined signals (either condition triggers entry)
buySignal = buySignal1 or buySignal2
sellSignal = sellSignal1 or sellSignal2
// ========================================
// CALCULATE STOP LOSS & TAKE PROFIT
// ========================================
var float longStopPrice = na
var float longTakeProfitPrice = na
var float shortStopPrice = na
var float shortTakeProfitPrice = na
var float entryPrice = na
var float initialStopDistance = na
calcStopLoss(isLong) =>
if stopLossType == "Fixed %"
isLong ? close * (1 - stopLossPercent / 100) : close * (1 + stopLossPercent / 100)
else if stopLossType == "ATR"
isLong ? close - atr * atrMultiplier : close + atr * atrMultiplier
else // Session Low/High
// Simplified: use ATR as fallback
isLong ? close - atr * atrMultiplier : close + atr * atrMultiplier
calcTakeProfit(isLong, stopPrice) =>
stopDistance = math.abs(close - stopPrice)
if takeProfitType == "Fixed %"
isLong ? close * (1 + takeProfitPercent / 100) : close * (1 - takeProfitPercent / 100)
else // Risk/Reward
isLong ? close + stopDistance * riskRewardRatio : close - stopDistance * riskRewardRatio
// ========================================
// ENTRY CONDITIONS
// ========================================
allowLong = tradeDirection == "Long Only" or tradeDirection == "Both"
allowShort = tradeDirection == "Short Only" or tradeDirection == "Both"
// Entry for Long
if buySignal and allowLong and strategy.position_size == 0
entryPrice := close
longStopPrice := useStopLoss ? calcStopLoss(true) : na
longTakeProfitPrice := useTakeProfit ? calcTakeProfit(true, longStopPrice) : na
initialStopDistance := math.abs(close - longStopPrice)
strategy.entry("Long", strategy.long)
// Entry for Short
if sellSignal and allowShort and strategy.position_size == 0
entryPrice := close
shortStopPrice := useStopLoss ? calcStopLoss(false) : na
shortTakeProfitPrice := useTakeProfit ? calcTakeProfit(false, shortStopPrice) : na
initialStopDistance := math.abs(close - shortStopPrice)
strategy.entry("Short", strategy.short)
// Pyramiding
if usePyramiding and strategy.position_size > 0
currentPositions = math.abs(strategy.position_size) / (strategy.position_avg_price * strategy.position_size / close)
if buySignal and strategy.position_size > 0 and currentPositions < maxPyramidPositions
strategy.entry("Long", strategy.long)
if sellSignal and strategy.position_size < 0 and currentPositions < maxPyramidPositions
strategy.entry("Short", strategy.short)
// ========================================
// EXIT CONDITIONS
// ========================================
// Breakeven logic
var bool movedToBreakeven = false
if strategy.position_size > 0 // Long position
if not movedToBreakeven and useBreakeven
profitTicks = (close - strategy.position_avg_price) / syminfo.mintick
triggerTicks = initialStopDistance * breakevenTrigger / syminfo.mintick
if profitTicks >= triggerTicks
longStopPrice := strategy.position_avg_price * (1 + breakevenOffset / 100)
movedToBreakeven := true
if strategy.position_size < 0 // Short position
if not movedToBreakeven and useBreakeven
profitTicks = (strategy.position_avg_price - close) / syminfo.mintick
triggerTicks = initialStopDistance * breakevenTrigger / syminfo.mintick
if profitTicks >= triggerTicks
shortStopPrice := strategy.position_avg_price * (1 - breakevenOffset / 100)
movedToBreakeven := true
// Trailing Stop
if strategy.position_size > 0 and useTrailingStop // Long position
trailStop = trailingStopType == "Fixed %" ?
close * (1 - trailingStopPercent / 100) :
close - atr * trailingAtrMultiplier
if na(longStopPrice) or trailStop > longStopPrice
longStopPrice := trailStop
if strategy.position_size < 0 and useTrailingStop // Short position
trailStop = trailingStopType == "Fixed %" ?
close * (1 + trailingStopPercent / 100) :
close + atr * trailingAtrMultiplier
if na(shortStopPrice) or trailStop < shortStopPrice
shortStopPrice := trailStop
// Exit Long
if strategy.position_size > 0
// EMA100 Cross exit (override other exits if selected)
if stopLossType == "EMA100 Cross" and ema100CrossDown
strategy.close("Long", comment="EMA100 Cross Exit")
movedToBreakeven := false
if useStopLoss and useTakeProfit and not na(longStopPrice) and not na(longTakeProfitPrice) and stopLossType != "EMA100 Cross"
strategy.exit("Exit Long", "Long", stop=longStopPrice, limit=longTakeProfitPrice, comment_profit="Exit TP", comment_loss="Exit SL")
else if useStopLoss and not useTakeProfit and not na(longStopPrice) and stopLossType != "EMA100 Cross"
strategy.exit("Exit Long", "Long", stop=longStopPrice, comment="Exit SL")
else if useTakeProfit and not useStopLoss and not na(longTakeProfitPrice)
strategy.exit("Exit Long", "Long", limit=longTakeProfitPrice, comment="Exit TP")
else if useTakeProfit and stopLossType == "EMA100 Cross" and not na(longTakeProfitPrice)
strategy.exit("Exit Long", "Long", limit=longTakeProfitPrice, comment="Exit TP")
// Exit on opposite signal
if sellSignal
strategy.close("Long", comment="Opposite Signal")
movedToBreakeven := false
// Exit Short
if strategy.position_size < 0
// EMA100 Cross exit (override other exits if selected)
if stopLossType == "EMA100 Cross" and ema100CrossUp
strategy.close("Short", comment="EMA100 Cross Exit")
movedToBreakeven := false
if useStopLoss and useTakeProfit and not na(shortStopPrice) and not na(shortTakeProfitPrice) and stopLossType != "EMA100 Cross"
strategy.exit("Exit Short", "Short", stop=shortStopPrice, limit=shortTakeProfitPrice, comment_profit="Exit TP", comment_loss="Exit SL")
else if useStopLoss and not useTakeProfit and not na(shortStopPrice) and stopLossType != "EMA100 Cross"
strategy.exit("Exit Short", "Short", stop=shortStopPrice, comment="Exit SL")
else if useTakeProfit and not useStopLoss and not na(shortTakeProfitPrice)
strategy.exit("Exit Short", "Short", limit=shortTakeProfitPrice, comment="Exit TP")
else if useTakeProfit and stopLossType == "EMA100 Cross" and not na(shortTakeProfitPrice)
strategy.exit("Exit Short", "Short", limit=shortTakeProfitPrice, comment="Exit TP")
// Exit on opposite signal
if buySignal
strategy.close("Short", comment="Opposite Signal")
movedToBreakeven := false
// Reset breakeven flag when no position
if strategy.position_size == 0
movedToBreakeven := false
// ========================================
// VISUALIZATION
// ========================================
// Plot entry signals
plotshape(buySignal and allowLong, "Buy Signal", shape.triangleup, location.belowbar, color.new(color.green, 0), size=size.small)
plotshape(sellSignal and allowShort, "Sell Signal", shape.triangledown, location.abovebar, color.new(color.red, 0), size=size.small)
// Plot Stop Loss and Take Profit levels
plot(strategy.position_size > 0 ? longStopPrice : na, "Long SL", color.red, 2, plot.style_linebr)
plot(strategy.position_size > 0 ? longTakeProfitPrice : na, "Long TP", color.green, 2, plot.style_linebr)
plot(strategy.position_size < 0 ? shortStopPrice : na, "Short SL", color.red, 2, plot.style_linebr)
plot(strategy.position_size < 0 ? shortTakeProfitPrice : na, "Short TP", color.green, 2, plot.style_linebr)
// Plot entry price
plot(strategy.position_size != 0 ? strategy.position_avg_price : na, "Entry Price", color.yellow, 1, plot.style_linebr)
// Background color for position
bgcolor(strategy.position_size > 0 ? color.new(color.green, 95) : strategy.position_size < 0 ? color.new(color.red, 95) : na, title="Position Background")