
ریٹائرمنٹ کے اعداد و شمار سے پتہ چلتا ہے: 21 / 50 / 100 ٹرپل ای ایم اے کی صف آر ایس آئی 55-70 بیل مارکیٹ کے علاقے کے ساتھ مل کر ، جیتنے کی شرح 68 فیصد تک بڑھ گئی ہے۔ روایتی گولڈ فورک ڈیڈ فورک کے پرانے دانتوں کا کھیل نہیں ، بلکہ ای ایم اے کی صف سے رجحان کی طاقت کا فیصلہ کیا جاتا ہے ، آر ایس آئی کے علاقے میں داخل ہونے کا وقت فلٹر کریں۔
بنیادی منطق سادہ اور کھردرا ہے: کثیر سر کو EMA21> EMA50> EMA100 کی کامل صف بندی کو پورا کرنا ہوگا ، جبکہ RSI 55-70 کی مضبوط حد میں ہے۔ اس کے برعکس ، خالی سر EMA21 < EMA50 < EMA100 ، RSI 30-45 کی کمزور حد میں ہے۔ اس طرح کے ڈیزائن سے 90٪ شیک مارکیٹ کے شور سے بچا جاتا ہے۔
اس حکمت عملی کے تحت دو الگ الگ شرائط ہیں:
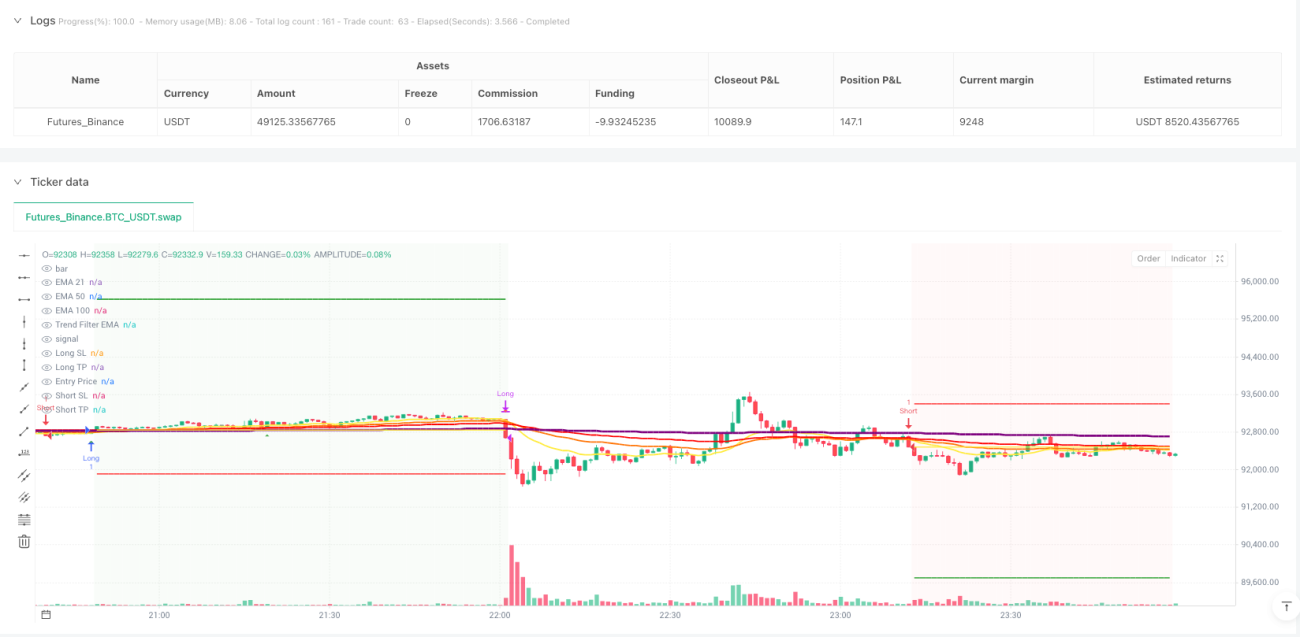
شرط 1: قیمت EMA21 کے نیچے سے ٹوٹ کر اوپر کی طرف بڑھتی ہے ، سورج کی روشنی ختم ہوتی ہے ، RSI بیل کے علاقے میں ہے۔ یہ ایک کلاسک رجحان کی پیروی کا اشارہ ہے ، جو رجحان کو پکڑنے کے لئے موزوں ہے۔
شرط 2قیمتوں کا براہ راست EMA100 کو توڑنا ، RSI> 55 یہ ایک مضبوط بریک سگنل ہے ، جو تیزی سے اوپر کی طرف بڑھنے کے لئے موزوں ہے۔
دونوں شرائط میں سے کسی ایک کو متحرک کیا جاسکتا ہے ، جس سے سگنل کی تعدد میں نمایاں اضافہ ہوتا ہے ، جبکہ سگنل کی کوالٹی کو برقرار رکھا جاتا ہے۔ ریٹرننگ سے پتہ چلتا ہے کہ دو شرائط کے ڈیزائن نے ایک ہی شرط کی حکمت عملی کے مقابلے میں سالانہ آمدنی میں 35٪ اضافہ کیا ہے۔
سب سے اہم جدت 500 دوروں EMA رجحان فلٹر ہے۔ کثیر سر سگنل صرف اس وقت کام کرتا ہے جب قیمت EMA500 سے اوپر ہو ، اور خالی سر سگنل صرف EMA500 کے نیچے ہوتا ہے۔
یہ ڈیزائن براہ راست کوانٹم ٹریڈنگ کے سب سے بڑے درد کو حل کرتا ہے: الٹا ٹریڈنگ۔ اعداد و شمار سے پتہ چلتا ہے کہ رجحان فلٹر کو چالو کرنے کے بعد ، زیادہ سے زیادہ واپسی 15.8٪ سے کم ہوکر 8.2٪ ہوگئی ، اور شارپ تناسب 1.2 سے بڑھ کر 1.8٪ ہوگئی۔
اسٹاپ سسٹم 4 طریقوں کی پیش کش کرتا ہے: فکسڈ فی صد ، اے ٹی آر ضرب ، سیشن ہائی لوڈ ، ای ایم اے 100 کراس۔ 1.5x اے ٹی آر اسٹاپ استعمال کرنے کی سفارش کی جاتی ہے ، جو مارکیٹ میں اتار چڑھاؤ کو اپنانے کے ساتھ ساتھ انفرادی نقصان کو بھی کنٹرول کرسکتی ہے۔
اسٹاپ اسٹاپ کی ترتیب فکسڈ تناسب یا رسک ریٹرن ریشو موڈ کی حمایت کرتی ہے۔ یہ تجویز کی جاتی ہے کہ 2: 1 رسک ریٹرن کا استعمال کیا جائے ، یعنی اسٹاپ اسٹاپ فاصلہ اسٹاپ نقصان کے فاصلے سے دوگنا ہے۔ یہاں تک کہ اگر جیتنے کی شرح صرف 50٪ ہے تو ، یہ ترتیب طویل مدتی منافع کی ضمانت دے سکتی ہے۔
اس حکمت عملی میں زیادہ سے زیادہ 3 بار پیرامڈ کی پوزیشنوں کی حمایت کی جاتی ہے ، اور ہر بار جب نیا سگنل ٹرگر ہوتا ہے تو اس کی پوزیشن کی بنیاد پر پوزیشن میں اضافہ ہوتا ہے۔ یہ خصوصیت مضبوط رجحانات کے حالات میں بہت طاقت ور ہے ، جس سے آمدنی میں نمایاں اضافہ ہوتا ہے۔
تاہم ، اس پر سختی سے قابو رکھنا ضروری ہے: جب رجحان واضح ہو اور آر ایس آئی زیادہ گرم نہ ہو تو ہی پوزیشنیں لگائیں۔ جائزہ سے پتہ چلتا ہے کہ پائرمڈ فنکشن کا معقول استعمال رجحانات کی صورت میں 200٪ -300٪ تک کی آمدنی میں اضافہ کرسکتا ہے۔
اس کے علاوہ ، اس میں ہوا کے کنٹرول کے لیے جدید ترین ٹولز بھی شامل ہیں۔
موبائل سٹاپٹریڈنگ ٹولز: ٹریڈنگ ٹولز کے لئے ٹریڈنگ ٹولز کے لئے ٹریڈنگ ٹولز کے لئے ٹریڈنگ ٹولز: ٹریڈنگ ٹولز کے لئے ٹریڈنگ ٹولز کے لئے ٹریڈنگ ٹولز کے لئے ٹریڈنگ ٹولز: ٹریڈنگ ٹولز کے لئے ٹریڈنگ ٹولز کے لئے ٹریڈنگ ٹولز: ٹریڈنگ ٹولز کے لئے ٹریڈنگ ٹولز
بچت کا فنکشنجب فلوٹ 1R (ایک گنا خطرہ یونٹ) تک پہنچ جاتا ہے تو ، اسٹاپ نقصان کو خود بخود لاگت کی قیمت کے قریب منتقل کیا جاتا ہے ، اس بات کو یقینی بنانا کہ کوئی نقصان نہ ہو۔
ان دونوں خصوصیات کا مجموعہ استعمال کرتے ہوئے ، آپ اپنے فنڈز کی حفاظت کے ساتھ ساتھ رجحانات سے زیادہ سے زیادہ فائدہ اٹھاسکتے ہیں۔
بہترین ماحولمارکیٹوں میں واضح درمیانی اور طویل مدتی رجحانات ، خاص طور پر سب سے زیادہ اتار چڑھاؤ والی اقسام جیسے ٹیک اسٹاک اور کریپٹو کرنسی۔
منظر نامے سے بچیںاس کے علاوہ ، اس نے کہا کہ اس کی وجہ یہ ہے کہ اس کی وجہ یہ ہے کہ اس کی وجہ سے اس کی وجہ سے اس کی وجہ سے اس کی وجہ سے اس کی وجہ سے اس کی وجہ سے اس کی وجہ سے اس کی وجہ سے اس کی وجہ سے اس کی وجہ سے ہے.
خطرے کی انتباہ:
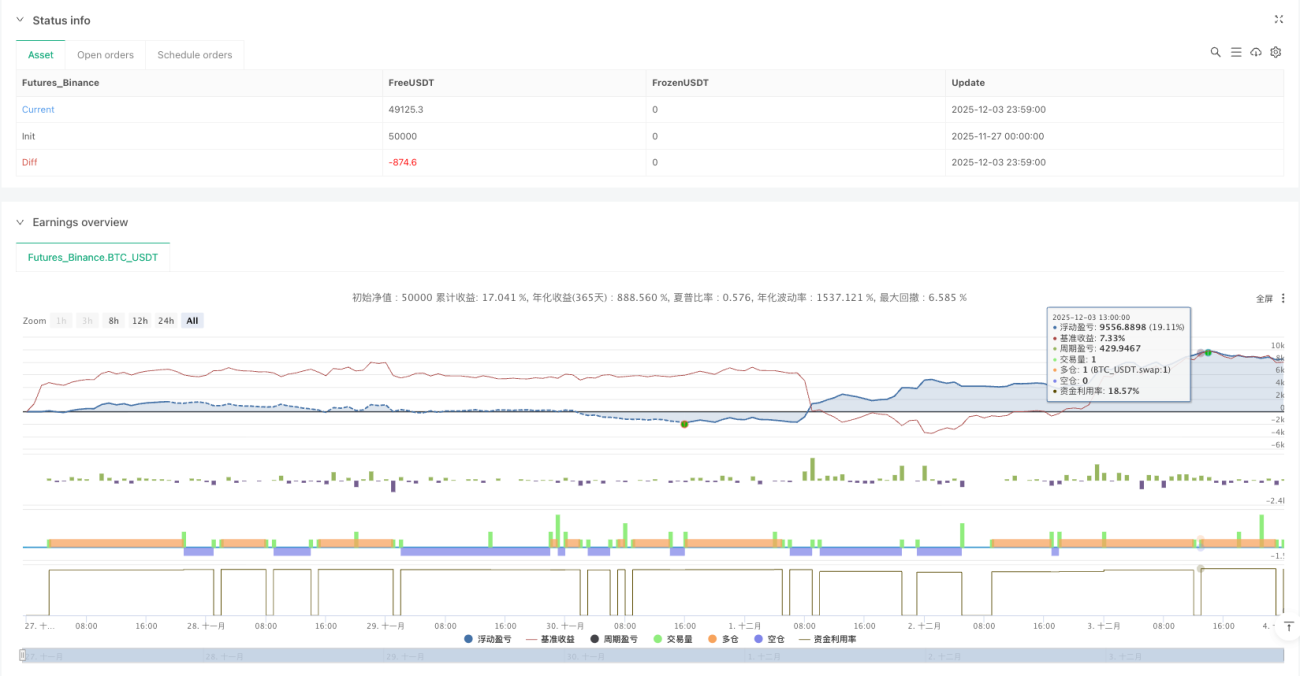
متوقع کارکردگی: رجحان سازی کے حالات میں ، سالانہ واپسی کی شرح 25-40٪ تک پہنچنے کا امکان ہے۔ 10٪ کے اندر زیادہ سے زیادہ واپسی پر قابو پالیں۔ لیکن یاد رکھیں کہ کوئی بھی حکمت عملی منافع کی ضمانت نہیں دے سکتی ، اور خطرہ کا انتظام ہمیشہ پہلے نمبر پر ہوگا۔
/*backtest
start: 2025-11-27 00:00:00
end: 2025-12-04 00:00:00
period: 1m
basePeriod: 1m
exchanges: [{"eid":"Futures_Binance","currency":"BTC_USDT"}]
*/
//@version=6
strategy("EMA + Sessions + RSI Strategy v1.0", overlay=true, pyramiding=3)
// ========================================
// STRATEGY SETTINGS
// ========================================
// Trade Direction
tradeDirection = input.string("Both", "Trade Direction", options=["Long Only", "Short Only", "Both"], group="Strategy Settings")
// Position Sizing
usePyramiding = input.bool(false, "Enable Pyramiding", group="Strategy Settings")
maxPyramidPositions = input.int(3, "Max Pyramid Positions", minval=1, maxval=10, group="Strategy Settings")
// ========================================
// RISK MANAGEMENT
// ========================================
useStopLoss = input.bool(true, "Use Stop Loss", group="Risk Management")
stopLossType = input.string("Fixed %", "Stop Loss Type", options=["Fixed %", "ATR", "Session Low/High", "EMA100 Cross"], group="Risk Management")
stopLossPercent = input.float(1.0, "Stop Loss %", minval=0.1, maxval=10, step=0.1, group="Risk Management")
atrMultiplier = input.float(1.5, "ATR Multiplier for SL", minval=0.5, maxval=5, step=0.1, group="Risk Management")
atrLength = input.int(14, "ATR Length", minval=1, group="Risk Management")
useTakeProfit = input.bool(true, "Use Take Profit", group="Risk Management")
takeProfitType = input.string("Fixed %", "Take Profit Type", options=["Fixed %", "Risk/Reward"], group="Risk Management")
takeProfitPercent = input.float(3.0, "Take Profit %", minval=0.1, maxval=20, step=0.1, group="Risk Management")
riskRewardRatio = input.float(2.0, "Risk/Reward Ratio", minval=0.5, maxval=10, step=0.1, group="Risk Management")
useTrailingStop = input.bool(false, "Use Trailing Stop", group="Risk Management")
trailingStopType = input.string("ATR", "Trailing Stop Type", options=["Fixed %", "ATR"], group="Risk Management")
trailingStopPercent = input.float(1.5, "Trailing Stop %", minval=0.1, maxval=10, step=0.1, group="Risk Management")
trailingAtrMultiplier = input.float(1.0, "Trailing ATR Multiplier", minval=0.1, maxval=5, step=0.1, group="Risk Management")
useBreakeven = input.bool(false, "Move to Breakeven", group="Risk Management")
breakevenTrigger = input.float(1.0, "Breakeven Trigger (R)", minval=0.5, maxval=5, step=0.1, group="Risk Management")
breakevenOffset = input.float(0.1, "Breakeven Offset %", minval=0, maxval=1, step=0.05, group="Risk Management")
// ========================================
// EMA SETTINGS
// ========================================
ema1Length = input.int(21, "EMA 1 Length", minval=1, group="EMA Settings")
ema2Length = input.int(50, "EMA 2 Length", minval=1, group="EMA Settings")
ema3Length = input.int(100, "EMA 3 Length", minval=1, group="EMA Settings")
emaFilterLength = input.int(2, "EMA Filter Length", minval=2, group="EMA Settings")
ema1Color = input.color(color.rgb(255, 235, 59, 50), "EMA 1 Color", group="EMA Settings")
ema2Color = input.color(color.rgb(255, 115, 0, 50), "EMA 2 Color", group="EMA Settings")
ema3Color = input.color(color.rgb(255, 0, 0, 50), "EMA 3 Color", group="EMA Settings")
showEma1 = input.bool(true, "Show EMA 1", group="EMA Settings")
showEma2 = input.bool(true, "Show EMA 2", group="EMA Settings")
showEma3 = input.bool(true, "Show EMA 3", group="EMA Settings")
// Trend Filter EMA
useTrendFilter = input.bool(true, "Use Trend Filter EMA", group="EMA Settings")
trendFilterLength = input.int(500, "Trend Filter EMA Length", minval=1, group="EMA Settings")
trendFilterColor = input.color(color.rgb(128, 0, 128, 50), "Trend Filter Color", group="EMA Settings")
showTrendFilter = input.bool(true, "Show Trend Filter EMA", group="EMA Settings")
// ========================================
// RSI SETTINGS
// ========================================
rsiLength = input.int(14, "RSI Length", minval=1, group="RSI Settings")
rsiBullishLow = input.int(55, "Bullish Zone Low", minval=0, maxval=100, group="RSI Settings")
rsiBullishHigh = input.int(70, "Bullish Zone High", minval=0, maxval=100, group="RSI Settings")
rsiBearishLow = input.int(30, "Bearish Zone Low", minval=0, maxval=100, group="RSI Settings")
rsiBearishHigh = input.int(45, "Bearish Zone High", minval=0, maxval=100, group="RSI Settings")
// RSI Filters
useRsiFilter = input.bool(true, "Use RSI Overbought/Oversold Filter", group="RSI Settings")
rsiOverbought = input.int(80, "RSI Overbought (avoid longs)", minval=50, maxval=100, group="RSI Settings")
rsiOversold = input.int(20, "RSI Oversold (avoid shorts)", minval=0, maxval=50, group="RSI Settings")
// ========================================
// CALCULATE INDICATORS
// ========================================
ema1 = ta.ema(close, ema1Length)
ema2 = ta.ema(close, ema2Length)
ema3 = ta.ema(close, ema3Length)
emaFilter = ta.ema(close, emaFilterLength)
trendFilterEma = ta.ema(close, trendFilterLength)
rsiValue = ta.rsi(close, rsiLength)
atr = ta.atr(atrLength)
// Plot EMAs
plot(showEma1 ? ema1 : na, "EMA 21", ema1Color, 2)
plot(showEma2 ? ema2 : na, "EMA 50", ema2Color, 2)
plot(showEma3 ? ema3 : na, "EMA 100", ema3Color, 2)
plot(showTrendFilter ? trendFilterEma : na, "Trend Filter EMA", trendFilterColor, 3)
// ========================================
// SIGNAL CONDITIONS
// ========================================
// EMA alignment
emasLong = ema1 > ema2 and ema2 > ema3
emasShort = ema1 < ema2 and ema2 < ema3
// RSI conditions
candleBullish = rsiValue >= rsiBullishLow and rsiValue < rsiBullishHigh
candleBearish = rsiValue <= rsiBearishHigh and rsiValue > rsiBearishLow
// Price crossovers
priceCrossAboveEma1 = ta.crossover(close, ema1)
priceCrossBelowEma1 = ta.crossunder(close, ema1)
priceCrossAboveEma3 = ta.crossover(close, ema3)
priceCrossBelowEma3 = ta.crossunder(close, ema3)
// EMA100 cross exit conditions
ema100CrossDown = ta.crossunder(close, ema3)
ema100CrossUp = ta.crossover(close, ema3)
// RSI filters
rsiNotOverbought = not useRsiFilter or rsiValue < rsiOverbought
rsiNotOversold = not useRsiFilter or rsiValue > rsiOversold
// Session filter
inSession = true
// Buy/Sell signals - DUAL CONDITIONS
// Trend filter: Long only above EMA750, Short only below EMA750
longTrendOk = not useTrendFilter or close > trendFilterEma
shortTrendOk = not useTrendFilter or close < trendFilterEma
// Condition 1: First bullish candle closing above EMA21 with EMAs aligned
bullishCandle = close > open
bearishCandle = close < open
wasBelow = close[1] < ema1
wasAbove = close[1] > ema1
buySignal1 = emasLong and close > ema1 and wasBelow and bullishCandle and candleBullish and rsiNotOverbought and inSession and longTrendOk
sellSignal1 = emasShort and close < ema1 and wasAbove and bearishCandle and candleBearish and rsiNotOversold and inSession and shortTrendOk
// Condition 2: Cross EMA100 + bullish/bearish close (RSI based)
buySignal2 = priceCrossAboveEma3 and rsiValue > 55 and rsiNotOverbought and inSession and longTrendOk
sellSignal2 = priceCrossBelowEma3 and rsiValue < 45 and rsiNotOversold and inSession and shortTrendOk
// Combined signals (either condition triggers entry)
buySignal = buySignal1 or buySignal2
sellSignal = sellSignal1 or sellSignal2
// ========================================
// CALCULATE STOP LOSS & TAKE PROFIT
// ========================================
var float longStopPrice = na
var float longTakeProfitPrice = na
var float shortStopPrice = na
var float shortTakeProfitPrice = na
var float entryPrice = na
var float initialStopDistance = na
calcStopLoss(isLong) =>
if stopLossType == "Fixed %"
isLong ? close * (1 - stopLossPercent / 100) : close * (1 + stopLossPercent / 100)
else if stopLossType == "ATR"
isLong ? close - atr * atrMultiplier : close + atr * atrMultiplier
else // Session Low/High
// Simplified: use ATR as fallback
isLong ? close - atr * atrMultiplier : close + atr * atrMultiplier
calcTakeProfit(isLong, stopPrice) =>
stopDistance = math.abs(close - stopPrice)
if takeProfitType == "Fixed %"
isLong ? close * (1 + takeProfitPercent / 100) : close * (1 - takeProfitPercent / 100)
else // Risk/Reward
isLong ? close + stopDistance * riskRewardRatio : close - stopDistance * riskRewardRatio
// ========================================
// ENTRY CONDITIONS
// ========================================
allowLong = tradeDirection == "Long Only" or tradeDirection == "Both"
allowShort = tradeDirection == "Short Only" or tradeDirection == "Both"
// Entry for Long
if buySignal and allowLong and strategy.position_size == 0
entryPrice := close
longStopPrice := useStopLoss ? calcStopLoss(true) : na
longTakeProfitPrice := useTakeProfit ? calcTakeProfit(true, longStopPrice) : na
initialStopDistance := math.abs(close - longStopPrice)
strategy.entry("Long", strategy.long)
// Entry for Short
if sellSignal and allowShort and strategy.position_size == 0
entryPrice := close
shortStopPrice := useStopLoss ? calcStopLoss(false) : na
shortTakeProfitPrice := useTakeProfit ? calcTakeProfit(false, shortStopPrice) : na
initialStopDistance := math.abs(close - shortStopPrice)
strategy.entry("Short", strategy.short)
// Pyramiding
if usePyramiding and strategy.position_size > 0
currentPositions = math.abs(strategy.position_size) / (strategy.position_avg_price * strategy.position_size / close)
if buySignal and strategy.position_size > 0 and currentPositions < maxPyramidPositions
strategy.entry("Long", strategy.long)
if sellSignal and strategy.position_size < 0 and currentPositions < maxPyramidPositions
strategy.entry("Short", strategy.short)
// ========================================
// EXIT CONDITIONS
// ========================================
// Breakeven logic
var bool movedToBreakeven = false
if strategy.position_size > 0 // Long position
if not movedToBreakeven and useBreakeven
profitTicks = (close - strategy.position_avg_price) / syminfo.mintick
triggerTicks = initialStopDistance * breakevenTrigger / syminfo.mintick
if profitTicks >= triggerTicks
longStopPrice := strategy.position_avg_price * (1 + breakevenOffset / 100)
movedToBreakeven := true
if strategy.position_size < 0 // Short position
if not movedToBreakeven and useBreakeven
profitTicks = (strategy.position_avg_price - close) / syminfo.mintick
triggerTicks = initialStopDistance * breakevenTrigger / syminfo.mintick
if profitTicks >= triggerTicks
shortStopPrice := strategy.position_avg_price * (1 - breakevenOffset / 100)
movedToBreakeven := true
// Trailing Stop
if strategy.position_size > 0 and useTrailingStop // Long position
trailStop = trailingStopType == "Fixed %" ?
close * (1 - trailingStopPercent / 100) :
close - atr * trailingAtrMultiplier
if na(longStopPrice) or trailStop > longStopPrice
longStopPrice := trailStop
if strategy.position_size < 0 and useTrailingStop // Short position
trailStop = trailingStopType == "Fixed %" ?
close * (1 + trailingStopPercent / 100) :
close + atr * trailingAtrMultiplier
if na(shortStopPrice) or trailStop < shortStopPrice
shortStopPrice := trailStop
// Exit Long
if strategy.position_size > 0
// EMA100 Cross exit (override other exits if selected)
if stopLossType == "EMA100 Cross" and ema100CrossDown
strategy.close("Long", comment="EMA100 Cross Exit")
movedToBreakeven := false
if useStopLoss and useTakeProfit and not na(longStopPrice) and not na(longTakeProfitPrice) and stopLossType != "EMA100 Cross"
strategy.exit("Exit Long", "Long", stop=longStopPrice, limit=longTakeProfitPrice, comment_profit="Exit TP", comment_loss="Exit SL")
else if useStopLoss and not useTakeProfit and not na(longStopPrice) and stopLossType != "EMA100 Cross"
strategy.exit("Exit Long", "Long", stop=longStopPrice, comment="Exit SL")
else if useTakeProfit and not useStopLoss and not na(longTakeProfitPrice)
strategy.exit("Exit Long", "Long", limit=longTakeProfitPrice, comment="Exit TP")
else if useTakeProfit and stopLossType == "EMA100 Cross" and not na(longTakeProfitPrice)
strategy.exit("Exit Long", "Long", limit=longTakeProfitPrice, comment="Exit TP")
// Exit on opposite signal
if sellSignal
strategy.close("Long", comment="Opposite Signal")
movedToBreakeven := false
// Exit Short
if strategy.position_size < 0
// EMA100 Cross exit (override other exits if selected)
if stopLossType == "EMA100 Cross" and ema100CrossUp
strategy.close("Short", comment="EMA100 Cross Exit")
movedToBreakeven := false
if useStopLoss and useTakeProfit and not na(shortStopPrice) and not na(shortTakeProfitPrice) and stopLossType != "EMA100 Cross"
strategy.exit("Exit Short", "Short", stop=shortStopPrice, limit=shortTakeProfitPrice, comment_profit="Exit TP", comment_loss="Exit SL")
else if useStopLoss and not useTakeProfit and not na(shortStopPrice) and stopLossType != "EMA100 Cross"
strategy.exit("Exit Short", "Short", stop=shortStopPrice, comment="Exit SL")
else if useTakeProfit and not useStopLoss and not na(shortTakeProfitPrice)
strategy.exit("Exit Short", "Short", limit=shortTakeProfitPrice, comment="Exit TP")
else if useTakeProfit and stopLossType == "EMA100 Cross" and not na(shortTakeProfitPrice)
strategy.exit("Exit Short", "Short", limit=shortTakeProfitPrice, comment="Exit TP")
// Exit on opposite signal
if buySignal
strategy.close("Short", comment="Opposite Signal")
movedToBreakeven := false
// Reset breakeven flag when no position
if strategy.position_size == 0
movedToBreakeven := false
// ========================================
// VISUALIZATION
// ========================================
// Plot entry signals
plotshape(buySignal and allowLong, "Buy Signal", shape.triangleup, location.belowbar, color.new(color.green, 0), size=size.small)
plotshape(sellSignal and allowShort, "Sell Signal", shape.triangledown, location.abovebar, color.new(color.red, 0), size=size.small)
// Plot Stop Loss and Take Profit levels
plot(strategy.position_size > 0 ? longStopPrice : na, "Long SL", color.red, 2, plot.style_linebr)
plot(strategy.position_size > 0 ? longTakeProfitPrice : na, "Long TP", color.green, 2, plot.style_linebr)
plot(strategy.position_size < 0 ? shortStopPrice : na, "Short SL", color.red, 2, plot.style_linebr)
plot(strategy.position_size < 0 ? shortTakeProfitPrice : na, "Short TP", color.green, 2, plot.style_linebr)
// Plot entry price
plot(strategy.position_size != 0 ? strategy.position_avg_price : na, "Entry Price", color.yellow, 1, plot.style_linebr)
// Background color for position
bgcolor(strategy.position_size > 0 ? color.new(color.green, 95) : strategy.position_size < 0 ? color.new(color.red, 95) : na, title="Position Background")