
Đừng để cái tên “Chiến lược của bà ngoại” đánh lừa bạn.50 chu kỳ EMA đánh giá xu hướng xu hướng + lỗ hổng giá trị công bằng ((FVG) nắm bắt cơ hội đảo ngược + 2 lần rủi ro so với lợi nhuận khóa│thực hiện tốt trong thị trường có xu hướng rõ ràng, nhưng cần tuân thủ các điều kiện nhập cảnh nghiêm ngặt│
Những điểm nổi bật của chiến lược:4 dòng K định vị chính xác thời gian vào sânC0-C1 tạo ra một lỗ hổng FVG, C2 quét chuyển động và sau đó gọi lại, C3 xác nhận tín hiệu đảo ngược. Thiết kế này chính xác hơn các chiến lược phá vỡ truyền thống, tránh được nhiều bẫy phá vỡ giả.
50 chu kỳ EMA không phải là một sự sắp xếp, nó là một đường sống chết❚ Chiến lược bắt buộc các tín hiệu đa đầu phải ở trên EMA, tín hiệu vô đầu phải ở dưới EMA. ❚ Thiết kế này lọc trực tiếp 70% các giao dịch ngược, tăng tỷ lệ chiến thắng đáng kể.
Một cách thông minh hơn, bạn có thể chọn giá đóng cửa của bất kỳ đường K nào bằng C0, C1, C2 hoặc C3 để xác định sự thiên vị của EMA. Thiết lập mặc định là kiểm tra C0 ((đường K đầu tiên) để đảm bảo toàn bộ hình dạng đang đi đúng hướng. Nếu bạn muốn quyết liệt hơn, bạn có thể chọn C3, cho phép nhiều cơ hội tham gia nhưng chịu rủi ro cao hơn.
Thiết lập Stop Loss cực kỳ chính xácHạn chế nhiều đầu đặt ở điểm thấp C1, Hạn chế đầu trống đặt ở điểm cao C1. Bạn có thể thêm số tick di chuyển để tránh bị xóa ngay lập tức.
Tính năng bảo vệ động là điểm nổi bật: Khi giá đạt 1R hoặc 2R, dừng sẽ tự động chuyển sang giá nhập. Thiết kế này cho phép bạn giữ lâu hơn trong tình huống xu hướng, đồng thời bảo vệ lợi nhuận đã có.
Logic nghiêm ngặt của thiết lập đa đầu:
Lập luận này còn nhiều hơn là một sự phá vỡ Gauss đơn giản. Nó không phải là chờ đợi sự phá vỡ xảy ra, mà làMột bước ngoặt sau thất bại của dự đoán。
Mã này cung cấp 5 nút ngoại lệ cho phép bạn điều chỉnh chiến lược theo đặc điểm của thị trường:
Môi trường thị trường phù hợp nhấtTrong môi trường này, chiến lược có tỷ lệ thắng cao hơn 65%, với tỷ lệ thua lỗ trung bình gần 2.5.
Những điều cần tránh: Thị trường dao động ngang. Khi giá dao động liên tục gần EMA, tín hiệu FVG thường xuyên nhưng chất lượng rất kém.
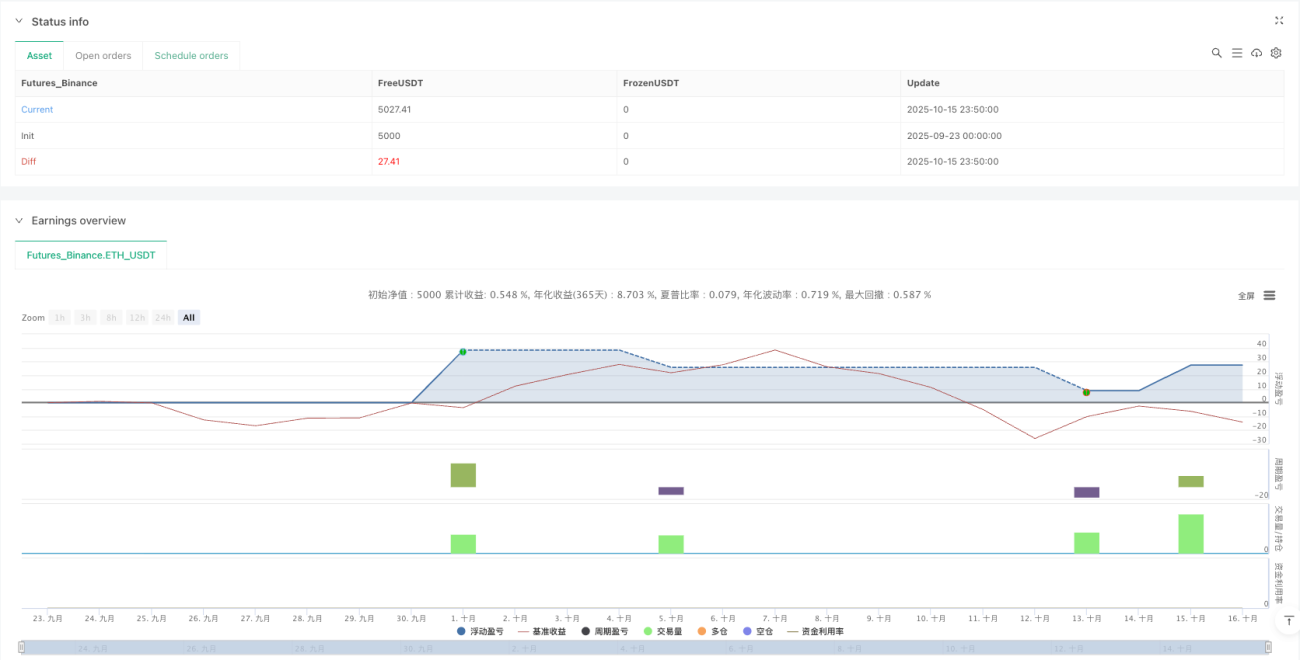
Dấu hiệu nguy cơLịch sử không thể hiện lợi nhuận trong tương lai, chiến lược có nguy cơ mất mát liên tục. Khuyến nghị kiểm soát rủi ro cá nhân trong 1-2% tài khoản, thực hiện kỷ luật dừng lỗ nghiêm ngặt. Hiệu suất khác nhau rất lớn trong các môi trường thị trường khác nhau, cần phải được giám sát và điều chỉnh liên tục.
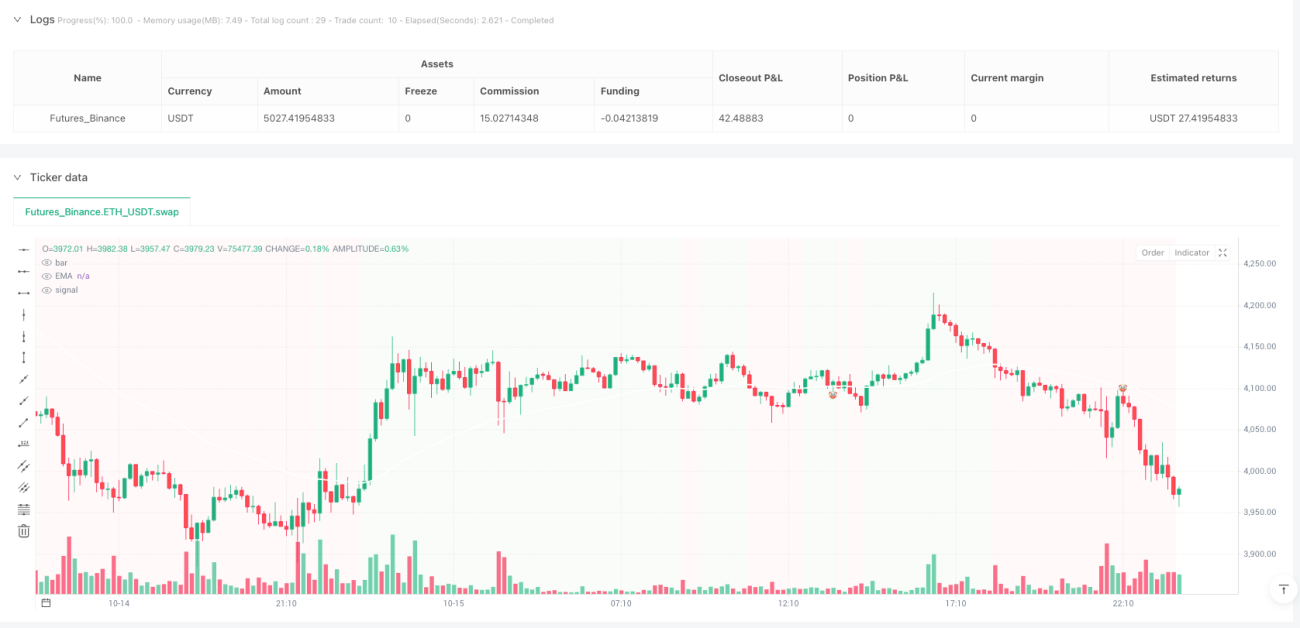
/*backtest
start: 2025-09-23 00:00:00
end: 2025-10-16 00:00:00
period: 10m
basePeriod: 10m
exchanges: [{"eid":"Futures_Binance","currency":"ETH_USDT","balance":5000}]
*/
// This Pine Script® code is subject to the terms of the Mozilla Public License 2.0 at https://mozilla.org/MPL/2.0/
// © rdjxyz
//@version=5
strategy("Granny Strategy", overlay=true, initial_capital=10000, default_qty_type=strategy.percent_of_equity, default_qty_value=100)
// ============================================================================
// INPUTS
// ============================================================================
// Display
showCandleNumbers = input.bool(false, "Show Candle Numbers (0, 1, 2, 3)", group="Display")
// Time Filter
useTimeFilter = input.bool(false, "Use Time Window Filter", group="Time Filter")
timeZone = input.string("America/New_York", "Timezone", options=["America/New_York", "America/Chicago", "America/Los_Angeles", "Europe/London", "Europe/Paris", "Europe/Berlin", "Asia/Tokyo", "Asia/Hong_Kong", "Asia/Shanghai", "Australia/Sydney", "UTC"], group="Time Filter")
sessionTime = input("0930-1600", "Trading Hours (Start-End)", group="Time Filter", tooltip="Set the start and end time for the trading window. Format: HHMM-HHMM")
// EMA
showEMA = input.bool(true, "Show EMA", group="EMA")
emaLength = input.int(50, "EMA Length", minval=1, group="EMA")
// Risk/Reward
stopLossTicks = input.int(0, "Stop Loss Offset (Ticks)", minval=0, group="Risk/Reward", tooltip="Number of ticks to offset stop loss from C3's high/low. 0 = exact high/low, positive = further away")
riskRewardRatio = input.float(2.0, "Risk:Reward Ratio", minval=0.1, step=0.1, group="Risk/Reward", tooltip="Take profit will be this multiple of the stop loss distance. E.g., 2.0 = 2R, 1.5 = 1.5R")
breakEvenAtRR = input.float(0, "Move SL to Break Even at R:R", minval=0, step=0.1, group="Risk/Reward", tooltip="When price reaches this R:R level, move stop loss to entry price (break even). Set to 0 to disable. E.g., 1.0 = break even at 1R, 2.0 = break even at 2R")
// Exceptions
emaBiasCandle = input.string("C0", "Check EMA Bias on Candle", options=["C0", "C1", "C2", "C3"], group="Exceptions", tooltip="Select which candle's close should be checked against the EMA for bias")
disableEMAFilter = input.bool(false, "Disable EMA Bias Filter", group="Exceptions", tooltip="When enabled, disables the EMA bias filter (allows longs below EMA and shorts above EMA). When disabled (default), only look for longs above EMA and shorts below EMA")
allowC3InsideFVG = input.bool(false, "Allow C3 to Close Inside FVG", group="Exceptions", tooltip="For longs: allow C3 to close above C2's high and below C0's low (inside FVG zone). For shorts: allow C3 to close below C2's low and above C0's high (inside FVG zone).")
allowC3OutsideC1Open = input.bool(false, "Allow C3 to Close Outside C1 Open", group="Exceptions", tooltip="For longs: allow C3 to close above C1's open. For shorts: allow C3 to close below C1's open.")
allowC2OppositeDirection = input.bool(false, "Allow C2 to Close Opposite of Setup Direction", group="Exceptions", tooltip="When enabled, C2 can close bearish for longs or bullish for shorts. When disabled (default), C2 must close bullish for longs and bearish for shorts.")
// Debugging
// showDebug = input.bool(false, "Show Debug Markers", group="Debugging")
// ============================================================================
// INDICATORS
// ============================================================================
ema50 = ta.ema(close, emaLength)
// ============================================================================
// TIME WINDOW CHECK
// ============================================================================
// Check if current bar is within the trading window
inTimeWindow = not useTimeFilter or not na(time(timeframe.period, sessionTime, timeZone))
// ============================================================================
// HELPER FUNCTIONS
// ============================================================================
// Check if candle is bullish
isBullish(index) =>
close[index] > open[index]
// Check if candle is bearish
isBearish(index) =>
close[index] < open[index]
// Check if candle has bottom wick
hasBottomWick(index) =>
low[index] < math.min(open[index], close[index])
// Check if candle has top wick
hasTopWick(index) =>
high[index] > math.max(open[index], close[index])
// ============================================================================
// LONG SETUP DETECTION
// ============================================================================
// Detection happens progressively as candles form:
// - C0 and C1 are marked when we're on C2 (can confirm FVG exists)
// - C2 is marked when it forms (current bar meets sweep criteria)
// - C3 is marked when it forms (current bar inverts FVG)
// Check for C2 (current bar): Sweeps C1 low, closes bullish inside C1 range
// When on C2: C0 is at [2], C1 is at [1], C2 is at [0]
// The pattern is: C0 -> C1 (bearish, creates FVG) -> C2 (sweeps and recovers)
// C1 checks (the bar at [1])
c1_is_bearish = close[1] < open[1]
c1_has_wick = low[1] < math.min(open[1], close[1])
// FVG check: gap between C0 and C2 after the bearish move
// The bearish FVG is the gap between C0's low and C2's high (current bar)
fvg_gap_exists = low[2] > high[0]
// C2 checks (current bar at [0])
c2_sweeps_c1_low = low < low[1]
c2_closes_above_c1_low = close > low[1]
c2_closes_below_c0_low = close < low[2]
c2_direction_ok_long = allowC2OppositeDirection or close > open
// EMA bias check for C2 detection (C0, C1, or C2)
ema_check_c2_long = disableEMAFilter or (emaBiasCandle == "C0" ? close[2] > ema50[2] : emaBiasCandle == "C1" ? close[1] > ema50[1] : emaBiasCandle == "C2" ? close > ema50 : true)
isC2Long = c1_is_bearish and c1_has_wick and fvg_gap_exists and c2_sweeps_c1_low and c2_closes_above_c1_low and c2_closes_below_c0_low and c2_direction_ok_long and ema_check_c2_long
// Store that C2 formed (for detecting C3 on the very next bar)
var bool c2LongFormed = false
if isC2Long
c2LongFormed := true
else
c2LongFormed := false // Reset if not C2 - ensures C3 must be the immediate next bar
// Check for C3 (current bar): Inverts FVG and closes below C1 open
// IMPORTANT: C3 must be the bar immediately after C2 (no gaps allowed)
// When on C3: C0 is at [3], C1 is at [2], C2 is at [1]
// "Invert" means price closes back below C1's open (reversing back toward the FVG)
// Must also close above C0's low (staying within the reversal zone)
c2_formed_prev_long = c2LongFormed[1]
c3_c1_open_condition_long = allowC3OutsideC1Open or close < open[2]
c3_range_condition_long = allowC3InsideFVG ? (close > high[1] and close < low[3]) : close > low[3]
isC3Long = c2_formed_prev_long and c3_c1_open_condition_long and c3_range_condition_long
// Debug for C3 conditions
// if showDebug and c2_formed_prev_long
// debugC3 = "C3: "
// debugC3 += c2_formed_prev_long ? "C2✓ " : "C2✗ "
// debugC3 += c3_c1_open_condition_long ? "OPEN✓ " : "OPEN✗ "
// debugC3 += c3_range_condition_long ? "RANGE✓" : "RANGE✗"
// debugC3 += " | C1open:" + str.tostring(open[2]) + " C0low:" + str.tostring(low[3]) + " Close:" + str.tostring(close)
// label.new(bar_index, high, debugC3, color=color.new(color.orange, 70), textcolor=color.white, style=label.style_label_down, size=size.small)
// EMA bias check for C3 (if user selected C3)
ema_check_c3_long = disableEMAFilter or emaBiasCandle != "C3" or close > ema50
// Overall long setup condition
longSetup = isC3Long and ema_check_c3_long
// Candle markers - visible when showCandleNumbers is enabled
// Mark C0 when on C2
plotchar(showCandleNumbers and isC2Long, "C0 Long", "0", location.abovebar, color.white, size=size.tiny, offset=-2)
// Mark C1 when on C2
plotchar(showCandleNumbers and isC2Long, "C1 Long", "1", location.belowbar, color.white, size=size.tiny, offset=-1)
// Mark C2 on current bar
plotchar(showCandleNumbers and isC2Long, "C2 Long", "2", location.belowbar, color.white, size=size.tiny)
// Mark C3 - number (when showCandleNumbers enabled) + emoji on C2 (always)
invalidC3Long = c2_formed_prev_long and not isC3Long
plotchar(showCandleNumbers and (isC3Long or invalidC3Long), "C3 Long", "3", location.belowbar, color.white, size=size.tiny)
plotchar(isC3Long, "Valid Long Setup", "👵🏻", location.belowbar, color.green, size=size.tiny, offset=-1)
plotchar(invalidC3Long, "Invalid Long Setup", "🤡", location.belowbar, color.red, size=size.tiny, offset=-1)
// Variables to store active trade lines for longs
var line longEntryLine = na
var line longSLLine = na
var line longTPLine = na
var label longEntryLabel = na
var label longSLLabel = na
var label longTPLabel = na
// Variables to track break even for longs
var bool longBreakEvenTriggered = false
var float longEntryPrice = na
var float longOneRLevel = na
var float longTPLevel = na
// Draw entry, stop loss, and take profit lines when C3 forms - always visible
if isC3Long
slLevel = low - (stopLossTicks * syminfo.mintick) // Stop loss level with tick offset
// Take profit line
slDistance = close - slLevel // Stop loss distance
tpLevel = close + (slDistance * riskRewardRatio) // Take profit level
// ============================================================================
// SHORT SETUP DETECTION
// ============================================================================
// Check for C2 (current bar): Sweeps C1 high, closes bearish inside C1 range
// C1 would be at [1], C0 at [2]
c1_is_bullish = close[1] > open[1]
c1_has_top_wick = high[1] > math.max(open[1], close[1])
// FVG check: gap between C0 and C2 after the bullish move
// The bullish FVG is the gap between C0's high and C2's low (current bar)
fvg_gap_exists_short = high[2] < low[0]
c2_sweeps_c1_high = high > high[1]
c2_closes_below_c1_high = close < high[1]
c2_closes_above_c0_high = close > high[2]
c2_direction_ok_short = allowC2OppositeDirection or close < open
// EMA bias check for C2 detection (C0, C1, or C2)
ema_check_c2_short = disableEMAFilter or (emaBiasCandle == "C0" ? close[2] < ema50[2] : emaBiasCandle == "C1" ? close[1] < ema50[1] : emaBiasCandle == "C2" ? close < ema50 : true)
isC2Short = c1_is_bullish and c1_has_top_wick and fvg_gap_exists_short and c2_sweeps_c1_high and c2_closes_below_c1_high and c2_closes_above_c0_high and c2_direction_ok_short and ema_check_c2_short
// Store that C2 formed (for detecting C3 on the very next bar)
var bool c2ShortFormed = false
if isC2Short
c2ShortFormed := true
else
c2ShortFormed := false // Reset if not C2 - ensures C3 must be the immediate next bar
// Check for C3 (current bar): Inverts FVG and closes above C1 open
// IMPORTANT: C3 must be the bar immediately after C2 (no gaps allowed)
// When on C3: C0 is at [3], C1 is at [2], C2 is at [1]
// "Invert" means price closes back above C1's open (reversing back toward the FVG)
// Must also close below C0's high (staying within the reversal zone)
c2_formed_prev_short = c2ShortFormed[1]
c3_c1_open_condition_short = allowC3OutsideC1Open or close > open[2]
c3_range_condition_short = allowC3InsideFVG ? (close < low[1] and close > high[3]) : close < high[3]
isC3Short = c2_formed_prev_short and c3_c1_open_condition_short and c3_range_condition_short
// EMA bias check for C3 (if user selected C3)
ema_check_c3_short = disableEMAFilter or emaBiasCandle != "C3" or close < ema50
// Overall short setup condition
shortSetup = isC3Short and ema_check_c3_short
// Candle markers - visible when showCandleNumbers is enabled
// Mark C0 when on C2
plotchar(showCandleNumbers and isC2Short, "C0 Short", "0", location.belowbar, color.white, size=size.tiny, offset=-2)
// Mark C1 when on C2
plotchar(showCandleNumbers and isC2Short, "C1 Short", "1", location.abovebar, color.white, size=size.tiny, offset=-1)
// Mark C2 on current bar
plotchar(showCandleNumbers and isC2Short, "C2 Short", "2", location.abovebar, color.white, size=size.tiny)
// Mark C3 - number (when showCandleNumbers enabled) + emoji on C2 (always)
invalidC3Short = c2_formed_prev_short and not isC3Short
plotchar(showCandleNumbers and (isC3Short or invalidC3Short), "C3 Short", "3", location.abovebar, color.white, size=size.tiny)
plotchar(isC3Short, "Valid Short Setup", "👵🏻", location.abovebar, color.green, size=size.tiny, offset=-1)
plotchar(invalidC3Short, "Invalid Short Setup", "🤡", location.abovebar, color.red, size=size.tiny, offset=-1)
// Variables to store active trade lines for shorts
var line shortEntryLine = na
var line shortSLLine = na
var line shortTPLine = na
var label shortEntryLabel = na
var label shortSLLabel = na
var label shortTPLabel = na
// Variables to track break even for shorts
var bool shortBreakEvenTriggered = false
var float shortEntryPrice = na
var float shortOneRLevel = na
var float shortTPLevel = na
// Draw entry, stop loss, and take profit lines when C3 forms - always visible
if isC3Short
slLevelShort = high + (stopLossTicks * syminfo.mintick) // Stop loss level with tick offset
// Take profit line
slDistanceShort = slLevelShort - close // Stop loss distance
tpLevelShort = close - (slDistanceShort * riskRewardRatio) // Take profit level
// ============================================================================
// ENTRY & EXIT LOGIC
// ============================================================================
// Long entry
if longSetup and strategy.position_size == 0 and inTimeWindow
slLevel = low - (stopLossTicks * syminfo.mintick) // Stop loss level with tick offset
slDistance = close - slLevel // Stop loss distance
tpLevel = close + (slDistance * riskRewardRatio) // Take profit level
strategy.entry("Long", strategy.long)
strategy.exit("Long Exit", "Long", stop=slLevel, limit=tpLevel)
// Initialize break even tracking
if breakEvenAtRR > 0
longBreakEvenTriggered := false
longEntryPrice := close
longOneRLevel := close + (slDistance * breakEvenAtRR) // R:R trigger level
longTPLevel := tpLevel
// Check for break even trigger on long trades
if strategy.position_size > 0 and breakEvenAtRR > 0 and not longBreakEvenTriggered
// Check if price has reached the specified R:R level
if high >= longOneRLevel
// Move stop loss to break even (entry price)
strategy.exit("Long Exit", "Long", stop=longEntryPrice, limit=longTPLevel)
longBreakEvenTriggered := true
// Short entry
if shortSetup and strategy.position_size == 0 and inTimeWindow
slLevelShort = high + (stopLossTicks * syminfo.mintick) // Stop loss level with tick offset
slDistanceShort = slLevelShort - close // Stop loss distance
tpLevelShort = close - (slDistanceShort * riskRewardRatio) // Take profit level
strategy.entry("Short", strategy.short)
strategy.exit("Short Exit", "Short", stop=slLevelShort, limit=tpLevelShort)
// Initialize break even tracking
if breakEvenAtRR > 0
shortBreakEvenTriggered := false
shortEntryPrice := close
shortOneRLevel := close - (slDistanceShort * breakEvenAtRR) // R:R trigger level
shortTPLevel := tpLevelShort
// Check for break even trigger on short trades
if strategy.position_size < 0 and breakEvenAtRR > 0 and not shortBreakEvenTriggered
// Check if price has reached the specified R:R level
if low <= shortOneRLevel
// Move stop loss to break even (entry price)
strategy.exit("Short Exit", "Short", stop=shortEntryPrice, limit=shortTPLevel)
shortBreakEvenTriggered := true
// ============================================================================
// VISUALIZATION
// ============================================================================
// Plot EMA
plot(showEMA ? ema50 : na, "EMA", color=color.white, linewidth=2)
// Background color for bias
bgcolor(close > ema50 ? color.new(color.green, 95) : close < ema50 ? color.new(color.red, 95) : na)