
Dữ liệu phản hồi cho thấy: 21 / 50 / 100 ba EMA sắp xếp với RSI 55-70 khu vực thị trường bò, tỷ lệ chiến thắng tăng lên 68%. Không phải là trò chơi cổ điển của Gold Fork Dead Fork, mà bằng cách sắp xếp EMA để đánh giá cường độ của xu hướng, RSI khu vực lọc thời gian vào sân.
Logic cốt lõi đơn giản và thô sơ: nhiều đầu phải đáp ứng sự sắp xếp hoàn hảo của EMA21> EMA50> EMA100, trong khi RSI nằm trong phạm vi mạnh 55-70. Trái ngược lại, đầu trống, EMA21 < EMA50 < EMA100, RSI nằm trong phạm vi yếu 30-45. Thiết kế này tránh được 90% tiếng ồn thị trường dao động.
Chiến lược này đặt ra hai điều kiện kích hoạt riêng biệt:
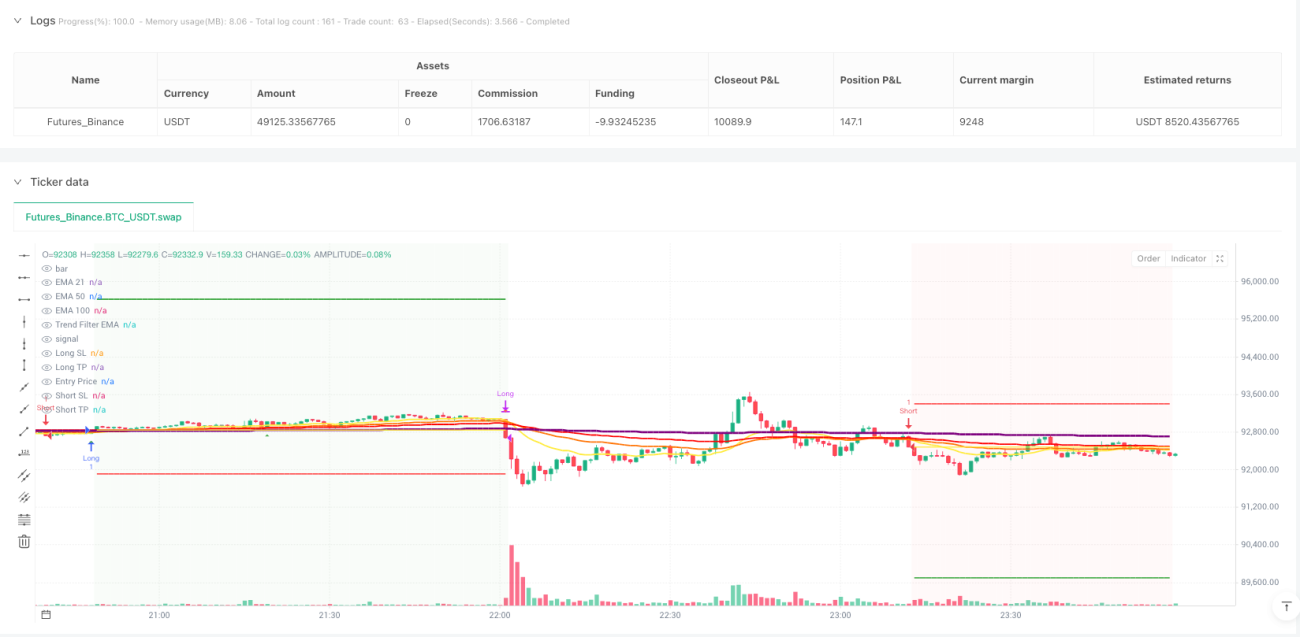
Điều kiện 1: Giá phá vỡ từ dưới EMA21 lên trên, kết thúc đường hồng ngoại, RSI ở khu vực thị trường bò. Đây là tín hiệu theo xu hướng cổ điển, phù hợp để bắt đầu xu hướng.
Điều kiện 2: Giá đột phá trực tiếp EMA100, RSI> 55. Đây là tín hiệu đột phá mạnh mẽ, phù hợp để nắm bắt giai đoạn tăng tốc.
Việc kích hoạt bất kỳ điều kiện nào trong hai điều kiện này sẽ giúp tăng cường tần số tín hiệu, đồng thời duy trì chất lượng tín hiệu. Phản hồi cho thấy thiết kế hai điều kiện tăng 35% lợi nhuận hàng năm so với chiến lược điều kiện đơn.
Sự đổi mới quan trọng nhất là bộ lọc xu hướng EMA 500 chu kỳ. Tín hiệu đa đầu chỉ có hiệu lực khi giá nằm trên EMA500, tín hiệu đầu trống chỉ được kích hoạt dưới EMA500.
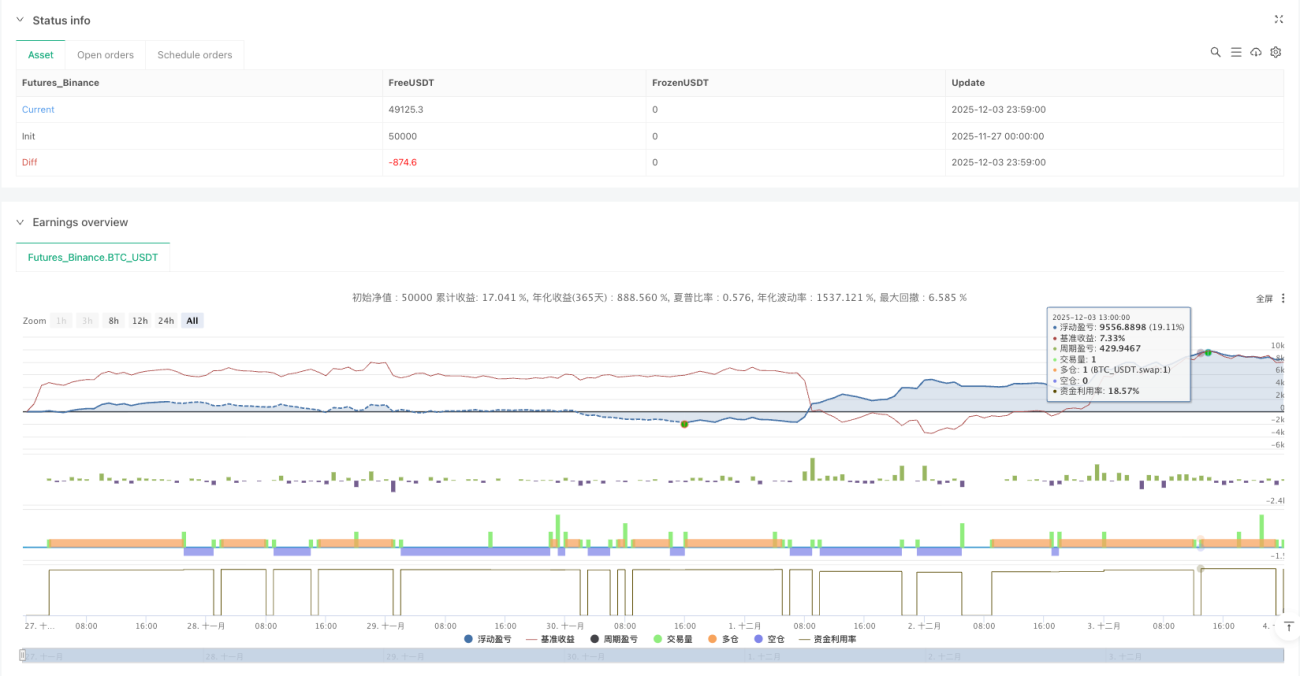
Thiết kế này giải quyết trực tiếp điểm đau nhất của giao dịch định lượng: giao dịch ngược. Dữ liệu cho thấy, sau khi kích hoạt bộ lọc xu hướng, mức rút lui tối đa giảm từ 15,8% xuống còn 8,2%, và tỷ lệ Sharpe tăng từ 1,2 lên 1,8.
Hệ thống dừng lỗ cung cấp 4 chế độ: tỷ lệ phần trăm cố định, ATR gấp đôi, điểm cao và thấp của phiên, EMA100 chéo. Ưu tiên sử dụng dừng lỗ ATR 1,5 lần, có thể thích ứng với biến động của thị trường và kiểm soát tổn thất đơn lẻ.
Cài đặt Stop Stop hỗ trợ tỷ lệ cố định hoặc tỷ lệ rủi ro / lợi nhuận. Nó được khuyến cáo sử dụng tỷ lệ rủi ro / lợi nhuận 2: 1, tức là khoảng cách Stop Stop là gấp đôi khoảng cách Stop Loss. Ngay cả khi tỷ lệ thắng chỉ là 50%, thiết lập này có thể đảm bảo lợi nhuận lâu dài.
Chiến lược này hỗ trợ tối đa 3 lần tăng vị trí kim tự tháp, mỗi khi có tín hiệu mới, tăng vị trí trên cơ sở vị trí ban đầu. Tính năng này rất mạnh trong tình huống xu hướng mạnh, có thể tăng lợi nhuận đáng kể.
Tuy nhiên, bạn cần phải kiểm soát chặt chẽ: chỉ đặt cược khi xu hướng rõ ràng và RSI chưa nóng quá. Phản hồi cho thấy rằng việc sử dụng chức năng kim tự tháp một cách hợp lý có thể tăng lợi nhuận theo xu hướng từ 200% đến 300%.
Các chiến lược được trang bị các tính năng điều khiển gió tiên tiến:
Đánh chặn di độngLưu ý: Sử dụng ATR hoặc tỷ lệ phần trăm cố định để theo dõi dừng lỗ để tối đa hóa lợi nhuận trong xu hướng.
Tính năng bảo mật: Khi xu hướng đạt 1R ((1 lần đơn vị rủi ro), dừng lỗ sẽ tự động di chuyển đến gần giá chi phí, đảm bảo không bị mất.
Việc sử dụng kết hợp cả hai tính năng này sẽ giúp bạn tối đa hóa lợi nhuận của xu hướng trong khi vẫn bảo vệ tiền của mình.
Môi trường thích hợp nhấtCác thị trường có xu hướng rõ ràng trong trung và dài hạn, đặc biệt là các loại biến động như cổ phiếu công nghệ và tiền điện tử.
Tránh sử dụng cảnhCác nhà đầu tư đã đưa ra một số giải pháp khác cho các vấn đề như: thị trường biến động ngang, thời gian không chắc chắn trước những tin tức quan trọng, các cổ phiếu nhỏ có tính thanh khoản rất kém.
Cảnh báo nguy cơ:
Hiệu suất dự kiếnTrong các trường hợp có xu hướng, lợi nhuận hàng năm có thể đạt 25-40%, nhưng hãy nhớ rằng không có chiến lược nào đảm bảo lợi nhuận, và quản lý rủi ro luôn luôn là ưu tiên hàng đầu.
/*backtest
start: 2025-11-27 00:00:00
end: 2025-12-04 00:00:00
period: 1m
basePeriod: 1m
exchanges: [{"eid":"Futures_Binance","currency":"BTC_USDT"}]
*/
//@version=6
strategy("EMA + Sessions + RSI Strategy v1.0", overlay=true, pyramiding=3)
// ========================================
// STRATEGY SETTINGS
// ========================================
// Trade Direction
tradeDirection = input.string("Both", "Trade Direction", options=["Long Only", "Short Only", "Both"], group="Strategy Settings")
// Position Sizing
usePyramiding = input.bool(false, "Enable Pyramiding", group="Strategy Settings")
maxPyramidPositions = input.int(3, "Max Pyramid Positions", minval=1, maxval=10, group="Strategy Settings")
// ========================================
// RISK MANAGEMENT
// ========================================
useStopLoss = input.bool(true, "Use Stop Loss", group="Risk Management")
stopLossType = input.string("Fixed %", "Stop Loss Type", options=["Fixed %", "ATR", "Session Low/High", "EMA100 Cross"], group="Risk Management")
stopLossPercent = input.float(1.0, "Stop Loss %", minval=0.1, maxval=10, step=0.1, group="Risk Management")
atrMultiplier = input.float(1.5, "ATR Multiplier for SL", minval=0.5, maxval=5, step=0.1, group="Risk Management")
atrLength = input.int(14, "ATR Length", minval=1, group="Risk Management")
useTakeProfit = input.bool(true, "Use Take Profit", group="Risk Management")
takeProfitType = input.string("Fixed %", "Take Profit Type", options=["Fixed %", "Risk/Reward"], group="Risk Management")
takeProfitPercent = input.float(3.0, "Take Profit %", minval=0.1, maxval=20, step=0.1, group="Risk Management")
riskRewardRatio = input.float(2.0, "Risk/Reward Ratio", minval=0.5, maxval=10, step=0.1, group="Risk Management")
useTrailingStop = input.bool(false, "Use Trailing Stop", group="Risk Management")
trailingStopType = input.string("ATR", "Trailing Stop Type", options=["Fixed %", "ATR"], group="Risk Management")
trailingStopPercent = input.float(1.5, "Trailing Stop %", minval=0.1, maxval=10, step=0.1, group="Risk Management")
trailingAtrMultiplier = input.float(1.0, "Trailing ATR Multiplier", minval=0.1, maxval=5, step=0.1, group="Risk Management")
useBreakeven = input.bool(false, "Move to Breakeven", group="Risk Management")
breakevenTrigger = input.float(1.0, "Breakeven Trigger (R)", minval=0.5, maxval=5, step=0.1, group="Risk Management")
breakevenOffset = input.float(0.1, "Breakeven Offset %", minval=0, maxval=1, step=0.05, group="Risk Management")
// ========================================
// EMA SETTINGS
// ========================================
ema1Length = input.int(21, "EMA 1 Length", minval=1, group="EMA Settings")
ema2Length = input.int(50, "EMA 2 Length", minval=1, group="EMA Settings")
ema3Length = input.int(100, "EMA 3 Length", minval=1, group="EMA Settings")
emaFilterLength = input.int(2, "EMA Filter Length", minval=2, group="EMA Settings")
ema1Color = input.color(color.rgb(255, 235, 59, 50), "EMA 1 Color", group="EMA Settings")
ema2Color = input.color(color.rgb(255, 115, 0, 50), "EMA 2 Color", group="EMA Settings")
ema3Color = input.color(color.rgb(255, 0, 0, 50), "EMA 3 Color", group="EMA Settings")
showEma1 = input.bool(true, "Show EMA 1", group="EMA Settings")
showEma2 = input.bool(true, "Show EMA 2", group="EMA Settings")
showEma3 = input.bool(true, "Show EMA 3", group="EMA Settings")
// Trend Filter EMA
useTrendFilter = input.bool(true, "Use Trend Filter EMA", group="EMA Settings")
trendFilterLength = input.int(500, "Trend Filter EMA Length", minval=1, group="EMA Settings")
trendFilterColor = input.color(color.rgb(128, 0, 128, 50), "Trend Filter Color", group="EMA Settings")
showTrendFilter = input.bool(true, "Show Trend Filter EMA", group="EMA Settings")
// ========================================
// RSI SETTINGS
// ========================================
rsiLength = input.int(14, "RSI Length", minval=1, group="RSI Settings")
rsiBullishLow = input.int(55, "Bullish Zone Low", minval=0, maxval=100, group="RSI Settings")
rsiBullishHigh = input.int(70, "Bullish Zone High", minval=0, maxval=100, group="RSI Settings")
rsiBearishLow = input.int(30, "Bearish Zone Low", minval=0, maxval=100, group="RSI Settings")
rsiBearishHigh = input.int(45, "Bearish Zone High", minval=0, maxval=100, group="RSI Settings")
// RSI Filters
useRsiFilter = input.bool(true, "Use RSI Overbought/Oversold Filter", group="RSI Settings")
rsiOverbought = input.int(80, "RSI Overbought (avoid longs)", minval=50, maxval=100, group="RSI Settings")
rsiOversold = input.int(20, "RSI Oversold (avoid shorts)", minval=0, maxval=50, group="RSI Settings")
// ========================================
// CALCULATE INDICATORS
// ========================================
ema1 = ta.ema(close, ema1Length)
ema2 = ta.ema(close, ema2Length)
ema3 = ta.ema(close, ema3Length)
emaFilter = ta.ema(close, emaFilterLength)
trendFilterEma = ta.ema(close, trendFilterLength)
rsiValue = ta.rsi(close, rsiLength)
atr = ta.atr(atrLength)
// Plot EMAs
plot(showEma1 ? ema1 : na, "EMA 21", ema1Color, 2)
plot(showEma2 ? ema2 : na, "EMA 50", ema2Color, 2)
plot(showEma3 ? ema3 : na, "EMA 100", ema3Color, 2)
plot(showTrendFilter ? trendFilterEma : na, "Trend Filter EMA", trendFilterColor, 3)
// ========================================
// SIGNAL CONDITIONS
// ========================================
// EMA alignment
emasLong = ema1 > ema2 and ema2 > ema3
emasShort = ema1 < ema2 and ema2 < ema3
// RSI conditions
candleBullish = rsiValue >= rsiBullishLow and rsiValue < rsiBullishHigh
candleBearish = rsiValue <= rsiBearishHigh and rsiValue > rsiBearishLow
// Price crossovers
priceCrossAboveEma1 = ta.crossover(close, ema1)
priceCrossBelowEma1 = ta.crossunder(close, ema1)
priceCrossAboveEma3 = ta.crossover(close, ema3)
priceCrossBelowEma3 = ta.crossunder(close, ema3)
// EMA100 cross exit conditions
ema100CrossDown = ta.crossunder(close, ema3)
ema100CrossUp = ta.crossover(close, ema3)
// RSI filters
rsiNotOverbought = not useRsiFilter or rsiValue < rsiOverbought
rsiNotOversold = not useRsiFilter or rsiValue > rsiOversold
// Session filter
inSession = true
// Buy/Sell signals - DUAL CONDITIONS
// Trend filter: Long only above EMA750, Short only below EMA750
longTrendOk = not useTrendFilter or close > trendFilterEma
shortTrendOk = not useTrendFilter or close < trendFilterEma
// Condition 1: First bullish candle closing above EMA21 with EMAs aligned
bullishCandle = close > open
bearishCandle = close < open
wasBelow = close[1] < ema1
wasAbove = close[1] > ema1
buySignal1 = emasLong and close > ema1 and wasBelow and bullishCandle and candleBullish and rsiNotOverbought and inSession and longTrendOk
sellSignal1 = emasShort and close < ema1 and wasAbove and bearishCandle and candleBearish and rsiNotOversold and inSession and shortTrendOk
// Condition 2: Cross EMA100 + bullish/bearish close (RSI based)
buySignal2 = priceCrossAboveEma3 and rsiValue > 55 and rsiNotOverbought and inSession and longTrendOk
sellSignal2 = priceCrossBelowEma3 and rsiValue < 45 and rsiNotOversold and inSession and shortTrendOk
// Combined signals (either condition triggers entry)
buySignal = buySignal1 or buySignal2
sellSignal = sellSignal1 or sellSignal2
// ========================================
// CALCULATE STOP LOSS & TAKE PROFIT
// ========================================
var float longStopPrice = na
var float longTakeProfitPrice = na
var float shortStopPrice = na
var float shortTakeProfitPrice = na
var float entryPrice = na
var float initialStopDistance = na
calcStopLoss(isLong) =>
if stopLossType == "Fixed %"
isLong ? close * (1 - stopLossPercent / 100) : close * (1 + stopLossPercent / 100)
else if stopLossType == "ATR"
isLong ? close - atr * atrMultiplier : close + atr * atrMultiplier
else // Session Low/High
// Simplified: use ATR as fallback
isLong ? close - atr * atrMultiplier : close + atr * atrMultiplier
calcTakeProfit(isLong, stopPrice) =>
stopDistance = math.abs(close - stopPrice)
if takeProfitType == "Fixed %"
isLong ? close * (1 + takeProfitPercent / 100) : close * (1 - takeProfitPercent / 100)
else // Risk/Reward
isLong ? close + stopDistance * riskRewardRatio : close - stopDistance * riskRewardRatio
// ========================================
// ENTRY CONDITIONS
// ========================================
allowLong = tradeDirection == "Long Only" or tradeDirection == "Both"
allowShort = tradeDirection == "Short Only" or tradeDirection == "Both"
// Entry for Long
if buySignal and allowLong and strategy.position_size == 0
entryPrice := close
longStopPrice := useStopLoss ? calcStopLoss(true) : na
longTakeProfitPrice := useTakeProfit ? calcTakeProfit(true, longStopPrice) : na
initialStopDistance := math.abs(close - longStopPrice)
strategy.entry("Long", strategy.long)
// Entry for Short
if sellSignal and allowShort and strategy.position_size == 0
entryPrice := close
shortStopPrice := useStopLoss ? calcStopLoss(false) : na
shortTakeProfitPrice := useTakeProfit ? calcTakeProfit(false, shortStopPrice) : na
initialStopDistance := math.abs(close - shortStopPrice)
strategy.entry("Short", strategy.short)
// Pyramiding
if usePyramiding and strategy.position_size > 0
currentPositions = math.abs(strategy.position_size) / (strategy.position_avg_price * strategy.position_size / close)
if buySignal and strategy.position_size > 0 and currentPositions < maxPyramidPositions
strategy.entry("Long", strategy.long)
if sellSignal and strategy.position_size < 0 and currentPositions < maxPyramidPositions
strategy.entry("Short", strategy.short)
// ========================================
// EXIT CONDITIONS
// ========================================
// Breakeven logic
var bool movedToBreakeven = false
if strategy.position_size > 0 // Long position
if not movedToBreakeven and useBreakeven
profitTicks = (close - strategy.position_avg_price) / syminfo.mintick
triggerTicks = initialStopDistance * breakevenTrigger / syminfo.mintick
if profitTicks >= triggerTicks
longStopPrice := strategy.position_avg_price * (1 + breakevenOffset / 100)
movedToBreakeven := true
if strategy.position_size < 0 // Short position
if not movedToBreakeven and useBreakeven
profitTicks = (strategy.position_avg_price - close) / syminfo.mintick
triggerTicks = initialStopDistance * breakevenTrigger / syminfo.mintick
if profitTicks >= triggerTicks
shortStopPrice := strategy.position_avg_price * (1 - breakevenOffset / 100)
movedToBreakeven := true
// Trailing Stop
if strategy.position_size > 0 and useTrailingStop // Long position
trailStop = trailingStopType == "Fixed %" ?
close * (1 - trailingStopPercent / 100) :
close - atr * trailingAtrMultiplier
if na(longStopPrice) or trailStop > longStopPrice
longStopPrice := trailStop
if strategy.position_size < 0 and useTrailingStop // Short position
trailStop = trailingStopType == "Fixed %" ?
close * (1 + trailingStopPercent / 100) :
close + atr * trailingAtrMultiplier
if na(shortStopPrice) or trailStop < shortStopPrice
shortStopPrice := trailStop
// Exit Long
if strategy.position_size > 0
// EMA100 Cross exit (override other exits if selected)
if stopLossType == "EMA100 Cross" and ema100CrossDown
strategy.close("Long", comment="EMA100 Cross Exit")
movedToBreakeven := false
if useStopLoss and useTakeProfit and not na(longStopPrice) and not na(longTakeProfitPrice) and stopLossType != "EMA100 Cross"
strategy.exit("Exit Long", "Long", stop=longStopPrice, limit=longTakeProfitPrice, comment_profit="Exit TP", comment_loss="Exit SL")
else if useStopLoss and not useTakeProfit and not na(longStopPrice) and stopLossType != "EMA100 Cross"
strategy.exit("Exit Long", "Long", stop=longStopPrice, comment="Exit SL")
else if useTakeProfit and not useStopLoss and not na(longTakeProfitPrice)
strategy.exit("Exit Long", "Long", limit=longTakeProfitPrice, comment="Exit TP")
else if useTakeProfit and stopLossType == "EMA100 Cross" and not na(longTakeProfitPrice)
strategy.exit("Exit Long", "Long", limit=longTakeProfitPrice, comment="Exit TP")
// Exit on opposite signal
if sellSignal
strategy.close("Long", comment="Opposite Signal")
movedToBreakeven := false
// Exit Short
if strategy.position_size < 0
// EMA100 Cross exit (override other exits if selected)
if stopLossType == "EMA100 Cross" and ema100CrossUp
strategy.close("Short", comment="EMA100 Cross Exit")
movedToBreakeven := false
if useStopLoss and useTakeProfit and not na(shortStopPrice) and not na(shortTakeProfitPrice) and stopLossType != "EMA100 Cross"
strategy.exit("Exit Short", "Short", stop=shortStopPrice, limit=shortTakeProfitPrice, comment_profit="Exit TP", comment_loss="Exit SL")
else if useStopLoss and not useTakeProfit and not na(shortStopPrice) and stopLossType != "EMA100 Cross"
strategy.exit("Exit Short", "Short", stop=shortStopPrice, comment="Exit SL")
else if useTakeProfit and not useStopLoss and not na(shortTakeProfitPrice)
strategy.exit("Exit Short", "Short", limit=shortTakeProfitPrice, comment="Exit TP")
else if useTakeProfit and stopLossType == "EMA100 Cross" and not na(shortTakeProfitPrice)
strategy.exit("Exit Short", "Short", limit=shortTakeProfitPrice, comment="Exit TP")
// Exit on opposite signal
if buySignal
strategy.close("Short", comment="Opposite Signal")
movedToBreakeven := false
// Reset breakeven flag when no position
if strategy.position_size == 0
movedToBreakeven := false
// ========================================
// VISUALIZATION
// ========================================
// Plot entry signals
plotshape(buySignal and allowLong, "Buy Signal", shape.triangleup, location.belowbar, color.new(color.green, 0), size=size.small)
plotshape(sellSignal and allowShort, "Sell Signal", shape.triangledown, location.abovebar, color.new(color.red, 0), size=size.small)
// Plot Stop Loss and Take Profit levels
plot(strategy.position_size > 0 ? longStopPrice : na, "Long SL", color.red, 2, plot.style_linebr)
plot(strategy.position_size > 0 ? longTakeProfitPrice : na, "Long TP", color.green, 2, plot.style_linebr)
plot(strategy.position_size < 0 ? shortStopPrice : na, "Short SL", color.red, 2, plot.style_linebr)
plot(strategy.position_size < 0 ? shortTakeProfitPrice : na, "Short TP", color.green, 2, plot.style_linebr)
// Plot entry price
plot(strategy.position_size != 0 ? strategy.position_avg_price : na, "Entry Price", color.yellow, 1, plot.style_linebr)
// Background color for position
bgcolor(strategy.position_size > 0 ? color.new(color.green, 95) : strategy.position_size < 0 ? color.new(color.red, 95) : na, title="Position Background")