
4
Follow
15
Followers
이전에는 다른 사람들에게 대본을 작성했는데, 많은 친구들이 상황을 감시하는 전략을 사용해야 하고, 특별한 상황이 발생했을 때 즉시 경보를 할 수 있다는 것을 알게 되었지만, 항상 리스크를 가지고 있는 것에 대해 그다지 만족스럽지 않았습니다. 그래서 오늘 간단한 가격 상기 데모를 공유합니다.
ps: 언어는 파이썬으로 쓰여져 있고, 기둥과 기둥의 인터페이스를 통해 알람을 냅니다. 서버의 구성은 여기에 소개되지 않습니다.
1 준비
- 제어판
여기서는 파일을 서버로 업로드하기 위한 바타르 패널을 사용한다. 물론 다른 방법으로도 사용할 수 있다. 경로를 기억하면 된다.
- 다운로드
wget -O install.sh http://download.bt.cn/install/install-ubuntu_6.0.sh && sudo bash install.sh
완료 후 URL을 얻어서 로그인하십시오 (WEB URL이 열리지 않으면 8888 포트를 열어야합니다.)
-
권한을 얻으십시오
보안 - shh 보안 관리 - shh 키 로그인
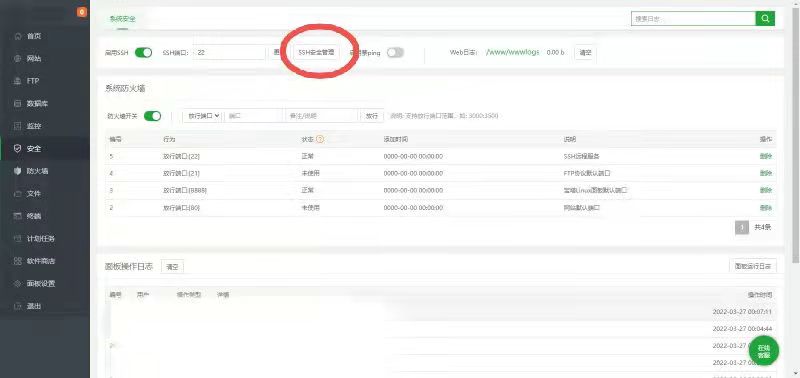
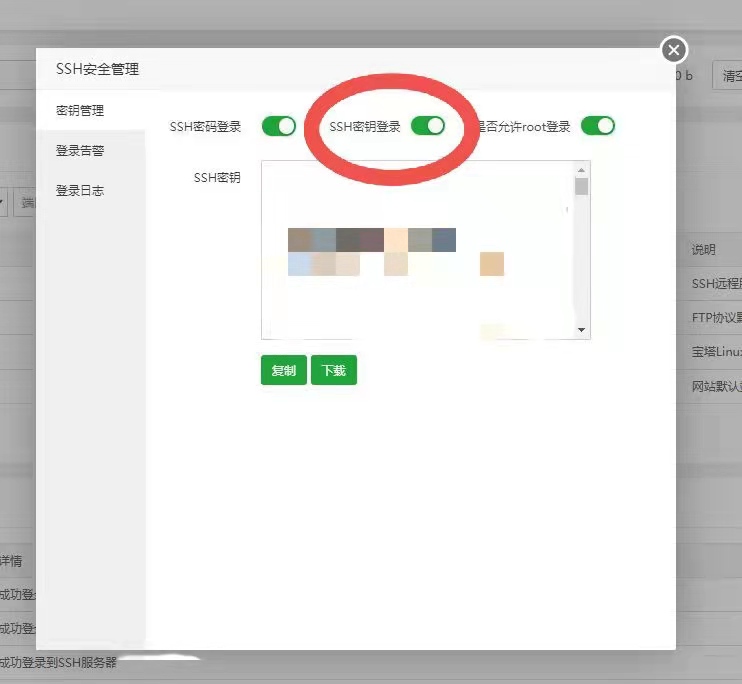
-
파일 업로드
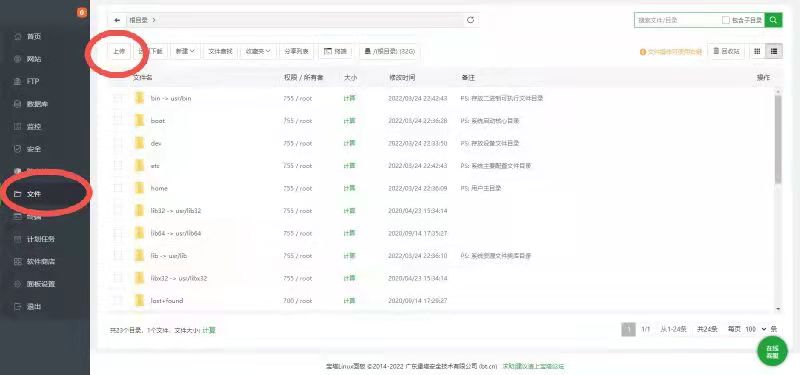
- Screen
스크린 (screen) 은 리눅스 (linux) 의 창 다중 사용 관리 프로그램으로, 터미널 shh 연결 후에도 프로그램을 실행할 수 있도록 하기 위한 것이다.
- 다운로드
sudo apt-get install screen
- 일반적인 명령
실행 스크린, 경로 실행 파일을 열기 후에 가능 ([name] 태그는 스스로 설정할 수 있습니다) <unk>
screen -S [name]
스크린 단축키를 종료
ctrl+a+d
스크린이 백그라운드에서 실행되는 과정을 확인합니다.
screen -ls
프로세스 종료 (pid 번호는 프로세스를 통해 확인할 수 있습니다)
kill -9 [pid号]
화면에서 죽은 프로세스 정보를 삭제합니다.
screen -wipe
- 기둥 설정
여기서는 Hukybo 대<unk>의 기사를 참조하고, 원리 구현은 더 이상 설명하지 않고, 간단한 패키지 코드가 표시되어 있습니다.
https://www.fmz.com/digest-topic/5840
            # 钉钉输出接口
class DING:
    # 向钉钉群输出信息
    def msg(self,text):
        token ="***"
        headers = {'Content-Type': 'application/json;charset=utf-8'}  # 请求头
        api_url = f"***={token}"
        json_text = {
            "msgtype": "text",  # 信息格式
            "text": {
                "content": text
            }
        }
        # 发送并打印信息
        requests.post(api_url, json.dumps(json_text), headers=headers).content

    #拼接输出信息
    def dd(self,logging):
        bj_dt = str(datetime.datetime.now())
        bj_dt = bj_dt.split('.')[0]  # 处理时间
        text = f'{bj_dt}\n'  # 定义信息内容
        text = text + logging # 处理信息内容
        log.msg(text)  # 调用msg函数,输出信息
2. 코드 구현
거래는 Binance API를 통해 취득되며, U-본 계약 fapi 인터페이스를 사용하며, 다음 코드는 Binance API를 간편하게 포장하여 참조를 위해 사용합니다.
            import requests,json,time,hmac,hashlib,datetime

# APIKEY填写位置
apikey = '***'
Secret_KEY = '***'

#币安接口
class bian:
    #拼接请求参数
    def param2string(self,param):
        s = ''
        for k in param.keys():
            s += k
            s += '='
            s += str(param[k])
            s += '&'
        return s[:-1]

    # 参数为get,post请求方式,路径,body
    def IO(self,method,request_path,body):
        header = {
        'X-MBX-APIKEY': apikey,
        }
        #选择请求方式
        if body != '':
            #签名
            body['signature'] = hmac.new(Secret_KEY.encode('utf-8'), self.param2string(body).encode('utf-8'), hashlib.sha256).hexdigest()
            if method == 'GET':
                body = self.param2string(body)
                tell = 'https://fapi.binance.com{0}?{1}'.format(request_path,body)
                response = requests.get(url=tell, headers=header).json()
                return response
            elif method == 'POST':
                response = requests.post(url='https://fapi.binance.com'+str(request_path), headers=header, data=body).json()
                return response
        else:
            response = requests.get(url='https://fapi.binance.com'+str(request_path), headers=header).json()
            return response
전략은 가격 인터페이스를 얻는 데만 사용되기 때문에 간단한 데모만 진행됩니다. 다른 인터페이스는 마찬가지입니다.
            #封装获取价格接口
def price(self,Name):
    body = {"symbol":str(Name)}
    info = self.IO("GET","/fapi/v1/ticker/price",body)
    for i in info:
        if i == "code":
            #设计一个接口错误容错功能
            time.sleep(0.5)
            letgo = '调用price函数接口返回错误,再次尝试 返回错误代码:{0}'.format(str(info))
            log.dd(str(letgo))
            exchange.price(Name)
    return info["price"]
아래는 실황 모니터링 코드의 구현입니다.
            # 监控币种&&监控价格一一对应
ccy = ["BTCUSDT","ETHUSDT","LTCUSDT"]
PriceTIME = ["100000;28000","500000000;1200","500;100"]

#行情监控逻辑
def pricewarm():
    #轮询获取当前价格
    for i in range(len(PriceTIME)):
        info = exchange.price(str(PriceTIME[i]))
        priceindex = PriceTIME[i].find(";") #提取价格区间
        #价格上限
        priceup = PriceTIME[i][:priceindex]
        #价格下限
        pricedown = PriceTIME[i][priceindex+1:]
        if float(info) >= float(priceup): #钉钉接口输出
            letgo = f'当前价格{info}USDT大于所设定上限{priceup}USDT'
            log.dd(letgo)
        elif float(info) <= float(pricedown):
            letgo = f'当前价格{info}USDT小于等于设定下限{pricedown}USDT'
            log.dd(letgo)
        time.sleep(0.2)

# 主函数
def main():
    global exchange,log
    log = DING
    exchange = bian
    while True:
        try:
            pricewarm()
            time.sleep(1)
        except:
            time.sleep(1)

if __name__ == "__main__":
    main()
3. 운영
코드가 완료되면 경로를 기억하고, 터미널 실행 화면을 엽니다.
screen -S [名称]
cd [路径]
python3 [文件名]
확인 절차가 실행되면 탈퇴할 수 있습니다.
정책 주소:간단한 가격 알림 로봇
Related Recommendations
Use the extended API on FMZ Quant to realize "TradingView" alert signal tradingMain Interface Overview and Structure of FMZ Quant Trading PlatformHow to Pend Market orders (Only Passively Traded) and Place Orders in Batch on BitMEX (IO Demo)FMZ Launched Python Local Backtest EngineFMZ Feedback to New and Old Users by AffiliationFMZ Quant Simulation Level Backtest Mechanism DescriptionFMZ Backtest Mechanism DescriptionLinux Docker Installation and Update StepsQuick Start for PythonQuick Start for JavaScript

