
Overview
The Multi-Confluence Swing Hunter Strategy is an advanced quantitative approach designed for low timeframe trading that employs a comprehensive point-based scoring system combining optimized technical indicators, price action analysis, and reversal pattern recognition to generate precise trading signals. The core innovation of this strategy lies in its unique dual scoring mechanism, which identifies swing bottoms through an entry scoring system and determines optimal exit timing through an exit scoring system. Unlike traditional strategies that rely on simple indicator crossovers, this system quantifies market conditions through a weighted scoring mechanism, providing objective, data-driven entry and exit decisions.
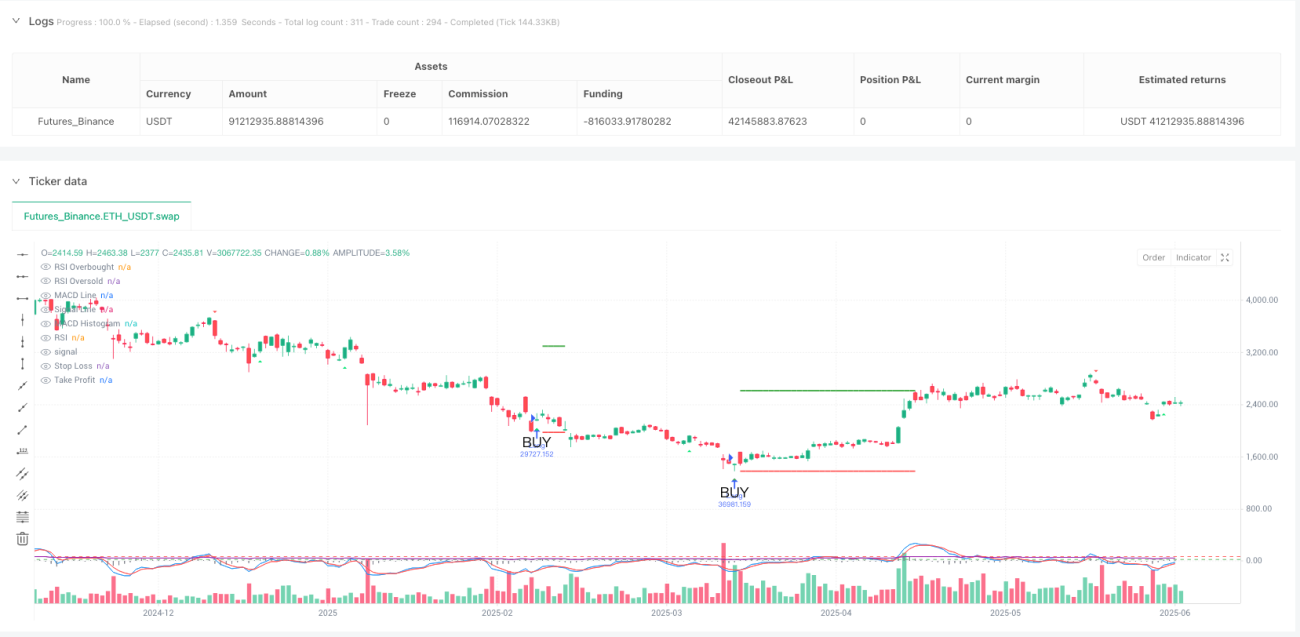
The strategy utilizes extensively backtested optimized indicator parameters, including specially configured MACD(3,10,3) and RSI(21), which are more responsive to rapid market changes than standard configurations. The strategy requires high score thresholds of at least 13 points for both entry and exit, ensuring that only high-conviction signals trigger trades. In backtesting, this strategy has demonstrated over 200% profit performance, proving its effectiveness in capturing market volatility patterns.
Strategy Principles
The core of the Multi-Confluence Swing Hunter Strategy is its comprehensive scoring system that quantifies multiple technical conditions to determine trading opportunities. The entry scoring system consists of four main components:
-
RSI Signals (maximum 5 points):
- RSI < 30: +2 points
- RSI < 25: +2 points
- RSI turning up: +1 point
-
MACD Signals (maximum 8 points):
- MACD below zero: +1 point
- MACD turning up: +2 points
- MACD histogram improving: +2 points
- MACD bullish divergence: +3 points
-
Price Action (maximum 4 points):
- Long lower wick (>50%): +2 points
- Small body (<30%): +1 point
- Bullish close: +1 point
-
Pattern Recognition (maximum 8 points):
- RSI bullish divergence: +4 points
- Quick recovery pattern: +2 points
- Reversal confirmation: +4 points
The exit scoring system uses a similar weighting system but employs inverse criteria to identify swing tops. The strategy requires a minimum score of 13 points for both entry and exit, ensuring that only high-conviction signals are executed, reducing the possibility of false signals.
Another key component of the strategy is its optimized indicator parameters:
- MACD Configuration (3,10,3): Faster than the standard (12,26,9) configuration, providing earlier signal detection while maintaining reliability
- RSI Configuration (21-period): Reduces false signals compared to the standard 14-period RSI while still effectively capturing oversold conditions
These parameters have been specifically optimized to capture rapid price movements and high-frequency volatility.
Strategy Advantages
-
Objective Quantified Decision Process: Through its point-based scoring system, the strategy eliminates subjective judgment and provides clear trading criteria. This approach makes trading decisions based on data rather than emotions, significantly improving trading discipline.
-
Multiple Confirmation Mechanism: The strategy requires confirmation from multiple technical indicators and price patterns, significantly improving signal reliability. Trades are only executed when at least 13 points of criteria are met, reducing the risk of false signals.
-
Optimized Time Sensitivity: By using optimized MACD(3,10,3) and RSI(21) parameters, the strategy can capture price momentum changes earlier while filtering out market noise, providing better time sensitivity.
-
Flexible Risk Management: The strategy incorporates risk-based stop loss and take profit calculations, with a default 5:1 risk-reward ratio, providing a clear risk management framework for trades. Dynamic stop losses based on recent swing lows with configurable buffers enhance risk control flexibility.
-
Highly Visual Trading System: The strategy provides a score display system, including green labels (entry scores ≥10 points) and red labels (exit scores ≥10 points), as well as distinct trade entry/exit markers, allowing traders to clearly see how the system operates.
-
High Adaptability: While the strategy parameters are optimized, they can be adjusted for different market environments and trading instruments, giving the strategy broad applicability.
Strategy Risks
-
High Position Allocation Risk: The strategy's default approach uses 100% equity allocation per trade, which increases the risk exposure for individual trades. In cases of severe market volatility or unexpected events, this could lead to significant account fluctuations.
-
Market Condition Dependency: This strategy performs best in clearly trending and volatile markets but may be less effective in highly choppy, sideways markets. It should be used cautiously in different market environments, with consideration for adjusting parameters or pausing trading.
-
Optimization Overfitting Risk: The strategy parameters have been optimized, which may pose a risk of overfitting to historical data. Changes in future market conditions could lead to strategy performance that doesn't match backtesting results. Parameters should be regularly revalidated and adjusted to maintain strategy effectiveness.
-
Lack of Diversification Protection: As a single position strategy, it lacks diversification protection, increasing specific market risk. In practical application, consider using this strategy as part of a broader portfolio or introducing multi-instrument trading to increase diversification.
-
Technical Failure Risk: The complex scoring system and multiple conditions may fail in certain market environments, especially under extreme market conditions. It's advisable to implement additional risk management measures, such as maximum loss limits or volatility filters.
Optimization Directions
-
Introduce Adaptive Parameters: The current strategy uses fixed MACD and RSI parameters, but could benefit from adaptive parameters based on market volatility or trend strength. For example, automatically adjusting MACD parameters in high-volatility environments, or adjusting RSI oversold/overbought levels based on current market conditions, to improve the strategy's adaptability across different market environments.
-
Integrate Volume-Price Relationship Analysis: The current strategy is primarily based on price action and momentum indicators and could be enhanced by integrating volume analysis to improve signal quality. Particularly in reversal pattern confirmation, volume confirmation can provide additional reliability. Consider adding volume-related scoring criteria, such as volume increase, volume divergence, etc.
-
Add Market Environment Filters: Implement market environment recognition mechanisms to automatically reduce trading frequency or adjust parameters in market conditions unsuitable for the strategy. For example, increasing score thresholds in highly sideways markets, or reducing stop loss ranges in low-volatility environments.
-
Optimize Money Management System: The current strategy uses 100% position allocation, but could implement a more sophisticated money management system that dynamically adjusts position size based on signal strength, market volatility, or historical performance. For example, allocating more capital for higher scores, or reducing position size after consecutive losses.
-
Integrate Multi-Timeframe Analysis: Enhance entry signal quality by incorporating trend confirmation from higher timeframes. For example, only executing trades when the higher timeframe trend direction is aligned, or assigning more points for trades that follow the main trend.
-
Machine Learning Optimization: Consider using machine learning methods to optimize scoring weights and thresholds. By analyzing historical data, it's possible to determine which signal combinations are most effective in specific market environments and adjust the scoring system accordingly.
Conclusion
The Multi-Confluence Swing Hunter Strategy represents a comprehensive, systematic approach to low timeframe trading that creates a data-driven trading decision system by integrating multiple technical analysis indicators and price action characteristics. The core advantage of this strategy lies in its objective multi-criteria scoring method, which effectively eliminates emotional decision-making while maintaining sufficient flexibility to adapt to different trading instruments and market environments.
Through optimized MACD(3,10,3) and RSI(21) parameters, combined with strict entry and exit conditions, the strategy can effectively capture market swings, especially in markets with higher volatility. Built-in risk management features and visualization tools further enhance the strategy's practicality and user-friendliness.
However, the strategy also has certain limitations and risks, including high position allocation, market condition dependency, and the possibility of optimization overfitting. By implementing the suggested optimization directions, such as introducing adaptive parameters, integrating volume-price relationship analysis, adding market environment filters, etc., the strategy's robustness and adaptability can be further enhanced.
For experienced traders, the Multi-Confluence Swing Hunter Strategy provides a powerful framework for trend capture and swing trading in low timeframes. By understanding its core principles and adjusting according to specific needs, traders can use this strategy to find high-probability trading opportunities in rapidly changing markets. It's worth noting that any trading strategy requires strict risk management and continuous monitoring and evaluation to ensure long-term trading success.
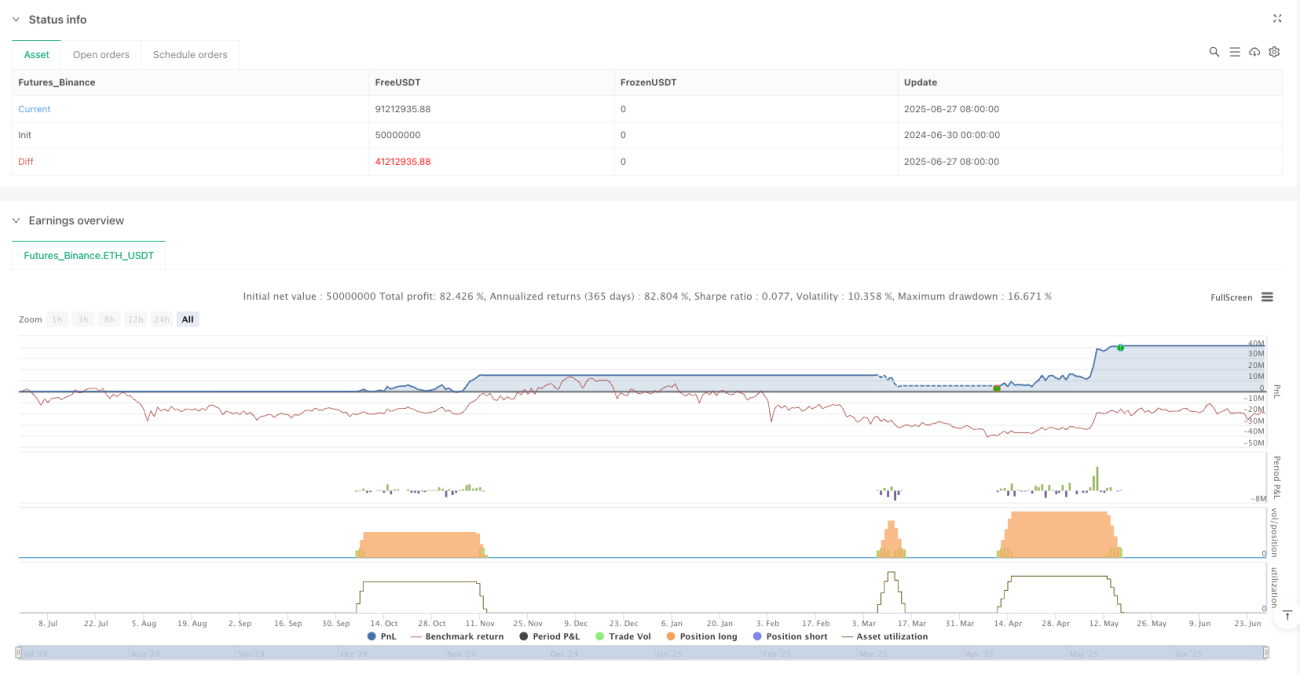
/*backtest
start: 2024-06-30 00:00:00
end: 2025-06-28 08:00:00
period: 1d
basePeriod: 1d
exchanges: [{"eid":"Futures_Binance","currency":"ETH_USDT","balance":50000000}]
*/

//   ____                    _     _______            _ _               _____
//  / __ \                  | |   |__   __|          | (_)             |  __ \
// | |  | |_   _  __ _ _ __ | |_     | |_ __ __ _  __| |_ _ __   __ _  | |__) |
// | | | | | | |/ _` | '_ \| __| | | '__/ _` |/ _` | | '_ \ / _` | | ___/ '__/ _ \ - 1