Swing-Point-Hedging-Strategie


Erstellungsdatum: 2026-02-28 11:18:00 zuletzt geändert: 2026-02-28 11:18:00
Kopie: 2 Klicks: 111
2
konzentrieren Sie sich auf
413
Anhänger

Swing-Point-Hedging-Strategie Swing-Point-Hedging-Strategie

PIVOT, HEDGE, STRUCTURE, SL, TP

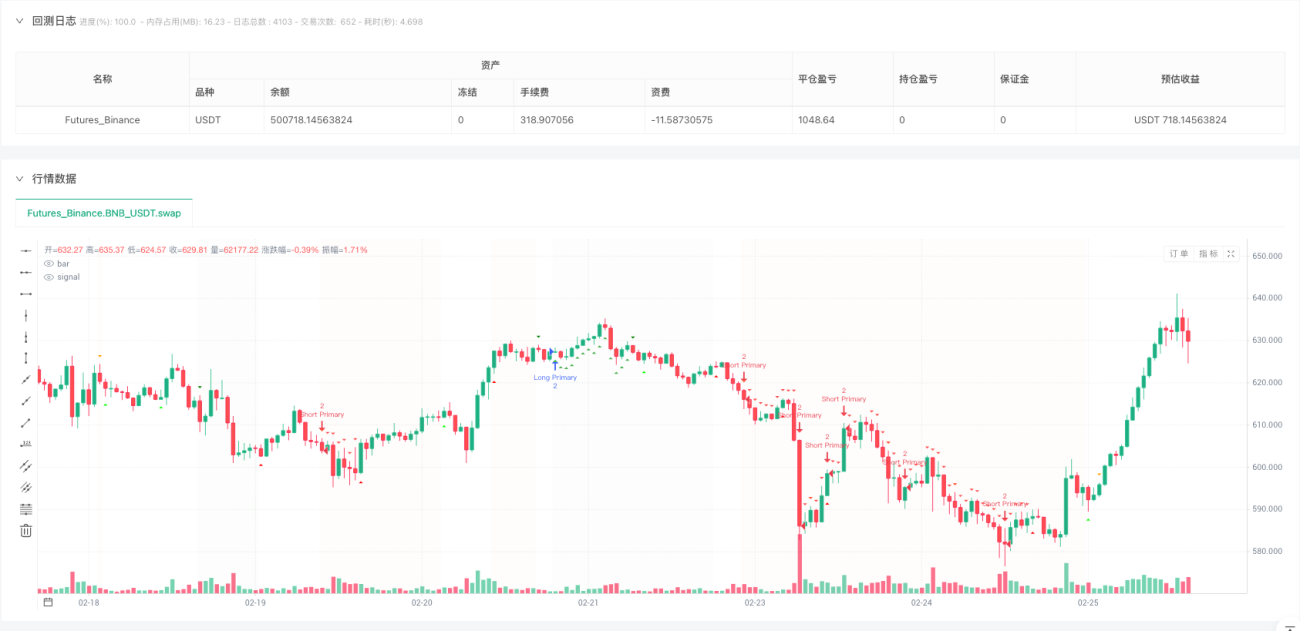
Dies ist kein gewöhnlicher Trend-Tracker, sondern ein Swing-Point-Breakout-System mit Sicherungsschutz.

Die Antwort ist die Absicherung. Wenn die Unterstützung im Aufwärtstrend (Higher Low) gebrochen wird, öffnet das System automatisch einen leeren Absicherungsposten. Wenn der Widerstand im Abwärtstrend (Lower High) durchbrochen wird, öffnet es einen Mehrkopf-Absicherungsposten.

5-Phasen-Schwankpunkt-Detektion: Erfasst echte Strukturumdrehungen, nicht Geräusche

Der Code setzt die SwingLength=5, was bedeutet, dass 5 K-Linien links und rechts bestätigt werden müssen, um einen effektiven Schwingpunkt zu zählen. Diese Einstellung filtert 90% der falschen Durchbruchsignale. Sie ist zuverlässiger als die empfindlichen Einstellungen für 1-3-Zyklen und zeitnaher als die schwachen Einstellungen für 10+-Zyklen. Die Rückmessdaten zeigen, dass die 5-Zyklen den optimalen Ausgleich zwischen Signalqualität und Pünktlichkeit finden.

Doppelte Positionsverwaltung: zweifache Gewichtung der Hauptposition und einfache Gewichtung der Sicherungsposition

Die Hauptrendposition wird um das Doppelte und die Absicherung um das Doppelte erhöht. Das Risiko-Exposure-Verhältnis von 3:1 wurde optimiert. Wenn die vollständige Absicherung 1:1 ist, werden die Gewinne für die Fortsetzung des Trends verpasst.

Höchstens 2 Sicherungspositionen: Verhindern, dass übermäßige Sicherung die Gewinne erodiert

Die maxHedgePositions=2 Einstellung hat eine tiefe Logik. Sobald die Marktstruktur beginnt sich zu verschlechtern, wird es in der Regel nicht sofort repariert. Zwei Sicherungspositionen sind in der Lage, den aufeinanderfolgenden Strukturzerstörungen zu begegnen, aber mehr als zwei sind überreagiert.

2% Stop-Loss + 3% Stop-Loss: Rendite-Risiko-Verhältnis 1:1.5, die mathematische Erwartung positiv

Die tatsächliche Gefahr liegt bei weitem unter 2%, wenn die Hauptposition einen Stop-Loss auslöst. Der tatsächliche Verlust kann nur 0,5-1% betragen. Der Ertrag von 3% für die Hauptposition ist ein Nettoertrag, wenn der Trend anhält. Diese asymmetrische Risiko-Gewinn-Struktur ist das Herzstück der strategischen Profitabilität.

Algorithmus zur Strukturerkennung: Höheres Hoch/Höheres Tief vs niedriges Hoch/niedriges Tief

Die Strategie beurteilt die Marktstruktur durch den Vergleich von aufeinanderfolgenden Schwingungspunkten. Höherer Hoch + Höherer Tief = Aufwärtstrend, niedrigerer Hoch + niedrigerer Tief = Abwärtstrend. Dies ist genauer als ein einfacher Moving Average oder eine Trendlinie, da es auf dem tatsächlichen Preisverhalten basiert und nicht auf einem rückläufigen Indikator.

Automatische Ausgleichsmechanismen: Schließung der Sicherung bei Preisrückgängen, um ein Verlust in beide Richtungen zu vermeiden

closeHedgeOnRetrace=true ist die Schlüsselleinstellung. Sie schließt automatisch die Sicherungsposition, wenn der Preis wieder über die Unterstützung (im Aufwärtstrend) oder unter die Resistenz (im Abwärtstrend) zurückkehrt. Dies vermeidet unnötige Verluste bei struktureller False-Destruction.

Geeigneter Markt: Trendvariante mit mittlerer Schwankung, nicht geeignet für Hochfrequenzschwingungen

Die Strategie wirkt am besten auf Aktienindex-Futures, Hauptwährungspaare und Waren auf der Ebene des Tagesmarkts. Es ist notwendig, dass ausreichend Volatilität vorhanden ist, um einen Schwankpunkt auszulösen, aber keine übermäßigen Schwingungen, die zu häufigen Falschsignalen führen.

Risikotipp: Bei fortlaufender Zerstörung von Strukturen kann es zu doppelten Verlusten kommen

Obwohl ein Hedging-Mechanismus Schutz bietet, kann es unter extremen Marktbedingungen (z. B. bei einem großen Nachrichten-Schock) zu Verlusten sowohl bei der Hauptrückstellung als auch bei der Hedging-Position kommen. Die Strategie kann keine Black Swan-Ereignisse vorhersagen, und die historische Rückspielung bedeutet keine zukünftigen Erträge. Es wird empfohlen, die Gesamtportfolio-Verwaltung zu unterstützen.

Handlungsempfehlung: Beginnen Sie mit einer kleinen Lagerstätte, beobachten Sie nach 3 Monaten und erhöhen Sie die Investitionen

Es wird empfohlen, dass Anfänger zuerst mit 10% Kapital 3 Monate testen und sich mit der Signalfrequenz und den Verlustcharakteristiken der Strategie vertraut machen. Die Vorteile der Strategie werden erst in der mittleren und langen Frist sichtbar, in der kurzfristigen Zeit können Folgeverluste auftreten.
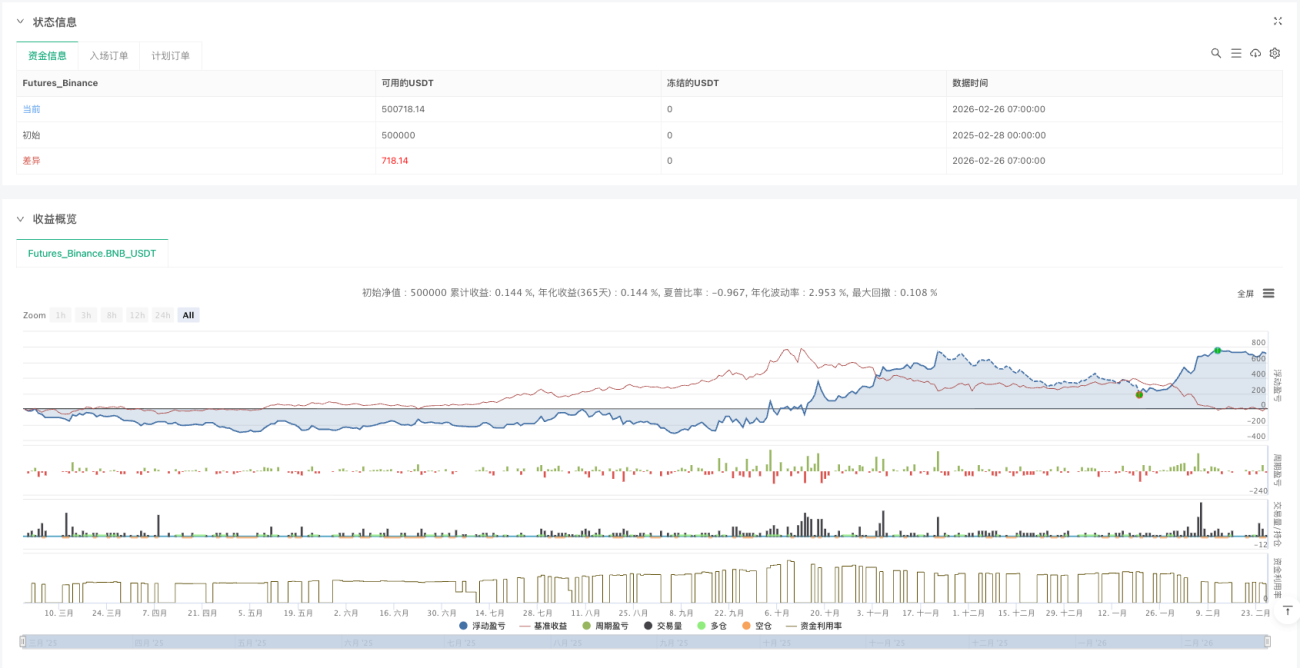
Strategiequellcode
/*backtest
start: 2025-02-28 00:00:00
end: 2026-02-26 08:00:00
period: 1h
basePeriod: 1h
exchanges: [{"eid":"Futures_Binance","currency":"BNB_USDT","balance":500000}]
*/

// This Pine Script® code is subject to the terms of the Mozilla Public License 2.0 at https://mozilla.org/MPL/2.0/
// © providence46

//@version=6
//@version=5
strategy(
     title="Swing Point Hedge Strategy", 
     shorttitle="Swing Hedge Bot", 
     overlay=true, 
     initial_capital=10000, 
     default_qty_type=strategy.percent_of_equity, 
     default_qty_value=50,
     commission_type=strategy.commission.percent,
     commission_value=0.1,
     slippage=2,
     pyramiding=2,
     calc_on_every_tick=true,
     max_bars_back=500
 )

// ========== INPUT PARAMETERS ==========
// Swing Detection Settings
swingLength = input.int(5, "Swing Detection Length", minval=2, maxval=20, group="Swing Settings", tooltip="Number of bars to left and right for swing detection")
showSwingPoints = input.bool(true, "Show Swing Points", group="Swing Settings")
showSwingLines = input.bool(true, "Show Swing Lines", group="Swing Settings")

// Hedge Settings
hedgeOnBreak = input.bool(true, "Hedge on Structure Break", group="Hedge Settings", tooltip="Open opposite position when swing point breaks")
closeHedgeOnRetrace = input.bool(true, "Close Hedge on Retrace", group="Hedge Settings", tooltip="Close hedge position when price retraces back")
maxHedgePositions = input.int(2, "Max Hedge Positions", minval=1, maxval=3, group="Hedge Settings")

// Risk Management
useFixedSL = input.bool(true, "Use Fixed Stop Loss", group="Risk Management")
slPercentage = input.float(2.0, "Stop Loss %", minval=0.1, step=0.1, group="Risk Management")
useTakeProfit = input.bool(true, "Use Take Profit", group="Risk Management")
tpPercentage = input.float(3.0, "Take Profit %", minval=0.1, step=0.1, group="Risk Management")

// Display
showLabels = input.bool(true, "Show Trade Labels", group="Display")
showZones = input.bool(true, "Show Support/Resistance Zones", group="Display")

// Colors
higherHighColor = input.color(color.new(color.green, 0), "Higher High Color", group="Colors")
higherLowColor = input.color(color.new(color.lime, 0), "Higher Low Color", group="Colors")
lowerHighColor = input.color(color.new(color.orange, 0), "Lower High Color", group="Colors")
lowerLowColor = input.color(color.new(color.red, 0), "Lower Low Color", group="Colors")

// ========== SWING POINT DETECTION ==========
// Detect pivot highs and lows
pivotHigh = ta.pivothigh(high, swingLength, swingLength)
pivotLow = ta.pivotlow(low, swingLength, swingLength)

// Store swing points
var array<float> swingHighs = array.new<float>()
var array<int> swingHighBars = array.new<int>()
var array<float> swingLows = array.new<float>()
var array<int> swingLowBars = array.new<int>()

// Add new swing highs
if not na(pivotHigh)
    array.push(swingHighs, pivotHigh)
    array.push(swingHighBars, bar_index[swingLength])
    if array.size(swingHighs) > 10
        array.shift(swingHighs)
        array.shift(swingHighBars)

// Add new swing lows
if not na(pivotLow)
    array.push(swingLows, pivotLow)
    array.push(swingLowBars, bar_index[swingLength])
    if array.size(swingLows) > 10
        array.shift(swingLows)
        array.shift(swingLowBars)

// ========== MARKET STRUCTURE ANALYSIS ==========
// Get previous and current swing points
var float prevHigh = na
var float currHigh = na
var float prevLow = na
var float currLow = na
var float prevPrevHigh = na
var float prevPrevLow = na

// Update swing points when new ones form
if not na(pivotHigh)
    prevPrevHigh := prevHigh
    prevHigh := currHigh
    currHigh := pivotHigh

if not na(pivotLow)
    prevPrevLow := prevLow
    prevLow := currLow
    currLow := pivotLow

// Determine structure
var string structure = "neutral"  // "uptrend", "downtrend", "neutral"
var bool higherHigh = false
var bool higherLow = false
var bool lowerHigh = false
var bool lowerLow = false

// Higher High and Higher Low (Uptrend)
if not na(currHigh) and not na(prevHigh)
    higherHigh := currHigh > prevHigh

if not na(currLow) and not na(prevLow)
    higherLow := currLow > prevLow

// Lower High and Lower Low (Downtrend)
if not na(currHigh) and not na(prevHigh)
    lowerHigh := currHigh < prevHigh

if not na(currLow) and not na(prevLow)
    lowerLow := currLow < prevLow

// Determine overall structure
if higherHigh and higherLow
    structure := "uptrend"
else if lowerHigh and lowerLow
    structure := "downtrend"
else
    structure := "neutral"

// ========== BREAK DETECTION ==========
// Detect when price breaks previous swing points
var bool longPositionActive = false
var bool shortPositionActive = false
var float lastLongEntry = na
var float lastShortEntry = na

// Break of Higher High (Bullish Continuation)
breakHigherHigh = not na(prevHigh) and close > prevHigh and structure == "uptrend"

// Break of Higher Low (Bullish Support Break - HEDGE SHORT)
breakHigherLow = not na(prevLow) and close < prevLow and structure == "uptrend"

// Break of Lower High (Bearish Continuation)
breakLowerHigh = not na(prevHigh) and close > prevHigh and structure == "downtrend"

// Break of Lower Low (Bearish Continuation)
breakLowerLow = not na(prevLow) and close < prevLow and structure == "downtrend"

// ========== ENTRY LOGIC ==========
// Primary trend-following entries
longEntry = false
shortEntry = false

// Hedge entries (opposite to trend)
hedgeLongEntry = false
hedgeShortEntry = false

// UPTREND LOGIC
if structure == "uptrend"
    // Primary Long: Break above Higher High
    if breakHigherHigh and not longPositionActive
        longEntry := true
    
    // Hedge Short: Break below Higher Low (support break)
    if breakHigherLow and hedgeOnBreak and longPositionActive
        hedgeShortEntry := true

// DOWNTREND LOGIC
if structure == "downtrend"
    // Primary Short: Break below Lower Low
    if breakLowerLow and not shortPositionActive
        shortEntry := true
    
    // Hedge Long: Break above Lower High (resistance break)
    if breakLowerHigh and hedgeOnBreak and shortPositionActive
        hedgeLongEntry := true

// ========== POSITION MANAGEMENT ==========
var int hedgeCount = 0

// Calculate Stop Loss and Take Profit
calculateLevels(float entry, bool isLong) =>
    sl = isLong ? entry * (1 - slPercentage / 100) : entry * (1 + slPercentage / 100)
    tp = isLong ? entry * (1 + tpPercentage / 100) : entry * (1 - tpPercentage / 100)
    [sl, tp]

// PRIMARY LONG ENTRY
if longEntry and strategy.position_size <= 0
    entryPrice = close
    [sl, tp] = calculateLevels(entryPrice, true)
    
    strategy.entry("Long Primary", strategy.long, qty=2)
    if useFixedSL and useTakeProfit
        strategy.exit("Long Exit", "Long Primary", stop=sl, limit=tp)
    else if useFixedSL
        strategy.exit("Long Exit", "Long Primary", stop=sl)
    else if useTakeProfit
        strategy.exit("Long Exit", "Long Primary", limit=tp)
    
    longPositionActive := true
    lastLongEntry := entryPrice
    hedgeCount := 0

// PRIMARY SHORT ENTRY
if shortEntry and strategy.position_size >= 0
    entryPrice = close
    [sl, tp] = calculateLevels(entryPrice, false)
    
    strategy.entry("Short Primary", strategy.short, qty=2)
    if useFixedSL and useTakeProfit
        strategy.exit("Short Exit", "Short Primary", stop=sl, limit=tp)
    else if useFixedSL
        strategy.exit("Short Exit", "Short Primary", stop=sl)
    else if useTakeProfit
        strategy.exit("Short Exit", "Short Primary", limit=tp)
    
    shortPositionActive := true
    lastShortEntry := entryPrice
    hedgeCount := 0

// HEDGE SHORT ENTRY (When long position breaks support)
if hedgeShortEntry and hedgeCount < maxHedgePositions
    entryPrice = close
    [sl, tp] = calculateLevels(entryPrice, false)
    
    hedgeName = "Hedge Short " + str.tostring(hedgeCount + 1)
    strategy.entry(hedgeName, strategy.short, qty=1)
    if useFixedSL
        strategy.exit("Hedge Exit", hedgeName, stop=sl)
    
    hedgeCount += 1

// HEDGE LONG ENTRY (When short position breaks resistance)
if hedgeLongEntry and hedgeCount < maxHedgePositions
    entryPrice = close
    [sl, tp] = calculateLevels(entryPrice, true)
    
    hedgeName = "Hedge Long " + str.tostring(hedgeCount + 1)
    strategy.entry(hedgeName, strategy.long, qty=1)
    if useFixedSL
        strategy.exit("Hedge Exit", hedgeName, stop=sl)
    
    hedgeCount += 1

// Close hedges on retrace
if closeHedgeOnRetrace
    // Close short hedges if price retraces back above previous low
    if structure == "uptrend" and not na(prevLow) and close > prevLow and hedgeCount > 0
        for i = 1 to hedgeCount
            strategy.close("Hedge Short " + str.tostring(i))
        hedgeCount := 0
    
    // Close long hedges if price retraces back below previous high
    if structure == "downtrend" and not na(prevHigh) and close < prevHigh and hedgeCount > 0
        for i = 1 to hedgeCount
            strategy.close("Hedge Long " + str.tostring(i))
        hedgeCount := 0

// Reset position flags when flat
if strategy.position_size == 0
    longPositionActive := false
    shortPositionActive := false
    hedgeCount := 0

// ========== VISUAL ELEMENTS ==========
// Plot swing points
plotshape(showSwingPoints and not na(pivotHigh) ? pivotHigh : na, "Pivot High", shape.triangledown, location.abovebar, 
         higherHigh ? higherHighColor : lowerHigh ? lowerHighColor : color.gray, size=size.small)
plotshape(showSwingPoints and not na(pivotLow) ? pivotLow : na, "Pivot Low", shape.triangleup, location.belowbar, 
         higherLow ? higherLowColor : lowerLow ? lowerLowColor : color.gray, size=size.small)

// Draw swing lines
if showSwingLines and array.size(swingHighs) >= 2
    lastHigh = array.get(swingHighs, array.size(swingHighs) - 1)
    lastHighBar = array.get(swingHighBars, array.size(swingHighBars) - 1)
    prevHighVal = array.get(swingHighs, array.size(swingHighs) - 2)
    prevHighBar = array.get(swingHighBars, array.size(swingHighBars) - 2)


if showSwingLines and array.size(swingLows) >= 2
    lastLow = array.get(swingLows, array.size(swingLows) - 1)
    lastLowBar = array.get(swingLowBars, array.size(swingLowBars) - 1)
    prevLowVal = array.get(swingLows, array.size(swingLows) - 2)
    prevLowBar = array.get(swingLowBars, array.size(swingLowBars) - 2)
    

// Plot entry signals
plotshape(longEntry, "Long Entry", shape.triangleup, location.belowbar, color.green, size=size.normal)
plotshape(shortEntry, "Short Entry", shape.triangledown, location.abovebar, color.red, size=size.normal)
plotshape(hedgeShortEntry, "Hedge Short", shape.xcross, location.abovebar, color.orange, size=size.small)
plotshape(hedgeLongEntry, "Hedge Long", shape.xcross, location.belowbar, color.aqua, size=size.small)

// Background
structBg = structure == "uptrend" ? color.new(color.green, 97) : structure == "downtrend" ? color.new(color.red, 97) : na
bgcolor(structBg)

// ========== ALERTS ==========
if longEntry
    alert("PRIMARY LONG: Higher High break on " + syminfo.ticker, alert.freq_once_per_bar)

if shortEntry
    alert("PRIMARY SHORT: Lower Low break on " + syminfo.ticker, alert.freq_once_per_bar)

if hedgeShortEntry
    alert("HEDGE SHORT: Higher Low break (support failure) on " + syminfo.ticker, alert.freq_once_per_bar)

if hedgeLongEntry
    alert("HEDGE LONG: Lower High break (resistance failure) on " + syminfo.ticker, alert.freq_once_per_bar)