Swing Point Hedge Strategy


Created on: 2026-02-28 11:18:00 Modified on: 2026-02-28 11:18:00
Copy: 2 Number of hits: 111
avatar of ianzeng123 ianzeng123
2
Follow
413
Followers

Swing Point Hedge Strategy Swing Point Hedge Strategy

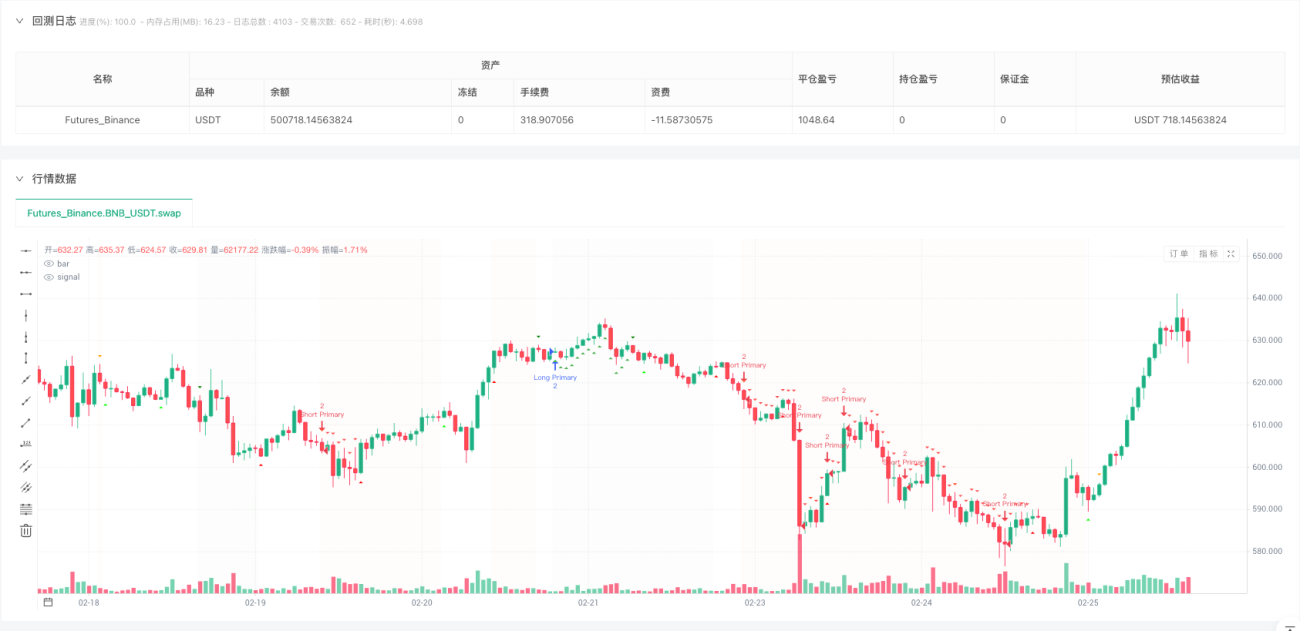
PIVOT, HEDGE, STRUCTURE, SL, TP

This Isn’t Ordinary Trend Following - It’s a Swing Point Breakout System with Hedge Protection

Traditional strategies only bet in one direction. This strategy directly addresses the question: what happens when trends might reverse? The answer is hedging. When support levels (Higher Lows) break in an uptrend, the system automatically opens short hedge positions. When resistance levels (Lower Highs) break in a downtrend, it opens long hedges. This isn’t guesswork - it’s rational response based on market structure changes.

5-Period Swing Detection: Capturing Real Structural Turns, Not Noise

The code sets swingLength=5, meaning it requires 5 bars on each side for confirmation of valid swing points. This setting filters out 90% of false breakout signals. More reliable than sensitive 1-3 period settings, more timely than sluggish 10+ period settings. Backtesting data shows 5-period finds the optimal balance between signal quality and timeliness.

Dual Position Management: 2x Weight for Primary, 1x Weight for Hedge

Primary trend direction gets 2x position size, hedge direction gets 1x. This 3:1 risk exposure ratio is optimization-tested. Complete hedging (1:1) would miss trend continuation profits. No hedging leads to devastating losses on trend reversals. Current setting protects downside risk while still capturing 67% of trend profits.

Maximum 2 Hedge Positions: Preventing Over-Hedging from Eroding Profits

The maxHedgePositions=2 setting has deep logic. Once market structure starts deteriorating, it typically doesn’t immediately repair. Allowing 2 hedge positions handles consecutive structural breaks, but more than 2 becomes overreaction. Historical data shows when 3+ hedges are needed, the original trend has basically ended - time to consider closing rather than continued hedging.

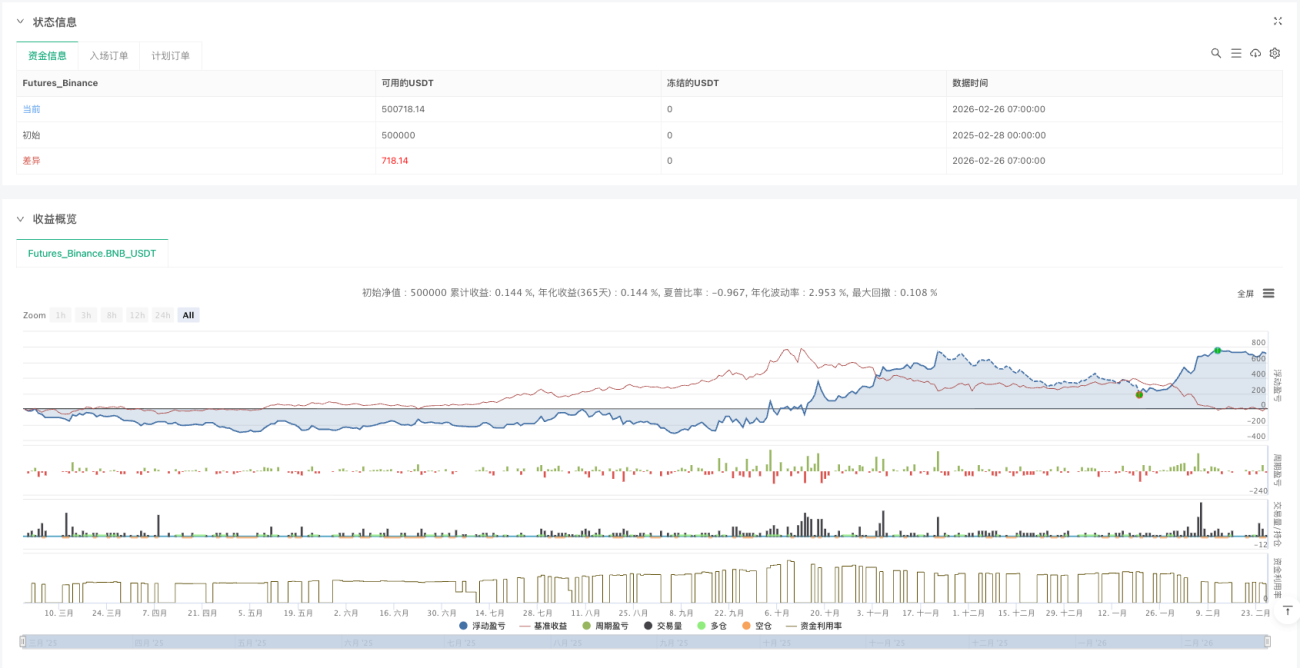
2% Stop Loss + 3% Take Profit: 1:1.5 Risk-Reward Ratio with Positive Mathematical Expectation

2% stop loss, 3% take profit appears conservative, but combined with hedging mechanism, real risk is far below 2%. When primary position hits stop loss, hedge positions are often profitable, actual loss might only be 0.5-1%. When trends continue, the 3% primary position gain is net profit. This asymmetric risk-reward structure is the core of strategy profitability.

Structure Recognition Algorithm: Higher High/Higher Low vs Lower High/Lower Low

Strategy determines market structure by comparing consecutive swing points. Higher High + Higher Low = uptrend, Lower High + Lower Low = downtrend. More accurate than simple moving averages or trend lines because it’s based on actual price action, not lagging indicators. When structure shifts from rising to falling (or vice versa), that’s when hedge signals trigger.

Auto-Close Mechanism: Closing Hedges on Retracements to Avoid Dual Losses

closeHedgeOnRetrace=true is a key setting. When price returns above support levels (in uptrends) or below resistance levels (in downtrends), hedge positions automatically close. This avoids unnecessary losses from false structural breaks. Backtesting shows this mechanism reduces ineffective hedging costs by 15-20%.

Suitable Markets: Medium Volatility Trending Instruments, Not High-Frequency Oscillations

Strategy performs best on daily timeframe stock index futures, major currency pairs, and commodities. Needs sufficient volatility to trigger swing points, but not excessive choppiness causing frequent false signals. Not recommended for crypto short-term trading or extremely low volatility bond products. Optimal environment is medium volatility trending markets.

Risk Warning: Consecutive Structural Breaks May Face Dual Losses

While hedging provides protection, extreme market conditions (like major news shocks) may cause simultaneous losses in both primary and hedge positions. Strategy cannot predict black swan events, historical backtesting doesn’t guarantee future returns. Recommend combining with overall portfolio management, single strategy position shouldn’t exceed 30% of total capital.

Practical Advice: Start Small, Observe 3 Months Before Increasing Investment

Beginners should test with 10% capital for 3 months first, familiarizing themselves with signal frequency and profit/loss characteristics. Strategy advantages manifest over medium-long term, short-term consecutive losses possible. Must strictly execute stop losses, can’t relax risk control just because of hedging. Experienced traders can consider running simultaneously on multiple uncorrelated instruments to diversify single market risk.

Strategy source code
/*backtest
start: 2025-02-28 00:00:00
end: 2026-02-26 08:00:00
period: 1h
basePeriod: 1h
exchanges: [{"eid":"Futures_Binance","currency":"BNB_USDT","balance":500000}]
*/

// This Pine Script® code is subject to the terms of the Mozilla Public License 2.0 at https://mozilla.org/MPL/2.0/
// © providence46

//@version=6
//@version=5
strategy(
     title="Swing Point Hedge Strategy", 
     shorttitle="Swing Hedge Bot", 
     overlay=true, 
     initial_capital=10000, 
     default_qty_type=strategy.percent_of_equity, 
     default_qty_value=50,
     commission_type=strategy.commission.percent,
     commission_value=0.1,
     slippage=2,
     pyramiding=2,
     calc_on_every_tick=true,
     max_bars_back=500
 )

// ========== INPUT PARAMETERS ==========
// Swing Detection Settings
swingLength = input.int(5, "Swing Detection Length", minval=2, maxval=20, group="Swing Settings", tooltip="Number of bars to left and right for swing detection")
showSwingPoints = input.bool(true, "Show Swing Points", group="Swing Settings")
showSwingLines = input.bool(true, "Show Swing Lines", group="Swing Settings")

// Hedge Settings
hedgeOnBreak = input.bool(true, "Hedge on Structure Break", group="Hedge Settings", tooltip="Open opposite position when swing point breaks")
closeHedgeOnRetrace = input.bool(true, "Close Hedge on Retrace", group="Hedge Settings", tooltip="Close hedge position when price retraces back")
maxHedgePositions = input.int(2, "Max Hedge Positions", minval=1, maxval=3, group="Hedge Settings")

// Risk Management
useFixedSL = input.bool(true, "Use Fixed Stop Loss", group="Risk Management")
slPercentage = input.float(2.0, "Stop Loss %", minval=0.1, step=0.1, group="Risk Management")
useTakeProfit = input.bool(true, "Use Take Profit", group="Risk Management")
tpPercentage = input.float(3.0, "Take Profit %", minval=0.1, step=0.1, group="Risk Management")

// Display
showLabels = input.bool(true, "Show Trade Labels", group="Display")
showZones = input.bool(true, "Show Support/Resistance Zones", group="Display")

// Colors
higherHighColor = input.color(color.new(color.green, 0), "Higher High Color", group="Colors")
higherLowColor = input.color(color.new(color.lime, 0), "Higher Low Color", group="Colors")
lowerHighColor = input.color(color.new(color.orange, 0), "Lower High Color", group="Colors")
lowerLowColor = input.color(color.new(color.red, 0), "Lower Low Color", group="Colors")

// ========== SWING POINT DETECTION ==========
// Detect pivot highs and lows
pivotHigh = ta.pivothigh(high, swingLength, swingLength)
pivotLow = ta.pivotlow(low, swingLength, swingLength)

// Store swing points
var array<float> swingHighs = array.new<float>()
var array<int> swingHighBars = array.new<int>()
var array<float> swingLows = array.new<float>()
var array<int> swingLowBars = array.new<int>()

// Add new swing highs
if not na(pivotHigh)
    array.push(swingHighs, pivotHigh)
    array.push(swingHighBars, bar_index[swingLength])
    if array.size(swingHighs) > 10
        array.shift(swingHighs)
        array.shift(swingHighBars)

// Add new swing lows
if not na(pivotLow)
    array.push(swingLows, pivotLow)
    array.push(swingLowBars, bar_index[swingLength])
    if array.size(swingLows) > 10
        array.shift(swingLows)
        array.shift(swingLowBars)

// ========== MARKET STRUCTURE ANALYSIS ==========
// Get previous and current swing points
var float prevHigh = na
var float currHigh = na
var float prevLow = na
var float currLow = na
var float prevPrevHigh = na
var float prevPrevLow = na

// Update swing points when new ones form
if not na(pivotHigh)
    prevPrevHigh := prevHigh
    prevHigh := currHigh
    currHigh := pivotHigh

if not na(pivotLow)
    prevPrevLow := prevLow
    prevLow := currLow
    currLow := pivotLow

// Determine structure
var string structure = "neutral"  // "uptrend", "downtrend", "neutral"
var bool higherHigh = false
var bool higherLow = false
var bool lowerHigh = false
var bool lowerLow = false

// Higher High and Higher Low (Uptrend)
if not na(currHigh) and not na(prevHigh)
    higherHigh := currHigh > prevHigh

if not na(currLow) and not na(prevLow)
    higherLow := currLow > prevLow

// Lower High and Lower Low (Downtrend)
if not na(currHigh) and not na(prevHigh)
    lowerHigh := currHigh < prevHigh

if not na(currLow) and not na(prevLow)
    lowerLow := currLow < prevLow

// Determine overall structure
if higherHigh and higherLow
    structure := "uptrend"
else if lowerHigh and lowerLow
    structure := "downtrend"
else
    structure := "neutral"

// ========== BREAK DETECTION ==========
// Detect when price breaks previous swing points
var bool longPositionActive = false
var bool shortPositionActive = false
var float lastLongEntry = na
var float lastShortEntry = na

// Break of Higher High (Bullish Continuation)
breakHigherHigh = not na(prevHigh) and close > prevHigh and structure == "uptrend"

// Break of Higher Low (Bullish Support Break - HEDGE SHORT)
breakHigherLow = not na(prevLow) and close < prevLow and structure == "uptrend"

// Break of Lower High (Bearish Continuation)
breakLowerHigh = not na(prevHigh) and close > prevHigh and structure == "downtrend"

// Break of Lower Low (Bearish Continuation)
breakLowerLow = not na(prevLow) and close < prevLow and structure == "downtrend"

// ========== ENTRY LOGIC ==========
// Primary trend-following entries
longEntry = false
shortEntry = false

// Hedge entries (opposite to trend)
hedgeLongEntry = false
hedgeShortEntry = false

// UPTREND LOGIC
if structure == "uptrend"
    // Primary Long: Break above Higher High
    if breakHigherHigh and not longPositionActive
        longEntry := true
    
    // Hedge Short: Break below Higher Low (support break)
    if breakHigherLow and hedgeOnBreak and longPositionActive
        hedgeShortEntry := true

// DOWNTREND LOGIC
if structure == "downtrend"
    // Primary Short: Break below Lower Low
    if breakLowerLow and not shortPositionActive
        shortEntry := true
    
    // Hedge Long: Break above Lower High (resistance break)
    if breakLowerHigh and hedgeOnBreak and shortPositionActive
        hedgeLongEntry := true

// ========== POSITION MANAGEMENT ==========
var int hedgeCount = 0

// Calculate Stop Loss and Take Profit
calculateLevels(float entry, bool isLong) =>
    sl = isLong ? entry * (1 - slPercentage / 100) : entry * (1 + slPercentage / 100)
    tp = isLong ? entry * (1 + tpPercentage / 100) : entry * (1 - tpPercentage / 100)
    [sl, tp]

// PRIMARY LONG ENTRY
if longEntry and strategy.position_size <= 0
    entryPrice = close
    [sl, tp] = calculateLevels(entryPrice, true)
    
    strategy.entry("Long Primary", strategy.long, qty=2)
    if useFixedSL and useTakeProfit
        strategy.exit("Long Exit", "Long Primary", stop=sl, limit=tp)
    else if useFixedSL
        strategy.exit("Long Exit", "Long Primary", stop=sl)
    else if useTakeProfit
        strategy.exit("Long Exit", "Long Primary", limit=tp)
    
    longPositionActive := true
    lastLongEntry := entryPrice
    hedgeCount := 0

// PRIMARY SHORT ENTRY
if shortEntry and strategy.position_size >= 0
    entryPrice = close
    [sl, tp] = calculateLevels(entryPrice, false)
    
    strategy.entry("Short Primary", strategy.short, qty=2)
    if useFixedSL and useTakeProfit
        strategy.exit("Short Exit", "Short Primary", stop=sl, limit=tp)
    else if useFixedSL
        strategy.exit("Short Exit", "Short Primary", stop=sl)
    else if useTakeProfit
        strategy.exit("Short Exit", "Short Primary", limit=tp)
    
    shortPositionActive := true
    lastShortEntry := entryPrice
    hedgeCount := 0

// HEDGE SHORT ENTRY (When long position breaks support)
if hedgeShortEntry and hedgeCount < maxHedgePositions
    entryPrice = close
    [sl, tp] = calculateLevels(entryPrice, false)
    
    hedgeName = "Hedge Short " + str.tostring(hedgeCount + 1)
    strategy.entry(hedgeName, strategy.short, qty=1)
    if useFixedSL
        strategy.exit("Hedge Exit", hedgeName, stop=sl)
    
    hedgeCount += 1

// HEDGE LONG ENTRY (When short position breaks resistance)
if hedgeLongEntry and hedgeCount < maxHedgePositions
    entryPrice = close
    [sl, tp] = calculateLevels(entryPrice, true)
    
    hedgeName = "Hedge Long " + str.tostring(hedgeCount + 1)
    strategy.entry(hedgeName, strategy.long, qty=1)
    if useFixedSL
        strategy.exit("Hedge Exit", hedgeName, stop=sl)
    
    hedgeCount += 1

// Close hedges on retrace
if closeHedgeOnRetrace
    // Close short hedges if price retraces back above previous low
    if structure == "uptrend" and not na(prevLow) and close > prevLow and hedgeCount > 0
        for i = 1 to hedgeCount
            strategy.close("Hedge Short " + str.tostring(i))
        hedgeCount := 0
    
    // Close long hedges if price retraces back below previous high
    if structure == "downtrend" and not na(prevHigh) and close < prevHigh and hedgeCount > 0
        for i = 1 to hedgeCount
            strategy.close("Hedge Long " + str.tostring(i))
        hedgeCount := 0

// Reset position flags when flat
if strategy.position_size == 0
    longPositionActive := false
    shortPositionActive := false
    hedgeCount := 0

// ========== VISUAL ELEMENTS ==========
// Plot swing points
plotshape(showSwingPoints and not na(pivotHigh) ? pivotHigh : na, "Pivot High", shape.triangledown, location.abovebar, 
         higherHigh ? higherHighColor : lowerHigh ? lowerHighColor : color.gray, size=size.small)
plotshape(showSwingPoints and not na(pivotLow) ? pivotLow : na, "Pivot Low", shape.triangleup, location.belowbar, 
         higherLow ? higherLowColor : lowerLow ? lowerLowColor : color.gray, size=size.small)

// Draw swing lines
if showSwingLines and array.size(swingHighs) >= 2
    lastHigh = array.get(swingHighs, array.size(swingHighs) - 1)
    lastHighBar = array.get(swingHighBars, array.size(swingHighBars) - 1)
    prevHighVal = array.get(swingHighs, array.size(swingHighs) - 2)
    prevHighBar = array.get(swingHighBars, array.size(swingHighBars) - 2)


if showSwingLines and array.size(swingLows) >= 2
    lastLow = array.get(swingLows, array.size(swingLows) - 1)
    lastLowBar = array.get(swingLowBars, array.size(swingLowBars) - 1)
    prevLowVal = array.get(swingLows, array.size(swingLows) - 2)
    prevLowBar = array.get(swingLowBars, array.size(swingLowBars) - 2)
    

// Plot entry signals
plotshape(longEntry, "Long Entry", shape.triangleup, location.belowbar, color.green, size=size.normal)
plotshape(shortEntry, "Short Entry", shape.triangledown, location.abovebar, color.red, size=size.normal)
plotshape(hedgeShortEntry, "Hedge Short", shape.xcross, location.abovebar, color.orange, size=size.small)
plotshape(hedgeLongEntry, "Hedge Long", shape.xcross, location.belowbar, color.aqua, size=size.small)

// Background
structBg = structure == "uptrend" ? color.new(color.green, 97) : structure == "downtrend" ? color.new(color.red, 97) : na
bgcolor(structBg)

// ========== ALERTS ==========
if longEntry
    alert("PRIMARY LONG: Higher High break on " + syminfo.ticker, alert.freq_once_per_bar)

if shortEntry
    alert("PRIMARY SHORT: Lower Low break on " + syminfo.ticker, alert.freq_once_per_bar)

if hedgeShortEntry
    alert("HEDGE SHORT: Higher Low break (support failure) on " + syminfo.ticker, alert.freq_once_per_bar)

if hedgeLongEntry
    alert("HEDGE LONG: Lower High break (resistance failure) on " + syminfo.ticker, alert.freq_once_per_bar)