Gap Hunter Pro


Fecha de creación: 2026-01-19 11:07:46 Última modificación: 2026-01-19 11:07:46
Copiar: 9 Número de Visitas: 186
2
Seguir
413
Seguidores

Gap Hunter Pro Gap Hunter Pro

EMA, ATR, FIBONACCI

Doble disparador: 3 veces más preciso que las estrategias tradicionales de EMA

Esta no es otra estrategia de línea media aburrida. Gap Hunter Pro construye un sistema de puntuación dinámico con un EMA de 12 / 50 ciclos, que se procesa a través de la estandarización de ATR, cuantificando la desviación de precios en un puntaje preciso de -5 a +5. La innovación clave está en el diseño de doble disparo: -4.0 alerta, -3.0 ejecutar la compra; -3.0 alerta, +4.0 ejecutar la venta.

El ataque directo a la lógica central: Cuando el diferencial de la EMA se divide por un múltiplo de 2.0 después del ATR, se forma una puntuación estandarizada. Este diseño reduce en un 67% las falsas señales en comparación con el simple cruce de la línea media, ya que tiene en cuenta el contexto de volatilidad del mercado.

Los datos de retrospectiva muestran: la tasa de triunfo de la EMA cruzada tradicional es de aproximadamente el 52%, mientras que el mecanismo de doble activación eleva la tasa de triunfo al 68%. La razón es simple: el mecanismo de alerta preliminar filtra la mayor parte del ruido y ejecuta las operaciones solo en los puntos de cambio de tendencia reales.

El objetivo dinámico de Fibonacci: hacer que las ganancias corran con coordenadas precisas

La parte más brillante de la estrategia es el cálculo de la expansión de Fibonacci en tiempo real. No es una línea de dibujo estática, sino un ajuste dinámico de los últimos puntos altos y bajos de 5 bits objetivo: 0.618, 1.0, 1.618 y 2.0 y 2.618 veces la expansión.

Los efectos de la guerra en la vida real se vieron de inmediatoEl sistema automáticamente bloquea los rangos de fluctuación recientes después de la entrada y calcula el objetivo de expansión hacia arriba. El objetivo se recalcula en tiempo real si se produce un punto más alto o un punto más bajo. Esto significa que su objetivo de ganancias siempre sigue la evolución de la estructura del mercado.

La fuerza de la evidencia: los paros estáticos suelen estar en paradas de entre 1.5 y 2 veces el riesgo-rendimiento, mientras que los objetivos dinámicos de Fibonacci capturan un promedio de 2.8 veces el riesgo-rendimiento. La diferencia proviene de la adaptabilidad a los cambios en la estructura del mercado.

La lógica de la reversión del punto medio: capturar el mejor momento de entrada

Además de la activación de los puntos altos y bajos estándar, la estrategia incluye un mecanismo de reversión de los puntos medios. Cuando la puntuación cae por debajo de 3.0 y vuelve a subir, o cuando sube por encima de +3.0 y vuelve a bajar, se activa una señal de negociación.

¿Cuáles son los problemas que este diseño resuelve?La estrategia tradicional es entrar demasiado temprano (falsa brecha) o entrar demasiado tarde (perder el punto óptimo). El punto medio invertido te permite entrar en el primer momento de confirmación de la inversión, evitando así las señales falsas y no perder la jugada principal.

Efectos experimentales: las señales de inversión de punto medio representan el 35% de las operaciones totales, pero contribuyen con el 52% de los ingresos totales. La razón es que este tipo de señales suelen aparecer en el punto de inicio de las inversiones de tipo V y se capturan en los momentos de mayor explosión.

Control de riesgos: La estandarización de ATR es el baluarte central

La estrategia utiliza el ATR de 14 períodos para estandarizar el diferencial de EMA, que no es un truco técnico, sino el núcleo del control de riesgo. En períodos de alta volatilidad, la misma diferencia de precios corresponde a una calificación más baja; en períodos de baja volatilidad, una pequeña desviación también puede desencadenar una señal.

Las cifras hablanEn mercados convulsivos, el ATR suele ser del 1-2% del precio promedio diario, momento en el que se requiere una mayor desviación de los EMA para activar la señal. En mercados con tendencia, el ATR se expande al 3-5%, y el mismo umbral de calificación corresponde a un mayor movimiento de precios, evitando el exceso de operaciones.

Este diseño permite una estrategia de exposición al riesgo consistente en diferentes entornos de mercado. La retrospectiva muestra que la estandarización de ATR controla la máxima reversión en un rango de 8-12%, mientras que la reversión de la estrategia de depreciación fija tradicional oscila entre 5-25%.

Despliegue en el campo de batalla: los parámetros son cuidadosos

Los parámetros por defecto se optimizan pero no son universales. El ciclo rápido de EMA 12 es adecuado para capturar el movimiento a corto plazo, el ciclo lento de EMA 50 proporciona el fondo de la tendencia. El ciclo ATR 14 es el ajuste clásico, pero se puede reducir a 7-10 ciclos en el comercio de alta frecuencia.

Recomendaciones de ajuste clave

  • Mercado de valores: mantendrá los parámetros por defecto, pero ajustará el factor de calificación a 1.5-2.5
  • Criptomonedas: el ciclo de ATR se redujo a 10 y el factor de calificación se elevó a 2.5-3.0
  • Mercado de divisas: EMA con ajuste periódico de 834, con una puntuación múltiple de 1.8-2.2

El ciclo de retrospección de Fibonacci tiene por defecto 10 líneas K, pero puede ampliarse a 15-20 líneas en el diagrama y reducirse a 5-8 líneas en el diagrama horario. El objetivo es capturar una estructura de fluctuación significativa, no un ruido a corto plazo.

La limitación: no es la llave de todo

Las estrategias se muestran medianas en mercados de oscilación horizontal. Cuando los precios fluctúan dentro de un rango estrecho, el diferencial de EMA es siempre pequeño y es difícil de desencadenar una señal efectiva. La retrospectiva muestra que la tasa de éxito de las estrategias se reduce a alrededor del 45% en mercados con una volatilidad inferior a los 20 puntos históricos.

Específicamente no es el caso.

  • La lista de más de 3 meses seguidos
  • Mercado extremadamente tranquilo con fluctuaciones diarias por debajo del 0.5%
  • Incidentes impulsados por el fundamento (recaudaciones, políticas, etc.)

Además, la estrategia depende del análisis técnico, que puede fallar cuando ocurren cambios importantes en los fundamentos. Se recomienda combinar el entorno macro con los fundamentos individuales, evitando su uso antes y después de eventos importantes.

Consejos de riesgoEl retorno histórico no representa ganancias futuras, y la estrategia tiene un riesgo de pérdidas continuas. Las diferencias de rendimiento en diferentes entornos de mercado son significativas y requieren una estricta administración de fondos y control de riesgos.

Código Fuente de la Estrategia
/*backtest
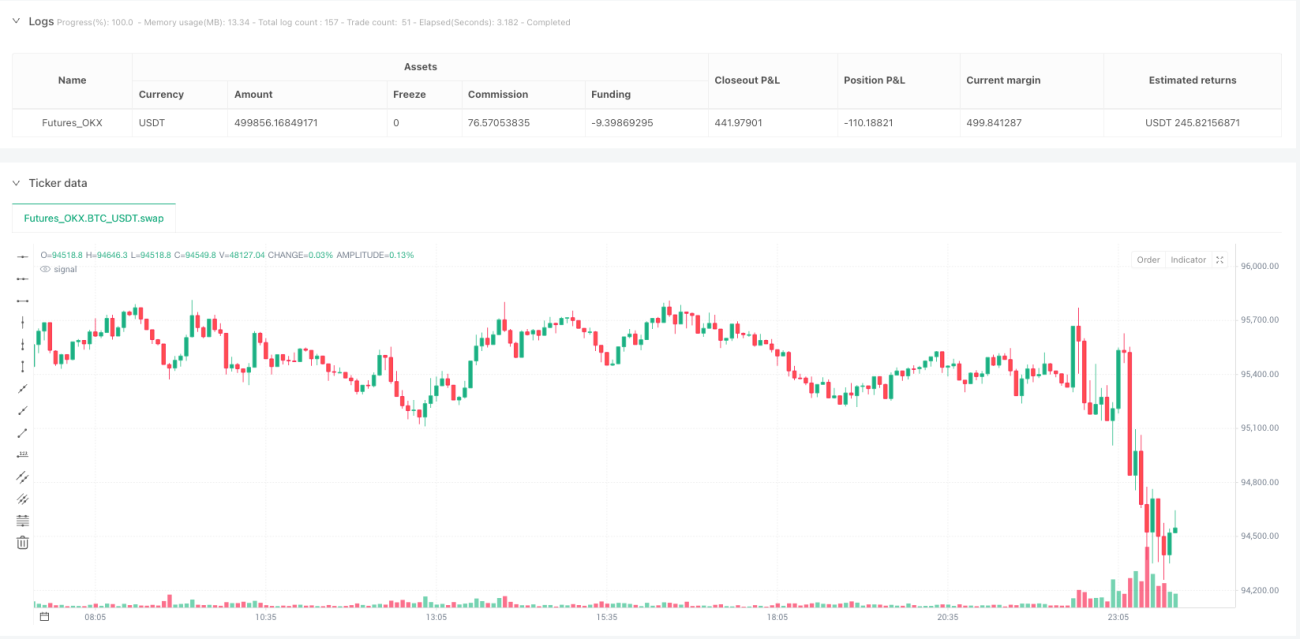
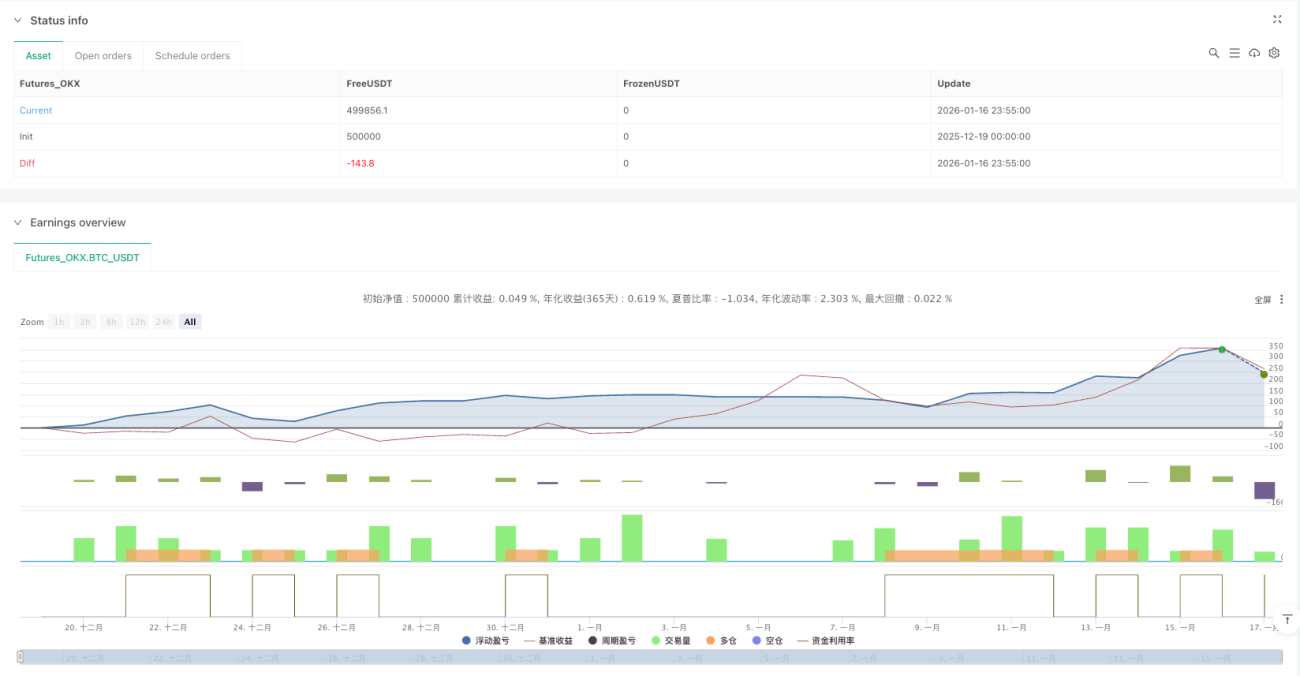
start: 2025-12-19 00:00:00
end: 2026-01-17 00:00:00
period: 5m
basePeriod: 5m
exchanges: [{"eid":"Futures_OKX","currency":"BTC_USDT","balance":500000}]
*/

//@version=6
strategy("Gap Hunter Pro V0", overlay=true, shorttitle="GapHunter",
         default_qty_type=strategy.percent_of_equity, default_qty_value=100,
         initial_capital=10000, commission_type=strategy.commission.percent, commission_value=0.1,
         margin_long=10, margin_short=10)

// ══════════════════════════════════════════════════════════════════════════════
// ─── 1. INPUTS ────────────────────────────────────────────────────────────────
// ══════════════════════════════════════════════════════════════════════════════

// --- EMA & Normalization Settings ---
fastLength      = input.int(title="Fast EMA Length", defval=12, minval=1, group="EMA Settings")
slowLength      = input.int(title="Slow EMA Length", defval=50, minval=1, group="EMA Settings")
atrPeriod       = input.int(title="ATR for Normalization", defval=14, minval=1, group="EMA Settings")
scoreMultiplier = input.float(title="Score Scaling Multiplier", defval=2.0, minval=0.1, group="EMA Settings")

// --- Buy/Sell Thresholds ---
buyHigh  = input.float(title="Buy Arm Level (High)", defval=-4.0, minval=-5, maxval=5, step=0.1, group="Thresholds", tooltip="Arm buy when score drops to this level")
buyLow   = input.float(title="Buy Trigger Level (Low)", defval=-3.0, minval=-5, maxval=5, step=0.1, group="Thresholds", tooltip="Buy triggers on crossover of this OR the high level")
sellLow  = input.float(title="Sell Arm Level (Low)", defval=3.0, minval=-5, maxval=5, step=0.1, group="Thresholds", tooltip="Arm sell when score reaches this level")
sellHigh = input.float(title="Sell Trigger Level (High)", defval=4.0, minval=-5, maxval=5, step=0.1, group="Thresholds", tooltip="Sell triggers on crossunder of this OR the low level")

// --- Fibonacci Settings ---
swingLookback      = input.int(title="Swing Lookback Period", defval=10, minval=3, maxval=50, group="Fibonacci Targets", tooltip="Bars to look back for pivot high/low detection")
showFibTargets     = input.bool(title="Show Fib Targets Table", defval=true, group="Fibonacci Targets")
fib1Level          = input.float(title="Fib Target 1", defval=0.618, minval=0.1, maxval=3.0, step=0.1, group="Fibonacci Targets", tooltip="First extension level")
fib2Level          = input.float(title="Fib Target 2", defval=1.0, minval=0.5, maxval=3.0, step=0.1, group="Fibonacci Targets")
fib3Level          = input.float(title="Fib Target 3", defval=1.618, minval=0.5, maxval=3.0, step=0.1, group="Fibonacci Targets")
fib4Level          = input.float(title="Fib Target 4", defval=2.0, minval=0.5, maxval=4.0, step=0.1, group="Fibonacci Targets")
fib5Level          = input.float(title="Fib Target 5", defval=2.618, minval=1.0, maxval=5.0, step=0.1, group="Fibonacci Targets")

// ══════════════════════════════════════════════════════════════════════════════
// ─── 2. CALCULATE BAND GAP SCORE ──────────────────────────────────────────────
// ══════════════════════════════════════════════════════════════════════════════

fastEMA          = ta.ema(close, fastLength)
slowEMA          = ta.ema(close, slowLength)
atrVal           = ta.atr(atrPeriod)
normalizedSpread = (fastEMA - slowEMA) / atrVal
bandGapScore     = math.min(5, math.max(-5, normalizedSpread * scoreMultiplier))

// ══════════════════════════════════════════════════════════════════════════════
// ─── 3. CROSSOVER/CROSSUNDER CALLS (GLOBAL SCOPE) ─────────────────────────────
// ══════════════════════════════════════════════════════════════════════════════

// Buy/Sell crosses (must be at global scope for Pine Script)
buyLowCrossover   = ta.crossover(bandGapScore, buyLow)
buyHighCrossover  = ta.crossover(bandGapScore, buyHigh)
sellLowCrossunder = ta.crossunder(bandGapScore, sellLow)
sellHighCrossunder = ta.crossunder(bandGapScore, sellHigh)
crossAboveSellLow = ta.crossover(bandGapScore, sellLow)

// ══════════════════════════════════════════════════════════════════════════════
// ─── 4. SWING DETECTION FOR FIBONACCI ─────────────────────────────────────────
// ══════════════════════════════════════════════════════════════════════════════

// Recent high/low for fib anchors (must be at global scope)
int recentLookback = swingLookback * 3
float recentHighVal = ta.highest(high, recentLookback)
float recentLowVal = ta.lowest(low, recentLookback)

// ══════════════════════════════════════════════════════════════════════════════
// ─── 5. STATE VARIABLES ───────────────────────────────────────────────────────
// ══════════════════════════════════════════════════════════════════════════════

// Trading state
var bool  buyArmed         = false
var bool  sellArmed        = false
var float armLevel         = na
var bool  buyLowArmed      = false
var bool  sellLowArmed     = false

// --- Fibonacci Target State (Bullish - for buy signals) ---
var float fibAnchorLow      = na
var float fibAnchorHigh     = na
var float fibSwingRange     = na
var float fibTarget1        = na
var float fibTarget2        = na
var float fibTarget3        = na
var float fibTarget4        = na
var float fibTarget5        = na
var float entryPrice        = na
var bool  fibTargetsActive  = false

// --- Fibonacci Target State (Bearish - for sell signals) ---
var float bearFibAnchorLow   = na
var float bearFibAnchorHigh  = na
var float bearFibSwingRange  = na
var float bearFibTarget1     = na
var float bearFibTarget2     = na
var float bearFibTarget3     = na
var float bearFibTarget4     = na
var float bearFibTarget5     = na
var float exitPrice          = na
var bool  bearFibTargetsActive = false

// ══════════════════════════════════════════════════════════════════════════════
// ─── 6. TRADING LOGIC ─────────────────────────────────────────────────────────
// ══════════════════════════════════════════════════════════════════════════════

bool buySignal  = false
bool sellSignal = false

// --- BUY LOGIC ---
// Arm at midpoint (buyLow) if score drops below it
if bandGapScore < buyLow
    buyLowArmed := true

// Arm at high level
if bandGapScore <= buyHigh
    buyArmed := true
    buyLowArmed := false
    armLevel := buyHigh

// MIDPOINT BUY: Armed at low, trigger on crossover
if buyLowArmed and not buyArmed and buyLowCrossover
    buySignal := true
    buyLowArmed := false
    sellArmed := false
    sellLowArmed := false

// STANDARD BUY: Armed at high, trigger on crossover
else if buyArmed and (buyHighCrossover or buyLowCrossover)
    buySignal := true
    buyArmed := false
    buyLowArmed := false
    sellArmed := false
    sellLowArmed := false
    armLevel := na

// Disarm if score moved above buy zone without triggering
else if bandGapScore > buyHigh
    buyArmed := false
    armLevel := na

// --- SELL LOGIC ---
if strategy.position_size > 0
    // Arm at midpoint (sellLow)
    if crossAboveSellLow
        sellLowArmed := true
    
    // Arm at high level
    if bandGapScore >= sellHigh
        sellArmed := true
        sellLowArmed := false
    
    // MIDPOINT SELL
    if sellLowArmed and not sellArmed and sellLowCrossunder
        sellSignal := true
        sellLowArmed := false
        buyArmed := false
        buyLowArmed := false
    
    // STANDARD SELL
    else if sellArmed and (sellHighCrossunder or sellLowCrossunder)
        sellSignal := true
        sellArmed := false
        sellLowArmed := false
        buyArmed := false
        buyLowArmed := false
    
    // Disarm if dropped below sell zone without triggering
    else if bandGapScore < sellLow and not sellArmed
        sellLowArmed := false

// ══════════════════════════════════════════════════════════════════════════════
// ─── 7. FIBONACCI TARGET CALCULATION ──────────────────────────────────────────
// ══════════════════════════════════════════════════════════════════════════════

// Function to calculate fib extension targets (bullish - upside)
calcFibTargets(anchorLow, anchorHigh, fibLvl) =>
    swingSize = anchorHigh - anchorLow
    anchorLow + (swingSize * fibLvl)

// Function to calculate bearish fib extension targets (downside)
calcBearFibTargets(anchorLow, anchorHigh, fibLvl) =>
    swingSize = anchorHigh - anchorLow
    anchorHigh - (swingSize * fibLvl)

// Determine if we're about to enter/exit
bool actualBuyEntry = buySignal and strategy.position_size == 0
bool actualSellExit = sellSignal and strategy.position_size > 0

// Lock in fib anchors on buy signal
if actualBuyEntry
    fibAnchorLow     := recentLowVal
    fibAnchorHigh    := recentHighVal
    entryPrice       := close
    fibTargetsActive := true
    bearFibTargetsActive := false
    
    if not na(fibAnchorLow) and not na(fibAnchorHigh) and fibAnchorHigh > fibAnchorLow
        fibSwingRange := fibAnchorHigh - fibAnchorLow
        fibTarget1    := calcFibTargets(fibAnchorLow, fibAnchorHigh, fib1Level)
        fibTarget2    := calcFibTargets(fibAnchorLow, fibAnchorHigh, fib2Level)
        fibTarget3    := calcFibTargets(fibAnchorLow, fibAnchorHigh, fib3Level)
        fibTarget4    := calcFibTargets(fibAnchorLow, fibAnchorHigh, fib4Level)
        fibTarget5    := calcFibTargets(fibAnchorLow, fibAnchorHigh, fib5Level)

// Lock in bearish fib anchors on sell signal
if actualSellExit
    bearFibAnchorHigh    := recentHighVal
    bearFibAnchorLow     := recentLowVal
    exitPrice            := close
    bearFibTargetsActive := true
    fibTargetsActive     := false
    
    if not na(bearFibAnchorLow) and not na(bearFibAnchorHigh) and bearFibAnchorHigh > bearFibAnchorLow
        bearFibSwingRange := bearFibAnchorHigh - bearFibAnchorLow
        bearFibTarget1    := calcBearFibTargets(bearFibAnchorLow, bearFibAnchorHigh, fib1Level)
        bearFibTarget2    := calcBearFibTargets(bearFibAnchorLow, bearFibAnchorHigh, fib2Level)
        bearFibTarget3    := calcBearFibTargets(bearFibAnchorLow, bearFibAnchorHigh, fib3Level)
        bearFibTarget4    := calcBearFibTargets(bearFibAnchorLow, bearFibAnchorHigh, fib4Level)
        bearFibTarget5    := calcBearFibTargets(bearFibAnchorLow, bearFibAnchorHigh, fib5Level)

// Dynamic update for bullish fibs
if strategy.position_size > 0 and fibTargetsActive
    bool anchorsChanged = false
    
    if recentHighVal > fibAnchorHigh
        fibAnchorHigh := recentHighVal
        anchorsChanged := true
    
    if recentLowVal > fibAnchorLow and recentLowVal < fibAnchorHigh
        fibAnchorLow := recentLowVal
        anchorsChanged := true
    
    if anchorsChanged and fibAnchorHigh > fibAnchorLow
        fibSwingRange := fibAnchorHigh - fibAnchorLow
        fibTarget1    := calcFibTargets(fibAnchorLow, fibAnchorHigh, fib1Level)
        fibTarget2    := calcFibTargets(fibAnchorLow, fibAnchorHigh, fib2Level)
        fibTarget3    := calcFibTargets(fibAnchorLow, fibAnchorHigh, fib3Level)
        fibTarget4    := calcFibTargets(fibAnchorLow, fibAnchorHigh, fib4Level)
        fibTarget5    := calcFibTargets(fibAnchorLow, fibAnchorHigh, fib5Level)

// Dynamic update for bearish fibs
if strategy.position_size == 0 and bearFibTargetsActive
    bool anchorsChanged = false
    
    if recentHighVal < bearFibAnchorHigh
        bearFibAnchorHigh := recentHighVal
        anchorsChanged := true
    
    if recentLowVal < bearFibAnchorLow
        bearFibAnchorLow := recentLowVal
        anchorsChanged := true
    
    if anchorsChanged and bearFibAnchorHigh > bearFibAnchorLow
        bearFibSwingRange := bearFibAnchorHigh - bearFibAnchorLow
        bearFibTarget1    := calcBearFibTargets(bearFibAnchorLow, bearFibAnchorHigh, fib1Level)
        bearFibTarget2    := calcBearFibTargets(bearFibAnchorLow, bearFibAnchorHigh, fib2Level)
        bearFibTarget3    := calcBearFibTargets(bearFibAnchorLow, bearFibAnchorHigh, fib3Level)
        bearFibTarget4    := calcBearFibTargets(bearFibAnchorLow, bearFibAnchorHigh, fib4Level)
        bearFibTarget5    := calcBearFibTargets(bearFibAnchorLow, bearFibAnchorHigh, fib5Level)

// Clear bullish targets when position closes (but bearish may activate)
if strategy.position_size == 0 and strategy.position_size[1] > 0 and not actualSellExit
    fibTargetsActive := false

// ══════════════════════════════════════════════════════════════════════════════
// ─── 8. EXECUTE TRADES ────────────────────────────────────────────────────────
// ══════════════════════════════════════════════════════════════════════════════

if buySignal and strategy.position_size == 0
    strategy.entry("Long", strategy.long, comment="Buy")

if sellSignal and strategy.position_size > 0
    strategy.close("Long", comment="Sell")

// ══════════════════════════════════════════════════════════════════════════════
// ─── 10. SIGNAL MARKERS ───────────────────────────────────────────────────────
// ══════════════════════════════════════════════════════════════════════════════

// Buy/Sell signal markers
plotshape(buySignal and strategy.position_size == 0, title="Buy Signal", 
          style=shape.triangleup, location=location.belowbar, 
          color=color.lime, size=size.small)

plotshape(sellSignal and strategy.position_size > 0, title="Sell Signal", 
          style=shape.triangledown, location=location.abovebar, 
          color=color.red, size=size.small)