
EMA, ATR, FIBONACCI
Il ne s’agit pas d’une autre stratégie d’équilibre ennuyeuse. Gap Hunter Pro a construit un système de notation dynamique avec un EMA de 12 à 50 cycles, traité par la normalisation ATR, pour quantifier l’écart de prix en un score précis de 5 à +5. L’innovation clé réside dans la conception à double déclenchement: - 4.0 préavis, - 3.0 exécution d’achat; - 3.0 préavis, + 4.0 exécution de vente.
La logique de base est une attaque directe.: Lorsque le décalage EMA est divisé par un multiple de 2.0 après l’ATR, un score normalisé est obtenu. Cette conception réduit de 67% les faux signaux par rapport au simple croisement de la moyenne, car elle prend en compte le contexte de volatilité du marché.
Les données de retracement montrent que le taux de victoire de l’EMA traditionnelle est d’environ 52% en cas de croisement annuel, tandis que le double déclencheur porte ce taux à 68%. La raison est simple - le mécanisme d’alerte précoce filtre la plupart du bruit et n’exécute des transactions que lorsque la tendance est réellement inversée.
La partie la plus brillante de la stratégie est le calcul de l’expansion de Fibonacci en temps réel. Non pas une ligne de dessin statique, mais un ajustement dynamique de 5 bits de cible basé sur les hauts et les bas les plus récents: 0,618, 1,0, 1,618 et 2,0 et 2,618 fois l’expansion.
Les effets immédiats de la guerre: Après l’entrée, le système bloque automatiquement la zone de fluctuation la plus récente et calcule l’objectif d’expansion vers le haut. Si un sommet plus élevé ou un sommet plus élevé survient, le but est recalculé en temps réel. Cela signifie que votre objectif de profit suit toujours l’évolution de la structure du marché.
La force de la preuve: les arrêts statiques sont généralement à 1,5 à 2 fois le taux de risque-rendement des arrêts, tandis que les objectifs Fibonacci dynamiques capturent en moyenne 2,8 fois le taux de risque-rendement. L’écart est dû à l’adaptation aux changements de la structure du marché.
Outre le déclenchement des hauts et des bas standards, la stratégie intègre un mécanisme de retournement des points moyens. Un signal de transaction est déclenché immédiatement lorsque le score remonte après une chute de -3.0 ou remonte après une hausse de +3.0.
Quels sont les problèmes que cette conception résout ?La stratégie traditionnelle consiste à entrer trop tôt (fausse percée) ou trop tard (manque de la meilleure position). Le revirement de la position centrale vous permet d’entrer au premier moment de la confirmation du revirement, tout en évitant les faux signaux et en ne manquant pas la situation principale.
Effet de test: les signaux de retournement du point médian représentent 35% du total des transactions, mais contribuent à 52% du total des bénéfices. La raison en est que ces signaux apparaissent généralement au début des retournements de type V et sont capturés dans les phases de marché les plus explosives.
La stratégie utilise l’ATR à 14 cycles pour normaliser l’écart entre les valeurs EMA, ce qui n’est pas une astuce technique, mais au cœur de la maîtrise des risques. Pendant les périodes de forte volatilité, le même écart de prix correspond à une note plus basse; pendant les périodes de faible volatilité, une légère déviation peut également déclencher un signal.
Les chiffres parlent: Dans les marchés en choc, l’ATR est généralement de 1 à 2% du prix moyen journalier, ce qui nécessite un écart plus important de l’EMA pour déclencher un signal. Dans les marchés en tendance, l’ATR s’élargit à 3 à 5%, et la même marge de notation correspond à un mouvement de prix plus important, évitant ainsi les surtensions.
Cette conception permet à la stratégie d’être exposée à des risques cohérents dans différents environnements de marché. La rétroaction montre que la normalisation de l’ATR maintient le maximum de rétraction dans la plage de 8 à 12%, alors que la rétraction des stratégies de dépréciation fixe traditionnelles oscille entre 5 et 25%.
Les paramètres par défaut ont été optimisés mais ne sont pas universels. Les cycles EMA 12 rapides sont appropriés pour capturer la dynamique à court terme, tandis que les cycles EMA 50 lents fournissent un fond de tendance. Les cycles ATR 14 sont un réglage classique, mais peuvent être raccourcis à des cycles 7-10 dans les transactions à haute fréquence.
Recommandations de modification clés:
Le cycle de rétroaction de Fibonacci est défini par défaut sur 10 lignes K, mais peut être étendu à 15-20 lignes sur les cartes de jour et réduit à 5-8 lignes sur les cartes horaires. L’objectif est de capturer une structure de fluctuation significative, et non un bruit à court terme.
Les stratégies ont une performance médiocre dans les marchés à oscillation horizontale. Lorsque les prix fluctuent dans une fourchette étroite, les différences d’EMA sont toujours plus petites et il est difficile de déclencher un signal efficace. Les retours d’expérience ont montré que le taux de réussite des stratégies est tombé à environ 45% dans les marchés où la volatilité était inférieure à 20 points historiques.
Scénario clairement inapproprié:
En outre, la stratégie repose sur l’analyse technique, qui peut être inefficace en cas de changements majeurs dans les fondamentaux. Il est recommandé de combiner l’environnement macro et les fondamentaux individuels, et d’éviter de l’utiliser avant et après les événements majeurs.
Conseils à la prudence: la rétroaction historique ne représente pas les gains futurs, la stratégie présente un risque de pertes continues. Les variations de performance dans différents environnements de marché sont significatives et nécessitent une gestion rigoureuse des fonds et un contrôle des risques.
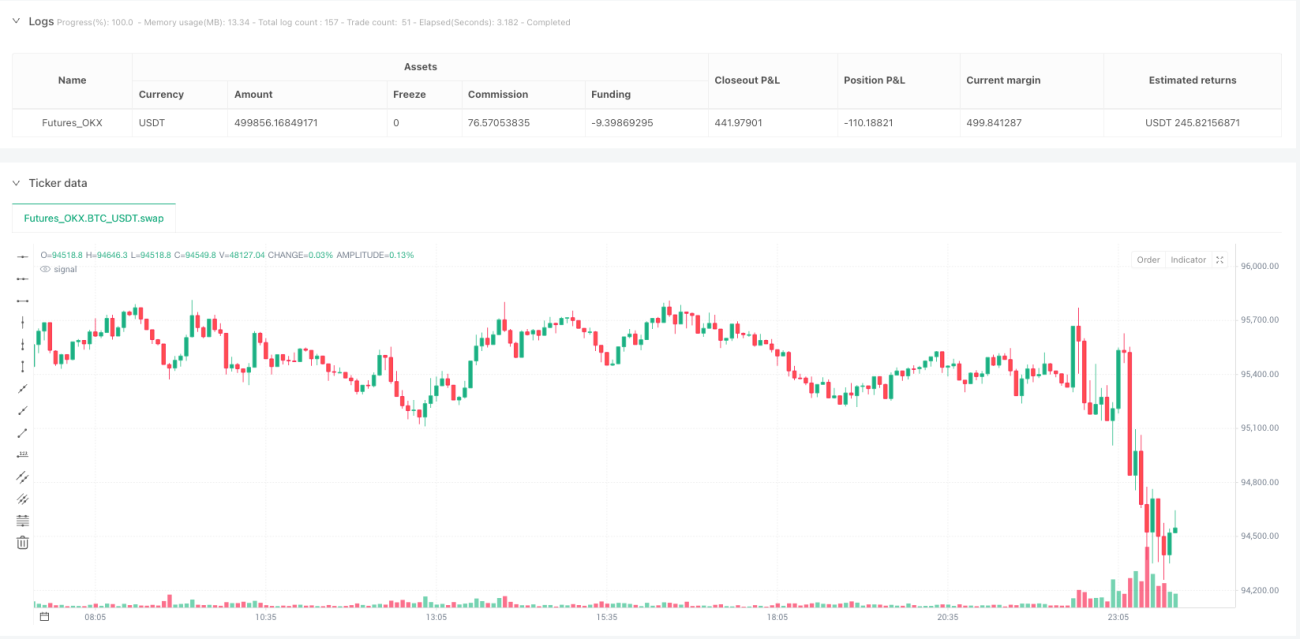
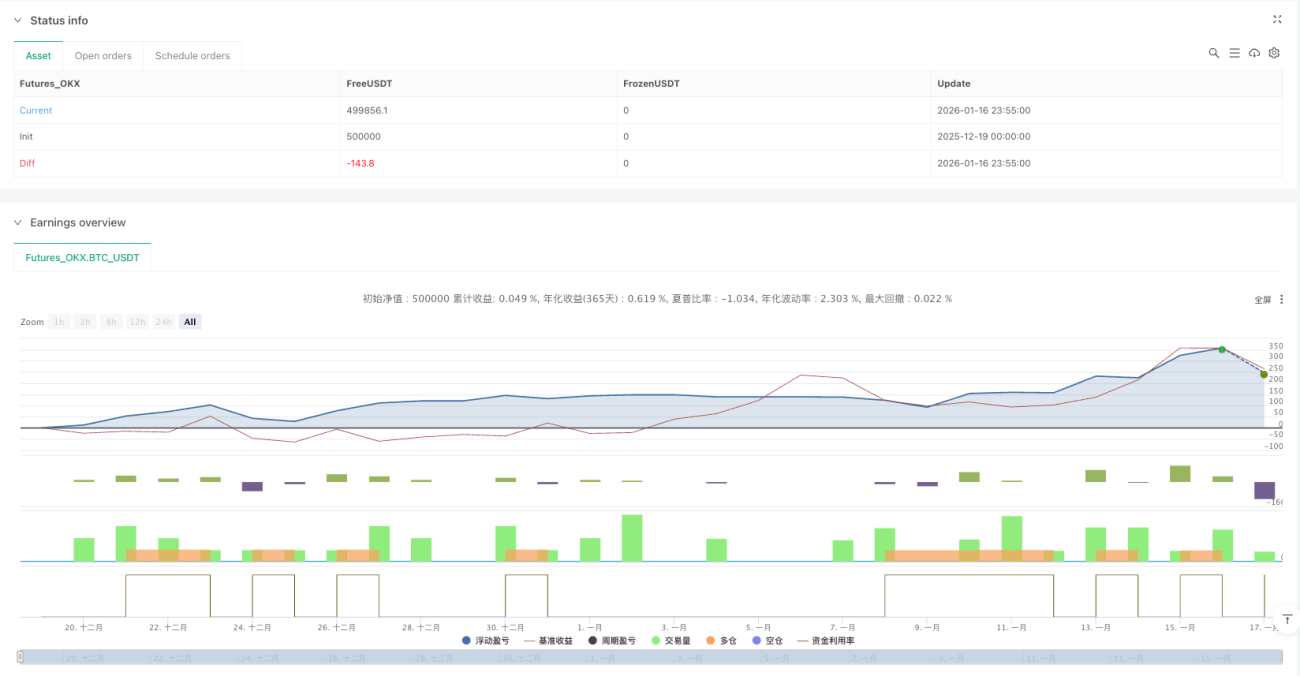
/*backtest
start: 2025-12-19 00:00:00
end: 2026-01-17 00:00:00
period: 5m
basePeriod: 5m
exchanges: [{"eid":"Futures_OKX","currency":"BTC_USDT","balance":500000}]
*/
//@version=6
strategy("Gap Hunter Pro V0", overlay=true, shorttitle="GapHunter",
default_qty_type=strategy.percent_of_equity, default_qty_value=100,
initial_capital=10000, commission_type=strategy.commission.percent, commission_value=0.1,
margin_long=10, margin_short=10)
// ══════════════════════════════════════════════════════════════════════════════
// ─── 1. INPUTS ────────────────────────────────────────────────────────────────
// ══════════════════════════════════════════════════════════════════════════════
// --- EMA & Normalization Settings ---
fastLength = input.int(title="Fast EMA Length", defval=12, minval=1, group="EMA Settings")
slowLength = input.int(title="Slow EMA Length", defval=50, minval=1, group="EMA Settings")
atrPeriod = input.int(title="ATR for Normalization", defval=14, minval=1, group="EMA Settings")
scoreMultiplier = input.float(title="Score Scaling Multiplier", defval=2.0, minval=0.1, group="EMA Settings")
// --- Buy/Sell Thresholds ---
buyHigh = input.float(title="Buy Arm Level (High)", defval=-4.0, minval=-5, maxval=5, step=0.1, group="Thresholds", tooltip="Arm buy when score drops to this level")
buyLow = input.float(title="Buy Trigger Level (Low)", defval=-3.0, minval=-5, maxval=5, step=0.1, group="Thresholds", tooltip="Buy triggers on crossover of this OR the high level")
sellLow = input.float(title="Sell Arm Level (Low)", defval=3.0, minval=-5, maxval=5, step=0.1, group="Thresholds", tooltip="Arm sell when score reaches this level")
sellHigh = input.float(title="Sell Trigger Level (High)", defval=4.0, minval=-5, maxval=5, step=0.1, group="Thresholds", tooltip="Sell triggers on crossunder of this OR the low level")
// --- Fibonacci Settings ---
swingLookback = input.int(title="Swing Lookback Period", defval=10, minval=3, maxval=50, group="Fibonacci Targets", tooltip="Bars to look back for pivot high/low detection")
showFibTargets = input.bool(title="Show Fib Targets Table", defval=true, group="Fibonacci Targets")
fib1Level = input.float(title="Fib Target 1", defval=0.618, minval=0.1, maxval=3.0, step=0.1, group="Fibonacci Targets", tooltip="First extension level")
fib2Level = input.float(title="Fib Target 2", defval=1.0, minval=0.5, maxval=3.0, step=0.1, group="Fibonacci Targets")
fib3Level = input.float(title="Fib Target 3", defval=1.618, minval=0.5, maxval=3.0, step=0.1, group="Fibonacci Targets")
fib4Level = input.float(title="Fib Target 4", defval=2.0, minval=0.5, maxval=4.0, step=0.1, group="Fibonacci Targets")
fib5Level = input.float(title="Fib Target 5", defval=2.618, minval=1.0, maxval=5.0, step=0.1, group="Fibonacci Targets")
// ══════════════════════════════════════════════════════════════════════════════
// ─── 2. CALCULATE BAND GAP SCORE ──────────────────────────────────────────────
// ══════════════════════════════════════════════════════════════════════════════
fastEMA = ta.ema(close, fastLength)
slowEMA = ta.ema(close, slowLength)
atrVal = ta.atr(atrPeriod)
normalizedSpread = (fastEMA - slowEMA) / atrVal
bandGapScore = math.min(5, math.max(-5, normalizedSpread * scoreMultiplier))
// ══════════════════════════════════════════════════════════════════════════════
// ─── 3. CROSSOVER/CROSSUNDER CALLS (GLOBAL SCOPE) ─────────────────────────────
// ══════════════════════════════════════════════════════════════════════════════
// Buy/Sell crosses (must be at global scope for Pine Script)
buyLowCrossover = ta.crossover(bandGapScore, buyLow)
buyHighCrossover = ta.crossover(bandGapScore, buyHigh)
sellLowCrossunder = ta.crossunder(bandGapScore, sellLow)
sellHighCrossunder = ta.crossunder(bandGapScore, sellHigh)
crossAboveSellLow = ta.crossover(bandGapScore, sellLow)
// ══════════════════════════════════════════════════════════════════════════════
// ─── 4. SWING DETECTION FOR FIBONACCI ─────────────────────────────────────────
// ══════════════════════════════════════════════════════════════════════════════
// Recent high/low for fib anchors (must be at global scope)
int recentLookback = swingLookback * 3
float recentHighVal = ta.highest(high, recentLookback)
float recentLowVal = ta.lowest(low, recentLookback)
// ══════════════════════════════════════════════════════════════════════════════
// ─── 5. STATE VARIABLES ───────────────────────────────────────────────────────
// ══════════════════════════════════════════════════════════════════════════════
// Trading state
var bool buyArmed = false
var bool sellArmed = false
var float armLevel = na
var bool buyLowArmed = false
var bool sellLowArmed = false
// --- Fibonacci Target State (Bullish - for buy signals) ---
var float fibAnchorLow = na
var float fibAnchorHigh = na
var float fibSwingRange = na
var float fibTarget1 = na
var float fibTarget2 = na
var float fibTarget3 = na
var float fibTarget4 = na
var float fibTarget5 = na
var float entryPrice = na
var bool fibTargetsActive = false
// --- Fibonacci Target State (Bearish - for sell signals) ---
var float bearFibAnchorLow = na
var float bearFibAnchorHigh = na
var float bearFibSwingRange = na
var float bearFibTarget1 = na
var float bearFibTarget2 = na
var float bearFibTarget3 = na
var float bearFibTarget4 = na
var float bearFibTarget5 = na
var float exitPrice = na
var bool bearFibTargetsActive = false
// ══════════════════════════════════════════════════════════════════════════════
// ─── 6. TRADING LOGIC ─────────────────────────────────────────────────────────
// ══════════════════════════════════════════════════════════════════════════════
bool buySignal = false
bool sellSignal = false
// --- BUY LOGIC ---
// Arm at midpoint (buyLow) if score drops below it
if bandGapScore < buyLow
buyLowArmed := true
// Arm at high level
if bandGapScore <= buyHigh
buyArmed := true
buyLowArmed := false
armLevel := buyHigh
// MIDPOINT BUY: Armed at low, trigger on crossover
if buyLowArmed and not buyArmed and buyLowCrossover
buySignal := true
buyLowArmed := false
sellArmed := false
sellLowArmed := false
// STANDARD BUY: Armed at high, trigger on crossover
else if buyArmed and (buyHighCrossover or buyLowCrossover)
buySignal := true
buyArmed := false
buyLowArmed := false
sellArmed := false
sellLowArmed := false
armLevel := na
// Disarm if score moved above buy zone without triggering
else if bandGapScore > buyHigh
buyArmed := false
armLevel := na
// --- SELL LOGIC ---
if strategy.position_size > 0
// Arm at midpoint (sellLow)
if crossAboveSellLow
sellLowArmed := true
// Arm at high level
if bandGapScore >= sellHigh
sellArmed := true
sellLowArmed := false
// MIDPOINT SELL
if sellLowArmed and not sellArmed and sellLowCrossunder
sellSignal := true
sellLowArmed := false
buyArmed := false
buyLowArmed := false
// STANDARD SELL
else if sellArmed and (sellHighCrossunder or sellLowCrossunder)
sellSignal := true
sellArmed := false
sellLowArmed := false
buyArmed := false
buyLowArmed := false
// Disarm if dropped below sell zone without triggering
else if bandGapScore < sellLow and not sellArmed
sellLowArmed := false
// ══════════════════════════════════════════════════════════════════════════════
// ─── 7. FIBONACCI TARGET CALCULATION ──────────────────────────────────────────
// ══════════════════════════════════════════════════════════════════════════════
// Function to calculate fib extension targets (bullish - upside)
calcFibTargets(anchorLow, anchorHigh, fibLvl) =>
swingSize = anchorHigh - anchorLow
anchorLow + (swingSize * fibLvl)
// Function to calculate bearish fib extension targets (downside)
calcBearFibTargets(anchorLow, anchorHigh, fibLvl) =>
swingSize = anchorHigh - anchorLow
anchorHigh - (swingSize * fibLvl)
// Determine if we're about to enter/exit
bool actualBuyEntry = buySignal and strategy.position_size == 0
bool actualSellExit = sellSignal and strategy.position_size > 0
// Lock in fib anchors on buy signal
if actualBuyEntry
fibAnchorLow := recentLowVal
fibAnchorHigh := recentHighVal
entryPrice := close
fibTargetsActive := true
bearFibTargetsActive := false
if not na(fibAnchorLow) and not na(fibAnchorHigh) and fibAnchorHigh > fibAnchorLow
fibSwingRange := fibAnchorHigh - fibAnchorLow
fibTarget1 := calcFibTargets(fibAnchorLow, fibAnchorHigh, fib1Level)
fibTarget2 := calcFibTargets(fibAnchorLow, fibAnchorHigh, fib2Level)
fibTarget3 := calcFibTargets(fibAnchorLow, fibAnchorHigh, fib3Level)
fibTarget4 := calcFibTargets(fibAnchorLow, fibAnchorHigh, fib4Level)
fibTarget5 := calcFibTargets(fibAnchorLow, fibAnchorHigh, fib5Level)
// Lock in bearish fib anchors on sell signal
if actualSellExit
bearFibAnchorHigh := recentHighVal
bearFibAnchorLow := recentLowVal
exitPrice := close
bearFibTargetsActive := true
fibTargetsActive := false
if not na(bearFibAnchorLow) and not na(bearFibAnchorHigh) and bearFibAnchorHigh > bearFibAnchorLow
bearFibSwingRange := bearFibAnchorHigh - bearFibAnchorLow
bearFibTarget1 := calcBearFibTargets(bearFibAnchorLow, bearFibAnchorHigh, fib1Level)
bearFibTarget2 := calcBearFibTargets(bearFibAnchorLow, bearFibAnchorHigh, fib2Level)
bearFibTarget3 := calcBearFibTargets(bearFibAnchorLow, bearFibAnchorHigh, fib3Level)
bearFibTarget4 := calcBearFibTargets(bearFibAnchorLow, bearFibAnchorHigh, fib4Level)
bearFibTarget5 := calcBearFibTargets(bearFibAnchorLow, bearFibAnchorHigh, fib5Level)
// Dynamic update for bullish fibs
if strategy.position_size > 0 and fibTargetsActive
bool anchorsChanged = false
if recentHighVal > fibAnchorHigh
fibAnchorHigh := recentHighVal
anchorsChanged := true
if recentLowVal > fibAnchorLow and recentLowVal < fibAnchorHigh
fibAnchorLow := recentLowVal
anchorsChanged := true
if anchorsChanged and fibAnchorHigh > fibAnchorLow
fibSwingRange := fibAnchorHigh - fibAnchorLow
fibTarget1 := calcFibTargets(fibAnchorLow, fibAnchorHigh, fib1Level)
fibTarget2 := calcFibTargets(fibAnchorLow, fibAnchorHigh, fib2Level)
fibTarget3 := calcFibTargets(fibAnchorLow, fibAnchorHigh, fib3Level)
fibTarget4 := calcFibTargets(fibAnchorLow, fibAnchorHigh, fib4Level)
fibTarget5 := calcFibTargets(fibAnchorLow, fibAnchorHigh, fib5Level)
// Dynamic update for bearish fibs
if strategy.position_size == 0 and bearFibTargetsActive
bool anchorsChanged = false
if recentHighVal < bearFibAnchorHigh
bearFibAnchorHigh := recentHighVal
anchorsChanged := true
if recentLowVal < bearFibAnchorLow
bearFibAnchorLow := recentLowVal
anchorsChanged := true
if anchorsChanged and bearFibAnchorHigh > bearFibAnchorLow
bearFibSwingRange := bearFibAnchorHigh - bearFibAnchorLow
bearFibTarget1 := calcBearFibTargets(bearFibAnchorLow, bearFibAnchorHigh, fib1Level)
bearFibTarget2 := calcBearFibTargets(bearFibAnchorLow, bearFibAnchorHigh, fib2Level)
bearFibTarget3 := calcBearFibTargets(bearFibAnchorLow, bearFibAnchorHigh, fib3Level)
bearFibTarget4 := calcBearFibTargets(bearFibAnchorLow, bearFibAnchorHigh, fib4Level)
bearFibTarget5 := calcBearFibTargets(bearFibAnchorLow, bearFibAnchorHigh, fib5Level)
// Clear bullish targets when position closes (but bearish may activate)
if strategy.position_size == 0 and strategy.position_size[1] > 0 and not actualSellExit
fibTargetsActive := false
// ══════════════════════════════════════════════════════════════════════════════
// ─── 8. EXECUTE TRADES ────────────────────────────────────────────────────────
// ══════════════════════════════════════════════════════════════════════════════
if buySignal and strategy.position_size == 0
strategy.entry("Long", strategy.long, comment="Buy")
if sellSignal and strategy.position_size > 0
strategy.close("Long", comment="Sell")
// ══════════════════════════════════════════════════════════════════════════════
// ─── 10. SIGNAL MARKERS ───────────────────────────────────────────────────────
// ══════════════════════════════════════════════════════════════════════════════
// Buy/Sell signal markers
plotshape(buySignal and strategy.position_size == 0, title="Buy Signal",
style=shape.triangleup, location=location.belowbar,
color=color.lime, size=size.small)
plotshape(sellSignal and strategy.position_size > 0, title="Sell Signal",
style=shape.triangledown, location=location.abovebar,
color=color.red, size=size.small)