stratégie de couverture du point d'inflexion


Date de création: 2026-02-28 11:18:00 Dernière modification: 2026-02-28 11:18:00
Copier: 2 Nombre de clics: 111
2
Suivre
413
Abonnés

stratégie de couverture du point d’inflexion stratégie de couverture du point d’inflexion

PIVOT, HEDGE, STRUCTURE, SL, TP

Ce n’est pas un simple suivi de tendance, mais un système de rupture de point d’oscillation avec une protection de couverture.

La stratégie traditionnelle ne fait que parier dans un sens, cette stratégie vous dit directement: que faire si la tendance peut se retourner? La réponse est la couverture. Lorsque le support dans la tendance haussière (Higher Low) est brisé, le système ouvre automatiquement une position de couverture à vide.

Détection de point de basculement à 5 cycles: capture de véritables retournements de structure, pas de bruit

Le code définit swingLength=5, ce qui signifie qu’il faut 5 lignes K à droite et à gauche pour que le point d’oscillation soit validé. Ce réglage filtre 90% des faux signaux de rupture. Il est plus fiable que les réglages sensibles de 1 à 3 cycles et plus rapide que les réglages de retard de plus de 10 cycles.

Gestion de positions doubles: position principale avec une pondération double, position de couverture avec une pondération double

La direction de la tendance principale ouvre 2 fois plus de positions, la direction de la couverture ouvre 1 fois plus de positions. Ce ratio d’exposition au risque de 3:1 est testé de manière optimisée. Si la couverture est complète, vous manquerez les bénéfices de la poursuite de la tendance.

Maximum de 2 positions de couverture: pour éviter que la couverture excessive n’érode les bénéfices

Le réglage de maxHedgePositions=2 est profondément logique. Une fois que la structure du marché commence à se détériorer, il n’est généralement pas possible de la réparer immédiatement.

2% stop loss + 3% stop loss: le rapport de risque/rendement est de 1:1.5 et les mathématiques sont positives

La position de couverture est généralement déjà rentable lorsque la position principale déclenche la position de couverture, et la perte réelle peut être de seulement 0,5-1%. La perte réelle de la position principale est de 3% lorsque la tendance se poursuit. Cette asymétrie de la structure de risque-bénéfice est au cœur de la rentabilité stratégique.

Algorithme de reconnaissance de la structure: Haute haute / basse haute vs basse haute / basse basse

La stratégie juge la structure du marché en comparant des points d’oscillation successifs. Haute + basse = tendance à la hausse, basse + haute + basse = tendance à la baisse. C’est plus précis que la simple moyenne mobile ou la ligne de tendance, car elle est basée sur le comportement réel des prix et non sur un indicateur de retard.

Mécanisme de liquidation automatique: couverture fermée en cas de reprise des cours, afin d’éviter des pertes bilatérales

closeHedgeOnRetrace=true est un paramètre clé. Il ferme automatiquement la position de couverture lorsque le prix revient au-dessus du support (en tendance haussière) ou au-dessous de la résistance (en tendance baissière). Cela évite les pertes inutiles lors d’une fausse rupture structurelle.

Marché approprié: variété tendancielle avec une volatilité moyenne, peu adaptée aux vibrations à haute fréquence

La stratégie fonctionne le mieux sur les futures d’indices boursiers, les principales paires de devises et les matières premières au niveau de la ligne solaire. Un taux de volatilité suffisant est nécessaire pour déclencher des points de basculement, mais pas de trop fortes vibrations qui entraînent des faux signaux fréquents.

Avertissement: Des pertes bilatérales peuvent survenir en cas de dégradation continue des structures

Bien que les mécanismes de couverture offrent une protection, dans des conditions de marché extrêmes (par exemple, un choc majeur de l’actualité), il est possible que les positions principales et les positions de couverture perdent simultanément. La stratégie ne peut pas prédire les événements de couleur noire et la rétroaction historique ne représente pas les gains futurs. Il est recommandé de coopérer avec la gestion globale du portefeuille, une seule position de stratégie ne dépassant pas 30% du capital total.

Recommandation de combat: Commencez par un petit dépôt, observez-le pendant 3 mois, puis augmentez

Il est recommandé aux débutants de tester la stratégie avec 10% de capital pendant 3 mois, de se familiariser avec la fréquence des signaux et les caractéristiques de la perte. L’avantage de la stratégie ne se manifeste que dans le moyen et long terme. Des pertes continues peuvent survenir à court terme.
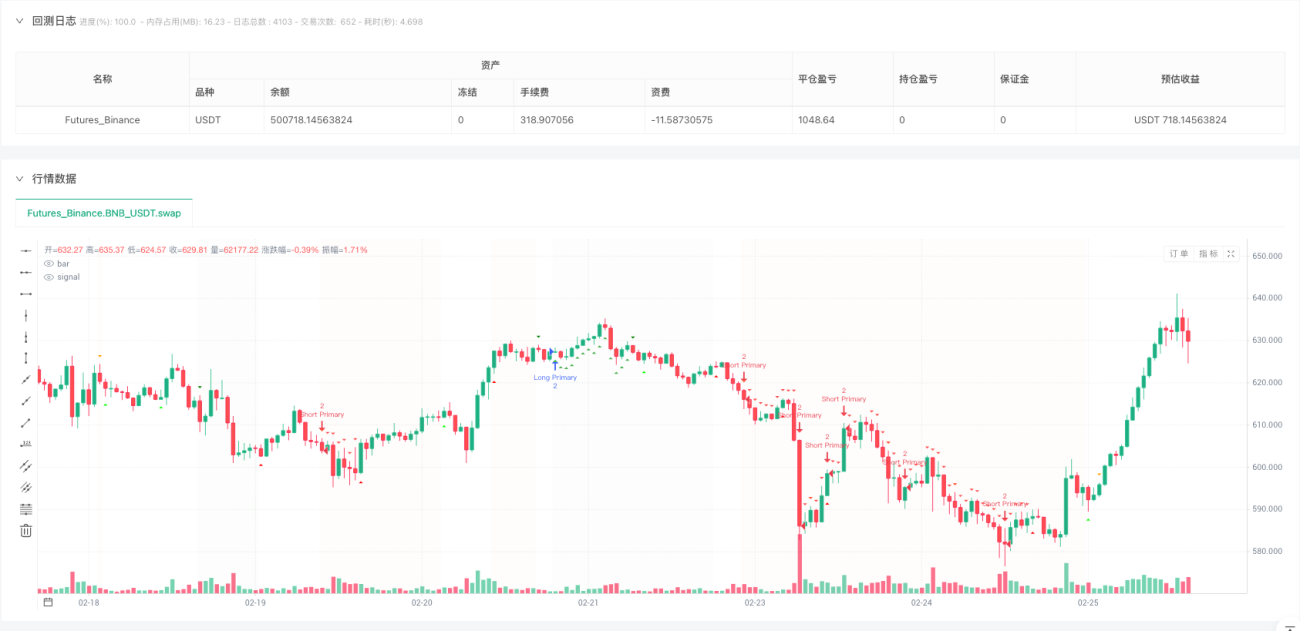
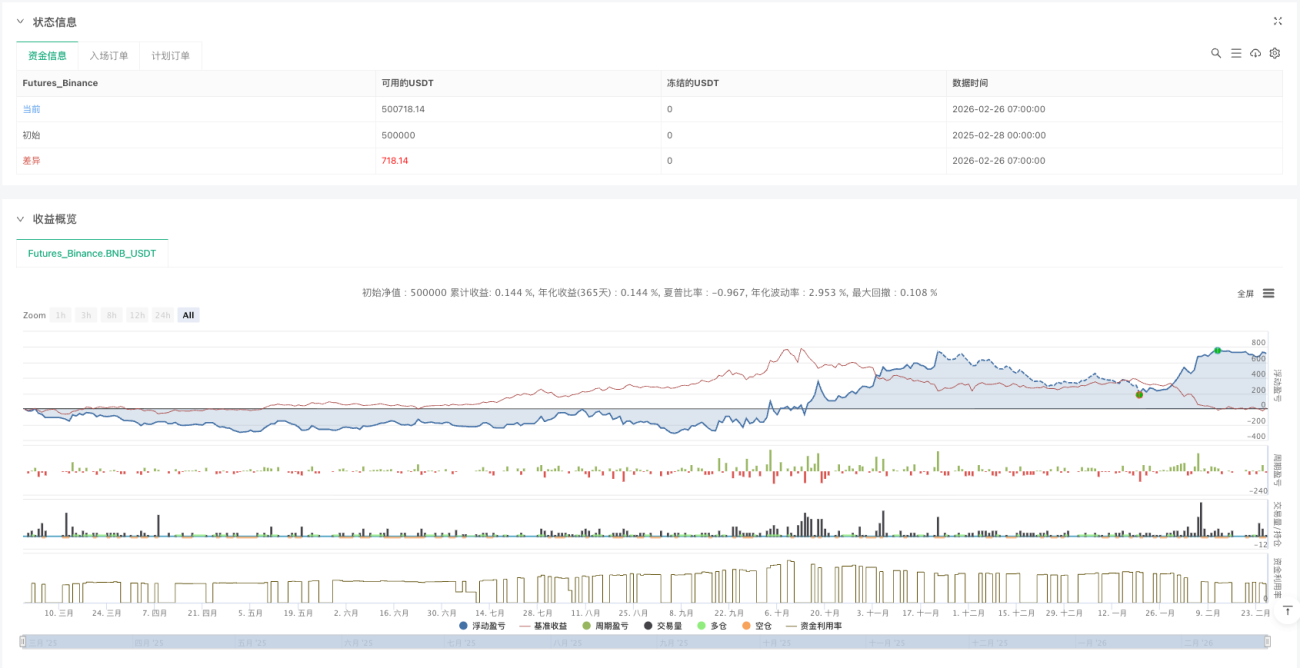
Code source de la stratégie
/*backtest
start: 2025-02-28 00:00:00
end: 2026-02-26 08:00:00
period: 1h
basePeriod: 1h
exchanges: [{"eid":"Futures_Binance","currency":"BNB_USDT","balance":500000}]
*/

// This Pine Script® code is subject to the terms of the Mozilla Public License 2.0 at https://mozilla.org/MPL/2.0/
// © providence46

//@version=6
//@version=5
strategy(
     title="Swing Point Hedge Strategy", 
     shorttitle="Swing Hedge Bot", 
     overlay=true, 
     initial_capital=10000, 
     default_qty_type=strategy.percent_of_equity, 
     default_qty_value=50,
     commission_type=strategy.commission.percent,
     commission_value=0.1,
     slippage=2,
     pyramiding=2,
     calc_on_every_tick=true,
     max_bars_back=500
 )

// ========== INPUT PARAMETERS ==========
// Swing Detection Settings
swingLength = input.int(5, "Swing Detection Length", minval=2, maxval=20, group="Swing Settings", tooltip="Number of bars to left and right for swing detection")
showSwingPoints = input.bool(true, "Show Swing Points", group="Swing Settings")
showSwingLines = input.bool(true, "Show Swing Lines", group="Swing Settings")

// Hedge Settings
hedgeOnBreak = input.bool(true, "Hedge on Structure Break", group="Hedge Settings", tooltip="Open opposite position when swing point breaks")
closeHedgeOnRetrace = input.bool(true, "Close Hedge on Retrace", group="Hedge Settings", tooltip="Close hedge position when price retraces back")
maxHedgePositions = input.int(2, "Max Hedge Positions", minval=1, maxval=3, group="Hedge Settings")

// Risk Management
useFixedSL = input.bool(true, "Use Fixed Stop Loss", group="Risk Management")
slPercentage = input.float(2.0, "Stop Loss %", minval=0.1, step=0.1, group="Risk Management")
useTakeProfit = input.bool(true, "Use Take Profit", group="Risk Management")
tpPercentage = input.float(3.0, "Take Profit %", minval=0.1, step=0.1, group="Risk Management")

// Display
showLabels = input.bool(true, "Show Trade Labels", group="Display")
showZones = input.bool(true, "Show Support/Resistance Zones", group="Display")

// Colors
higherHighColor = input.color(color.new(color.green, 0), "Higher High Color", group="Colors")
higherLowColor = input.color(color.new(color.lime, 0), "Higher Low Color", group="Colors")
lowerHighColor = input.color(color.new(color.orange, 0), "Lower High Color", group="Colors")
lowerLowColor = input.color(color.new(color.red, 0), "Lower Low Color", group="Colors")

// ========== SWING POINT DETECTION ==========
// Detect pivot highs and lows
pivotHigh = ta.pivothigh(high, swingLength, swingLength)
pivotLow = ta.pivotlow(low, swingLength, swingLength)

// Store swing points
var array<float> swingHighs = array.new<float>()
var array<int> swingHighBars = array.new<int>()
var array<float> swingLows = array.new<float>()
var array<int> swingLowBars = array.new<int>()

// Add new swing highs
if not na(pivotHigh)
    array.push(swingHighs, pivotHigh)
    array.push(swingHighBars, bar_index[swingLength])
    if array.size(swingHighs) > 10
        array.shift(swingHighs)
        array.shift(swingHighBars)

// Add new swing lows
if not na(pivotLow)
    array.push(swingLows, pivotLow)
    array.push(swingLowBars, bar_index[swingLength])
    if array.size(swingLows) > 10
        array.shift(swingLows)
        array.shift(swingLowBars)

// ========== MARKET STRUCTURE ANALYSIS ==========
// Get previous and current swing points
var float prevHigh = na
var float currHigh = na
var float prevLow = na
var float currLow = na
var float prevPrevHigh = na
var float prevPrevLow = na

// Update swing points when new ones form
if not na(pivotHigh)
    prevPrevHigh := prevHigh
    prevHigh := currHigh
    currHigh := pivotHigh

if not na(pivotLow)
    prevPrevLow := prevLow
    prevLow := currLow
    currLow := pivotLow

// Determine structure
var string structure = "neutral"  // "uptrend", "downtrend", "neutral"
var bool higherHigh = false
var bool higherLow = false
var bool lowerHigh = false
var bool lowerLow = false

// Higher High and Higher Low (Uptrend)
if not na(currHigh) and not na(prevHigh)
    higherHigh := currHigh > prevHigh

if not na(currLow) and not na(prevLow)
    higherLow := currLow > prevLow

// Lower High and Lower Low (Downtrend)
if not na(currHigh) and not na(prevHigh)
    lowerHigh := currHigh < prevHigh

if not na(currLow) and not na(prevLow)
    lowerLow := currLow < prevLow

// Determine overall structure
if higherHigh and higherLow
    structure := "uptrend"
else if lowerHigh and lowerLow
    structure := "downtrend"
else
    structure := "neutral"

// ========== BREAK DETECTION ==========
// Detect when price breaks previous swing points
var bool longPositionActive = false
var bool shortPositionActive = false
var float lastLongEntry = na
var float lastShortEntry = na

// Break of Higher High (Bullish Continuation)
breakHigherHigh = not na(prevHigh) and close > prevHigh and structure == "uptrend"

// Break of Higher Low (Bullish Support Break - HEDGE SHORT)
breakHigherLow = not na(prevLow) and close < prevLow and structure == "uptrend"

// Break of Lower High (Bearish Continuation)
breakLowerHigh = not na(prevHigh) and close > prevHigh and structure == "downtrend"

// Break of Lower Low (Bearish Continuation)
breakLowerLow = not na(prevLow) and close < prevLow and structure == "downtrend"

// ========== ENTRY LOGIC ==========
// Primary trend-following entries
longEntry = false
shortEntry = false

// Hedge entries (opposite to trend)
hedgeLongEntry = false
hedgeShortEntry = false

// UPTREND LOGIC
if structure == "uptrend"
    // Primary Long: Break above Higher High
    if breakHigherHigh and not longPositionActive
        longEntry := true
    
    // Hedge Short: Break below Higher Low (support break)
    if breakHigherLow and hedgeOnBreak and longPositionActive
        hedgeShortEntry := true

// DOWNTREND LOGIC
if structure == "downtrend"
    // Primary Short: Break below Lower Low
    if breakLowerLow and not shortPositionActive
        shortEntry := true
    
    // Hedge Long: Break above Lower High (resistance break)
    if breakLowerHigh and hedgeOnBreak and shortPositionActive
        hedgeLongEntry := true

// ========== POSITION MANAGEMENT ==========
var int hedgeCount = 0

// Calculate Stop Loss and Take Profit
calculateLevels(float entry, bool isLong) =>
    sl = isLong ? entry * (1 - slPercentage / 100) : entry * (1 + slPercentage / 100)
    tp = isLong ? entry * (1 + tpPercentage / 100) : entry * (1 - tpPercentage / 100)
    [sl, tp]

// PRIMARY LONG ENTRY
if longEntry and strategy.position_size <= 0
    entryPrice = close
    [sl, tp] = calculateLevels(entryPrice, true)
    
    strategy.entry("Long Primary", strategy.long, qty=2)
    if useFixedSL and useTakeProfit
        strategy.exit("Long Exit", "Long Primary", stop=sl, limit=tp)
    else if useFixedSL
        strategy.exit("Long Exit", "Long Primary", stop=sl)
    else if useTakeProfit
        strategy.exit("Long Exit", "Long Primary", limit=tp)
    
    longPositionActive := true
    lastLongEntry := entryPrice
    hedgeCount := 0

// PRIMARY SHORT ENTRY
if shortEntry and strategy.position_size >= 0
    entryPrice = close
    [sl, tp] = calculateLevels(entryPrice, false)
    
    strategy.entry("Short Primary", strategy.short, qty=2)
    if useFixedSL and useTakeProfit
        strategy.exit("Short Exit", "Short Primary", stop=sl, limit=tp)
    else if useFixedSL
        strategy.exit("Short Exit", "Short Primary", stop=sl)
    else if useTakeProfit
        strategy.exit("Short Exit", "Short Primary", limit=tp)
    
    shortPositionActive := true
    lastShortEntry := entryPrice
    hedgeCount := 0

// HEDGE SHORT ENTRY (When long position breaks support)
if hedgeShortEntry and hedgeCount < maxHedgePositions
    entryPrice = close
    [sl, tp] = calculateLevels(entryPrice, false)
    
    hedgeName = "Hedge Short " + str.tostring(hedgeCount + 1)
    strategy.entry(hedgeName, strategy.short, qty=1)
    if useFixedSL
        strategy.exit("Hedge Exit", hedgeName, stop=sl)
    
    hedgeCount += 1

// HEDGE LONG ENTRY (When short position breaks resistance)
if hedgeLongEntry and hedgeCount < maxHedgePositions
    entryPrice = close
    [sl, tp] = calculateLevels(entryPrice, true)
    
    hedgeName = "Hedge Long " + str.tostring(hedgeCount + 1)
    strategy.entry(hedgeName, strategy.long, qty=1)
    if useFixedSL
        strategy.exit("Hedge Exit", hedgeName, stop=sl)
    
    hedgeCount += 1

// Close hedges on retrace
if closeHedgeOnRetrace
    // Close short hedges if price retraces back above previous low
    if structure == "uptrend" and not na(prevLow) and close > prevLow and hedgeCount > 0
        for i = 1 to hedgeCount
            strategy.close("Hedge Short " + str.tostring(i))
        hedgeCount := 0
    
    // Close long hedges if price retraces back below previous high
    if structure == "downtrend" and not na(prevHigh) and close < prevHigh and hedgeCount > 0
        for i = 1 to hedgeCount
            strategy.close("Hedge Long " + str.tostring(i))
        hedgeCount := 0

// Reset position flags when flat
if strategy.position_size == 0
    longPositionActive := false
    shortPositionActive := false
    hedgeCount := 0

// ========== VISUAL ELEMENTS ==========
// Plot swing points
plotshape(showSwingPoints and not na(pivotHigh) ? pivotHigh : na, "Pivot High", shape.triangledown, location.abovebar, 
         higherHigh ? higherHighColor : lowerHigh ? lowerHighColor : color.gray, size=size.small)
plotshape(showSwingPoints and not na(pivotLow) ? pivotLow : na, "Pivot Low", shape.triangleup, location.belowbar, 
         higherLow ? higherLowColor : lowerLow ? lowerLowColor : color.gray, size=size.small)

// Draw swing lines
if showSwingLines and array.size(swingHighs) >= 2
    lastHigh = array.get(swingHighs, array.size(swingHighs) - 1)
    lastHighBar = array.get(swingHighBars, array.size(swingHighBars) - 1)
    prevHighVal = array.get(swingHighs, array.size(swingHighs) - 2)
    prevHighBar = array.get(swingHighBars, array.size(swingHighBars) - 2)


if showSwingLines and array.size(swingLows) >= 2
    lastLow = array.get(swingLows, array.size(swingLows) - 1)
    lastLowBar = array.get(swingLowBars, array.size(swingLowBars) - 1)
    prevLowVal = array.get(swingLows, array.size(swingLows) - 2)
    prevLowBar = array.get(swingLowBars, array.size(swingLowBars) - 2)
    

// Plot entry signals
plotshape(longEntry, "Long Entry", shape.triangleup, location.belowbar, color.green, size=size.normal)
plotshape(shortEntry, "Short Entry", shape.triangledown, location.abovebar, color.red, size=size.normal)
plotshape(hedgeShortEntry, "Hedge Short", shape.xcross, location.abovebar, color.orange, size=size.small)
plotshape(hedgeLongEntry, "Hedge Long", shape.xcross, location.belowbar, color.aqua, size=size.small)

// Background
structBg = structure == "uptrend" ? color.new(color.green, 97) : structure == "downtrend" ? color.new(color.red, 97) : na
bgcolor(structBg)

// ========== ALERTS ==========
if longEntry
    alert("PRIMARY LONG: Higher High break on " + syminfo.ticker, alert.freq_once_per_bar)

if shortEntry
    alert("PRIMARY SHORT: Lower Low break on " + syminfo.ticker, alert.freq_once_per_bar)

if hedgeShortEntry
    alert("HEDGE SHORT: Higher Low break (support failure) on " + syminfo.ticker, alert.freq_once_per_bar)

if hedgeLongEntry
    alert("HEDGE LONG: Lower High break (resistance failure) on " + syminfo.ticker, alert.freq_once_per_bar)