FMZ Quant のPINE 言語紹介チュートリアル
作者: リン・ハーンリディア, 作成日:2022-09-23 15:23:34, 更新日:2024-02-27 16:47:41線Aより1BAR遅い.線Cは線Bより1BAR遅い.線Cは線Aより2BAR遅い.
図表を最左に引っ張って,最初のK線で,bとcの両方の値が null (na) であることを観察することができます.これは,スクリプトが最初のK線 BARで実行されるとき,存在していない1〜2つの期間の過去値を参照するときに存在しないからです.したがって,歴史的なデータへの参照が null 値を生むかどうかをチェックする戦略を書くときに注意する必要があります. null 値は不注意に使用されれば,一連の計算差が生み出し,リアルタイム BAR にさえ影響する可能性があります.通常,内蔵関数を使用します.na, nz(実際,我々はまた遭遇しています)nz前回のビデオでは,どの章か覚えてますか?) は,例えば,ゼロ値について扱っています.
close > nz(close[1], open) // When referencing the historical value of the previous BAR of the close built-in variable, if it does not exist, the open built-in variable is used
これは,ゼロ値 (na) に可能な参照を扱う方法です.
事業者の優先度
パイン言語では多くの演算子を学びました. これらの演算子は,演算子との様々な組み合わせによって表現を形成します. では,表現で評価する際にこれらの演算子の優先順位は何ですか? 学校で学んだ算術と同様に,掛け算と除算は最初に計算され,加算と引算が続きます. パイン言語の表現も同じです.
| 優先順位 | 事業者 |
|---|---|
| 9 | [] |
| 8 | + 、-そしてnot単数演算子で |
| 7 | *、/、% |
| 6 | +、-バイナリー演算子で |
| 5 | >、<、>=、<= |
| 4 | ==、!= |
| 3 | and |
| 2 | or |
| 1 | ?: |
優先順位が同じなら,左から右に評価されます. 特定の部分を最初に評価することを強制したい場合は,()表現を包むために,最初に評価される部分を強制します.
変数
変形申告
変数の名前として使用されます. つまり,変数は値を保持するマーカーです. では,変数をどのように宣言しますか? 変数を宣言するルールは何ですか?
-
宣言モード: 変数を宣言するときに最初に書くのは,宣言モードです.変数には3つの宣言モードがあります.
- キーワードを使う
var. - キーワードを使う
varip. - 何も書かないで
について
varそしてvaripキーワードは,実際に研究されていますAssignment Operators変数宣言モードには何も書かれていない場合,例えば,i = 1,前にも述べたように,このような変数が宣言され割り当てられ,すべてのK線 BARで実行されます. - キーワードを使う
-
タイプ FMZのPine言語はタイプについて厳格ではない.一般的に省略することができる.しかし,トレードビューのスクリプト戦略と互換性のために,変数はタイプで宣言することもできる.例えば:
int i = 0
float f = 1.1
トレーディング ビューのタイプ要求はかなり厳格で,次のコードが トレーディング ビューで使用された場合,エラーが報告されます.
baseLine0 = na // compile time error! -
マーカー マーカーは変数名である. マーカーの命名は,以前の章で言及されているので,ここで見直すことができます:https://www.fmz.com/bbs-topic/9637#markers
概要すると,変数を宣言すると,次のように書ける.
// [<declaration_mode>] [<type>] <marker> = value
   declaration mode             type     marker      = value
割り当て演算子は以下のように使用されます.=変数を宣言するときに変数に値を代入します.代入すると文字列,数,式,関数呼び出し,if, for, while,またはswitchこの構造キーワードとステートメントの使用は,次のコースで詳細に説明されます. 実際,私たちは,以前のコースで簡単なifステートメントの割り当てを学び,それらを見直すことができます.
戦略の設計や書き込み時に頻繁に使用する機能です. 戦略の設計においても非常に重要な機能です.
入力機能:
input function, parameters: defval、title、tooltip、inline、group
FMZの入力関数は,トレードビューの入力関数とは少し異なりますが,この関数は戦略パラメータの割り当て入力として使用されます. FMZの入力関数の使用を詳細に説明するために,例を使用しましょう:
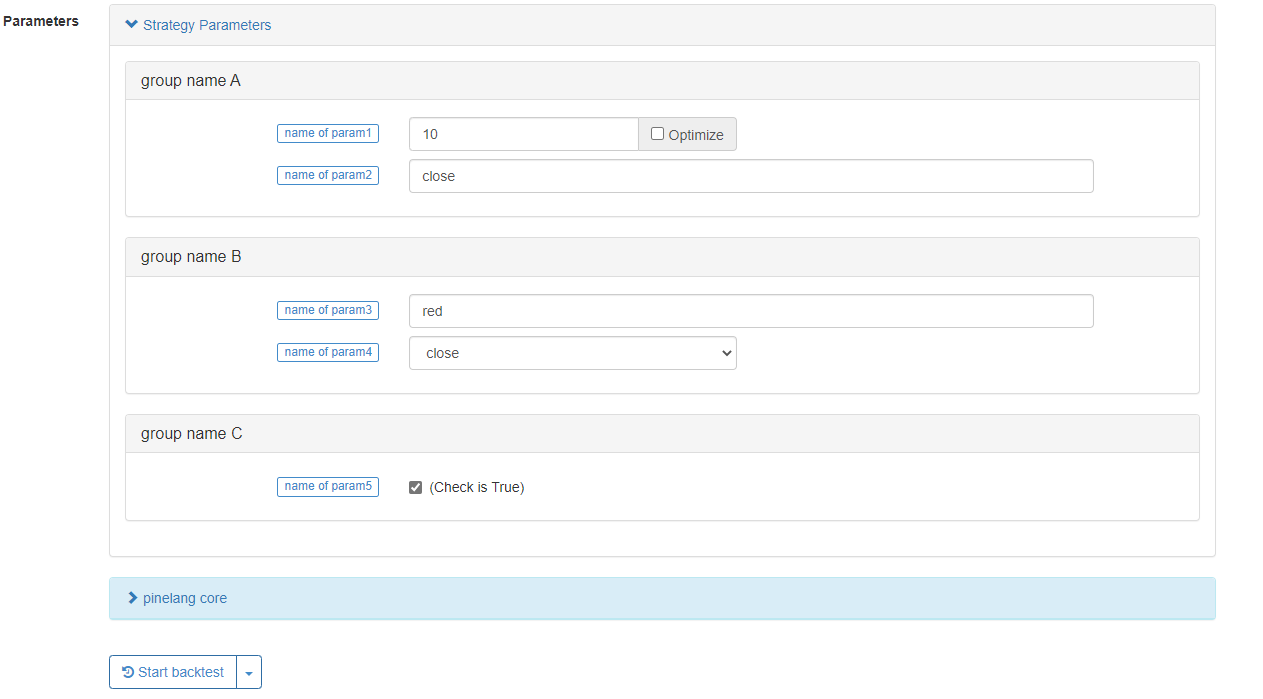
param1 = input(10, title="name of param1", tooltip="description for param1", group="group name A")
param2 = input("close", title="name of param2", tooltip="description for param2", group="group name A")
param3 = input(color.red, title="name of param3", tooltip="description for param3", group="group name B")
param4 = input(close, title="name of param4", tooltip="description for param4", group="group name B")
param5 = input(true, title="name of param5", tooltip="description for param5", group="group name C")

ma = ta.ema(param4, param1)
plot(ma, title=param2, color=param3, overlay=param5)
入力関数は,変数を宣言する際に変数に値を割り当てるためにしばしば使用されます. FMZの入力関数は,FMZの戦略インターフェイスで戦略パラメータを自動的に設定するためのコントロールを抽出します. FMZでサポートされているコントロールには,現在,数値入力ボックス,テキスト入力ボックス,ドロップダウンボックス,ブールチェックボックスが含まれています.また,戦略パラメータグループを設定し,パラメータプロンプトテキストメッセージを設定し,その他の機能を設定できます.
入力関数のいくつかの主要なパラメータを導入します.
- defval: パイン言語内蔵変数,数値値,文字列をサポートする入力関数によって設定された戦略パラメータオプションのデフォルト値.
- タイトル: ライブ取引/バックテスト中に戦略インターフェースに表示される戦略のパラメータ名.
- ツールチップ: 戦略パラメータのためのツールチップ情報,マウスが戦略パラメータの上にハマると,パラメータ設定のテキスト情報が表示されます.
- グループ: 戦略パラメータグループの名前で,戦略パラメータに使用できます.
個々の変数の宣言と割り当てに加えて,変数のグループを宣言し,それを Pine 言語で割り当てる方法もあります.
[Variable A, Variable B, Variable C] = function or structure, such as ```if```, ```for```, ```while``` or ```switch```
最も一般的なのはta.macdMACDインジケーターは多線指標であるため,3つのデータセットが計算されます.
[dif,dea,column] = ta.macd(close, 12, 26, 9)

plot(dif, title="dif")
plot(dea, title="dea")
plot(column, title="column", style=plot.style_histogram)
上記のコードを使用してMACDチャートを簡単に描くことができます. 組み込み関数だけでなく,書き込みのカスタム関数も複数のデータに戻ることができます.
twoEMA(data, fastPeriod, slowPeriod) =>
    fast = ta.ema(data, fastPeriod)
    slow = ta.ema(data, slowPeriod)
    [fast, slow]

[ema10, ema20] = twoEMA(close, 10, 20)
plot(ema10, title="ema10", overlay=true)
plot(ema20, title="ema20", overlay=true)
if と他の構造を複数変数割り当てとして使う書き込み方法も上記のカスタム関数に似ています.興味がある場合は試してみてください.
[ema10, ema20] = if true
    fast = ta.ema(close, 10)
    slow = ta.ema(close, 20)
    [fast, slow]

plot(ema10, title="ema10", color=color.fuchsia, overlay=true)
plot(ema20, title="ema20", color=color.aqua, overlay=true)
条件構造
いくつかの関数は,主に次の関数を含む条件分岐のローカルコードブロックに書き込めない.
バークローラ (barcolor)) 記号 (fill)) 線 (hline)) 指示 (indicator)) 図 (plot)) 図 (candle)) 図表 (plotchar)) 図形 (plotshape))
トレーディングビューではエラーがコンパイルされますが,FMZはそれほど制限的ではありませんが,トレーディングビューの仕様に従うことが推奨されます.例えば,これはFMZでエラーを報告しませんが,推奨されません.
strategy("test", overlay=true)
if close > open
    plot(close, title="close")
else
    plot(open, title="open")
if 声明
説明の例:
var lineColor = na

n = if bar_index > 10 and bar_index <= 20
    lineColor := color.green
else if bar_index > 20 and bar_index <= 30
    lineColor := color.blue
else if bar_index > 30 and bar_index <= 40
    lineColor := color.orange
else if bar_index > 40
    lineColor := color.black
else
    lineColor := color.red

plot(close, title="close", color=n, linewidth=5, overlay=true)
plotchar(true, title="bar_index", char=str.tostring(bar_index), location=location.abovebar, color=color.red, overlay=true)
キーポイント: ブール式値を返す判定に使用される式.インデントに注意してください. 最大でも1つのブランチがある可能性があります. すべてのブランチ表現が真でない場合,他のブランチがない場合は,na を返します.
x = if close > open
    close
plot(x, title="x")
スイッチ ステートメント
スイッチ文は,特定の条件に従って実行される異なる経路を設計するために使用されるブランチ構造の文である.一般的に,スイッチ文には以下の主要な知識点があります.
- if 文のように switch 文も値を返します
- 他の言語のスイッチステートメントとは異なり,スイッチコンストラクタを実行すると,そのコードのローカルブロックのみを実行されるため,breakステートメントは不要である (つまり,breakのようなキーワードを書く必要はありません).
- スイッチの各ブランチはローカルコードブロックを書き込むことができる.このローカルコードブロックの最後の行は返却値 (値のタプルであることもできる).ブランチローカルコードブロックのいずれも実行されていない場合は na を返します.
- スイッチ構造の式が位置を決定します 文字列,変数,式,または関数呼び出しを書き込むことができます
- スイッチは,実行する構造の他のケースがない場合に使用するデフォルト値として動作する返却値を指定することができます.
スイッチには2つの形態があります. その使い方を理解するために,例を一つずつ見ていきましょう.
- A について
switch表現で - 例説明:
// input.string: defval, title, options, tooltip
func = input.string("EMA", title="indicator name", tooltip="select the name of the indicator function to be used", options=["EMA", "SMA", "RMA", "WMA"])

// input.int: defval, title, options, tooltip
// param1 = input.int(10, title="period parameter")
fastPeriod = input.int(10, title="fastPeriod parameter", options=[5, 10, 20])
slowPeriod = input.int(20, title="slowPeriod parameter", options=[20, 25, 30])

data = input(close, title="data", tooltip="select the closing price, opening price, highest price...")
fastColor = color.red
slowColor = color.red

[fast, slow] = switch func
    "EMA" =>
        fastLine = ta.ema(data, fastPeriod)
        slowLine = ta.ema(data, slowPeriod)
        fastColor := color.red
        slowColor := color.red
        [fastLine, slowLine]
    "SMA" =>
        fastLine = ta.sma(data, fastPeriod)
        slowLine = ta.sma(data, slowPeriod)
        fastColor := color.green
        slowColor := color.green
        [fastLine, slowLine]
    "RMA" =>
        fastLine = ta.rma(data, fastPeriod)
        slowLine = ta.rma(data, slowPeriod)
        fastColor := color.blue
        slowColor := color.blue
        [fastLine, slowLine]
    =>
        runtime.error("error")

plot(fast, title="fast" + fastPeriod, color=fastColor, overlay=true)
plot(slow, title="slow" + slowPeriod, color=slowColor, overlay=true)
2つの関数を学び続けます. この関数は,input.string, input.int functions.
input.string文字列を返します.input.intこの例では,この関数の新しい使い方があります.optionsパラメータoptionsパラメータは,任意の値の配列を通過することができます.options=["EMA", "SMA", "RMA", "WMA"]そしてoptions=[5, 10, 20]この例では (一つは文字列型,もう一つは数値型) 戦略インターフェースのコントロールは特定の値を入力する必要はありませんが,コントロールはオプションパラメータで提供されているこれらのオプションを選択するためのドロップダウンボックスになります.
変数 func の値は文字列であり,変数 func はスイッチ (変数,関数呼び出し,または表現) の式として使用され,スイッチ内のどのブランチが実行されるかを決定する.変数 func がスイッチ内の任意のブランチの式に一致 (すなわち等) できない場合,デフォルトのブランチコードブロックが実行され,runtime.error("error")戦略が例外を投げ,停止する.
上記のテストコードでは,スイッチのデフォルトブランチコードブロックのランタイム.エラーの最後の行の後,返却値と互換性を持つために [na, na] のようなコードを追加しませんでした.この問題はトレードビューで考慮する必要があります.タイプが不一致であれば,エラーが報告されます.しかし,FMZでは,タイプが厳格に要求されないため,この互換性コードは省略できます.したがって,ifの返却値のタイプ互換性およびFMZのブランチを考慮する必要はありません.
strategy("test", overlay=true)
x = if close > open
    close
else
    "open"
plotchar(true, title="x", char=str.tostring(x), location=location.abovebar, color=color.red)
FMZではエラーは報告されませんが,取引ビューではエラーが報告されます.ifブランチが返したタイプが不一致だからです.
switch表現がない
この方法を使って,switch表現もせずに
up = close > open     // up = close < open
down = close < open
var upOfCount = 0
var downOfCount = 0

msgColor = switch
    up  =>
        upOfCount += 1
        color.green
    down =>
        downOfCount += 1
        color.red

plotchar(up, title="up", char=str.tostring(upOfCount), location=location.abovebar, color=msgColor, overlay=true)
plotchar(down, title="down", char=str.tostring(downOfCount), location=location.belowbar, color=msgColor, overlay=true)
テストコードの例から見られるように,スイッチはブランチ条件で真であるローカルコードブロックの実行に一致する.一般的に,スイッチ文の後に続くブランチ条件は相互に排他的である必要があります.つまり,例の上下は同時に真であることはできない.スイッチは1つのブランチのローカルコードブロックのみを実行できるため,興味がある場合は,コードにこの行を置き換えることができます:up = close > open // up = close < openコメントの内容に,および結果を観察するためにバックテストします. スイッチブランチは最初のブランチのみを実行することがわかります. さらに,可能な限りスイッチのブランチに関数呼び出しを書かないように注意する必要があります. 機能は各 BAR で呼び出されず,いくつかのデータ計算問題を引き起こす可能性があります (例の"switch実行分支は決定的であり,戦略操作中に変更されません).
ループ構造
申告のために
return value = for count = start count to final count by step length
    statement                                            // Note: There can be break and continue in the statement
    statement                                            // Note: The last statement is the return value
for 文は使いやすいので, for ループは最終的に値 (または [a, b, c] の形で複数の値) を返すことができる.上記の偽コードの
についてbreakループが停止するときにbreak実行されます.
についてcontinueforループで使用されたキーワード:continueループはコードを無視します.continueループの次のラウンドを直接実行します. for 文はループの最後の実行からの返却値に戻します. そしてコードが実行されない場合は null を返します.
簡単な例で示します
ret = for i = 0 to 10       // We can increase the keyword by to modify the step length, FMZ does not support reverse loops such as i = 10 to 0 for now
    // We can add condition settings, use continue to skip, use break to jump out
    runtime.log("i:", i)
    i                       // If this line is not written, it will return null because there is no variable to return

runtime.log("ret:", ret)
runtime.error("stop")
... 声明で
についてfor ... in次の偽コードで説明します. 偽コードは,
return value = for array element in array
    statement                        // Note: There can be break and continue in the statement
    statement                        // Note: The last statement is the return value
Return value = for [index variable, array element corresponding to index variable] in array
    statement                        // Note: There can be break and continue in the statement
    statement                        // Note: The last statement is the return value
この2つの形式の主な違いは,forキーワードに続く内容である.一つは,配列の要素を参照する変数として変数を使用することであり,もう一つは,参照としてインデックス変数,配列要素変数のツープルを含む構造を使用することです.他の返回値ルールの場合,例えばbreak,continueなどを使用することは, forループと一致しています.また,簡単な例で使用を例示します.
testArray = array.from(10, 20, 30, 40, 50, 60, 70, 80, 90, 100)
for ele in testArray            // Modify it to the form of [i, ele]: for [i, ele] in testArray, runtime.log("ele:", ele, ", i:", i)
    runtime.log("ele:", ele)

runtime.error("stop")
文法を使います.for [i, ele] in testArray.
ループの適用
パイン言語で提供されている内蔵関数を利用して,ループ論理計算のいくつかを完了することができます. ループ構造を直接使用して記述するか,内蔵関数を使用して処理します. 2つの例を挙げましょう:
- 平均値を計算する
ループ構造で設計する場合:
length = 5
var a = array.new(length)
array.push(a, close)

if array.size(a) >= length
	array.remove(a, 0)

sum = 0
for ele in a
    sum += ele

avg = sum / length
plot(avg, title="avg", overlay=true)
この例では for ループを使用して合計を計算し,その後平均値を計算します.
移動平均を直接内蔵関数を使って計算する.
plot(ta.sma(close, length), title="ta.sma", overlay=true)
組み込み関数を使用するta.sma移動平均指標を直接計算する.明らかに,移動平均を計算するために内蔵関数を使用することはより簡単です.チャートで比較すると,計算結果はまったく同じであることがわかります.
- 概要
上の例を例として使います
ループ構造で設計する場合:
length = 5
var a = array.new(length)
array.push(a, close)

if array.size(a) >= length
	array.remove(a, 0)

sum = 0
for ele in a
    sum += ele

avg = sum / length
plot(avg, title="avg", overlay=true)
plot(ta.sma(close, length), title="ta.sma", overlay=true)
処理するためにループを使用したり,内蔵関数を使用したりできます.array.sum計算する
組み込み関数を直接使って合計を計算します:
length = 5
var a = array.new(length)
array.push(a, close)

if array.size(a) >= length
	array.remove(a, 0)

plot(array.sum(a) / length, title="avg", overlay=true)
plot(ta.sma(close, length), title="ta.sma", overlay=true)
グラフに示されているデータと全く同じです. グラフに示されているデータと全く同じです.
ループは主に 3 つのポイントの適用に基づいています.
- 配列のいくつかの操作と計算のために
- 履歴を復習するには,例えば,現在の BAR
の高点よりも過去の高点がどのくらい高いか調べる.現在の BAR の高点はスクリプトが実行されている BAR にのみ知られるため,過去 BAR を時間内に返却して分析するためにループが必要です. - パイン言語の内蔵関数は過去BARの計算を完了できないとき
ステータムネット
についてwhile while 構造の判断条件が false になるまでループセクションのコードを実行し続けます
return value = while judgment condition
    statement                    // Note: There can be break and continue in the statement
    statement                    // Note: The last statement is the return value
while の他のルールは,for ループのルプに似ている.ループボディのローカルコードブロックの最後の行は,複数の値を返すことができる返却値である.
移動平均を計算する例を示します.
length = 10

sma(data, length) =>
    i = 0
    sum = 0
    while i < 10
        sum += data[i]
        i += 1
        sum / length

plot(sma(close, length), title="sma", overlay=true)
plot(ta.sma(close, length), title="ta.sma", overlay=true)
計算論理を設計することも可能で 組み込み関数で置き換えない. 例えば,因数計算:
counter = 5
fact = 1

ret = while counter > 0
    fact := fact * counter
    counter := counter - 1
    fact

plot(ret, title="ret")  // ret = 5 * 4 * 3 * 2 * 1
配列
パイン言語における配列の定義は,他のプログラミング言語の定義と類似している. パイン[]配列の要素を参照するには,関数を使用する必要があります.array.get()そしてarray.set()配列内の要素のインデックス順序は,配列の最初の要素のインデックスが0で,次の要素のインデックスは1で増加します.
簡単なコードで説明します
var a = array.from(0)
if bar_index == 0
    runtime.log("current value a on BAR:", a, ", a on the last BAR, i.e. the value of a[1]:", a[1])
else if bar_index == 1
    array.push(a, bar_index)
    runtime.log("current value a on BAR:", a, ", a on the last BAR, i.e. the value of a[1]:", a[1])
else if bar_index == 2
    array.push(a, bar_index)
    runtime.log("current value a on BAR:", a, ", a on the last BAR, i.e. the value of a[1]:", a[1], ", a on the last second BAR, i.e. the value of a[2]:", a[2])
else if bar_index == 3
    array.push(a, bar_index)
    runtime.log("current value a on BAR:", a, ", a on the last BAR, i.e. the value of a[1]:", a[1], ", a on the last second BAR, i.e. the value of a[2]:", a[2], ", a on the last third BAR, i.e. the value of a[3]:", a[3])
else if bar_index == 4
    // Obtain elements by index using array.get, modify elements by index using array.set
    runtime.log("Before array modification:", array.get(a, 0), array.get(a, 1), array.get(a, 2), array.get(a, 3))
    array.set(a, 1, 999)
    runtime.log("After array modification:", array.get(a, 0), array.get(a, 1), array.get(a, 2), array.get(a, 3))
配列を宣言する
使用array<int> a, float[] b配列を宣言したり,配列に割り当てられる変数を宣言したりします 例えば:
array<int> a = array.new(3, bar_index)
float[] b = array.new(3, close)
c = array.from("hello", "fmz", "!")
runtime.log("a:", a)
runtime.log("b:", b)
runtime.log("c:", c)
runtime.error("stop")
配列変数が初期化されるのはarray.newそしてarray.from種類に関連した関数もたくさんあります.array.newパイン語:array.new_int(), array.new_bool(), array.new_color(), array.new_string()など
varキーワードは,配列宣言モードでも動作する.varキーワードで宣言された配列は,最初の BAR にのみ初期化される.例で観察してみよう:
var a = array.from(0)
b = array.from(0)

if bar_index == 1
    array.push(a, bar_index)
    array.push(b, bar_index)
else if bar_index == 2
    array.push(a, bar_index)
    array.push(b, bar_index)
else if barstate.islast
    runtime.log("a:", a)
    runtime.log("b:", b)
    runtime.error("stop")
配列 a の変化が継続的に決定され,リセットされていないことが見られます.配列 b は各 BAR で初期化されます.最後に,barstate.islast0 の値で印刷された要素が1つしかありません.
配列の要素を読み書きする
array.get を使って配列の指定されたインデックス位置にある要素を取得し, array.set を使って配列の指定されたインデックス位置にある要素を変更します
array.get の最初のパラメータは処理される配列で,第2パラメータは指定されたインデックスです. array.set の最初のパラメータは処理される配列であり,第2パラメータは指定されたインデックスであり,第3パラメータは書き込む要素です.
簡単な例を挙げます
lookbackInput = input.int(100)
FILL_COLOR = color.green

var fillColors = array.new(5)
if barstate.isfirst
    array.set(fillColors, 0, color.new(FILL_COLOR, 70))
    array.set(fillColors, 1, color.new(FILL_COLOR, 75))
    array.set(fillColors, 2, color.new(FILL_COLOR, 80))
    array.set(fillColors, 3, color.new(FILL_COLOR, 85))
    array.set(fillColors, 4, color.new(FILL_COLOR, 90))

lastHiBar = - ta.highestbars(high, lookbackInput)
fillNo = math.min(lastHiBar / (lookbackInput / 5), 4)

bgcolor(array.get(fillColors, int(fillNo)), overlay=true)
plot(lastHiBar, title="lastHiBar")
plot(fillNo, title="fillNo")
この例では,基色緑を初期化し,色を格納する配列を宣言し初期化し,色に異なる透明度値を割り当てます (color.newランクレベルは,現在のBARの距離を100回見直し期間の最高値から計算することによって計算される.過去100回見直し期間のHIGHの最大値に距離が近いほど,ランクが高くなり,対応する色値が暗くなる.多くの類似の戦略は,N回見直し期間の現在の価格レベルを表現するためにこの方法を使用する.
配列要素を繰り返す
前述の for/for in/while 文を使用できます. この文は,
a = array.from(1, 2, 3, 4, 5, 6)

for i = 0 to (array.size(a) == 0 ? na : array.size(a) - 1)
    array.set(a, i, i)

runtime.log(a)
runtime.error("stop")
a = array.from(1, 2, 3, 4, 5, 6)

i = 0
while i < array.size(a)
    array.set(a, i, i)
    i += 1

runtime.log(a)
runtime.error("stop")
a = array.from(1, 2, 3, 4, 5, 6)

for [i, ele] in a
    array.set(a, i, i)

runtime.log(a)
runtime.error("stop")
この3つの横断方法は 同じ実行結果を持っています
配列はスクリプトのグローバルスコープ,または関数またはifブランチのローカルスコープで宣言することができます.
歴史的なデータ参照
配列内の要素の使用には,以下の方法が等価である.次の例から,グラフに2つの列が描かれ,各列に2つの列が描かれ,各列の2つの列がまったく同じ値を持っていることがわかります.
a = array.new_float(1)
array.set(a, 0, close)
closeA1 = array.get(a, 0)[1]
closeB1 = close[1]
plot(closeA1, "closeA1", color.red, 6)
plot(closeB1, "closeB1", color.black, 2)

ma1 = ta.sma(array.get(a, 0), 20)
ma2 = ta.sma(close, 20)
plot(ma1, "ma1", color.aqua, 6)
plot(ma2, "ma2", color.black, 2)
配列を追加・削除する機能
- 配列の加算操作に関連する機能:
array.unshift(), array.insert(), array.push().
- 配列の削除操作に関連する機能:
array.remove(), array.shift(), array.pop(), array.clear().
この配列の追加と削除操作関数をテストするために次の例を使います
a = array.from("A", "B", "C")
ret = array.unshift(a, "X")
runtime.log("array a:", a, ", ret:", ret)

ret := array.insert(a, 1, "Y")
runtime.log("array a:", a, ", ret:", ret)

ret := array.push(a, "D")
runtime.log("array a:", a, ", ret:", ret)

ret := array.remove(a, 2)
runtime.log("array a:", a, ", ret:", ret)

ret := array.shift(a)
runtime.log("array a:", a, ", ret:", ret)

ret := array.pop(a)
runtime.log("array a:", a, ", ret:", ret)

ret := array.clear(a)
runtime.log("array a:", a, ", ret:", ret)

runtime.error("stop")
追加,削除の適用:配列をキューとして
配列や配列の追加と削除のいくつかの関数を使用して"キュー"データ構造を構築することができます. キューは,ティックの価格の移動平均を計算するために使用できます. 誰かが尋ねるかもしれません. "なぜキュー構造を構築すべきですか? 私たちは以前平均を計算するために配列を使用しませんでしたか?"
キューとは,プログラミングの分野でよく使われる構造である.キューの特徴は:
列に最初に入る要素は列を先に出てきます
この方法で,キュー内のデータが最新のデータであることを確認し,キューの長さは無期限に拡大しない.
次の例では,各ティックの価格を記録するためにキュー構造を使用し,ティックのレベルでの移動平均価格を計算し,1分間のK線レベルでの移動平均値と比較します.
strategy("test", overlay=true)

varip a = array.new_float(0)
var length = 10

if not barstate.ishistory
    array.push(a, close)

    if array.size(a) > length
        array.shift(a)

sum = 0.0
for [index, ele] in a
    sum += ele

avgPrice = array.size(a) == length ? sum / length : na

plot(avgPrice, title="avgPrice")
plot(ta.sma(close, length), title="ta.sma")
キーワードを入力します. キーワードを入力します.variantこの方法で,すべての価格の変化は,配列 a に記録されます.
通常使用される配列計算および操作機能
コレレーション関数を計算する:
array.avg()配列内のすべての要素の平均値を計算する.array.min()配列内の最小の要素を計算しますarray.max()配列内の最小の要素を計算しますarray.stdev()配列内のすべての要素の標準偏差を計算する.array.sum()配列内のすべての要素の標準偏差を計算します.
運用に関連する機能:array.concat()2つの配列を合併または連結します.array.copy()配列をコピーするarray.join配列のすべての要素を文字列に連結しますarray.sort()順番を順番に並べますarray.reverse()逆の行列を表示しますarray.slice()配列を切るarray.includes()その要素を判断するためにarray.indexof()パラメータとして渡された値の最初の出現のインデックスに戻します.値が見つからない場合は -1 が返されます.array.lastindexof()値の最後の出現を見つけるために
配列計算に関連する関数の試験例:
a = array.from(3, 2, 1, 4, 5, 6, 7, 8, 9)

runtime.log("Arithmetic average of the array a:", array.avg(a))
runtime.log("The minimum element in the array a:", array.min(a))
runtime.log("The maximum element in the array a:", array.max(a))
runtime.log("Standard deviation in array a:", array.stdev(a))
runtime.log("Sum of all elements of the array a:", array.sum(a))
runtime.error("stop")
これは通常使用される配列計算関数です.
運用関連機能の例:
a = array.from(1, 2, 3, 4, 5, 6)
b = array.from(11, 2, 13, 4, 15, 6)

runtime.log("array a: ", a, ", array b: ", b)
runtime.log("array a, array b is concatenated with:", array.concat(a, b))
c = array.copy(b)

runtime.log("Copy an array b and assign it to the variable c, variable c:", c)

runtime.log("use array.join to process the array c, add the symbol + to the middle of each element, concatenating all elements results in a string:", array.join(c, "+"))
runtime.log("Sort the array b, in order from smallest to largest, using the parameter order.ascending:", array.sort(b, order.ascending))     // array.sort function modifies the original array
runtime.log("Sort the array b, in order from largest to smallest, using the parameter order.descending:", array.sort(b, order.descending))   // array.sort function modifies the original array

runtime.log("array a:", a, ", array b:", b)
array.reverse(a)   // This function modifies the original array
runtime.log("reverse the order of all elements in the array a, after reversing, the array a is:", a)

runtime.log("Intercept array a, index 0~index 3, and follow the rule of left-closed and right-open interval:", array.slice(a, 0, 3))
runtime.log("Search for element 11 in array b:", array.includes(b, 11))
runtime.log("Search for element 100 in array a:", array.includes(a, 100))
runtime.log("Connect array a and array b, and search the index position of the first occurrence of element 2:", array.indexof(array.concat(a, b), 2), " , observe array.concat(a, b):", array.concat(a, b))
runtime.log("Connect array a and array b, and search the index position of the last occurrence of element 6:", array.lastindexof(array.concat(a, b), 6), " , observe array.concat(a, b):", array.concat(a, b))

runtime.error("stop")
機能
カスタム機能
パイン言語はカスタム関数で設計することができる.一般的に,以下のルールがパイン言語のカスタム関数に適用される:
- すべての関数はスクリプトのグローバルスコープで定義されます.関数は他の関数内で宣言することはできません.
- 函数には自分のコード (リキュレーション) で自らを呼び出すことは許されません.
- 原則として,すべてのPINE言語に組み込まれた図解機能 (
barcolor(), fill(), hline(), plot(), plotbar(), plotcandle()) はカスタム関数では呼び出せません. - 関数は単行本または複数行として記述できる.最後の文の返却値は,タプル形式で返却できる現在の関数の返却値である.
単行本として設計されたものなどです.
barIsUp() => close > open
函数が返したときに現在の BAR が正線であるかどうか
複数行に設計されたカスタム機能:
sma(data, length) =>
    i = 0
    sum = 0
    while i < 10
        sum += data[i]
        i += 1
        sum / length

plot(sma(close, length), title="sma", overlay=true)
plot(ta.sma(close, length), title="ta.sma", overlay=true)
SMA平均計算の関数を実現します. SMA平均計算の関数です.
返却できるカスタム関数の例が 2つあります
twoEMA(data, fastPeriod, slowPeriod) =>
    fast = ta.ema(data, fastPeriod)
    slow = ta.ema(data, slowPeriod)
    [fast, slow]

[ema10, ema20] = twoEMA(close, 10, 20)
plot(ema10, title="ema10", overlay=true)
plot(ema20, title="ema20", overlay=true)
1つの関数は,高速線,遅い線,そして2つのEMA平均を計算できます.
内蔵機能
組み込み機能はFMZ PINE スクリプト文書.
パイン言語における内蔵機能の分類:
- 文字列処理機能
str.series. - 色値処理機能
color.series. - パラメータ入力機能
input.series. - インディケーター計算機能
ta.series. - 図解機能
plot.series. - 配列処理機能
array.series. - 取引に関する機能
strategy.series. - 数学操作に関連する機能
math.series. - 他の機能 (時間処理,非グラフ系図の図解機能,
request.シリーズ機能,型処理機能など)
取引機能
についてstrategy.これらの機能は,戦略が実行されているときの取引の実行と密接に関連しています.
strategy.entry
strategy.entry命令を出すための戦略を書くと,関数のいくつかの重要なパラメータは:id, direction, qty, whenなど
パラメーター:
id: これは,取引ポジションに参照のために名前を与えることを理解することができます.このIDは,キャンセル,変更命令および閉じるポジションを参照することができます.direction: オーダーの方向が長ければ (buy) 組み込み変数で送信するstrategy.long変数を入力します. 変数を入力します.strategy.short.qty: 配置されるオーダーの金額を指定します.このパラメータが送信されない場合,デフォルトのオーダーの金額が使用されます.when:実行条件,このパラメータを指定して,現在のオーダー操作が起動するか否かを制御できます.limit: 注文制限価格を指定する.stopストップ損失価格
具体的実施の詳細はstrategy.entryパラメータ設定によって制御されます.strategy[
集中するpyramiding, default_qty_valueパラメータstrategyテストには次のコードを使用します.
/*backtest
start: 2022-07-03 00:00:00
end: 2022-07-09 00:00:00
period: 1d
basePeriod: 1h
exchanges: [{"eid":"Binance","currency":"BTC_USDT"}]
*/

strategy(title = "open long example", pyramiding = 3, default_qty_value=0.1, overlay=true)

ema10 = ta.ema(close, 10)

findOrderIdx(idx) =>
    if strategy.opentrades == 0
        false
    else
        ret = false
        for i = 0 to strategy.opentrades - 1
            if strategy.opentrades.entry_id(i) == idx
                ret := true
                break
        ret


if not findOrderIdx("long1")
    strategy.entry("long1", strategy.long)

if not findOrderIdx("long2")
    strategy.entry("long2", strategy.long, 0.2, when = close > ema10)

if not findOrderIdx("long3")
    strategy.entry("long3", strategy.long, 0.2, limit = low[1])
    strategy.entry("long3", strategy.long, 0.3, limit = low[1])

if not findOrderIdx("long4")
    strategy.entry("long4", strategy.long, 0.2)

plot(ema10, title="ema10", color=color.red)
コードの初めの部分/* backtest... */バックテストの設定で,起動コードではなく,バックテストの設定時間とその時の他の情報をデバッグするために記録します.
コードでは:strategy(title = "open long example", pyramiding = 3, default_qty_value=0.1, overlay=true)指定するときにpyramiding3 に設定します. つまり,この4つのうちの1つは,strategy.entry命令操作は実行されません.default_qty_valueこのパラメータを 0.1 にします.strategy.entryID の操作long1既定のオーダーサイズが0.1である.strategy.entry指定するときに関数呼び出しdirectionとstrategy.longバックテストのテストオーダーはすべて購入オーダーです
オーダー操作はstrategy.entry("long3", ...このコードは同じIDに対して2回呼び出されます.long3,第1回strategy.entry注文操作は満たされていなかった,そして,第2の呼び出しstrategy.entryこのIDの順序を変更することでした (バックテストのテストで示されたデータによると,この制限順序の順序量は0.3に変更されました).別のケースでは,例えば,ID strategy.entryID
strategy.close
についてstrategy.closeこの関数は,指定された識別IDで入力位置を閉じるのに使用されます.主なパラメータは:id, when, qty, qty_percent.
パラメーター:
id: 閉じる必要があるエントリーIDは,エントリーオーダー関数を使用してポジションを開くときに指定するIDです.strategy.entry.when: 執行条件qty: 閉じたポジション数.qty_percent: 閉じたポジションの割合
この関数の使用の詳細を例で説明しましょう.
について/*backtest ... */このコードには,FMZ.COMテストに必要な市場,品種,時間帯,その他の情報を設定できます.
/*backtest
start: 2022-07-03 00:00:00
end: 2022-07-09 00:00:00
period: 1d
basePeriod: 1h
exchanges: [{"eid":"Binance","currency":"BTC_USDT"}]
*/

strategy("close Demo", pyramiding=3)

var enableStop = false
if enableStop
    runtime.error("stop")

strategy.entry("long1", strategy.long, 0.2)
if strategy.opentrades >= 3
    strategy.close("long1")                   // Multiple entry orders, no qty parameters specified, close all
    // strategy.close()                          // Without specifying the id parameter, the current position will be closed
    // strategy.close("long2")                   // If a non-existent id is specified then nothing is done
    // strategy.close("long1", qty=0.15)         // Specify qty parameters to close a position
    // strategy.close("long1", qty_percent=50)   // qty_percent is set to 50 to close 50% of the positions marked by long1
    // strategy.close("long1", qty_percent=80, when=close<open)  // Specify the parameter when, change it to close>open and it won't trigger
    enableStop := true
テスト戦略は,エントリIDの3つの連続した長いエントリを表示し,その後strategy.closeポジションを閉じる際にバックテストの異なる結果を設定する機能です.strategy.closeこの関数は,ポジションを閉鎖するオーダーの価格を指定するパラメータを持っていないため,この関数は主に現在の市場価格で直ちにポジションを閉鎖するために使用されます.
strategy.close_all
機能についてstrategy.close_allパイン言語のスクリプトのポジションは,方向性しか持たないので,現在のポジションの反対方向に信号が起動した場合,現在のポジションを閉じ,信号トリガーに従ってそれを開きます.strategy.close_all呼び出すとき,現在の方向のすべてのポジションを閉じます.strategy.close_all機能はwhen.
パラメーター:
when: 執行条件
観察するために例を挙げましょう.
/*backtest
start: 2022-07-03 00:00:00
end: 2022-07-09 00:00:00
period: 1d
basePeriod: 1h
exchanges: [{"eid":"Binance","currency":"BTC_USDT"}]
*/

strategy("closeAll Demo")

var enableStop = false
if enableStop
    runtime.error("stop")

strategy.entry("long", strategy.long, 0.2, when=strategy.position_size==0 and close>open)
strategy.entry("short", strategy.short, 0.3, when=strategy.position_size>0 and close<open)

if strategy.position_size < 0
    strategy.close_all()
    enableStop := true
試験コードは位置番号 0 で始まる (つまりstrategy.position_size==0値が true になるので, when パラメータで設定された条件を満たすとき,strategy.entryID strategy.position_sizeこのとき,このショートリング逆転信号は,ロングポジションを閉じ,その後逆方向にショートポジションを開く結果になります.その後,if条件で,strategy.position_size < 0つまり,ショートポジションを保持すると,現在のホールディング方向のすべてのポジションが閉鎖されます.enableStop := trueログを観察できるように戦略実行を停止します.
この関数はstrategy.close_allオーダーの閉じる価格を指定するパラメータがない場合,この機能は主に現在の市場価格でポジションを直ちに閉じるのに使用されます.
strategy.exit
についてstrategy.exitこの関数とは異なり,strategy.closeそしてstrategy.close_all市場価格で即座に取引を終了します.strategy.exitパラメータ設定に従って位置を閉じます.
パラメーター:
id: 現在の終了条件のオーダーのオーダー識別子ID.from_entry: 閉じるポジションのエントリーIDを指定するために使用されます.qty: 閉じたポジション数.qty_percent: 閉じたポジションの割合,範囲: 0 ~ 100.profit: ポイントで表した利益目標lossポイントで表されるストップ損失目標limit: 価格によって指定された利益目標stopストップ・ロスの目標,価格によって指定される.when: 執行条件
パラメータの使用を理解するためにテスト戦略を使用する.
/*backtest
start: 2022-07-03 00:00:00
end: 2022-07-09 00:00:00
period: 1d
basePeriod: 1h
exchanges: [{"eid":"Binance","currency":"BTC_USDT"}]
args: [["RunMode",1,358374],["ZPrecision",0,358374]]
*/

strategy("strategy.exit Demo", pyramiding=3)

varip isExit = false

findOrderIdx(idx) =>
    ret = -1
    if strategy.opentrades == 0
        ret
    else
        for i = 0 to strategy.opentrades - 1
            if strategy.opentrades.entry_id(i) == idx
                ret := i
                break
        ret

strategy.entry("long1", strategy.long, 0.1, limit=1, when=findOrderIdx("long1") < 0)
strategy.entry("long2", strategy.long, 0.2, when=findOrderIdx("long2") < 0)
strategy.entry("long3", strategy.long, 0.3, when=findOrderIdx("long3") < 0)

if not isExit and strategy.opentrades > 0
    // strategy.exit("exitAll")          // If only one id parameter is specified, the exit order is invalid, and the parameters profit, limit, loss, stop and other exit conditions also need to be set at least one, otherwise it is also invalid
    strategy.exit("exit1", "long1", profit=50)                    // Since the long1 entry order is not filled, the exit order with ID exit1 is also on hold until the corresponding entry order is filled before exit1 is placed
    strategy.exit("exit2", "long2", qty=0.1, profit=100)          // Specify the parameter qty to close 0.1 positions in the position with ID long2
    strategy.exit("exit3", "long3", qty_percent=50, limit=strategy.opentrades.entry_price(findOrderIdx("long3")) + 1000)   // Specify the parameter qty_percent to close 50% of the positions in the position with ID long3
    isExit := true

if bar_index == 0
    runtime.log("The price per point:", syminfo.mintick)    // The price per point is related to the "Pricing Currency Precision" parameter setting on the Pine language template parameters
テスト戦略は3つの入力操作から始まります (strategy.entry機能) とlong1意図的に設定されていますlimit条件出力関数をテストします. 条件出力関数をテストします.strategy.exitポイントで利益を取ることと価格で利益を取ること,一定の数のポジションを閉じること,そして百分比でポジションを閉じることを用いた.例の長さにより,利益を取ることのみが示されている.ストップ・ロスの操作も同じである.strategy.exit機能にはさらに複雑なトレーリングストップパラメータがありますtrail_price, trail_points, trail_offsetこの例でもテストできます.
strategy.cancel
についてstrategy.cancelこの関数は,すべての未定の注文をキャンセル/停止するために使用されます.strategy.order, strategy.entry , strategy.exitこの機能の主なパラメータは:id, when.
パラメーター:
id: 入場IDはキャンセルしますwhen: 執行条件
この関数は理解が容易で,満たされていないエントリーオーダーをキャンセルするために使用されます.
/*backtest
start: 2022-07-03 00:00:00
end: 2022-07-09 00:00:00
period: 1d
basePeriod: 1h
exchanges: [{"eid":"Binance","currency":"BTC_USDT"}]
*/

strategy("strategy.cancel Demo", pyramiding=3)

var isStop = false
if isStop
    runtime.error("stop")

strategy.entry("long1", strategy.long, 0.1, limit=1)
strategy.entry("long2", strategy.long, 0.2, limit=2)
strategy.entry("long3", strategy.long, 0- 復習手続料の計算方法について
- 永続契約 倉庫問題
- 図面図書の問題をお教えください.
- 20〜30月のマーティン 投資のアイデアはありますか?
- 1分間のk線で最高値でどのように買ったり売ったりするか.
- 変数値の問題
- エマの計算問題
- また,多国貨の取引に関する新たな問題もあります.
- GetDepth がデータを取得する時間回数は,
- exchange.SetPrecision ((2, 3) この2つの領域は,永続的な取引のどの2つの領域に作用しているのでしょうか?
- サーバーが自動で Ali Cloud Linux システムを更新した後,ホストを使用するエラーを報告します.
- なぜ私はこれ以上できないのか?
- テスト バイナンスフューチャー ----- 品種 加入失敗 BTC_USDT_Futures_Binance
- JS言語の神を探しています.
- バイナンのAPIが単筆注文の実現にどのように貢献しているのかお尋ねください.
- サーバーが複数のホストを展開できるのか?
- 指標庫 (python版)
- トレンド判断に関する問題
- ETH2.0来袭,有什么致富机会?可以来套保ETH,赢分叉币糖果空投
- 援助を求める