FMZ Quant의 PINE 언어 소개 자습서
저자:리디아, 창작: 2022-09-23 15:23:34, 업데이트: 2024-02-27 16:47:41그래서 우리는 그려진 세 직선 a, b, c에서 직선 b가 직선 a보다 1 BAR 느리고 직선 c가 직선 b보다 1 BAR 느린 것을 볼 수 있습니다.
우리는 차트를 가장 왼쪽으로 당겨서 첫 번째 K-라인에서 b와 c의 값이 모두 null (na) 인 것을 관찰 할 수 있습니다. 이것은 스크립트가 첫 번째 K-라인 BAR에서 실행되면 존재하지 않는 한 또는 두 기간 앞으로의 역사적 값을 참조할 때 존재하지 않기 때문입니다. 따라서 역사 데이터를 참조하면 null 값이 나올지 확인하는 전략을 작성할 때 조심해야합니다. null 값이 부주의하게 사용되면 일련의 계산 차이를 유발하고 실시간 BAR에도 영향을 줄 수 있습니다. 일반적으로 내장 함수를 사용합니다.na, nz코드에서 판단 (실제로, 우리는 또한nz, ```na`` 우리의 이전 비디오에서, 당신은 어떤 장을 기억합니까?)
close > nz(close[1], open) // When referencing the historical value of the previous BAR of the close built-in variable, if it does not exist, the open built-in variable is used
이것은 null 값 (na) 에 대한 가능한 참조를 처리하는 방법입니다.
운영자 우선 순위
우리는 파이어 언어에서 많은 연산자를 배웠습니다. 이 연산자는 연산자와의 다양한 조합을 통해 표현식을 형성합니다. 그래서 표현식을 평가할 때 이러한 연산의 우선 순위는 무엇입니까? 학교에서 배운 수학과 마찬가지로 곱셈과 분수는 먼저 계산되고 그 다음 덧셈과 빼기입니다. 파이어 언어의 표현에도 마찬가지입니다.
| 우선 순위 | 사업자 |
|---|---|
| 9 | [] |
| 8 | + 、-그리고not유나리 연산자 |
| 7 | *、/、% |
| 6 | +、-이진 연산자 |
| 5 | >、<、>=、<= |
| 4 | ==、!= |
| 3 | and |
| 2 | or |
| 1 | ?: |
우선 순위가 높은 표현식을 먼저 계산하고 우선 순위가 같으면 왼쪽에서 오른쪽으로 평가합니다.()표현식을 종합해서 먼저 평가해야 할 부분을 강제합니다.
변수
변수 선언
우리는 이미 변수의 이름으로 사용되는
-
선언 모드: 변수를 선언할 때 가장 먼저 작성해야 할 것은
declaration mode 이다. 변수에는 세 가지 선언 모드가 있다. - 키워드를 사용하세요
var. - 키워드를 사용하세요
varip. - 아무 것도 쓰지 마
이
var그리고varip키워드는 실제로 우리의 이전 장에서 연구되었습니다Assignment Operators, 그래서 우리는 여기에 세부 사항에 가지 않을 것입니다. 변수 선언 모드를 위해 아무것도 쓰여지지 않는 경우, 같은 명령어:i = 1, 우리가 또한 전에 언급했듯이, 이러한 변수 선언 및 할당은 모든 K-라인 BAR에서 실행됩니다. - 키워드를 사용하세요
-
종류 FMZ의 파이프 언어는 타입에 대해 엄격하지 않으며 일반적으로 생략 할 수 있습니다. 그러나, 트레이딩 뷰의 스크립트 전략과 호환되기 위해 변수는 타입으로 선언 할 수 있습니다. 예를 들어:
int i = 0
float f = 1.1
트레이딩 뷰의 타입 요구 사항은 상당히 엄격하며, 트레이딩 뷰에서 다음 코드가 사용되면 오류가 보고됩니다.
baseLine0 = na // compile time error! -
마커 마커는 변수 이름입니다. 마커의 명칭은 이전 장에서 언급되었으므로 여기에서 검토 할 수 있습니다.https://www.fmz.com/bbs-topic/9637#markers
요약하면 변수를 선언하는 것은 다음과 같이 쓸 수 있습니다.
// [<declaration_mode>] [<type>] <marker> = value
   declaration mode             type     marker      = value
할당 연산자는 여기에 사용 됩니다:=변수가 선언될 때 값을 부여합니다. 값을 부여할 때 문자열, 숫자, 표현, 함수 호출,if, for, while, 또는switch그리고 다른 구조 (이 구조 키워드와 명령어 사용은 다음 코스에서 자세히 설명 될 것입니다. 사실, 우리는 이전 코스에서 간단한 if 명령어 임무를 배웠고 당신은 그들을 검토 할 수 있습니다.)
여기서 우리는 입력 기능에 초점을 맞추고 있습니다. 이는 전략을 설계하고 작성할 때 자주 사용하는 기능입니다. 또한 전략을 설계할 때 매우 중요한 기능입니다.
입력 함수:
input function, parameters: defval、title、tooltip、inline、group
FMZ의 입력 함수는 트레이딩 뷰의 것과 다소 다릅니다. 그러나 이 함수는 전략 매개 변수의 할당 입력으로 사용됩니다. FMZ의 입력 함수의 사용을 자세히 설명하기 위해 예를 사용해보겠습니다:
param1 = input(10, title="name of param1", tooltip="description for param1", group="group name A")
param2 = input("close", title="name of param2", tooltip="description for param2", group="group name A")
param3 = input(color.red, title="name of param3", tooltip="description for param3", group="group name B")
param4 = input(close, title="name of param4", tooltip="description for param4", group="group name B")
param5 = input(true, title="name of param5", tooltip="description for param5", group="group name C")

ma = ta.ema(param4, param1)
plot(ma, title=param2, color=param3, overlay=param5)
입력 함수는 종종 변수를 선언할 때 변수에 값을 할당하는 데 사용됩니다. FMZ의 입력 함수는 FMZ 전략 인터페이스에서 전략 매개 변수를 자동으로 설정하는 컨트롤을 그리습니다. FMZ에서 지원되는 컨트롤에는 현재 수치 입력 상자, 텍스트 입력 상자, 드롭 다운 상자 및 풀 체크 상자가 포함됩니다. 그리고 전략 매개 변수 그룹을 설정하고 매개 변수 프롬프트 문자 메시지를 설정하고 기타 기능을 설정할 수 있습니다.
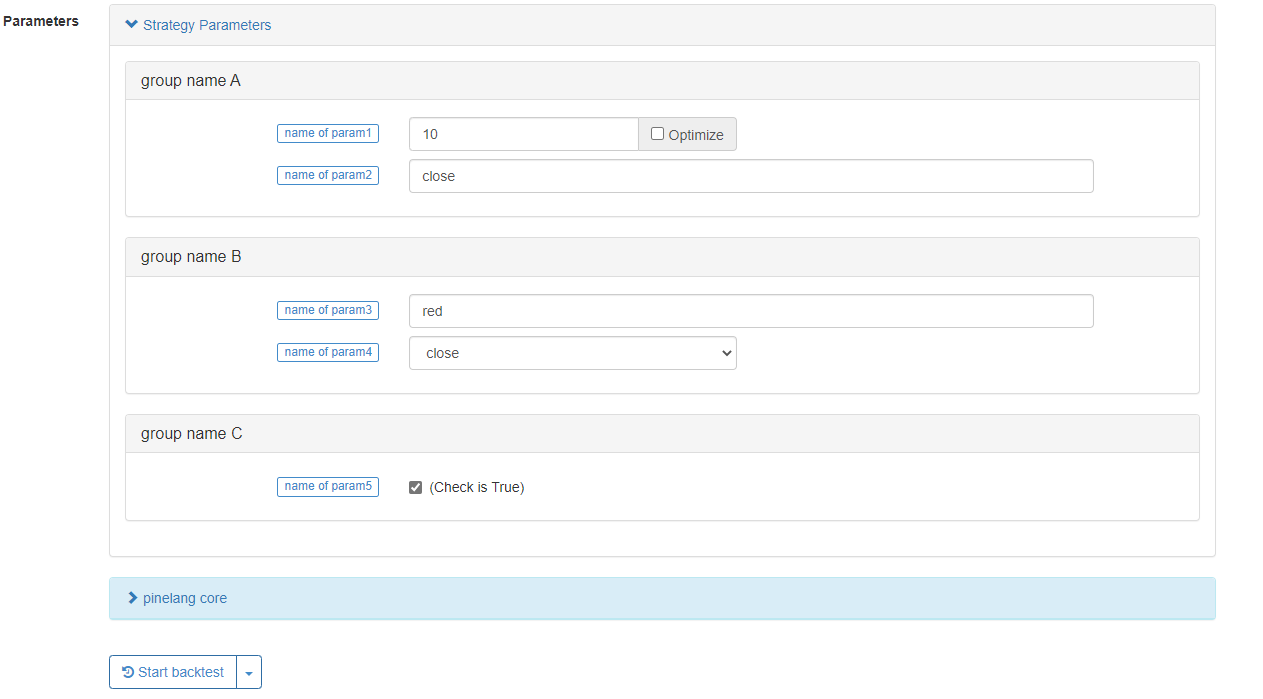
우리는 입력 함수의 몇 가지 주요 매개 변수를 소개합니다:
- defval: 입력 함수에 의해 설정된 전략 매개 변수 옵션의 기본 값, 파이인 언어 내장 변수, 수치 값 및 문자열을 지원합니다.
- 제목: 라이브 거래/백테스팅 중에 전략 인터페이스에 표시되는 전략의 매개 변수 이름.
- 도구 팁: 전략 매개 변수에 대한 도구 팁 정보는, 마우스가 전략 매개 변수 위에 이동하면 매개 변수 설정의 텍스트 정보가 표시됩니다.
- 그룹: 전략 매개 변수 그룹의 이름, 전략 매개 변수에 사용할 수 있습니다.
개별 변수 선언과 할당 외에도, 파이어 언어로 변수 그룹을 선언하고 할당하는 방법이 있습니다.
[Variable A, Variable B, Variable C] = function or structure, such as ```if```, ```for```, ```while``` or ```switch```
가장 흔한 것은ta.macdMACD 지표를 계산하는 함수, MACD 지표가 다선 지표이기 때문에 세 개의 데이터 세트가 계산됩니다. 그래서 이렇게 쓸 수 있습니다:
[dif,dea,column] = ta.macd(close, 12, 26, 9)

plot(dif, title="dif")
plot(dea, title="dea")
plot(column, title="column", style=plot.style_histogram)
우리는 위의 코드를 사용하여 MACD 차트를 쉽게 그려낼 수 있습니다. 내장 함수뿐만 아니라 작성된 사용자 정의 함수도 여러 데이터로 반환 할 수 있습니다.
twoEMA(data, fastPeriod, slowPeriod) =>
    fast = ta.ema(data, fastPeriod)
    slow = ta.ema(data, slowPeriod)
    [fast, slow]

[ema10, ema20] = twoEMA(close, 10, 20)
plot(ema10, title="ema10", overlay=true)
plot(ema20, title="ema20", overlay=true)
if와 다른 구조를 여러 변수 할당으로 사용하는 글쓰기 방법도 위의 사용자 정의 함수와 유사하며, 관심있는 경우 시도 할 수 있습니다.
[ema10, ema20] = if true
    fast = ta.ema(close, 10)
    slow = ta.ema(close, 20)
    [fast, slow]

plot(ema10, title="ema10", color=color.fuchsia, overlay=true)
plot(ema20, title="ema20", color=color.aqua, overlay=true)
조건 구조
일부 함수는 조건부 지부의 로컬 코드 블록에 쓸 수 없습니다. 주로 다음 함수를 포함합니다.
바콜러 (barcolor) (), 풀 (fill) (), 라인 (hline) (), 표시 (indicator) (), 플롯 (plot)) (), 플롯 캔들 (plotcandle)) (), 플롯 차르 (plotchar)) (), 플롯 모양 (plotshape)) (
트레이딩 뷰는 오류를 컴파일할 것이고, FMZ는 제한적이지 않지만, 트레이딩 뷰의 사양을 따르는 것이 좋습니다. 예를 들어, FMZ에서 오류를 보고하지는 않지만 권장되지 않습니다.
strategy("test", overlay=true)
if close > open
    plot(close, title="close")
else
    plot(open, title="open")
if 문장
설명 예제:
var lineColor = na

n = if bar_index > 10 and bar_index <= 20
    lineColor := color.green
else if bar_index > 20 and bar_index <= 30
    lineColor := color.blue
else if bar_index > 30 and bar_index <= 40
    lineColor := color.orange
else if bar_index > 40
    lineColor := color.black
else
    lineColor := color.red

plot(close, title="close", color=n, linewidth=5, overlay=true)
plotchar(true, title="bar_index", char=str.tostring(bar_index), location=location.abovebar, color=color.red, overlay=true)
핵심 포인트: 부울 값을 반환하는 판단에 사용되는 표현식. 인덴테이션에 유의하십시오. 한 가지 더 갈래가있을 수 있습니다. 모든 갈래 표현식이 사실이 아니며 다른 갈래가 없으면 na를 반환하십시오.
x = if close > open
    close
plot(x, title="x")
변경 문장
스위치 명령어는 특정 조건에 따라 실행되는 다른 경로를 설계하는 데 사용되는 브랜치 구조 명령어이기도 합니다. 일반적으로 스위치 명령어는 다음과 같은 핵심 지식 포인트를 가지고 있습니다.
- if 명령어처럼 스위치 명령어도 값을 반환할 수 있습니다.
- 다른 언어의 스위치 명령어와 달리, 스위치 구성 요소가 실행될 때, 코드의 로컬 블록만 실행되므로, 브레이크 명령어는 불필요하다 (즉, 브레이크와 같은 키워드를 쓸 필요가 없다).
- 스위치의 각 브랜치는 로컬 코드 블록을 쓸 수 있으며, 이 로컬 코드 블록의 마지막 줄은 반환 값 (값의 튜플이 될 수 있습니다). 브랜치 된 로컬 코드 블록 중 어느 것도 실행되지 않은 경우 na를 반환합니다.
- 스위치 구조의 표현은 위치를 결정합니다. 문자열, 변수, 표현 또는 함수 호출을 쓸 수 있습니다.
- 이 스위치는 구조에서 실행할 다른 케이스가 없을 때 사용할 기본 값으로 작용하는 반환 값을 지정할 수 있습니다.
스위치에는 두 가지 형태가 있습니다. 사용법을 이해하기 위해 예를 하나씩 살펴보겠습니다.
- A
switch표현식 - 예제 설명:
// input.string: defval, title, options, tooltip
func = input.string("EMA", title="indicator name", tooltip="select the name of the indicator function to be used", options=["EMA", "SMA", "RMA", "WMA"])

// input.int: defval, title, options, tooltip
// param1 = input.int(10, title="period parameter")
fastPeriod = input.int(10, title="fastPeriod parameter", options=[5, 10, 20])
slowPeriod = input.int(20, title="slowPeriod parameter", options=[20, 25, 30])

data = input(close, title="data", tooltip="select the closing price, opening price, highest price...")
fastColor = color.red
slowColor = color.red

[fast, slow] = switch func
    "EMA" =>
        fastLine = ta.ema(data, fastPeriod)
        slowLine = ta.ema(data, slowPeriod)
        fastColor := color.red
        slowColor := color.red
        [fastLine, slowLine]
    "SMA" =>
        fastLine = ta.sma(data, fastPeriod)
        slowLine = ta.sma(data, slowPeriod)
        fastColor := color.green
        slowColor := color.green
        [fastLine, slowLine]
    "RMA" =>
        fastLine = ta.rma(data, fastPeriod)
        slowLine = ta.rma(data, slowPeriod)
        fastColor := color.blue
        slowColor := color.blue
        [fastLine, slowLine]
    =>
        runtime.error("error")

plot(fast, title="fast" + fastPeriod, color=fastColor, overlay=true)
plot(slow, title="slow" + slowPeriod, color=slowColor, overlay=true)
우리는 이전에 입력 함수를 배웠고, 여기서 우리는 입력과 비슷한 두 가지 함수를 계속 배우게 됩니다.input.string, input.int functions.
input.string문자열을 반환하는 데 사용됩니다.input.int함수는 정수 값을 반환하는 데 사용됩니다. 예제에서,options매개 변수options매개 변수는 선택값의 배열을 전달할 수 있습니다.options=["EMA", "SMA", "RMA", "WMA"]그리고options=[5, 10, 20]예를 들어 (하나가 문자열 유형이고 다른 하나는 수치 유형입니다.) 이 방법으로 전략 인터페이스의 컨트롤은 특정 값을 입력 할 필요가 없지만 컨트롤은 옵션 매개 변수에서 제공되는 이러한 옵션을 선택하기 위해 드롭다운 박스가됩니다.
변수 func의 값은 문자열이며, 변수 func은 스위치의 어떤 브랜치가 실행되는지를 결정하기 위해 스위치 (변수, 함수 호출 또는 표현) 의 표현으로 사용됩니다. 변수 func이 스위치의 어떤 브랜치의 표현과 일치 (즉, 동등) 할 수 없다면 기본 브랜치 코드 블록이 실행되며,runtime.error("error")이 함수가 실행되면 전략이 예외를 던지고 멈추게 됩니다.
위의 테스트 코드에서, 스위치의 기본 브랜치 코드 블록에서 runtime.error의 마지막 줄 후에, 반환 값과 호환되도록 [na, na]와 같은 코드를 추가하지 않았습니다. 이 문제는 트레이딩 뷰에서 고려해야합니다. 유형이 불일치하면 오류가 보고됩니다. 그러나 FMZ에서 유형이 엄격히 필요하지 않기 때문에이 호환성 코드는 생략 될 수 있습니다. 따라서 FMZ에서 if 및 스위치 브랜치의 반환 값의 타입 호환성을 고려할 필요가 없습니다.
strategy("test", overlay=true)
x = if close > open
    close
else
    "open"
plotchar(true, title="x", char=str.tostring(x), location=location.abovebar, color=color.red)
FMZ에서는 오류가 보고되지 않습니다. 하지만 트레이딩 뷰에서는 오류가 보고됩니다. if 브랜치가 반환하는 타입이 불일치하기 때문입니다.
switch표현 없이
다음으로, 다른 방법을 살펴보겠습니다.switch즉, 표정 없이.
up = close > open     // up = close < open
down = close < open
var upOfCount = 0
var downOfCount = 0

msgColor = switch
    up  =>
        upOfCount += 1
        color.green
    down =>
        downOfCount += 1
        color.red

plotchar(up, title="up", char=str.tostring(upOfCount), location=location.abovebar, color=msgColor, overlay=true)
plotchar(down, title="down", char=str.tostring(downOfCount), location=location.belowbar, color=msgColor, overlay=true)
테스트 코드 예제에서 볼 수 있듯이, 스위치는 브랜치 조건에 맞는 로컬 코드 블록의 실행과 일치합니다. 일반적으로 스위치 명령어를 따르는 브랜치 조건은 상호 배타적이어야합니다. 즉, 예제에서 위와 아래는 동시에 사실이 될 수 없습니다. 스위치는 하나의 브랜치의 로컬 코드 블록만을 실행할 수 있기 때문에, 관심이 있다면, 코드에 이 줄을 대체할 수 있습니다:up = close > open // up = close < open코멘트 내의 내용, 그리고 결과를 관찰하기 위해 백테스트. 스위치 브랜치가 첫 번째 브랜치를만 실행할 수 있다는 것을 알게 될 것입니다. 또한 가능한 한 스위치 브랜치에 함수 호출을 작성하지 않도록 주의해야 합니다. 함수는 각 BAR에 호출 될 수 없습니다.switch표현으로, 실행 부문은 결정적이고 전략 운영 중에 변경되지 않습니다.)
루프 구조
진술용
return value = for count = start count to final count by step length
    statement                                            // Note: There can be break and continue in the statement
    statement                                            // Note: The last statement is the return value
for 명령어는 사용이 매우 간단하며, for 루프는 최종적으로 값을 (또는 [a, b, c]의 형태로 여러 값을) 반환할 수 있습니다. 위 위 위 코드의
이breakfor 루프에서 사용된 키워드: 루프는break명령어 실행됩니다.
이continuefor 루프에서 사용되는 키워드:continue이 명령어가 실행되면 루프는 코드를 무시합니다.continue그리고 루프의 다음 라운드를 직접 실행합니다. for 명령어는 루프의 마지막 실행에서 반환 값을 반환합니다. 그리고 코드가 실행되지 않으면 null을 반환합니다.
간단한 예로 보여드리겠습니다.
ret = for i = 0 to 10       // We can increase the keyword by to modify the step length, FMZ does not support reverse loops such as i = 10 to 0 for now
    // We can add condition settings, use continue to skip, use break to jump out
    runtime.log("i:", i)
    i                       // If this line is not written, it will return null because there is no variable to return

runtime.log("ret:", ret)
runtime.error("stop")
...에 대한 진술
이for ... in두 가지 형태를 가지고 있습니다. 우리는 다음 표절 코드에서 설명할 것입니다.
return value = for array element in array
    statement                        // Note: There can be break and continue in the statement
    statement                        // Note: The last statement is the return value
Return value = for [index variable, array element corresponding to index variable] in array
    statement                        // Note: There can be break and continue in the statement
    statement                        // Note: The last statement is the return value
우리는 두 형태의 주요 차이점은 for 키워드를 따르는 내용이라고 볼 수 있습니다. 하나는 배열의 요소를 참조하는 변수로 변수를 사용하는 것이고 다른 하나는 지표 변수, 배열 요소 변수 튜플을 참조로 포함하는 구조를 사용하는 것입니다. 다른 반환 값 규칙에 대해 break, continue 등을 사용하는 것은 for 루프와 일치합니다. 우리는 또한 간단한 예로 사용법을 설명합니다.
testArray = array.from(10, 20, 30, 40, 50, 60, 70, 80, 90, 100)
for ele in testArray            // Modify it to the form of [i, ele]: for [i, ele] in testArray, runtime.log("ele:", ele, ", i:", i)
    runtime.log("ele:", ele)

runtime.error("stop")
인덱스를 사용해야 할 때 문법을 사용for [i, ele] in testArray.
용 구슬의 적용
우리는 파이프 언어에서 제공되는 내장 함수를 사용하여 루프 논리 계산을 완료 할 수 있습니다. 루프 구조를 직접 사용하여 작성되거나 내장 함수를 사용하여 처리됩니다. 두 가지 예를 들어보자:
- 평균값을 계산합니다.
루프 구조로 설계할 때:
length = 5
var a = array.new(length)
array.push(a, close)

if array.size(a) >= length
	array.remove(a, 0)

sum = 0
for ele in a
    sum += ele

avg = sum / length
plot(avg, title="avg", overlay=true)
이 예제에서는 for 루프를 사용하여 합을 계산하고 평균 값을 계산합니다.
내장 함수를 사용하여 이동 평균을 직접 계산합니다.
plot(ta.sma(close, length), title="ta.sma", overlay=true)
내장 함수를 사용ta.sma이동 평균 지표를 직접 계산하기 위해. 분명히 이동 평균을 계산하기 위해 내장 함수를 사용하는 것이 더 간단합니다. 차트에 비교하면 계산 결과가 정확히 같다는 것을 알 수 있습니다.
- 요약
우리는 여전히 위의 예를 예로 사용합니다.
루프 구조로 설계할 때:
length = 5
var a = array.new(length)
array.push(a, close)

if array.size(a) >= length
	array.remove(a, 0)

sum = 0
for ele in a
    sum += ele

avg = sum / length
plot(avg, title="avg", overlay=true)
plot(ta.sma(close, length), title="ta.sma", overlay=true)
배열의 모든 요소의 합을 계산하기 위해, 우리는 그것을 처리하는 루프를 사용할 수 있습니다, 또는 내장 함수를 사용할 수 있습니다array.sum계산할 수 있습니다.
이 함수를 직접 내장 함수를 사용하여 계산합니다.
length = 5
var a = array.new(length)
array.push(a, close)

if array.size(a) >= length
	array.remove(a, 0)

plot(array.sum(a) / length, title="avg", overlay=true)
plot(ta.sma(close, length), title="ta.sma", overlay=true)
계산된 데이터가 그래프에서 표시된 것과 정확히 같다는 것을 볼 수 있습니다.
왜 루프를 디자인할까요? 우리는 이러한 모든 기능을 내장해서 할 수 있습니다. 루프의 사용은 주로 다음 3가지 점을 적용하는데 기반합니다.
- 일부 연산과 배열 계산을 위해
- 예를 들어, 과거 최고 지점이 현재 BAR의 최고 지점보다 얼마나 높는지 알아보기 위해 역사를 검토합니다. 현재 BAR의 최고 지점은 스크립트가 실행되는 BAR에서만 알려져 있기 때문에 과거 BAR를 시간적으로 반환하고 분석하기 위해 루프가 필요합니다.
- 파인 언어의 내장 함수는 과거 BAR에 대한 계산을 완료할 수 없습니다.
while statemnet
이while이 명령어는 while 구조의 판단 조건이 false가 될 때까지 루프 섹션에서 코드를 실행하도록 합니다.
return value = while judgment condition
    statement                    // Note: There can be break and continue in the statement
    statement                    // Note: The last statement is the return value
while의 다른 규칙은 for 루프와 유사하다. 루프 본체의 로컬 코드 블록의 마지막 줄은 복귀 값이며, 여러 값을 반환할 수 있다.
우리는 여전히 이동 평균을 계산하는 예제를 사용해서 증명할 것입니다.
length = 10

sma(data, length) =>
    i = 0
    sum = 0
    while i < 10
        sum += data[i]
        i += 1
        sum / length

plot(sma(close, length), title="sma", overlay=true)
plot(ta.sma(close, length), title="ta.sma", overlay=true)
while 루프도 매우 간단하게 사용할 수 있고, 인수분해와 같은 내장 함수들에 의해 대체될 수 없는 계산 논리를 설계할 수 있습니다.
counter = 5
fact = 1

ret = while counter > 0
    fact := fact * counter
    counter := counter - 1
    fact

plot(ret, title="ret")  // ret = 5 * 4 * 3 * 2 * 1
배열
파인 언어의 배열의 정의는 다른 프로그래밍 언어와 유사하다. 파인 배열은 단차원 배열이다. 일반적으로 연속적인 일련의 데이터를 저장하는 데 사용됩니다. 배열에 저장된 단일 데이터는 배열의 요소라고 불리며 이러한 요소의 유형은: 정수, 부동 소수점, 문자열, 색 값, 부울 값이 될 수 있습니다. FMZ의 파인 언어는 유형에 대해 매우 엄격하지 않으며 동시에 배열에 문자열과 숫자를 저장할 수 있습니다. 배열의 기본 구조가 또한 일련 구조이기 때문에, 역사 연산자가 사용되면 이전 BAR에 배열 상태를 참조합니다. 따라서 역사 연산자를 사용하는 대신[]배열의 요소를 참조하려면 함수를 사용해야 합니다array.get()그리고array.set()배열의 요소들의 지수 순서는 배열의 첫 번째 요소의 지수가 0이고 다음 요소의 지수가 1로 증가한다는 것입니다.
간단한 코드로 설명합니다.
var a = array.from(0)
if bar_index == 0
    runtime.log("current value a on BAR:", a, ", a on the last BAR, i.e. the value of a[1]:", a[1])
else if bar_index == 1
    array.push(a, bar_index)
    runtime.log("current value a on BAR:", a, ", a on the last BAR, i.e. the value of a[1]:", a[1])
else if bar_index == 2
    array.push(a, bar_index)
    runtime.log("current value a on BAR:", a, ", a on the last BAR, i.e. the value of a[1]:", a[1], ", a on the last second BAR, i.e. the value of a[2]:", a[2])
else if bar_index == 3
    array.push(a, bar_index)
    runtime.log("current value a on BAR:", a, ", a on the last BAR, i.e. the value of a[1]:", a[1], ", a on the last second BAR, i.e. the value of a[2]:", a[2], ", a on the last third BAR, i.e. the value of a[3]:", a[3])
else if bar_index == 4
    // Obtain elements by index using array.get, modify elements by index using array.set
    runtime.log("Before array modification:", array.get(a, 0), array.get(a, 1), array.get(a, 2), array.get(a, 3))
    array.set(a, 1, 999)
    runtime.log("After array modification:", array.get(a, 0), array.get(a, 1), array.get(a, 2), array.get(a, 3))
배열을 선언
사용array<int> a, float[] b배열을 선언하거나 배열을 할당할 수 있는 변수를 선언하는 것, 예를 들어:
array<int> a = array.new(3, bar_index)
float[] b = array.new(3, close)
c = array.from("hello", "fmz", "!")
runtime.log("a:", a)
runtime.log("b:", b)
runtime.log("c:", c)
runtime.error("stop")
배열 변수는array.new그리고array.from함수도 있습니다.array.new소나무 언어:array.new_int(), array.new_bool(), array.new_color(), array.new_string(), 등등
var 키워드는 배열 선언 모드와도 작동한다. var 키워드로 선언된 배열은 첫 번째 BAR에서만 초기화된다. 예를 들어보자:
var a = array.from(0)
b = array.from(0)

if bar_index == 1
    array.push(a, bar_index)
    array.push(b, bar_index)
else if bar_index == 2
    array.push(a, bar_index)
    array.push(b, bar_index)
else if barstate.islast
    runtime.log("a:", a)
    runtime.log("b:", b)
    runtime.error("stop")
배열 a의 변경 사항은 지속적으로 결정되어 다시 설정되지 않았음을 볼 수 있습니다. 배열 b는 각 BAR에서 초기화됩니다. 마지막으로,barstate.islast사실, 여전히 0의 값으로 인쇄된 하나의 요소만 있습니다.
배열에 있는 요소를 읽고 쓰기
array.get를 사용하여 배열의 지정된 인덱스 위치에 있는 요소를 얻으며 array.set를 사용하여 배열의 지정된 인덱스 위치에 있는 요소를 수정합니다.
array.get의 첫 번째 매개 변수는 처리해야 하는 매개 변수이고 두 번째 매개 변수는 지정된 인덱스입니다. array.set의 첫 번째 매개 변수는 처리해야 하는 매개 변수이고, 두 번째 매개 변수는 지정된 인덱스이고, 세 번째 매개 변수는 작성해야 하는 요소입니다.
다음 간단한 예제를 이용해서 설명하겠습니다.
lookbackInput = input.int(100)
FILL_COLOR = color.green

var fillColors = array.new(5)
if barstate.isfirst
    array.set(fillColors, 0, color.new(FILL_COLOR, 70))
    array.set(fillColors, 1, color.new(FILL_COLOR, 75))
    array.set(fillColors, 2, color.new(FILL_COLOR, 80))
    array.set(fillColors, 3, color.new(FILL_COLOR, 85))
    array.set(fillColors, 4, color.new(FILL_COLOR, 90))

lastHiBar = - ta.highestbars(high, lookbackInput)
fillNo = math.min(lastHiBar / (lookbackInput / 5), 4)

bgcolor(array.get(fillColors, int(fillNo)), overlay=true)
plot(lastHiBar, title="lastHiBar")
plot(fillNo, title="fillNo")
이 예제는 기본 색상 녹색을 초기화하고, 색상을 저장하기 위해 배열을 선언하고 초기화하고, 그 다음 색상에 다른 투명성 값을 할당합니다.color.new색상 레벨은 현재 BAR의 거리를 100 뷰백 기간 중 최고값에서 계산하여 계산됩니다. 지난 100 뷰백 주기의 HIGH의 최대값에 거리가 가까워질수록 순위가 높고 해당 색상 값이 더 어두운 (하하 투명성). 많은 유사한 전략은 N 뷰백 기간 내에서 현재 가격 수준을 표현하기 위해이 방법을 사용합니다.
배열 요소를 통해 반복
배열을 통해 반복하는 방법은 우리가 전에 배운 for/for in/while 문장을 사용할 수 있습니다.
a = array.from(1, 2, 3, 4, 5, 6)

for i = 0 to (array.size(a) == 0 ? na : array.size(a) - 1)
    array.set(a, i, i)

runtime.log(a)
runtime.error("stop")
a = array.from(1, 2, 3, 4, 5, 6)

i = 0
while i < array.size(a)
    array.set(a, i, i)
    i += 1

runtime.log(a)
runtime.error("stop")
a = array.from(1, 2, 3, 4, 5, 6)

for [i, ele] in a
    array.set(a, i, i)

runtime.log(a)
runtime.error("stop")
이 세 가지 횡단 방법은 같은 실행 결과를 가지고 있습니다.
배열은 스크립트의 글로벌 범위 또는 함수의 로컬 범위 또는 if 브랜치에서 선언될 수 있습니다.
역사 자료 참조
배열에 있는 요소의 사용에 대해서는 다음의 방법이 동등합니다. 다음 예로 우리는 차트에 두 개의 직선 집합이 그려져 있고, 각 집합에 두 개의 직선이 있고, 각 집합의 두 개의 직선이 정확히 같은 값을 가지고 있음을 볼 수 있습니다.
a = array.new_float(1)
array.set(a, 0, close)
closeA1 = array.get(a, 0)[1]
closeB1 = close[1]
plot(closeA1, "closeA1", color.red, 6)
plot(closeB1, "closeB1", color.black, 2)

ma1 = ta.sma(array.get(a, 0), 20)
ma2 = ta.sma(close, 20)
plot(ma1, "ma1", color.aqua, 6)
plot(ma2, "ma2", color.black, 2)
배열을 추가하고 삭제하는 기능
- 배열의 덧셈 작업과 관련된 기능:
array.unshift(), array.insert(), array.push().
- 배열 삭제 작업과 관련된 기능:
array.remove(), array.shift(), array.pop(), array.clear().
우리는 다음 예제를 사용하여 이러한 배열 덧셈과 삭제 동작 함수를 테스트합니다.
a = array.from("A", "B", "C")
ret = array.unshift(a, "X")
runtime.log("array a:", a, ", ret:", ret)

ret := array.insert(a, 1, "Y")
runtime.log("array a:", a, ", ret:", ret)

ret := array.push(a, "D")
runtime.log("array a:", a, ", ret:", ret)

ret := array.remove(a, 2)
runtime.log("array a:", a, ", ret:", ret)

ret := array.shift(a)
runtime.log("array a:", a, ", ret:", ret)

ret := array.pop(a)
runtime.log("array a:", a, ", ret:", ret)

ret := array.clear(a)
runtime.log("array a:", a, ", ret:", ret)

runtime.error("stop")
추가, 삭제: 배열을 대기열로 적용
우리는 배열과 배열을 추가하고 삭제하는 몇 가지 기능을 사용하여
큐는 프로그래밍 분야에서 자주 사용되는 구조이며, 큐의 특징은 다음과 같습니다.
대기열에 먼저 들어가는 요소는 대기열을 먼저 떠납니다.
이렇게 하면 대기열의 데이터가 최신 데이터이고 대기열의 길이가 무한히 확장되지 않는다는 것을 보장합니다.
다음 예제에서, 우리는 각 틱의 가격을 기록하기 위해 큐 구조를 사용하고, 틱 수준에서 이동 평균 가격을 계산하고, 1분 K-라인 수준에서 이동 평균과 비교합니다.
strategy("test", overlay=true)

varip a = array.new_float(0)
var length = 10

if not barstate.ishistory
    array.push(a, close)

    if array.size(a) > length
        array.shift(a)

sum = 0.0
for [index, ele] in a
    sum += ele

avgPrice = array.size(a) == length ? sum / length : na

plot(avgPrice, title="avgPrice")
plot(ta.sma(close, length), title="ta.sma")
배열 a를 선언할 때, 선언 모드를 지정하고 키워드를 사용하는 것을 참고하세요variant이 방법으로, 모든 가격 변화는 배열 a에 기록됩니다.
일반적으로 사용되는 배열 계산 및 동작 함수
상관 함수를 계산합니다:
array.avg()배열의 모든 요소의 평균 값을 계산합니다.array.min()배열의 가장 작은 요소를 계산합니다.array.max()배열의 가장 작은 요소를 계산합니다.array.stdev()배열의 모든 요소의 표준편차를 계산합니다.array.sum()배열의 모든 요소의 표준편차를 계산합니다.
운영과 관련된 기능:array.concat()두 개의 배열을 통합하거나 연결하기 위해서입니다.array.copy()배열을 복사합니다.array.jointo는 배열의 모든 요소를 문자열로 연결합니다.array.sort()상승하거나 하락하는 순서로 분류합니다.array.reverse()배열을 뒤집어 놓습니다.array.slice()배열을 잘라내기 위해서요.array.includes()그 요소를 판단하기 위해서요.array.indexof()매개 변수로 전달된 값의 첫 번째 발생의 지수에 반환합니다. 값이 발견되지 않으면 -1이 반환됩니다.array.lastindexof()값의 마지막 행렬을 찾기 위해
배열 계산과 관련된 함수의 테스트 예제:
a = array.from(3, 2, 1, 4, 5, 6, 7, 8, 9)

runtime.log("Arithmetic average of the array a:", array.avg(a))
runtime.log("The minimum element in the array a:", array.min(a))
runtime.log("The maximum element in the array a:", array.max(a))
runtime.log("Standard deviation in array a:", array.stdev(a))
runtime.log("Sum of all elements of the array a:", array.sum(a))
runtime.error("stop")
이것은 일반적으로 사용되는 배열 계산 함수입니다.
운영과 관련된 기능의 예:
a = array.from(1, 2, 3, 4, 5, 6)
b = array.from(11, 2, 13, 4, 15, 6)

runtime.log("array a: ", a, ", array b: ", b)
runtime.log("array a, array b is concatenated with:", array.concat(a, b))
c = array.copy(b)

runtime.log("Copy an array b and assign it to the variable c, variable c:", c)

runtime.log("use array.join to process the array c, add the symbol + to the middle of each element, concatenating all elements results in a string:", array.join(c, "+"))
runtime.log("Sort the array b, in order from smallest to largest, using the parameter order.ascending:", array.sort(b, order.ascending))     // array.sort function modifies the original array
runtime.log("Sort the array b, in order from largest to smallest, using the parameter order.descending:", array.sort(b, order.descending))   // array.sort function modifies the original array

runtime.log("array a:", a, ", array b:", b)
array.reverse(a)   // This function modifies the original array
runtime.log("reverse the order of all elements in the array a, after reversing, the array a is:", a)

runtime.log("Intercept array a, index 0~index 3, and follow the rule of left-closed and right-open interval:", array.slice(a, 0, 3))
runtime.log("Search for element 11 in array b:", array.includes(b, 11))
runtime.log("Search for element 100 in array a:", array.includes(a, 100))
runtime.log("Connect array a and array b, and search the index position of the first occurrence of element 2:", array.indexof(array.concat(a, b), 2), " , observe array.concat(a, b):", array.concat(a, b))
runtime.log("Connect array a and array b, and search the index position of the last occurrence of element 6:", array.lastindexof(array.concat(a, b), 6), " , observe array.concat(a, b):", array.concat(a, b))

runtime.error("stop")
기능
사용자 정의 함수
파이어 언어는 사용자 지정 함수와 함께 설계될 수 있다. 일반적으로 파이어 언어에서 사용자 지정 함수들에 적용되는 규칙은 다음과 같다.
- 모든 함수는 스크립트의 글로벌 범위에서 정의됩니다. 함수는 다른 함수 내에서 선언할 수 없습니다.
- 함수들은 자신의 코드에서 스스로를 호출할 수 없습니다.
- 원칙적으로, 모든 PINE 언어의 내장 그림 기능 (
barcolor(), fill(), hline(), plot(), plotbar(), plotcandle()) 는 사용자 정의 함수에서 호출할 수 없습니다. - 함수는 단일 줄 또는 여러 줄로 작성될 수 있다. 마지막 명령어의 반환 값은 현재 함수의 반환 값이며, 튜플 형태로 반환될 수 있다.
우리는 또한 우리의 이전 튜토리얼에서 사용자 정의 함수를 여러 번 사용했습니다. 하나의 라인으로 설계된 것 처럼:
barIsUp() => close > open
함수가 반환될 때 현재 BAR가 양직선인지 여부
여러 줄로 설계된 사용자 정의 함수:
sma(data, length) =>
    i = 0
    sum = 0
    while i < 10
        sum += data[i]
        i += 1
        sum / length

plot(sma(close, length), title="sma", overlay=true)
plot(ta.sma(close, length), title="ta.sma", overlay=true)
우리는 SMA 평균 계산의 함수를 실현하기 위해 사용자 정의 함수를 사용합니다.
또한, 우리가 반환할 수 있는 사용자 정의 함수의 두 가지 예시:
twoEMA(data, fastPeriod, slowPeriod) =>
    fast = ta.ema(data, fastPeriod)
    slow = ta.ema(data, slowPeriod)
    [fast, slow]

[ema10, ema20] = twoEMA(close, 10, 20)
plot(ema10, title="ema10", overlay=true)
plot(ema20, title="ema20", overlay=true)
하나의 함수는 빠른 라인, 느린 라인, 두 개의 EMA 평균을 계산할 수 있습니다.
내장 기능
내장 함수들은FMZ PINE 스크립트 문서.
파이어 언어의 내장 함수의 분류:
- 문자열 처리 함수
str.series. - 색값 처리 함수
color.series. - 파라미터 입력 함수
input.series. - 지표 계산 함수
ta.series. - 도면 기능
plot.series. - 배열 처리 기능
array.series. - 거래 관련 기능
strategy.series. - 수학 연산과 관련된 함수
math.series. - 다른 기능 (시간 처리, 그래프가 아닌 일련 그리기 기능,
request.시리즈 기능, 타입 처리 기능 등)
거래 기능
이strategy.함수들의 일련은 우리가 종종 전략의 설계에서 사용하는 함수이고, 이 함수들은 전략이 구체적으로 실행될 때 거래 운영의 실행과 밀접한 관련이 있습니다.
strategy.entry
strategy.entry함수는 더 중요한 함수입니다. 주문을 하기 위한 전략을 작성할 때, 함수의 몇 가지 중요한 매개 변수는 다음과 같습니다.id, direction, qty, when, 등등
매개 변수
id: 이것은 참조를 위해 거래 지위에 이름을 부여하는 것으로 이해될 수 있습니다. 이 id는 취소, 변경 명령 및 폐쇄 지위를 참조 할 수 있습니다.direction: 주문 방향이 길다면 (구입) 내장 변수를 입력합니다.strategy.long, 그리고 당신이 짧은 (판매) 가 가고 싶다면, 변수를 입력strategy.short.qty: 주문 금액을 지정합니다. 이 매개 변수가 통과되지 않으면 기본 주문 금액이 사용됩니다.when: 실행 조건, 당신은 이 매개 변수를 지정할 수 있습니다.limit: 주문 한계 가격을 지정합니다.stop: 스톱 로스 가격.
이 협정의 구체적인 실행 세부 사항strategy.entry함수는 매개 변수 설정에 의해 제어됩니다strategy이 함수는 [
우리가 집중하는 것은pyramiding, default_qty_value매개 변수strategy우리는 테스트를 위해 다음 코드를 사용합니다.
/*backtest
start: 2022-07-03 00:00:00
end: 2022-07-09 00:00:00
period: 1d
basePeriod: 1h
exchanges: [{"eid":"Binance","currency":"BTC_USDT"}]
*/

strategy(title = "open long example", pyramiding = 3, default_qty_value=0.1, overlay=true)

ema10 = ta.ema(close, 10)

findOrderIdx(idx) =>
    if strategy.opentrades == 0
        false
    else
        ret = false
        for i = 0 to strategy.opentrades - 1
            if strategy.opentrades.entry_id(i) == idx
                ret := true
                break
        ret


if not findOrderIdx("long1")
    strategy.entry("long1", strategy.long)

if not findOrderIdx("long2")
    strategy.entry("long2", strategy.long, 0.2, when = close > ema10)

if not findOrderIdx("long3")
    strategy.entry("long3", strategy.long, 0.2, limit = low[1])
    strategy.entry("long3", strategy.long, 0.3, limit = low[1])

if not findOrderIdx("long4")
    strategy.entry("long4", strategy.long, 0.2)

plot(ema10, title="ema10", color=color.red)
코드 시작 부분/* backtest... */배트테스트 설정입니다. 배트테스트 설정 시간 및 그 시간에 디버깅을 위한 다른 정보를 기록하는 데 사용되는데, 시작 코드가 아닙니다.
코드에서:strategy(title = "open long example", pyramiding = 3, default_qty_value=0.1, overlay=true), 우리가 특정 할 때pyramiding매개 변수를 3로 설정하면 같은 방향으로 거래하는 최대 수를 3로 설정합니다strategy.entry예제에서 명령 작업은 실행되지 않습니다. 우리는 또한 지정하기 때문에default_qty_value파라미터 0.1,이strategy.entryID를 가진 작업long1기본 주문 크기는 0.1입니다.strategy.entry함수를 호출 할 때direction그 외strategy.long, 그래서 백테스트 테스트 주문은 모두 구매 주문입니다.
참고로, 주문 작업은strategy.entry("long3", ...같은 ID를 위해 두 번 호출되는 코드:long3, 첫 번째strategy.entry주문 작업은 채우지 않았으며, 두 번째 호출strategy.entry이 ID의 순서를 수정하는 것이 기능이었습니다 (백테스트 테스트에서 표시된 데이터는 또한이 제한 순서에 대한 순서 양이 0.3로 수정되었음을 보여줍니다).strategy.entryID
strategy.close
이strategy.close함수는 지정된 식별 ID로 입구 위치를 닫기 위해 사용됩니다. 주요 매개 변수는 다음과 같습니다.id, when, qty, qty_percent.
매개 변수
id: 닫아야 할 엔트리 ID는 엔트리 오더 함수를 사용하여 포지션을 열 때 지정하는 ID입니다.strategy.entry.when: 집행 조건qty: 닫힌 포지션 수qty_percent: 닫힌 지점의 비율
이 함수의 사용에 대한 자세한 내용을 예를 통해 알아보자:
의/*backtest ... */코드에 있는 구성 정보는FMZ.COM국제 웹 사이트 백테스트, 당신은 그것을 삭제하고 시장, 품종, 시간 범위 및 다른 정보를 설정 할 수 있습니다 테스트해야합니다.
/*backtest
start: 2022-07-03 00:00:00
end: 2022-07-09 00:00:00
period: 1d
basePeriod: 1h
exchanges: [{"eid":"Binance","currency":"BTC_USDT"}]
*/

strategy("close Demo", pyramiding=3)

var enableStop = false
if enableStop
    runtime.error("stop")

strategy.entry("long1", strategy.long, 0.2)
if strategy.opentrades >= 3
    strategy.close("long1")                   // Multiple entry orders, no qty parameters specified, close all
    // strategy.close()                          // Without specifying the id parameter, the current position will be closed
    // strategy.close("long2")                   // If a non-existent id is specified then nothing is done
    // strategy.close("long1", qty=0.15)         // Specify qty parameters to close a position
    // strategy.close("long1", qty_percent=50)   // qty_percent is set to 50 to close 50% of the positions marked by long1
    // strategy.close("long1", qty_percent=80, when=close<open)  // Specify the parameter when, change it to close>open and it won't trigger
    enableStop := true
테스트 전략은 입력 ID strategy.close포지션을 닫을 때 백테스트의 다른 결과를 설정하는 함수입니다.strategy.close이 함수는 포지션을 닫는 명령의 가격을 지정하는 매개 변수가 없습니다. 이 함수는 주로 현재 시장 가격으로 즉시 포지션을 닫기 위해 사용됩니다.
strategy.close_all
기능strategy.close_all모든 현재 위치를 닫기 위해 사용 됩니다. 파이어 언어 스크립트 위치가 방향만 가질 수 있기 때문에, 즉, 현재 위치의 반대 방향으로 신호가 트리거되면 현재 위치를 닫고 신호 트리거에 따라 열 것입니다.strategy.close_all호출 할 때 현재 방향의 모든 위치를 닫을 것입니다.strategy.close_all함수는:when.
매개 변수
when: 집행 조건
예를 들어 보겠습니다.
/*backtest
start: 2022-07-03 00:00:00
end: 2022-07-09 00:00:00
period: 1d
basePeriod: 1h
exchanges: [{"eid":"Binance","currency":"BTC_USDT"}]
*/

strategy("closeAll Demo")

var enableStop = false
if enableStop
    runtime.error("stop")

strategy.entry("long", strategy.long, 0.2, when=strategy.position_size==0 and close>open)
strategy.entry("short", strategy.short, 0.3, when=strategy.position_size>0 and close<open)

if strategy.position_size < 0
    strategy.close_all()
    enableStop := true
테스트 코드는 위치 번호 0으로 시작합니다.strategy.position_size==0when 파라미터에 의해 설정된 조건이 충족되면,strategy.entryID strategy.position_size0보다 크면 ID strategy.position_size < 0즉, 짧은 포지션을 보유 할 때, 현재 보유 방향의 모든 포지션은 닫을 것입니다.enableStop := true. 로그가 관찰될 수 있도록 전략 실행을 중지합니다.
이 함수는strategy.close_all주문 종료 가격을 지정하는 매개 변수가 없으므로 이 함수는 주로 현재 시장 가격에 즉시 포지션을 종료하는 데 사용됩니다.
strategy.exit
이strategy.exit이 함수와 달리,strategy.close그리고strategy.close_all이 함수들은 현재 시장 가격에 즉시 포지션을 닫습니다.strategy.exit함수는 매개 변수 설정에 따라 위치를 닫을 것입니다.
매개 변수
id: 현재 클로즈오웃 조건의 오더 식별자 ID.from_entry: 닫아야 하는 포지션의 입력 ID를 지정하는 데 사용됩니다.qty: 닫힌 포지션 수qty_percent: 닫힌 지점의 비율, 범위: 0 ~ 100.profit: 포인트로 표현된 수익 목표.loss: 포인트로 표시된 스톱 로스 목표limit: 가격에 의해 정의된 수익 목표.stop: 가격에 의해 지정된 스톱 로스 목표물when: 집행 조건
매개 변수 사용법을 이해하기 위해 테스트 전략을 사용하십시오.
/*backtest
start: 2022-07-03 00:00:00
end: 2022-07-09 00:00:00
period: 1d
basePeriod: 1h
exchanges: [{"eid":"Binance","currency":"BTC_USDT"}]
args: [["RunMode",1,358374],["ZPrecision",0,358374]]
*/

strategy("strategy.exit Demo", pyramiding=3)

varip isExit = false

findOrderIdx(idx) =>
    ret = -1
    if strategy.opentrades == 0
        ret
    else
        for i = 0 to strategy.opentrades - 1
            if strategy.opentrades.entry_id(i) == idx
                ret := i
                break
        ret

strategy.entry("long1", strategy.long, 0.1, limit=1, when=findOrderIdx("long1") < 0)
strategy.entry("long2", strategy.long, 0.2, when=findOrderIdx("long2") < 0)
strategy.entry("long3", strategy.long, 0.3, when=findOrderIdx("long3") < 0)

if not isExit and strategy.opentrades > 0
    // strategy.exit("exitAll")          // If only one id parameter is specified, the exit order is invalid, and the parameters profit, limit, loss, stop and other exit conditions also need to be set at least one, otherwise it is also invalid
    strategy.exit("exit1", "long1", profit=50)                    // Since the long1 entry order is not filled, the exit order with ID exit1 is also on hold until the corresponding entry order is filled before exit1 is placed
    strategy.exit("exit2", "long2", qty=0.1, profit=100)          // Specify the parameter qty to close 0.1 positions in the position with ID long2
    strategy.exit("exit3", "long3", qty_percent=50, limit=strategy.opentrades.entry_price(findOrderIdx("long3")) + 1000)   // Specify the parameter qty_percent to close 50% of the positions in the position with ID long3
    isExit := true

if bar_index == 0
    runtime.log("The price per point:", syminfo.mintick)    // The price per point is related to the "Pricing Currency Precision" parameter setting on the Pine language template parameters
우리는 리얼 타임 가격 모델을 백테스트를 위해 사용합니다. 테스트 전략은 3 개의 입력 작업으로 시작합니다.strategy.entry함수), 그리고long1의도적으로limit1의 대기 주문 가격과 매개 변수, 그래서 채울 수 없습니다. 그 다음 조건의 출구 기능을 테스트strategy.exit이 예제에서 우리는 strategy.exit또한 더 복잡한 트레일링 스톱 매개 변수를 가지고 있습니다.trail_price, trail_points, trail_offset이 예제에서도 사용법을 배우기 위해 테스트할 수 있습니다.
strategy.cancel
이strategy.cancel함수들은 모든 대기 주문을 취소/정지하는 데 사용됩니다. 이 함수들은:strategy.order, strategy.entry , strategy.exit입력 ID를 생성할 수 있습니다. 이 기능의 주요 매개 변수는 다음과 같습니다.id, when.
매개 변수
id: 입학 ID는 취소됩니다.when: 집행 조건
이 함수는 이해하기 쉬우며, 채우지 않은 엔트리 오더를 취소하는 데 사용됩니다.
/*backtest
start: 2022-07-03 00:00:00
end: 2022-07-09 00:00:00
period: 1d
basePeriod: 1h
exchanges: [{"eid":"Binance","currency":"BTC_USDT"}]
*/

strategy("strategy.cancel Demo", pyramiding=3)

var isStop = false
if isStop
    runtime.error("stop")

strategy.entry("long1", strategy.long, 0.1, limit=1)
strategy.entry("long2", strategy.long, 0.2, limit=2)
strategy.entry("long3", strategy.long, 0- 재검토 수수료를 계산하는 방법에 대해
- 지속 계약 보관 문제
- 그림자 도서관의 질문을 가르쳐주세요.
- 월간 20-30 마틴 더하하우스의 아이디어가 있습니까? 적자를 잘 배치하십시오.
- 1분 k 라인의 가장 높은 지점에서 어떻게 구매하고 팔 수 있는지
- pine 스크립트 변수 값 문제
- Ema 계산 문제
- 또 다른 문제, 다화폐에 대한 주문입니다.
- 도움, GetDepth가 데이터를 얻는 시간 빈도 등
- exchange.SetPrecision ((2, 3) 이 두 개의 상수 거래의 필드는 어떤 역할을 합니까?
- 서버가 알리 클라우드 리눅스 시스템을 자동으로 업데이트 한 후 관리자 사용 오류를 보고합니다.
- 왜 제가 이 책을 못 읽었나요?
- 재검토 바이안 선물 ----- 품종 구독 실패 BTC_USDT_Futures_Binance
- JS 언어의 신을 찾는 것
- 어떻게 Bitcoin API가 단일 주문을 얻을 수 있는지 궁금합니다.
- 한 서버에 여러 개의 호스트를 배치할 수 있나요?
- 지표库 (python판)
- 트렌드 판단 문제
- ETH2.0来袭,有什么致富机会?可以来套保ETH,赢分叉币糖果空投
- 도움 요청