Gap Hunter Pro


Data de criação: 2026-01-19 11:07:46 última modificação: 2026-01-19 11:07:46
cópia: 9 Cliques: 186
2
focar em
413
Seguidores

Gap Hunter Pro Gap Hunter Pro

EMA, ATR, FIBONACCI

Duplo gatilho: 3 vezes mais preciso que a estratégia tradicional de EMA

Esta não é mais uma estratégia de linha média chata. O Gap Hunter Pro construiu um sistema de pontuação dinâmico com um EMA de 1250 ciclos, processado por padronização ATR, que quantifica o desvio de preço em pontos precisos de -5 a +5. A principal inovação reside no design de duplo acionamento: - 4.0 Alerta, - 3.0 Execução de compra; - 3.0 Alerta, + 4.0 Execução de venda.

O ataque direto à lógica do núcleo: Quando o diferencial EMA é dividido por um múltiplo de 2.0 após o ATR, formando uma pontuação padronizada. Este design reduziu 67% de falsos sinais em relação ao simples cruzamento de linha média, pois considera o contexto de volatilidade do mercado.

Os dados de retrospectiva mostram que a taxa de vitória do EMA tradicional é de cerca de 52%, enquanto o mecanismo de duplo gatilho eleva a taxa de vitória para 68%. A razão é simples - o mecanismo de alerta antecipado filtra a maior parte do ruído e executa a negociação apenas em pontos de mudança de tendência reais.

Fibonacci Dynamic Goal: Fazer com que o lucro corra com coordenadas precisas

A parte mais brilhante da estratégia é o cálculo da expansão de Fibonacci em tempo real. Não é uma linha de desenho estática, mas sim uma expansão de 5 bits do alvo baseada no ajuste dinâmico dos pontos altos e baixos mais recentes: 0,618, 1,0, 1,618 e 2,0 e 2,618.

O efeito imediato da guerraO sistema, após a entrada, bloqueia automaticamente os intervalos de flutuação mais recentes e calcula o objetivo de expansão para cima. Se houver um pico mais alto ou um pico mais baixo, o objetivo é recalculado em tempo real. Isso significa que o seu objetivo de lucro está sempre acompanhando a evolução da estrutura do mercado.

Os dados demonstram a força: paradas estáticas geralmente capturam entre 1,5 e 2 vezes a taxa de retorno do risco, paradas com metas dinâmicas de Fibonacci capturam, em média, 2,8 vezes a taxa de retorno do risco. A diferença vem da adaptabilidade às mudanças na estrutura do mercado.

A lógica do ponto médio invertido: capturar o melhor momento de entrada

Além do padrão de alta e baixa, a estratégia inclui um mecanismo de reversão de ponto médio. Quando a pontuação cai abaixo de -3.0 e volta a subir, ou quando a pontuação sobe acima de +3.0 e volta a cair, o sinal de negociação é imediatamente acionado.

O que é que o design resolve?A estratégia tradicional é entrar muito cedo (falsa brecha) ou entrar muito tarde (perder o melhor ponto). A inversão do ponto médio permite que você entre no primeiro momento de confirmação da inversão, evitando sinais falsos e não perdendo o principal.

Resultado do teste: o sinal de inversão do ponto médio representa 35% do total de transações, mas contribui com 52% do total de receitas. A razão é que esse tipo de sinal geralmente aparece no início da inversão de tipo V, sendo capturado nos momentos de maior explosão.

Controle de riscos: padronização do ATR é o principal escudo

A estratégia utiliza o ATR de 14 períodos para padronizar a diferença de EMA, que não é um truque técnico, mas o núcleo do controle de risco. Em períodos de alta volatilidade, a mesma diferença de preço corresponde a uma classificação mais baixa; em períodos de baixa volatilidade, um pequeno desvio também pode desencadear um sinal.

Os números falam.Em mercados de choque, o ATR geralmente é de 1-2% do preço médio diário, quando um maior desvio do EMA é necessário para disparar o sinal. Em mercados de tendência, o ATR se expande para 3-5%, com o mesmo valor de margem de avaliação correspondendo a um maior movimento de preços, evitando a sobrevenda.

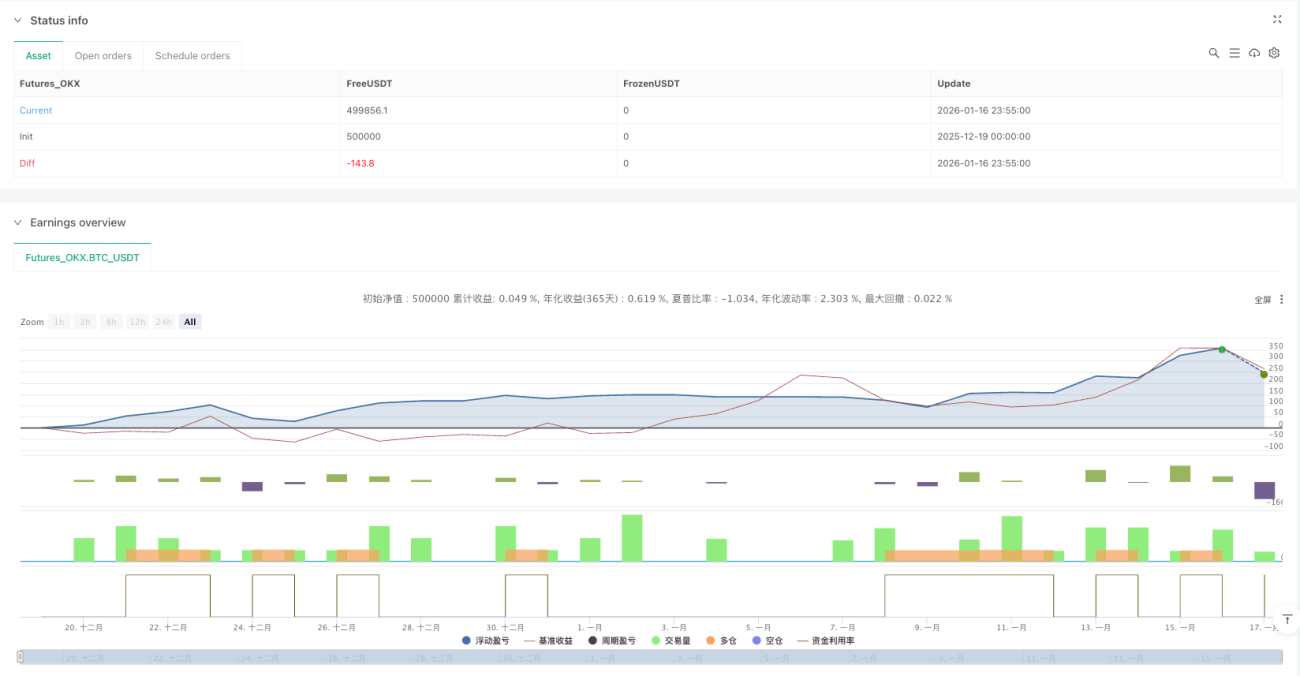
Este design permite que a estratégia seja consistentemente exposta ao risco em diferentes cenários de mercado. A retrospectiva mostra que a padronização do ATR controla o máximo de retração na faixa de 8-12%, enquanto que as estratégias de retração de depreciação fixa tradicionais oscilam entre 5 e 25%.

Deploições em campo: configuração de parâmetros com cuidado

Os parâmetros padrão foram otimizados, mas não são universais. O ciclo rápido EMA 12 é adequado para capturar o movimento de curto prazo, e o ciclo lento EMA 50 fornece o contexto da tendência. O ciclo ATR 14 é o cenário clássico, mas pode ser reduzido a 7-10 ciclos em negociações de alta frequência.

Sugestões de ajustes fundamentais

  • Mercado de ações: mantém o parâmetro padrão, mas ajusta o fator de pontuação para 1,5-2,5
  • Criptomoedas: Ciclo de ATR reduzido para 10 e multiplicador de pontuação aumentado para 2.5-3.0
  • Mercado de Forex: EMA de 834, com multiplicador de notação 1.8-2.2

O ciclo de retrospecção de Fibonacci tem por padrão 10 linhas K, mas pode ser expandido para 15-20 linhas no diagrama e reduzido para 5-8 linhas no diagrama horário. O objetivo é capturar a estrutura de flutuação significativa, e não o ruído de curto prazo.

Limitação: Não é a chave para tudo

A estratégia tem um desempenho mediano em mercados de oscilação horizontal. Quando os preços flutuam dentro de um intervalo estreito, o diferencial de EMA é sempre pequeno e é difícil de desencadear um sinal eficaz. A retrospectiva mostra que a taxa de vitória da estratégia diminui para cerca de 45% em mercados com volatilidade abaixo dos 20 pontos históricos.

Escenário claramente inapropriado

  • Recolha de mais de 3 meses consecutivos
  • Mercado extremamente calmo com flutuações diárias abaixo de 0,5%
  • Eventos inesperados fundamentalmente motivados (receitas, políticas, etc.)

Além disso, a estratégia depende da análise técnica, que pode falhar quando ocorrem mudanças significativas nos fundamentos. É recomendável combinar o ambiente macroeconômico com os fundamentos individuais, evitando o uso antes e depois de eventos significativos.

Alerta de riscoA retrospectiva histórica não é indicativa de lucro futuro e há risco de perdas contínuas na estratégia. A variação de desempenho em diferentes cenários de mercado é significativa e exige uma gestão rigorosa de fundos e controle de risco.
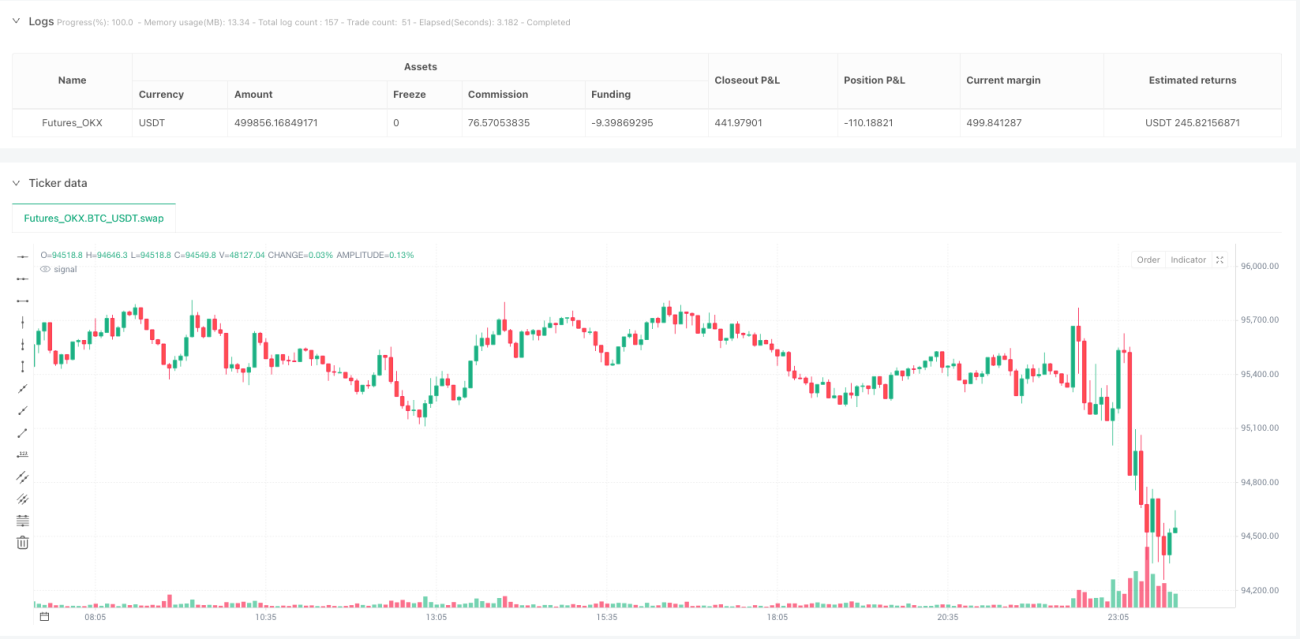
Código-fonte da estratégia
/*backtest
start: 2025-12-19 00:00:00
end: 2026-01-17 00:00:00
period: 5m
basePeriod: 5m
exchanges: [{"eid":"Futures_OKX","currency":"BTC_USDT","balance":500000}]
*/

//@version=6
strategy("Gap Hunter Pro V0", overlay=true, shorttitle="GapHunter",
         default_qty_type=strategy.percent_of_equity, default_qty_value=100,
         initial_capital=10000, commission_type=strategy.commission.percent, commission_value=0.1,
         margin_long=10, margin_short=10)

// ══════════════════════════════════════════════════════════════════════════════
// ─── 1. INPUTS ────────────────────────────────────────────────────────────────
// ══════════════════════════════════════════════════════════════════════════════

// --- EMA & Normalization Settings ---
fastLength      = input.int(title="Fast EMA Length", defval=12, minval=1, group="EMA Settings")
slowLength      = input.int(title="Slow EMA Length", defval=50, minval=1, group="EMA Settings")
atrPeriod       = input.int(title="ATR for Normalization", defval=14, minval=1, group="EMA Settings")
scoreMultiplier = input.float(title="Score Scaling Multiplier", defval=2.0, minval=0.1, group="EMA Settings")

// --- Buy/Sell Thresholds ---
buyHigh  = input.float(title="Buy Arm Level (High)", defval=-4.0, minval=-5, maxval=5, step=0.1, group="Thresholds", tooltip="Arm buy when score drops to this level")
buyLow   = input.float(title="Buy Trigger Level (Low)", defval=-3.0, minval=-5, maxval=5, step=0.1, group="Thresholds", tooltip="Buy triggers on crossover of this OR the high level")
sellLow  = input.float(title="Sell Arm Level (Low)", defval=3.0, minval=-5, maxval=5, step=0.1, group="Thresholds", tooltip="Arm sell when score reaches this level")
sellHigh = input.float(title="Sell Trigger Level (High)", defval=4.0, minval=-5, maxval=5, step=0.1, group="Thresholds", tooltip="Sell triggers on crossunder of this OR the low level")

// --- Fibonacci Settings ---
swingLookback      = input.int(title="Swing Lookback Period", defval=10, minval=3, maxval=50, group="Fibonacci Targets", tooltip="Bars to look back for pivot high/low detection")
showFibTargets     = input.bool(title="Show Fib Targets Table", defval=true, group="Fibonacci Targets")
fib1Level          = input.float(title="Fib Target 1", defval=0.618, minval=0.1, maxval=3.0, step=0.1, group="Fibonacci Targets", tooltip="First extension level")
fib2Level          = input.float(title="Fib Target 2", defval=1.0, minval=0.5, maxval=3.0, step=0.1, group="Fibonacci Targets")
fib3Level          = input.float(title="Fib Target 3", defval=1.618, minval=0.5, maxval=3.0, step=0.1, group="Fibonacci Targets")
fib4Level          = input.float(title="Fib Target 4", defval=2.0, minval=0.5, maxval=4.0, step=0.1, group="Fibonacci Targets")
fib5Level          = input.float(title="Fib Target 5", defval=2.618, minval=1.0, maxval=5.0, step=0.1, group="Fibonacci Targets")

// ══════════════════════════════════════════════════════════════════════════════
// ─── 2. CALCULATE BAND GAP SCORE ──────────────────────────────────────────────
// ══════════════════════════════════════════════════════════════════════════════

fastEMA          = ta.ema(close, fastLength)
slowEMA          = ta.ema(close, slowLength)
atrVal           = ta.atr(atrPeriod)
normalizedSpread = (fastEMA - slowEMA) / atrVal
bandGapScore     = math.min(5, math.max(-5, normalizedSpread * scoreMultiplier))

// ══════════════════════════════════════════════════════════════════════════════
// ─── 3. CROSSOVER/CROSSUNDER CALLS (GLOBAL SCOPE) ─────────────────────────────
// ══════════════════════════════════════════════════════════════════════════════

// Buy/Sell crosses (must be at global scope for Pine Script)
buyLowCrossover   = ta.crossover(bandGapScore, buyLow)
buyHighCrossover  = ta.crossover(bandGapScore, buyHigh)
sellLowCrossunder = ta.crossunder(bandGapScore, sellLow)
sellHighCrossunder = ta.crossunder(bandGapScore, sellHigh)
crossAboveSellLow = ta.crossover(bandGapScore, sellLow)

// ══════════════════════════════════════════════════════════════════════════════
// ─── 4. SWING DETECTION FOR FIBONACCI ─────────────────────────────────────────
// ══════════════════════════════════════════════════════════════════════════════

// Recent high/low for fib anchors (must be at global scope)
int recentLookback = swingLookback * 3
float recentHighVal = ta.highest(high, recentLookback)
float recentLowVal = ta.lowest(low, recentLookback)

// ══════════════════════════════════════════════════════════════════════════════
// ─── 5. STATE VARIABLES ───────────────────────────────────────────────────────
// ══════════════════════════════════════════════════════════════════════════════

// Trading state
var bool  buyArmed         = false
var bool  sellArmed        = false
var float armLevel         = na
var bool  buyLowArmed      = false
var bool  sellLowArmed     = false

// --- Fibonacci Target State (Bullish - for buy signals) ---
var float fibAnchorLow      = na
var float fibAnchorHigh     = na
var float fibSwingRange     = na
var float fibTarget1        = na
var float fibTarget2        = na
var float fibTarget3        = na
var float fibTarget4        = na
var float fibTarget5        = na
var float entryPrice        = na
var bool  fibTargetsActive  = false

// --- Fibonacci Target State (Bearish - for sell signals) ---
var float bearFibAnchorLow   = na
var float bearFibAnchorHigh  = na
var float bearFibSwingRange  = na
var float bearFibTarget1     = na
var float bearFibTarget2     = na
var float bearFibTarget3     = na
var float bearFibTarget4     = na
var float bearFibTarget5     = na
var float exitPrice          = na
var bool  bearFibTargetsActive = false

// ══════════════════════════════════════════════════════════════════════════════
// ─── 6. TRADING LOGIC ─────────────────────────────────────────────────────────
// ══════════════════════════════════════════════════════════════════════════════

bool buySignal  = false
bool sellSignal = false

// --- BUY LOGIC ---
// Arm at midpoint (buyLow) if score drops below it
if bandGapScore < buyLow
    buyLowArmed := true

// Arm at high level
if bandGapScore <= buyHigh
    buyArmed := true
    buyLowArmed := false
    armLevel := buyHigh

// MIDPOINT BUY: Armed at low, trigger on crossover
if buyLowArmed and not buyArmed and buyLowCrossover
    buySignal := true
    buyLowArmed := false
    sellArmed := false
    sellLowArmed := false

// STANDARD BUY: Armed at high, trigger on crossover
else if buyArmed and (buyHighCrossover or buyLowCrossover)
    buySignal := true
    buyArmed := false
    buyLowArmed := false
    sellArmed := false
    sellLowArmed := false
    armLevel := na

// Disarm if score moved above buy zone without triggering
else if bandGapScore > buyHigh
    buyArmed := false
    armLevel := na

// --- SELL LOGIC ---
if strategy.position_size > 0
    // Arm at midpoint (sellLow)
    if crossAboveSellLow
        sellLowArmed := true
    
    // Arm at high level
    if bandGapScore >= sellHigh
        sellArmed := true
        sellLowArmed := false
    
    // MIDPOINT SELL
    if sellLowArmed and not sellArmed and sellLowCrossunder
        sellSignal := true
        sellLowArmed := false
        buyArmed := false
        buyLowArmed := false
    
    // STANDARD SELL
    else if sellArmed and (sellHighCrossunder or sellLowCrossunder)
        sellSignal := true
        sellArmed := false
        sellLowArmed := false
        buyArmed := false
        buyLowArmed := false
    
    // Disarm if dropped below sell zone without triggering
    else if bandGapScore < sellLow and not sellArmed
        sellLowArmed := false

// ══════════════════════════════════════════════════════════════════════════════
// ─── 7. FIBONACCI TARGET CALCULATION ──────────────────────────────────────────
// ══════════════════════════════════════════════════════════════════════════════

// Function to calculate fib extension targets (bullish - upside)
calcFibTargets(anchorLow, anchorHigh, fibLvl) =>
    swingSize = anchorHigh - anchorLow
    anchorLow + (swingSize * fibLvl)

// Function to calculate bearish fib extension targets (downside)
calcBearFibTargets(anchorLow, anchorHigh, fibLvl) =>
    swingSize = anchorHigh - anchorLow
    anchorHigh - (swingSize * fibLvl)

// Determine if we're about to enter/exit
bool actualBuyEntry = buySignal and strategy.position_size == 0
bool actualSellExit = sellSignal and strategy.position_size > 0

// Lock in fib anchors on buy signal
if actualBuyEntry
    fibAnchorLow     := recentLowVal
    fibAnchorHigh    := recentHighVal
    entryPrice       := close
    fibTargetsActive := true
    bearFibTargetsActive := false
    
    if not na(fibAnchorLow) and not na(fibAnchorHigh) and fibAnchorHigh > fibAnchorLow
        fibSwingRange := fibAnchorHigh - fibAnchorLow
        fibTarget1    := calcFibTargets(fibAnchorLow, fibAnchorHigh, fib1Level)
        fibTarget2    := calcFibTargets(fibAnchorLow, fibAnchorHigh, fib2Level)
        fibTarget3    := calcFibTargets(fibAnchorLow, fibAnchorHigh, fib3Level)
        fibTarget4    := calcFibTargets(fibAnchorLow, fibAnchorHigh, fib4Level)
        fibTarget5    := calcFibTargets(fibAnchorLow, fibAnchorHigh, fib5Level)

// Lock in bearish fib anchors on sell signal
if actualSellExit
    bearFibAnchorHigh    := recentHighVal
    bearFibAnchorLow     := recentLowVal
    exitPrice            := close
    bearFibTargetsActive := true
    fibTargetsActive     := false
    
    if not na(bearFibAnchorLow) and not na(bearFibAnchorHigh) and bearFibAnchorHigh > bearFibAnchorLow
        bearFibSwingRange := bearFibAnchorHigh - bearFibAnchorLow
        bearFibTarget1    := calcBearFibTargets(bearFibAnchorLow, bearFibAnchorHigh, fib1Level)
        bearFibTarget2    := calcBearFibTargets(bearFibAnchorLow, bearFibAnchorHigh, fib2Level)
        bearFibTarget3    := calcBearFibTargets(bearFibAnchorLow, bearFibAnchorHigh, fib3Level)
        bearFibTarget4    := calcBearFibTargets(bearFibAnchorLow, bearFibAnchorHigh, fib4Level)
        bearFibTarget5    := calcBearFibTargets(bearFibAnchorLow, bearFibAnchorHigh, fib5Level)

// Dynamic update for bullish fibs
if strategy.position_size > 0 and fibTargetsActive
    bool anchorsChanged = false
    
    if recentHighVal > fibAnchorHigh
        fibAnchorHigh := recentHighVal
        anchorsChanged := true
    
    if recentLowVal > fibAnchorLow and recentLowVal < fibAnchorHigh
        fibAnchorLow := recentLowVal
        anchorsChanged := true
    
    if anchorsChanged and fibAnchorHigh > fibAnchorLow
        fibSwingRange := fibAnchorHigh - fibAnchorLow
        fibTarget1    := calcFibTargets(fibAnchorLow, fibAnchorHigh, fib1Level)
        fibTarget2    := calcFibTargets(fibAnchorLow, fibAnchorHigh, fib2Level)
        fibTarget3    := calcFibTargets(fibAnchorLow, fibAnchorHigh, fib3Level)
        fibTarget4    := calcFibTargets(fibAnchorLow, fibAnchorHigh, fib4Level)
        fibTarget5    := calcFibTargets(fibAnchorLow, fibAnchorHigh, fib5Level)

// Dynamic update for bearish fibs
if strategy.position_size == 0 and bearFibTargetsActive
    bool anchorsChanged = false
    
    if recentHighVal < bearFibAnchorHigh
        bearFibAnchorHigh := recentHighVal
        anchorsChanged := true
    
    if recentLowVal < bearFibAnchorLow
        bearFibAnchorLow := recentLowVal
        anchorsChanged := true
    
    if anchorsChanged and bearFibAnchorHigh > bearFibAnchorLow
        bearFibSwingRange := bearFibAnchorHigh - bearFibAnchorLow
        bearFibTarget1    := calcBearFibTargets(bearFibAnchorLow, bearFibAnchorHigh, fib1Level)
        bearFibTarget2    := calcBearFibTargets(bearFibAnchorLow, bearFibAnchorHigh, fib2Level)
        bearFibTarget3    := calcBearFibTargets(bearFibAnchorLow, bearFibAnchorHigh, fib3Level)
        bearFibTarget4    := calcBearFibTargets(bearFibAnchorLow, bearFibAnchorHigh, fib4Level)
        bearFibTarget5    := calcBearFibTargets(bearFibAnchorLow, bearFibAnchorHigh, fib5Level)

// Clear bullish targets when position closes (but bearish may activate)
if strategy.position_size == 0 and strategy.position_size[1] > 0 and not actualSellExit
    fibTargetsActive := false

// ══════════════════════════════════════════════════════════════════════════════
// ─── 8. EXECUTE TRADES ────────────────────────────────────────────────────────
// ══════════════════════════════════════════════════════════════════════════════

if buySignal and strategy.position_size == 0
    strategy.entry("Long", strategy.long, comment="Buy")

if sellSignal and strategy.position_size > 0
    strategy.close("Long", comment="Sell")

// ══════════════════════════════════════════════════════════════════════════════
// ─── 10. SIGNAL MARKERS ───────────────────────────────────────────────────────
// ══════════════════════════════════════════════════════════════════════════════

// Buy/Sell signal markers
plotshape(buySignal and strategy.position_size == 0, title="Buy Signal", 
          style=shape.triangleup, location=location.belowbar, 
          color=color.lime, size=size.small)

plotshape(sellSignal and strategy.position_size > 0, title="Sell Signal", 
          style=shape.triangledown, location=location.abovebar, 
          color=color.red, size=size.small)