oparameter is set toचिह्नorsignTx, thekey``` पैरामीटर की आवश्यकता है।
function main(){
    Log(Encode("md5", "raw", "hex", "hello"))
    Log(Encode("sha512", "raw", "base64", "hello"))
    Log(Encode("keccak256", "raw", "hex", "unwrapWETH9(uint256,address)"))

    Log(Encode("raw", "string", "hex", "example"))          // 6578616d706c65
    Log(Encode("raw", "hex", "string", "6578616d706c65"))   // example
}
def main():
    Log(Encode("md5", "raw", "hex", "hello", "", ""))
    Log(Encode("sha512", "raw", "base64", "hello", "", ""))
    Log(Encode("keccak256", "raw", "hex", "unwrapWETH9(uint256,address)", "", ""))

    Log(Encode("raw", "string", "hex", "example", "", ""))
    Log(Encode("raw", "hex", "string", "6578616d706c65", "", ""))
void main(){
    Log(Encode("md5", "raw", "hex", "hello"));
    Log(Encode("sha512", "raw", "base64", "hello"));
    Log(Encode("keccak256", "raw", "hex", "unwrapWETH9(uint256,address)"));

    Log(Encode("raw", "string", "hex", "example"));          // 6578616d706c65
    Log(Encode("raw", "hex", "string", "6578616d706c65"));   // example
}
पैरामीटरalgoस्ट्रिंग्स के एन्कोडिंग और डिकोडिंग का भी समर्थन करता है, जैसे किtext.encoder.utf8, text.decoder.utf8, text.encoder.gbkऔरtext.decoder.gbk.
function main(){
    var ret1 = Encode("text.encoder.utf8", "raw", "hex", "hello")     // e4bda0e5a5bd
    Log(ret1)
    var ret2 = Encode("text.decoder.utf8", "hex", "string", ret1)
    Log(ret2)

    var ret3 = Encode("text.encoder.gbk", "raw", "hex", "hello")      // c4e3bac3
    Log(ret3)
    var ret4 = Encode("text.decoder.gbk", "hex", "string", ret3)
    Log(ret4)
}
def main():
    ret1 = Encode("text.encoder.utf8", "raw", "hex", "hello", "", "")     # e4bda0e5a5bd
    Log(ret1)
    ret2 = Encode("text.decoder.utf8", "hex", "string", ret1, "", "")
    Log(ret2)

    ret3 = Encode("text.encoder.gbk", "raw", "hex", "hello", "", "")      # c4e3bac3
    Log(ret3)
    ret4 = Encode("text.decoder.gbk", "hex", "string", ret3, "", "")
    Log(ret4)
void main(){
    auto ret1 = Encode("text.encoder.utf8", "raw", "hex", "hello");     // e4bda0e5a5bd
    Log(ret1);
    auto ret2 = Encode("text.decoder.utf8", "hex", "string", ret1);
    Log(ret2);

    auto ret3 = Encode("text.encoder.gbk", "raw", "hex", "hello");      // c4e3bac3
    Log(ret3);
    auto ret4 = Encode("text.decoder.gbk", "hex", "string", ret3);
    Log(ret4);
}
यूनिक्स नैनो
UnixNano()नैनोसेकंड स्तर का टाइमस्टैम्प लौटाता है; यदि आपको मिलीसेकंड स्तर का टाइमस्टैम्प प्राप्त करने की आवश्यकता है, तो आप निम्न कोड का उपयोग कर सकते हैंः
function main() {
    var time = UnixNano() / 1000000
    Log(_N(time, 0))
}
def main():
    time = UnixNano()
    Log(time)
void main() {
    auto time = UnixNano();
    Log(time);
}
यूनिक्स
Unix()सेकंड में एक टाइमस्टैम्प लौटाता है.
function main() {
    var t = Unix()
    Log(t)
}
def main():
    t = Unix()
    Log(t)
void main() {
    auto t = Unix();
    Log(t);
}
GetOS()
GetOS()सिस्टम के बारे में जानकारी देता है जहां डॉकर स्थित है.
function main() {
    Log("GetOS:", GetOS())
}
def main():
    Log("GetOS:", GetOS())
void main() {
    Log("GetOS:", GetOS());
}
डॉकर द्वारा चलाए जाने वाले लॉग आउटपुटMac OSएप्पल कंप्यूटर काः
GetOS: डार्विन/amd64
darwinका नाम हैMac OS system.
MD5 ((String)
MD5(String); पैरामीटर मानः स्ट्रिंग प्रकार.
function main() {
    Log("MD5", MD5("hello world"))
}
def main():
    Log("MD5", MD5("hello world"))
void main() {
    Log("MD5", MD5("hello world"));
}
लॉग आउटपुटः
MD5 5eb63bbbe01eeed093cb22bb8f5acdc3
DBExec ((...)
DBExec(), इसका पैरामीटर मान स्ट्रिंग, संख्या या बूलियन, शून्य और अन्य प्रकार हो सकता है; रिटर्न वैल्यूः SQLite भाषा में निष्पादन परिणामों के साथ ऑब्जेक्ट।DBExec(), डेटाबेस का इंटरफ़ेस फ़ंक्शन, पासिंग पैरामीटर के माध्यम से, बॉट के डेटाबेस (SQLite डेटाबेस) को चला सकता है। यह बॉट डेटाबेस पर जोड़ने, हटाने, क्वेरी करने और संशोधित संचालन का एहसास करता है, समर्थन करता हैSQLiteबॉट डेटाबेस में सिस्टम तालिकाओं को सहेजता है जिसमें शामिल हैंःkvdb, cfg, log, profitऔरchartउपरोक्त किसी भी तालिका का संचालन न करें।DBExec()केवल असली बॉट का समर्थन करता है.
-
स्मृति डेटाबेस का समर्थन करता है कार्य के मापदंडों के लिए
DBExec, यदिस्क्वायरकथन के साथ शुरू होता है:, मेमोरी डेटाबेस में ऑपरेशन फ़ाइलों को लिखने के बिना तेज़ होगा। यह दीर्घकालिक भंडारण की आवश्यकता के बिना डेटाबेस ऑपरेशन के लिए उपयुक्त है, उदाहरण के लिएःfunction main() { var strSql = [ ":CREATE TABLE TEST_TABLE(", "TS INT PRIMARY KEY NOT NULL,", "HIGH REAL NOT NULL,", "OPEN REAL NOT NULL,", "LOW REAL NOT NULL,", "CLOSE REAL NOT NULL,", "VOLUME REAL NOT NULL)" ].join("") var ret = DBExec(strSql) Log(ret) // Add a piece of data Log(DBExec(":INSERT INTO TEST_TABLE (TS, HIGH, OPEN, LOW, CLOSE, VOLUME) VALUES (1518970320000, 100, 99.1, 90, 100, 12345.6);")) // Query the data Log(DBExec(":SELECT * FROM TEST_TABLE;")) }def main(): arr = [ ":CREATE TABLE TEST_TABLE(", "TS INT PRIMARY KEY NOT NULL,", "HIGH REAL NOT NULL,", "OPEN REAL NOT NULL,", "LOW REAL NOT NULL,", "CLOSE REAL NOT NULL,", "VOLUME REAL NOT NULL)" ] strSql = "" for i in range(len(arr)): strSql += arr[i] ret = DBExec(strSql) Log(ret) # Add a piece of data Log(DBExec(":INSERT INTO TEST_TABLE (TS, HIGH, OPEN, LOW, CLOSE, VOLUME) VALUES (1518970320000, 100, 99.1, 90, 100, 12345.6);")) # Query the data Log(DBExec(":SELECT * FROM TEST_TABLE;"))void main() { string strSql = ":CREATE TABLE TEST_TABLE(\ TS INT PRIMARY KEY NOT NULL,\ HIGH REAL NOT NULL,\ OPEN REAL NOT NULL,\ LOW REAL NOT NULL,\ CLOSE REAL NOT NULL,\ VOLUME REAL NOT NULL)"; auto ret = DBExec(strSql); Log(ret); // Add a piece of data Log(DBExec(":INSERT INTO TEST_TABLE (TS, HIGH, OPEN, LOW, CLOSE, VOLUME) VALUES (1518970320000, 100, 99.1, 90, 100, 12345.6);")); // Query the data Log(DBExec(":SELECT * FROM TEST_TABLE;")); } -
तालिका बनाएँ
function main() {
    var strSql = [
        "CREATE TABLE TEST_TABLE(",
        "TS INT PRIMARY KEY NOT NULL,",
        "HIGH REAL NOT NULL,",
        "OPEN REAL NOT NULL,",
        "LOW REAL NOT NULL,",
        "CLOSE REAL NOT NULL,",
        "VOLUME REAL NOT NULL)"
    ].join("")
    var ret = DBExec(strSql)
    Log(ret)
}
def main():
    arr = [
        "CREATE TABLE TEST_TABLE(",
        "TS INT PRIMARY KEY NOT NULL,",
        "HIGH REAL NOT NULL,",
        "OPEN REAL NOT NULL,",
        "LOW REAL NOT NULL,",
        "CLOSE REAL NOT NULL,",
        "VOLUME REAL NOT NULL)"
    ]
    strSql = ""
    for i in range(len(arr)):
        strSql += arr[i]
    ret = DBExec(strSql)
    Log(ret)
void main() {
    string strSql = "CREATE TABLE TEST_TABLE(\
        TS INT PRIMARY KEY NOT NULL,\
        HIGH REAL NOT NULL,\
        OPEN REAL NOT NULL,\
        LOW REAL NOT NULL,\
        CLOSE REAL NOT NULL,\
        VOLUME REAL NOT NULL)";
    auto ret = DBExec(strSql);
    Log(ret);
}
- तालिका में दर्ज किए गए जोड़ने, हटाने, क्वेरी करने और संशोधित करने के कार्य
function main() {
    var strSql = [
        "CREATE TABLE TEST_TABLE(",
        "TS INT PRIMARY KEY NOT NULL,",
        "HIGH REAL NOT NULL,",
        "OPEN REAL NOT NULL,",
        "LOW REAL NOT NULL,",
        "CLOSE REAL NOT NULL,",
        "VOLUME REAL NOT NULL)"
    ].join("")
    Log(DBExec(strSql))

    // Add a piece of data
    Log(DBExec("INSERT INTO TEST_TABLE (TS, HIGH, OPEN, LOW, CLOSE, VOLUME) VALUES (1518970320000, 100, 99.1, 90, 100, 12345.6);"))

    // Query the data
    Log(DBExec("SELECT * FROM TEST_TABLE;"))

    // Modify the data
    Log(DBExec("UPDATE TEST_TABLE SET HIGH=? WHERE TS=?", 110, 1518970320000))

    // Delete the data
    Log(DBExec("DELETE FROM TEST_TABLE WHERE HIGH=?", 110))
}
def main():
    arr = [
        "CREATE TABLE TEST_TABLE(",
        "TS INT PRIMARY KEY NOT NULL,",
        "HIGH REAL NOT NULL,",
        "OPEN REAL NOT NULL,",
        "LOW REAL NOT NULL,",
        "CLOSE REAL NOT NULL,",
        "VOLUME REAL NOT NULL)"
    ]
    strSql = ""
    for i in range(len(arr)):
        strSql += arr[i]
    Log(DBExec(strSql))

    # Add a piece of data
    Log(DBExec("INSERT INTO TEST_TABLE (TS, HIGH, OPEN, LOW, CLOSE, VOLUME) VALUES (1518970320000, 100, 99.1, 90, 100, 12345.6);"))

    # Query the data
    Log(DBExec("SELECT * FROM TEST_TABLE;"))

    # Modify the data
    Log(DBExec("UPDATE TEST_TABLE SET HIGH=? WHERE TS=?", 110, 1518970320000))

    # Delete the data
    Log(DBExec("DELETE FROM TEST_TABLE WHERE HIGH=?", 110))
void main() {
    string strSql = "CREATE TABLE TEST_TABLE(\
        TS INT PRIMARY KEY NOT NULL,\
        HIGH REAL NOT NULL,\
        OPEN REAL NOT NULL,\
        LOW REAL NOT NULL,\
        CLOSE REAL NOT NULL,\
        VOLUME REAL NOT NULL)";
    Log(DBExec(strSql));

    // Add a piece of data
    Log(DBExec("INSERT INTO TEST_TABLE (TS, HIGH, OPEN, LOW, CLOSE, VOLUME) VALUES (1518970320000, 100, 99.1, 90, 100, 12345.6);"));

    // Query the data
    Log(DBExec("SELECT * FROM TEST_TABLE;"));

    // Modify the data
    Log(DBExec("UPDATE TEST_TABLE SET HIGH=? WHERE TS=?", 110, 1518970320000));

    // Delete the data
    Log(DBExec("DELETE FROM TEST_TABLE WHERE HIGH=?", 110));
}
UUID (()
UUID(), एक 32-बिट अद्वितीय UUID लौटाता है, यह फ़ंक्शन केवल वास्तविक बॉट्स के लिए उपलब्ध है.
function main() {
    var uuid1 = UUID()
    var uuid2 = UUID()
    Log(uuid1, uuid2)
}
def main():
    uuid1 = UUID()
    uuid2 = UUID()
    Log(uuid1, uuid2)
void main() {
    auto uuid1 = UUID();
    auto uuid2 = UUID();
    Log(uuid1, uuid2);
}
इवेंट लूप (टाइमआउट)
EventLoop(timeout), कोई भी है के बाद लौटाता हैwebsocketपठनीय याexchange.Go, HttpQuery_Goऔर अन्य समवर्ती कार्य पूरा कर रहे हैं।timeout0 पर सेट है, लौटने से पहले किसी घटना के होने की प्रतीक्षा करें. यदि यह 0 से अधिक है, तो घटना प्रतीक्षा समय सीमा सेट करें. यदि यह 0 से कम है, तो तुरंत नवीनतम घटना लौटाएं. यदि लौटी वस्तु नहीं हैnull,Eventलौटाई गई सामग्री में निहित ट्रिगर की घटना प्रकार है। यह फ़ंक्शन केवल वास्तविक बॉट ट्रेडिंग के लिए उपलब्ध है।
पहली कॉलEventLoopकोड में घटना को सुनने के तंत्र को आरंभ करेगा.EventLoopघटना callback के बाद शुरू किया जाता है, तो पिछली घटना याद आ जाएगी। अंतर्निहित प्रणाली द्वारा कैप्चर की गई कतार संरचना 500 घटना callbacks तक कैश करेगी। यदिEventLoopकार्यक्रम निष्पादन के दौरान हटाने के लिए समय में नहीं बुलाया जाता है, 500 कैश से परे बाद की घटना कॉलबैक खो जाएगा.EventLoopफ़ंक्शन के कैश कतार को प्रभावित नहीं करेगाwebsocketअंतर्निहित प्रणाली पर, और न ही कैशexchange.Goऔर अन्य समवर्ती कार्यों. इन कैश के लिए, आप अभी भी डेटा पुनर्प्राप्त करने के लिए अपने स्वयं के तरीकों का उपयोग करने की जरूरत है. डेटा के लिए है कि बाहर ले जाया गया है से पहलेEventLoopफ़ंक्शन रिटर्न, कोई रिटर्न घटना में उत्पन्न किया जाएगाEventLoop function.
मुख्य उद्देश्यEventLoopकार्य रणनीति परत को सूचित करना है कि अंतर्निहित प्रणाली ने नए नेटवर्क डेटा प्राप्त किए हैं। घटनाओं के साथ पूरी रणनीति ड्राइव करें।EventLoopफ़ंक्शन एक घटना लौटाता है, आप केवल सभी डेटा स्रोतों के माध्यम से पार करने की जरूरत है. उदाहरण के लिए, द्वारा बनाई गई वस्तुओंwebsocketकनेक्शन और वस्तुओं द्वारा बनाई गईexchange.Goआप एक ओपन सोर्स क्लास लाइब्रेरी डिजाइन का उल्लेख कर सकते हैंःवर्ग पुस्तकालय लिंक.
function main() {
    var routine_getTicker = exchange.Go("GetTicker")
    var routine_getDepth = exchange.Go("GetDepth")
    var routine_getTrades = exchange.Go("GetTrades")

     // Sleep(2000), if the Sleep statement is used here, the subsequent EventLoop function will miss the previous events, because after waiting for 2 seconds, the concurrent function has received the data, and the EventLoop monitoring mechanism will start later, and these events will be missed
     // Unless you start calling EventLoop(-1) on the first line of code, first initialize the listening mechanism of EventLoop, you will not miss these events

     // Log("GetDepth:", routine_getDepth.wait()) If the wait function is called in advance to get the result of the concurrent call of the GetDepth function, the event that the GetDepth function receives the request result will not be returned in the EventLoop function
    var ts1 = new Date().getTime()
    var ret1 = EventLoop(0)

    var ts2 = new Date().getTime()
    var ret2 = EventLoop(0)

    var ts3 = new Date().getTime()
    var ret3 = EventLoop(0)

    Log("The first concurrent task completed was:", _D(ts1), ret1)
    Log("The second concurrent task completed was:", _D(ts2), ret2)
    Log("The third concurrent task completed was:", _D(ts3), ret3)

    Log("GetTicker:", routine_getTicker.wait())
    Log("GetDepth:", routine_getDepth.wait())
    Log("GetTrades:", routine_getTrades.wait())
}
import time
def main():
    routine_getTicker = exchange.Go("GetTicker")
    routine_getDepth = exchange.Go("GetDepth")
    routine_getTrades = exchange.Go("GetTrades")

    ts1 = time.time()
    ret1 = EventLoop(0)

    ts2 = time.time()
    ret2 = EventLoop(0)

    ts3 = time.time()
    ret3 = EventLoop(0)

    Log("The first concurrent task completed was:", _D(ts1), ret1)
    Log("The second concurrent task completed was:", _D(ts2), ret2)
    Log("The third concurrent task completed was:", _D(ts3), ret3)

    Log("GetTicker:", routine_getTicker.wait())
    Log("GetDepth:", routine_getDepth.wait())
    Log("GetTrades:", routine_getTrades.wait())
void main() {
    auto routine_getTicker = exchange.Go("GetTicker");
    auto routine_getDepth = exchange.Go("GetDepth");
    auto routine_getTrades = exchange.Go("GetTrades");

    auto ts1 = Unix() * 1000;
    auto ret1 = EventLoop(0);

    auto ts2 = Unix() * 1000;
    auto ret2 = EventLoop(0);

    auto ts3 = Unix() * 1000;
    auto ret3 = EventLoop(0);

    Log("The first concurrent task completed was:", _D(ts1), ret1);
    Log("The second concurrent task completed was:", _D(ts2), ret2);
    Log("The third concurrent task completed was:", _D(ts3), ret3);

    Ticker ticker;
    Depth depth;
    Trades trades;
    routine_getTicker.wait(ticker);
    routine_getDepth.wait(depth);
    routine_getTrades.wait(trades);

    Log("GetTicker:", ticker);
    Log("GetDepth:", depth);
    Log("GetTrades:", trades);
}
अंतर्निहित कार्य
_G(K, V)
_G(K, V), एक वैश्विक शब्दकोश के कार्य के साथ जिसे सहेजा जा सकता है, बैकटेस्ट और बॉट दोनों का समर्थन करता है। बैकटेस्ट के बाद, सहेजे गए डेटा को साफ़ किया जाएगा।
डेटा संरचना हैKVतालिका, एक स्थानीय फ़ाइल में स्थायी रूप से संग्रहीत. प्रत्येक बॉट का एक अलग डेटाबेस है. यह हमेशा पुनरारंभ के बाद या जब डॉकर बाहर निकलता है मौजूद होगा.Kएक स्ट्रिंग होना चाहिए, जो केस संवेदनशील नहीं है.Vकोई भी हो सकता हैJSONजब फ़ंक्शन_G()बुलाया जाता है और कोई पैरामीटर बॉट ऑपरेशन में पारित कर रहे हैं, समारोह_G()लौटाता हैIDवर्तमान बॉट की.
function main(){
    // Set a global variable num with a value of 1
    _G("num", 1)
    // Change a global variable num with the value "ok"
    _G("num", "ok")
    // Delete global variable num
    _G("num", null)
    // Return the value of the global variable num
    Log(_G("num"))
    // Delete all global variables
    _G(null)
    // Return bot ID
    var robotId = _G()
}
def main():
    _G("num", 1)
    _G("num", "ok")
    _G("num", None)
    Log(_G("num"))
    _G(None)
    robotId = _G()
void main() {
    _G("num", 1);
    _G("num", "ok");
    _G("num", NULL);
    Log(_G("num"));
    _G(NULL);
    // does not support auto robotId = _G();
}
नोटः
जब उपयोग करें_Gडेटा को सहेजने के लिए, इसका उपयोग हार्डवेयर डिवाइस की मेमोरी और हार्ड डिस्क स्थान के अनुसार उचित रूप से किया जाना चाहिए, और इसका दुरुपयोग नहीं किया जाना चाहिए।मेमोरी ओवरफ्लो problem.
_D ((टाइमस्टैम्प, एफएमटी)
_D(Timestamp, Fmt), निर्दिष्ट टाइमस्टैम्प के अनुरूप समय स्ट्रिंग्स लौटाता है। पैरामीटर मानःTimestampएक संख्यात्मक प्रकार है, मिलीसेकंड में।Fmtएक स्ट्रिंग प्रकार है;Fmtडिफ़ॉल्ट रूप सेःyyyy-MM-dd hh:mm:ss; रिटर्न मानः स्ट्रिंग प्रकार.
यह निर्दिष्ट टाइमस्टैम्प ((ms) स्ट्रिंग लौटाता है, और किसी भी पैरामीटर को पारित किए बिना वर्तमान समय लौटाता है; उदाहरण के लिएः_D()या_D(1478570053241), जिसका डिफ़ॉल्ट स्वरूप हैyyyy-MM-dd hh:mm:ss.
function main(){
    var time = _D()
    Log(time)
}
def main():
    strTime = _D()
    Log(strTime)
void main() {
    auto strTime = _D();
    Log(strTime);
}
नोटः
उपयोग के समय_D()मेंPythonरणनीति, हमें ध्यान देने की जरूरत है कि में पारित मापदंडों सेकंड में टाइमस्टैम्प हैं (मिलीसेकंड स्तर के टाइमस्टैम्प मेंJavaScriptऔरC ++रणनीतियों, और 1 सेकंड = 1000 मिलीसेकंड) ।
बॉट में, फ़ंक्शन का उपयोग करते समय_D()एक पठनीय टाइमस्टैम्प के साथ एक समय स्ट्रिंग को पार्स करने के लिए, आप डॉकर कार्यक्रम के ऑपरेटिंग सिस्टम में समय क्षेत्र पर ध्यान देने की जरूरत है।_D()डॉकर प्रणाली के समय के आधार पर एक पठनीय समय स्ट्रिंग के रूप में एक समयस्टैम्प को पार्स करता है.
उदाहरण के लिए, एक टाइमस्टैम्प का विश्लेषण1574993606000कोड के साथः
function main() {
    Log(_D(1574993606000))
}
def main():
    # Beijing time server runs: 2019-11-29 10:13:26, and the docker on another server in another region runs this code will get the results: 2019-11-29 02:13:26
    Log(_D(1574993606))
void main() {
    Log(_D(1574993606000));
}
_N(संख्या, सटीकता)
_N(Num, Precision), एक स्वरूपित फ्लोटिंग कॉमन नंबर। पैरामीटर मानःNumसंख्यात्मक प्रकार का हो;Precisionपूर्णांक प्रकार का होता है। रिटर्न मानः संख्यात्मक प्रकार का होता है।
उदाहरण के लिए:_N(3.1415, 2)के दो दशमलव स्थानों के बाद मान को मिटा देगा3.1415और लौटें3.14.
function main(){
    var i = 3.1415
    Log(i)
    var ii = _N(i, 2)
    Log(ii)
}
def main():
    i = 3.1415
    Log(i)
    ii = _N(i, 2)
    Log(ii)
void main() {
    auto i = 3.1415;
    Log(i);
    auto ii = _N(i, 2);
    Log(ii);
}
यदि आपको दशमलव बिंदु के बाईं ओर 0 के लिए N अंकों को बदलने की आवश्यकता है, तो आप लिख सकते हैंः
function main(){
    var i = 1300
    Log(i)
    var ii = _N(i, -3)
    // Checking the log shows that it is 1000
    Log(ii)
}
def main():
    i = 1300
    Log(i)
    ii = _N(i, -3)
    Log(ii)
void main() {
    auto i = 1300;
    Log(i);
    auto ii = _N(i, -3);
    Log(ii);
}
_C(...)
_C(function, args…)एक पुनः प्रयास कार्य है, जिसका उपयोग बाजार की जानकारी प्राप्त करने और अधूरे आदेशों आदि के अधिग्रहण के बारे में इंटरफेस के दोष सहिष्णुता के लिए किया जाता है।
इंटरफ़ेस निर्दिष्ट फ़ंक्शन को लगातार तब तक कॉल करेगा जब तक कि यह सफलतापूर्वक वापस न आ जाए (पैरामीटरfunctionसंदर्भित फ़ंक्शन को बुलाते समय शून्य मान लौटाता है याfalseकॉल पुनः प्रयास करेंगे) उदाहरण के लिए,_ C(exchange. GetTicker), डिफ़ॉल्ट पुनः प्रयास अंतराल 3 सेकंड है, जो फ़ंक्शन कॉल कर सकते हैं_CDelay (...)पुनः प्रयास के अंतराल को सेट करने के लिए, जैसे कि_CDelay (1000)अर्थ परिवर्तन कार्य_C1 सेकंड पर पुनः प्रयास करें।
निम्नलिखित कार्यों के लिए:
exchange.GetTicker()exchange.GetDepth()exchange.GetTrades()exchange.GetRecords()exchange.GetAccount()exchange.GetOrders()exchange.GetOrder()exchange.GetPosition()
वे सभी फ़ंक्शन द्वारा गलती सहिष्णुता करने के लिए बुलाया जा सकता है_C(...). कार्य_C(function, args...)उपरोक्त सूचीबद्ध कार्यों के दोष सहिष्णुता तक सीमित नहीं है। पैरामीटरfunctionकहा जाता है नहीं कहा जाता है, और ध्यान दें कि यह है_C(exchange.GetTicker), नहीं_C(exchange.GetTicker()).
function main(){
    var ticker = _C(exchange.GetTicker)
    // Adjust _C() function's retry interval to 2 seconds
    _CDelay(2000)
    var depth = _C(exchange.GetDepth)
    Log(ticker)
    Log(depth)
}
def main():
    ticker = _C(exchange.GetTicker)
    _CDelay(2000)
    depth = _C(exchange.GetDepth)
    Log(ticker)
    Log(depth)
void main() {
    auto ticker = _C(exchange.GetTicker);
    _CDelay(2000);
    auto depth = _C(exchange.GetDepth);
    Log(ticker);
    Log(depth);
}
पैरामीटर वाले कार्यों के लिए, जब उपयोग किया जाता है_C(...)दोष सहिष्णुता करने के लिएः
function main(){
    var records = _C(exchange.GetRecords, PERIOD_D1)
    Log(records)
}
def main():
    records = _C(exchange.GetRecords, PERIOD_D1)
    Log(records)
void main() {
    auto records = _C(exchange.GetRecords, PERIOD_D1);
    Log(records);
}
यह कस्टम फ़ंक्शन फॉल्ट टॉलरेंस हैंडलिंग के लिए भी इस्तेमाल किया जा सकता हैः
var test = function(a, b){
    var time = new Date().getTime() / 1000
    if(time % b == 3){
        Log("Meet the criteria! ", "#FF0000")
        return true
    }
    Log("Retry!", "#FF0000")
    return false
}

function main(){
    var ret = _C(test, 1, 5)
    Log(ret)
}
import time
def test(a, b):
    ts = time.time()
    if ts % b == 3:
        Log("Meet the criteria!", "#FF0000")
        return True
    Log("Retry!", "#FF0000")
    return False

def main():
    ret = _C(test, 1, 5)
    Log(ret)
// C++ does not support this method for fault tolerance of custom functions.
_क्रॉस ((Arr1, Arr2)
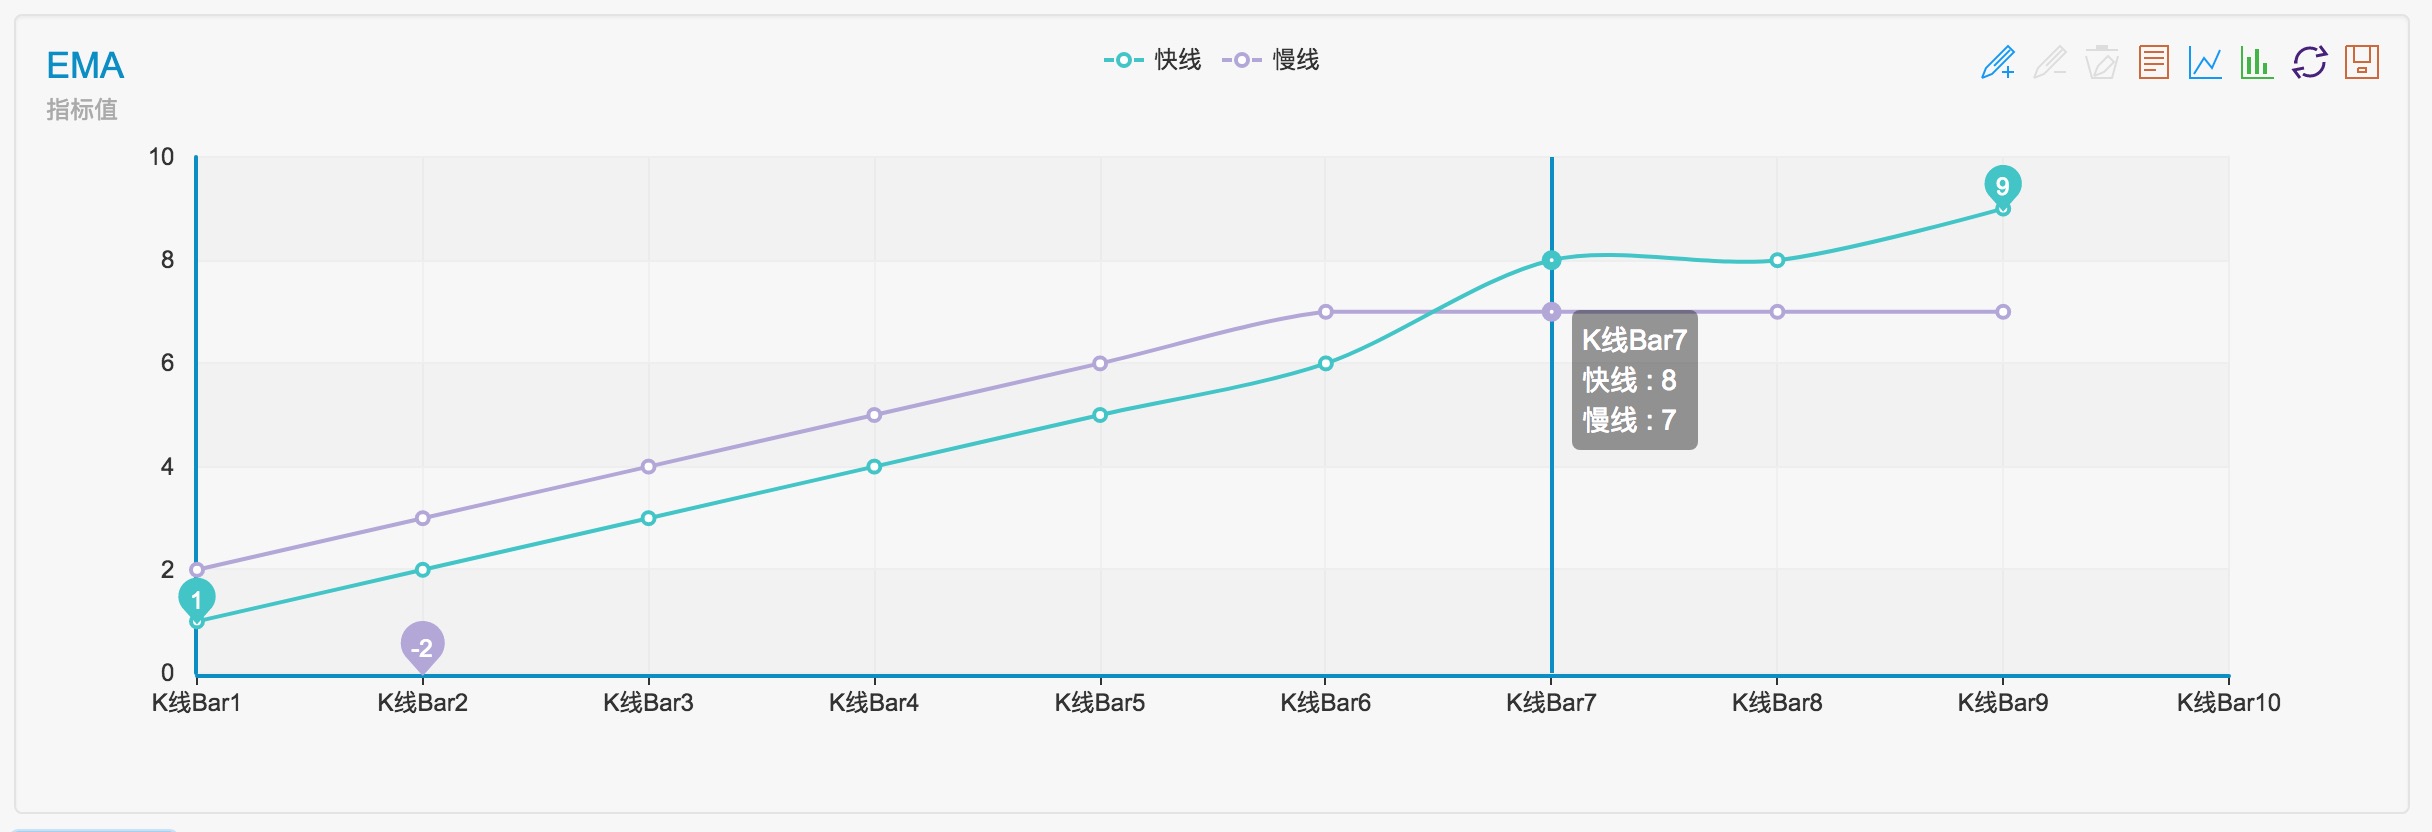
_Cross(Arr1, Arr2)सरणी के क्रॉसिंग अवधि की संख्या देता हैarr1औरarr2. एक सकारात्मक संख्या उछाल की अवधि है, और एक नकारात्मक संख्या गिरावट की अवधि है, और 0 का अर्थ वर्तमान मूल्य के समान है। पैरामीटर मानः संख्या प्रकार की सरणी।
आप समारोह का परीक्षण करने के लिए डेटा का एक सेट अनुकरण कर सकते हैं_Cross(Arr1, Arr2):
// Fast line indicator
var arr1 = [1,2,3,4,5,6,8,8,9]
// Slow line indicator
var arr2 = [2,3,4,5,6,7,7,7,7]
function main(){
    Log("_Cross(arr1, arr2) : ", _Cross(arr1, arr2))
    Log("_Cross(arr2, arr1) : ", _Cross(arr2, arr1))
}
arr1 = [1,2,3,4,5,6,8,8,9]
arr2 = [2,3,4,5,6,7,7,7,7]
def main():
    Log("_Cross(arr1, arr2) : ", _Cross(arr1, arr2))
    Log("_Cross(arr2, arr1) : ", _Cross(arr2, arr1))
void main() {
    vector<double> arr1 = {1,2,3,4,5,6,8,8,9};
    vector<double> arr2 = {2,3,4,5,6,7,7,7,7};
    Log("_Cross(arr1, arr2) : ", _Cross(arr1, arr2));
    Log("_Cross(arr2, arr1) : ", _Cross(arr2, arr1));
}

अवलोकन के लिए सिमुलेटेड डेटा को दृश्यमान करें
विशिष्ट निर्देश:अंतर्निहित कार्य _क्रॉस विश्लेषण और निर्देश
JSONParse ((strJson)
JSONParse(strJson), फ़ंक्शन का उपयोग JSON स्ट्रिंग्स को पार्स करने के लिए किया जाता है. बड़ी संख्याओं वाले JSON स्ट्रिंग्स को सही ढंग से पार्स किया जा सकता है, और बड़ी संख्याओं को स्ट्रिंग प्रकारों में पार्स किया जाएगा. बैकटेस्टिंग सिस्टम इस फ़ंक्शन का समर्थन नहीं करता है.
function main() {
    let s1 = '{"num": 8754613216564987646512354656874651651358}'
    Log("JSON.parse:", JSON.parse(s1))    // JSON.parse: {"num":8.754613216564988e+39}
    Log("JSONParse:", JSONParse(s1))      // JSONParse:  {"num":"8754613216564987646512354656874651651358"}

    let s2 = '{"num": 123}'
    Log("JSON.parse:", JSON.parse(s2))    // JSON.parse: {"num":123}
    Log("JSONParse:", JSONParse(s2))      // JSONParse:  {"num":123}
}
import json

def main():
    s1 = '{"num": 8754613216564987646512354656874651651358}'
    Log("json.loads:", json.loads(s1))    # json.loads: map[num:8.754613216564987e+39]
    Log("JSONParse:", JSONParse(s1))      # JSONParse:  map[num:8754613216564987646512354656874651651358]

    s2 = '{"num": 123}'
    Log("json.loads:", json.loads(s2))    # json.loads: map[num:123]
    Log("JSONParse:", JSONParse(s2))      # JSONParse:  map[num:123]
void main() {
    auto s1 = "{\"num\":8754613216564987646512354656874651651358}";
    Log("json::parse:", json::parse(s1));
    // Log("JSONParse:", JSONParse(s1));   // The function is not supported

    auto s2 = "{\"num\":123}";
    Log("json::parse:", json::parse(s2));
    // Log("JSONParse:", JSONParse(s2));   // The function is not supported
}
कस्टम रंग
प्रत्येक संदेश स्ट्रिंग एक आरजीबी मान के साथ समाप्त हो सकता है जैसे कि#ff0000, जो प्रदर्शित होने के लिए अग्रभूमि रंग का प्रतिनिधित्व करता है। यदि यह एक प्रारूप में है जैसे कि#ff0000112233, पिछले छह पिछवाड़े पृष्ठभूमि रंग का प्रतिनिधित्व करते हैं।
function main() {
    Log("Red", "#FF0000")
}
def main():
    Log("Red", "#FF0000")
void main() {
    Log("Red", "#FF0000");
}
लॉग जानकारी
जब बॉट चल रहा है, लॉग जानकारी बॉट के डेटाबेस में दर्ज की जाती है, जोsqlite3डेटाबेस फ़ाइलें डॉकर प्रोग्राम के साथ डिवाइस में स्थित हैं, और फ़ाइलों का सटीक स्थान डॉकर प्रोग्राम के शब्दकोश में है (robotउदाहरण के लिए: आईडी के साथ बॉट डेटाबेस फ़ाइल130350निर्देशिका में है../logs/storage/130350 (..शब्दकोश है जहां डॉकर केrobotस्थित है), और डेटाबेस फ़ाइल का नाम है130350.db3.
बैकटेस्ट प्रणाली में लॉग को [ पर क्लिक करके डाउनलोड किया जा सकता है।लॉग डाउनलोड करें] बटन बैकटेस्ट समाप्त होने के बाद बैकटेस्ट पृष्ठ के निचले दाएं कोने में।
जब आपको बॉट को किसी अन्य सर्वर पर डॉकर में स्थानांतरित करने की आवश्यकता होती है, तो आप बॉट की डेटाबेस फ़ाइलों (एक्सटेंशन के साथ डेटाबेस फ़ाइलें
लॉग ((...)
Log(message)लॉग सूची में संदेश सहेजने का अर्थ है। पैरामीटर मानःmessageकिसी भी प्रकार का हो सकता है।
यदि आप वर्ण जोड़ते हैं@स्ट्रिंग के बाद, संदेश पुश कतार में प्रवेश करेगा और एफएमजेड क्वांट ट्रेडिंग प्लेटफॉर्म के वर्तमान वीचैट खाते में पुश किया जाएगा, और
नोटः
डिबग टूल में पुश समर्थित नहीं है. बैकटेस्ट सिस्टम में पुश समर्थित नहीं है.
function main() {
    Log("Hello FMZ Quant!@")
    Sleep(1000 * 5)
    // Add the string to #ff0000, print the log in red, and push the message
    Log("Hello, #ff0000@")
}
def main():
    Log("Hello FMZ Quant!@")
    Sleep(1000 * 5)
    Log("Hello, #ff0000@")
void main() {
    Log("Hello FMZ Quant!@");
    Sleep(1000 * 5);
    Log("Hello, #ff0000@");
}
वेबहुकधक्काः
में लिखा सेवा कार्यक्रम डेमो का उपयोग करेंGolang:
package main
import (
    "fmt"
    "net/http"
)

func Handle (w http.ResponseWriter, r *http.Request) {
    defer func() {
        fmt.Println("req:", *r)
    }()
}

func main () {
    fmt.Println("listen http://localhost:9090")
    http.HandleFunc("/data", Handle)
    http.ListenAndServe(":9090", nil)
}
सेटWebHook: http://XXX.XX.XXX.XX:9090/data?data=Hello_FMZ
सेवा कार्यक्रम चलाने के बाद, रणनीति को निष्पादित करें और जानकारी दबाएंः
function main() {
    Log("msg", "@")
}
def main():
    Log("msg", "@")
void main() {
    Log("msg", "@");
}
पुश सूचना प्राप्त करें, और सेवा कार्यक्रम जानकारी प्रिंट करेंः
listen http://localhost:9090
req: {GET /data?data=Hello_FMZ HTTP/1.1 1 1 map[User-Agent:[Mozilla/5.0 (Macintosh; Intel Mac OS X 10_9_3) AppleWebKit/537.36 (KHTML, like Gecko) Chrome/xx.x.xxxx.xxx Safari/537.36] Accept-Encoding:[gzip]] {} <nil> 0 [] false 1XX.XX.X.XX:9090 map[] map[] <nil> map[] XXX.XX.XXX.XX:4xxx2 /data?data=Hello_FMZ <nil> <nil> <nil> 0xc420056300}
प्रिंट करेंbase64एन्कोडेड छविकार्यLogमें कोडित छवियों के मुद्रण का समर्थन करता हैbase64, से शुरू होता है`, और इसके साथ समाप्त होता है`उदाहरण के लिए:
function main() {
    Log("`data:image/png;base64,AAAA`")
}
def main():
    Log("`data:image/png;base64,AAAA`")
void main() {
    Log("`data:image/png;base64,AAAA`");
}
Logमुद्रण का समर्थन करता हैmatplotlib.pyplotवस्तुओं कीPythonसीधे, यानी जब तक वस्तुओं मेंsavefigविधि, आप उपयोग कर सकते हैंLogसीधे मुद्रित करने के लिए, उदाहरण के लिएः
import matplotlib.pyplot as plt
def main():
    plt.plot([3,6,2,4,7,1])
    Log(plt)
मुद्रित लॉग की भाषाओं का स्वचालित परिवर्तनकार्यLogभाषा स्विचिंग का समर्थन करता है; जब फ़ंक्शन टेक्स्ट आउटपुट करता है, तो यह प्लेटफ़ॉर्म पृष्ठ पर भाषा सेटिंग के अनुसार स्वचालित रूप से संबंधित भाषा में स्विच करेगा। उदाहरण के लिएः
function main() {
    Log("[trans]Chinese|abc[/trans]")
}
def main():
    Log("[trans]Chinese|abc[/trans]")
void main() {
    Log("[trans]Chinese|abc[/trans]");
}
LogProfit ((लाभ)
LogProfit(Profit)मुनाफा मूल्य रिकॉर्ड करता है, मुनाफा मूल्य प्रिंट करता है, और मुनाफा मूल्य के अनुसार मुनाफा वक्र खींचता है। पैरामीटर मूल्यःलाभसंख्यात्मक प्रकार है।
यदि फ़ंक्शन वर्ण के साथ समाप्त होता है&, यह केवल लाभ चार्ट खींचने का एहसास कर सकता है, और लाभ लॉग प्रिंट नहीं कर सकता है, जैसेःLogProfit(10, '&').
लॉगप्रॉफ़िट रीसेट करें (()
LogProfitReset()सभी लाभ लॉग साफ करता है; आप आरक्षित मदों की संख्या निर्दिष्ट करने के लिए एक पूर्णांक मान पैरामीटर ले सकते हैं।
function main() {
    // Print 30 points on the income chart, then reset, and only retain the last 10 points
    for(var i = 0; i < 30; i++) {
        LogProfit(i)
        Sleep(500)
    }
    LogProfitReset(10)
}
def main():
    for i in range(30):
        LogProfit(i)
        Sleep(500)
    LogProfitReset(10)
void main() {
    for(int i = 0; i < 30; i++) {
        LogProfit(i);
        Sleep(500);
    }
    LogProfitReset(10);
}
लॉगस्टेटस ((Msg)
LogStatus(Msg), जानकारी लॉग सूची में सहेजी नहीं जाती है, केवल बॉट की वर्तमान स्थिति की जानकारी अद्यतन की जाती है; यह लॉग के ऊपर प्रदर्शित होता है और स्थिति को अद्यतन करने के लिए कई बार बुलाया जा सकता है। पैरामीटर मानःMsgकिसी भी प्रकार का हो सकता है।
function main() {
    LogStatus('This is a normal status prompt')
    LogStatus('This is a status prompt in red font # ff0000')
    LogStatus('This is a multi-line status message \n I am the second line')
}
def main():
    LogStatus('This is a normal status prompt')
    LogStatus('This is a status prompt in red font # ff0000')
    LogStatus('This is a multi-line status message \nI am the second line')
void main() {
    LogStatus("This is a normal status prompt");
    LogStatus("This is a status prompt in red font # ff0000");
    LogStatus("This is a multi-line status message \nI am the second line");
}
LogStatus(Msg)मुद्रण का समर्थन करता हैbase64एन्कोडेड चित्र, के साथ शुरू`और अंत में`, जैसे:LogStatus("`data:image/png;base64,AAAA`").
LogStatus(Msg)प्रत्यक्ष आयात का समर्थन करता हैPythonहैmatplotlib.pyplotवस्तु, जब तक कि वस्तु मेंsavefigविधि, आप समारोह में पारित कर सकते हैंLogStatus(Msg), जैसे:
import matplotlib.pyplot as plt
def main():
    plt.plot([3,6,2,4,7,1])
    LogStatus(plt)
स्थिति पट्टी में डेटा आउटपुट उदाहरणः
function main() {
    var table = {type: 'table', title: 'Position Information', cols: ['Column1', 'Column2'], rows: [ ['abc', 'def'], ['ABC', 'support color #ff0000']]}
    // After the JSON order is serialized, add the character "`" on both sides, which is regarded as a complex message format (currently supporting tables)
    LogStatus('`' + JSON.stringify(table) + '`')
    // Table information can also appear in multiple lines
    LogStatus('First line message\n`' + JSON.stringify(table) + '`\nThird line message')
    // That supports multiple tables displayed at the same time, and that will be displayed in a group with TAB
    LogStatus('`' + JSON.stringify([table, table]) + '`')

    // You can also construct a button in the table, and the strategy uses "GetCommand" to receive the content of the cmd attribute
    var table = {
        type: 'table',
        title: 'Position operation',
        cols: ['Column1', 'Column2', 'Action'],
        rows: [
            ['abc', 'def', {'type':'button', 'cmd': 'coverAll', 'name': 'close position'}]
        ]
    }
    LogStatus('`' + JSON.stringify(table) + '`')
    // Or create a separate button
    LogStatus('`' + JSON.stringify({'type':'button', 'cmd': 'coverAll', 'name': 'close position'}) + '`')
    // You can customize the button style (button attribute of bootstrap)
    LogStatus('`' + JSON.stringify({'type':'button', 'class': 'btn btn-xs btn-danger', 'cmd': 'coverAll', 'name': 'close position'}) + '`')
}
import json
def main():
    table = {"type": "table", "title": "Position Information", "cols": ["Column1", "Column2"], "rows": [["abc", "def"], ["ABC", "support color #ff0000"]]}
    LogStatus('`' + json.dumps(table) + '`')
    LogStatus('First line message\n`' + json.dumps(table) + '`\nThird line message')
    LogStatus('`' + json.dumps([table, table]) + '`')

    table = {
        "type" : "table",
        "title" : "Position operation",
        "cols" : ["Column1", "Column2", "Action"],
        "rows" : [
            ["abc", "def", {"type": "button", "cmd": "coverAll", "name": "close position"}]
        ]
    }
    LogStatus('`' + json.dumps(table) + '`')
    LogStatus('`' + json.dumps({"type": "button", "cmd": "coverAll", "name": "close position"}) + '`')
    LogStatus('`' + json.dumps({"type": "button", "class": "btn btn-xs btn-danger", "cmd": "coverAll", "name": "close position"}) + '`')
void main() {
    json table = R"({"type": "table", "title": "Position Information", "cols": ["Column1", "Column2"], "rows": [["abc", "def"], ["ABC", "support color #ff0000"]]})"_json;
    LogStatus("`" + table.dump() + "`");
    LogStatus("First line message\n`" + table.dump() + "`\nThird line message");
    json arr = R"([])"_json;
    arr.push_back(table);
    arr.push_back(table);
    LogStatus("`" + arr.dump() + "`");

    table = R"({
        "type" : "table",
        "title" : "Position operation",
        "cols" : ["Column1", "Column2", "Action"],
        "rows" : [
            ["abc", "def", {"type": "button", "cmd": "coverAll", "name": "close position"}]
        ]
    })"_json;
    LogStatus("`" + table.dump() + "`");
    LogStatus("`" + R"({"type": "button", "cmd": "coverAll", "name": "close position"})"_json.dump() + "`");
    LogStatus("`" + R"({"type": "button", "class": "btn btn-xs btn-danger", "cmd": "coverAll", "name": "close position"})"_json.dump() + "`");
}
स्थिति पट्टी बटनों के अक्षम और वर्णन कार्यों को सेट करें:

function main() {
    var table = {
        type: "table",
        title: "Test the disable and description functions of status bar buttons",
        cols: ["Column1", "Column2", "Column3"],
        rows: []
    }
    var button1 = {"type": "button", "name": "button1", "cmd": "button1", "description": "This is the first button"}
    var button2 = {"type": "button", "name": "button2", "cmd": "button2", "description": "This is the second button, set to disabled", "disabled": true}
    var button3 = {"type": "button", "name": "button3", "cmd": "button3", "description": "This is the third button, set to enabled", "disabled": false}
    table.rows.push([button1, button2, button3])
    LogStatus("`" + JSON.stringify(table) + "`")
}
import json
def main():
    table = {
        "type": "table",
        "title": "Test the disable and description functions of status bar buttons",
        "cols": ["Column1", "Column2", "Column3"],
        "rows": []
    }
    button1 = {"type": "button", "name": "button1", "cmd": "button1", "description": "This is the first button"}
    button2 = {"type": "button", "name": "button2", "cmd": "button2", "description": "This is the second button, set to disabled", "disabled": True}
    button3 = {"type": "button", "name": "button3", "cmd": "button3", "description": "This is the third button, set to enabled", "disabled": False}
    table["rows"].append([button1, button2, button3])
    LogStatus("`" + json.dumps(table) + "`")
void main() {
    json table = R"({
        "type": "table",
        "title": "Test the disable and description functions of status bar buttons",
        "cols": ["Column1", "Column2", "Column3"],
        "rows": []
    })"_json;
    json button1 = R"({"type": "button", "name": "button1", "cmd": "button1", "description": "This is the first button"})"_json;
    json button2 = R"({"type": "button", "name": "button2", "cmd": "button2", "description": "This is the second button, set to disabled", "disabled": true})"_json;
    json button3 = R"({"type": "button", "name": "button3", "cmd": "button3", "description": "This is the third button, set to enabled", "disabled": false})"_json;
    json arr = R"([])"_json;
    arr.push_back(button1);
    arr.push_back(button2);
    arr.push_back(button3);
    table["rows"].push_back(arr);
    LogStatus("`" + table.dump() + "`");
}
स्थिति पट्टी बटन की शैली सेट करें:

function main() {
    var table = {
        type: "table",
        title: "status bar button style",
        cols: ["default", "raw", "success", "information", "warning", "danger"],
        rows: [
            [
                {"type":"button", "class": "btn btn-xs btn-default", "name": "default"},
                {"type":"button", "class": "btn btn-xs btn-primary", "name": "raw"},
                {"type":"button", "class": "btn btn-xs btn-success", "name": "success"},
                {"type":"button", "class": "btn btn-xs btn-info", "name": "information"},
                {"type":"button", "class": "btn btn-xs btn-warning", "name": "warning"},
                {"type":"button", "class": "btn btn-xs btn-danger", "name": "danger"}
            ]
        ]
    }
    LogStatus("`" + JSON.stringify(table) + "`")
}
import json
def main():
    table = {
        "type": "table",
        "title": "status bar button style",
        "cols": ["default", "raw", "success", "information", "warning", "danger"],
        "rows": [
            [
                {"type":"button", "class": "btn btn-xs btn-default", "name": "default"},
                {"type":"button", "class": "btn btn-xs btn-primary", "name": "raw"},
                {"type":"button", "class": "btn btn-xs btn-success", "name": "success"},
                {"type":"button", "class": "btn btn-xs btn-info", "name": "information"},
                {"type":"button", "class": "btn btn-xs btn-warning", "name": "warning"},
                {"type":"button", "class": "btn btn-xs btn-danger", "name": "danger"}
            ]
        ]
    }
    LogStatus("`" + json.dumps(table) + "`")
void main() {
    json table = R"({
        "type": "table",
        "title": "status bar button style",
        "cols": ["default", "raw", "success", "information", "warning", "danger"],
        "rows": [
            [
                {"type":"button", "class": "btn btn-xs btn-default", "name": "default"},
                {"type":"button", "class": "btn btn-xs btn-primary", "name": "raw"},
                {"type":"button", "class": "btn btn-xs btn-success", "name": "success"},
                {"type":"button", "class": "btn btn-xs btn-info", "name": "information"},
                {"type":"button", "class": "btn btn-xs btn-warning", "name": "warning"},
                {"type":"button", "class": "btn btn-xs btn-danger", "name": "danger"}
            ]
        ]
    })"_json;
    LogStatus("`" + table.dump() + "`");
}
फ़ंक्शन को जोड़ेंGetCommand()स्थिति पट्टी के बटनों के इंटरैक्टिव फ़ंक्शन का निर्माण करने के लिएः
function test1() {
    Log("Call a custom function")
}

function main() {
    while (true) {
        var table = {
            type: 'table',
            title: 'operation',
            cols: ['Column1', 'Column2', 'Action'],
            rows: [
                ['a', '1', {
                    'type': 'button',
                    'cmd': "CoverAll",
                    'name': 'close position'
                }],
                ['b', '1', {
                    'type': 'button',
                    'cmd': 10,
                    'name': 'Send value'
                }],
                ['c', '1', {
                    'type': 'button',
                    'cmd': _D(),
                    'name': 'Call a function'
                }],
                ['d', '1', {
                    'type': 'button',
                    'cmd': 'test1',
                    'name': 'Call a custom function'
                }]
            ]
        }
        LogStatus(_D(), "\n", '`' + JSON.stringify(table) + '`')

        var str_cmd = GetCommand()
        if (str_cmd) {
            Log("Received interactive data str_cmd:", "Types of:", typeof(str_cmd), "Value:", str_cmd)
            if(str_cmd == "test1") {
                test1()
            }
        }

        Sleep(500)
    }
}
import json
def test1():
    Log("Call a custom function")

def main():
    while True:
        table = {
            "type": "table",
            "title": "Operation",
            "cols": ["Column1", "Column2", "Action"],
            "rows": [
                ["a", "1", {
                    "type": "button",
                    "cmd": "CoverAll",
                    "name": "close position"
                }],
                ["b", "1", {
                    "type": "button",
                    "cmd": 10,
                    "name": "Send value"
                }],
                ["c", "1", {
                    "type": "button",
                    "cmd": _D(),
                    "name": "Call a function"
                }],
                ["d", "1", {
                    "type": "button",
                    "cmd": "test1",
                    "name": "Call a custom function"
                }]
            ]
        }

        LogStatus(_D(), "\n", "`" + json.dumps(table) + "`")
        str_cmd = GetCommand()
        if str_cmd:
            Log("Received interactive data str_cmd", "Types:", type(str_cmd), "Value:", str_cmd)
            if str_cmd == "test1":
                test1()
        Sleep(500)
void test1() {
    Log("Call a custom function");
}

void main() {
    while(true) {
        json table = R"({
            "type": "table",
            "title": "Operation",
            "cols": ["Column1", "Column2", "Action"],
            "rows": [
                ["a", "1", {
                    "type": "button",
                    "cmd": "CoverAll",
                    "name": "close position"
                }],
                ["b", "1", {
                    "type": "button",
                    "cmd": 10,
                    "name": "Send value"
                }],
                ["c", "1", {
                    "type": "button",
                    "cmd": "",
                    "name": "Call a function"
                }],
                ["d", "1", {
                    "type": "button",
                    "cmd": "test1",
                    "name": "Call a custom function"
                }]
            ]
        })"_json;
        table["rows"][2][2]["cmd"] = _D();
        LogStatus(_D(), "\n", "`" + table.dump() + "`");
        auto str_cmd = GetCommand();
        if(str_cmd != "") {
            Log("Received interactive data str_cmd", "Type:", typeid(str_cmd).name(), "Value:", str_cmd);
            if(str_cmd == "test1") {
                test1();
            }
        }
        Sleep(500);
    }
}
बातचीत के लिए एक स्थिति पट्टी बटन का निर्माण करते समय, इनपुट डेटा भी समर्थित है, और अंततः इंटरैक्टिव कमांड द्वारा कैप्चर किया जाता हैGetCommand()कार्य।
एक जोड़ने के लिएinputस्थिति पट्टी में एक बटन नियंत्रण के डेटा संरचना के लिए आइटम, उदाहरण के लिए, जोड़ें"input": {"name": "Number of opening orders", "type": "number", "defValue": 1}तक{"type": "button", "cmd": "open", "name": "open position"}, आप बटन पर क्लिक करने पर इनपुट बॉक्स कंट्रोल के साथ एक संवाद बॉक्स पॉप अप कर सकते हैं (इनपुट बॉक्स में डिफ़ॉल्ट मान 1 है, जिसे 111इनपुट बॉक्स में और GetCommandफ़ंक्शन संदेश को कैप्चर करेगाःopen:111.
function main() {
    var tbl = {
        type: "table",
        title: "operation",
        cols: ["column 1", "column2"],
        rows: [
            ["Open position operation", {"type": "button", "cmd": "open", "name": "open position", "input": {"name": "number of opening positions", "type": "number", "defValue": 1}}],
            ["Close position operation", {"type": "button", "cmd": "coverAll", "name": "close all positions"}]
        ]
    }

    LogStatus(_D(), "\n", "`" + JSON.stringify(tbl) + "`")
    while (true) {
        var cmd = GetCommand()
        if (cmd) {
            Log("cmd:", cmd)
        }
        Sleep(1000)
    }
}
import json

def main():
    tbl = {
        "type": "table",
        "title": "operation",
        "cols": ["column 1", "column 2"],
        "rows": [
            ["Open position operation", {"type": "button", "cmd": "open", "name": "open position", "input": {"name": "number of opening positions", "type": "number", "defValue": 1}}],
            ["Close position operation", {"type": "button", "cmd": "coverAll", "name": "close all positions"}]
        ]
    }

    LogStatus(_D(), "\n", "`" + json.dumps(tbl) + "`")
    while True:
        cmd = GetCommand()
        if cmd:
            Log("cmd:", cmd)
        Sleep(1000)
void main() {
    json tbl = R"({
        "type": "table",
        "title": "operation",
        "cols": ["column 1", "column 2"],
        "rows": [
            ["Open position operation", {"type": "button", "cmd": "open", "name": "open position", "input": {"name": "number of opening positions", "type": "number", "defValue": 1}}],
            ["Close position operation", {"type": "button", "cmd": "coverAll", "name": "close all positions"}]
        ]
    })"_json;

    LogStatus(_D(), "\n", "`" + tbl.dump() + "`");
    while(true) {
        auto cmd = GetCommand();
        if(cmd != "") {
            Log("cmd:", cmd);
        }
        Sleep(1000);
    }
}
तालिका में कक्षों को जोड़ेंLogStatus(Msg)कार्य:
-
क्षैतिज विलय
function main() {
    var table = {
        type: 'table',
        title: 'position operation',
        cols: ['Column1', 'Column2', 'Action'],
        rows: [
            ['abc', 'def', {'type':'button', 'cmd': 'coverAll', 'name': 'close position'}]
        ]
    }
    var ticker = exchange.GetTicker()
    // Add a row of data, merge the first and second cells, and output the ticker variable in the merged cell
    table.rows.push([{body : JSON.stringify(ticker), colspan : 2}, "abc"])
    LogStatus('`' + JSON.stringify(table) + '`')
}
import json def main(): table = { "type" : "table", "title" : "position operation", "cols" : ["Column1", "Column2", "Action"], "rows" : [ ["abc", "def", {"type": "button", "cmd": "coverAll", "name": "close position"}] ] } ticker = exchange.GetTicker() table["rows"].append([{"body": json.dumps(ticker), "colspan": 2}, "abc"]) LogStatus("`" + json.dumps(table) + "`")void main() { json table = R"({ "type" : "table", "title" : "position operation", "cols" : ["Column1", "Column2", "Action"], "rows" : [