oparameter is set to표지or표시Tx, thekey``` 파라미터가 필요합니다.
function main(){
    Log(Encode("md5", "raw", "hex", "hello"))
    Log(Encode("sha512", "raw", "base64", "hello"))
    Log(Encode("keccak256", "raw", "hex", "unwrapWETH9(uint256,address)"))

    Log(Encode("raw", "string", "hex", "example"))          // 6578616d706c65
    Log(Encode("raw", "hex", "string", "6578616d706c65"))   // example
}
def main():
    Log(Encode("md5", "raw", "hex", "hello", "", ""))
    Log(Encode("sha512", "raw", "base64", "hello", "", ""))
    Log(Encode("keccak256", "raw", "hex", "unwrapWETH9(uint256,address)", "", ""))

    Log(Encode("raw", "string", "hex", "example", "", ""))
    Log(Encode("raw", "hex", "string", "6578616d706c65", "", ""))
void main(){
    Log(Encode("md5", "raw", "hex", "hello"));
    Log(Encode("sha512", "raw", "base64", "hello"));
    Log(Encode("keccak256", "raw", "hex", "unwrapWETH9(uint256,address)"));

    Log(Encode("raw", "string", "hex", "example"));          // 6578616d706c65
    Log(Encode("raw", "hex", "string", "6578616d706c65"));   // example
}
매개 변수algo또한 문자열의 인코딩과 디코딩을 지원합니다.text.encoder.utf8, text.decoder.utf8, text.encoder.gbk그리고text.decoder.gbk.
function main(){
    var ret1 = Encode("text.encoder.utf8", "raw", "hex", "hello")     // e4bda0e5a5bd
    Log(ret1)
    var ret2 = Encode("text.decoder.utf8", "hex", "string", ret1)
    Log(ret2)

    var ret3 = Encode("text.encoder.gbk", "raw", "hex", "hello")      // c4e3bac3
    Log(ret3)
    var ret4 = Encode("text.decoder.gbk", "hex", "string", ret3)
    Log(ret4)
}
def main():
    ret1 = Encode("text.encoder.utf8", "raw", "hex", "hello", "", "")     # e4bda0e5a5bd
    Log(ret1)
    ret2 = Encode("text.decoder.utf8", "hex", "string", ret1, "", "")
    Log(ret2)

    ret3 = Encode("text.encoder.gbk", "raw", "hex", "hello", "", "")      # c4e3bac3
    Log(ret3)
    ret4 = Encode("text.decoder.gbk", "hex", "string", ret3, "", "")
    Log(ret4)
void main(){
    auto ret1 = Encode("text.encoder.utf8", "raw", "hex", "hello");     // e4bda0e5a5bd
    Log(ret1);
    auto ret2 = Encode("text.decoder.utf8", "hex", "string", ret1);
    Log(ret2);

    auto ret3 = Encode("text.encoder.gbk", "raw", "hex", "hello");      // c4e3bac3
    Log(ret3);
    auto ret4 = Encode("text.decoder.gbk", "hex", "string", ret3);
    Log(ret4);
}
유닉스나노 (UNIXNANO))
UnixNano()나노초 수준 타임 스탬프를 반환합니다. 밀리 초 수준 타임 스탬프를 얻으려면 다음 코드를 사용할 수 있습니다.
function main() {
    var time = UnixNano() / 1000000
    Log(_N(time, 0))
}
def main():
    time = UnixNano()
    Log(time)
void main() {
    auto time = UnixNano();
    Log(time);
}
유닉스 ((()
Unix()시간표를 초로 반환합니다.
function main() {
    var t = Unix()
    Log(t)
}
def main():
    t = Unix()
    Log(t)
void main() {
    auto t = Unix();
    Log(t);
}
GetOS()
GetOS()도커가 있는 시스템에 대한 정보를 반환합니다.
function main() {
    Log("GetOS:", GetOS())
}
def main():
    Log("GetOS:", GetOS())
void main() {
    Log("GetOS:", GetOS());
}
로그 출력Mac OS애플 컴퓨터:
GetOS:darwin/amd64
darwin이름입니다Mac OS system.
MD5 (String)
MD5(String); 매개 변수 값: 문자열 유형.
function main() {
    Log("MD5", MD5("hello world"))
}
def main():
    Log("MD5", MD5("hello world"))
void main() {
    Log("MD5", MD5("hello world"));
}
로그 출력:
MD5 5eb63bbbe01eeed093cb22bb8f5acdc3
DBExec(...)
DBExec(), 그 매개 변수 값은 문자열, 숫자 또는 부울, null 및 기타 유형이 될 수 있습니다. 반환 값: SQLite 언어로 실행 결과가있는 객체.DBExec(), 데이터베이스의 인터페이스 기능은 패러미터를 통과하여 봇 데이터베이스 (SQLite 데이터베이스) 를 실행할 수 있습니다. 그것은 봇 데이터베이스에 추가, 삭제, 질의 및 수정 작업을 실현합니다.SQLite문법. 시스템에서 봇 데이터베이스 저장 테이블을 포함:kvdb, cfg, log, profit그리고chart상기 테이블을 작동하지 않습니다.DBExec()진짜 로봇만 지원합니다.
-
메모리 데이터베이스를 지원합니다 기능 매개 변수
DBExec, 만약sql이 문서는:, 메모리 데이터베이스의 작업은 파일을 작성하지 않고 더 빨라질 것입니다. 그것은 장기 저장 필요 없이 데이터베이스 작업에 적합합니다, 예를 들어:function main() { var strSql = [ ":CREATE TABLE TEST_TABLE(", "TS INT PRIMARY KEY NOT NULL,", "HIGH REAL NOT NULL,", "OPEN REAL NOT NULL,", "LOW REAL NOT NULL,", "CLOSE REAL NOT NULL,", "VOLUME REAL NOT NULL)" ].join("") var ret = DBExec(strSql) Log(ret) // Add a piece of data Log(DBExec(":INSERT INTO TEST_TABLE (TS, HIGH, OPEN, LOW, CLOSE, VOLUME) VALUES (1518970320000, 100, 99.1, 90, 100, 12345.6);")) // Query the data Log(DBExec(":SELECT * FROM TEST_TABLE;")) }def main(): arr = [ ":CREATE TABLE TEST_TABLE(", "TS INT PRIMARY KEY NOT NULL,", "HIGH REAL NOT NULL,", "OPEN REAL NOT NULL,", "LOW REAL NOT NULL,", "CLOSE REAL NOT NULL,", "VOLUME REAL NOT NULL)" ] strSql = "" for i in range(len(arr)): strSql += arr[i] ret = DBExec(strSql) Log(ret) # Add a piece of data Log(DBExec(":INSERT INTO TEST_TABLE (TS, HIGH, OPEN, LOW, CLOSE, VOLUME) VALUES (1518970320000, 100, 99.1, 90, 100, 12345.6);")) # Query the data Log(DBExec(":SELECT * FROM TEST_TABLE;"))void main() { string strSql = ":CREATE TABLE TEST_TABLE(\ TS INT PRIMARY KEY NOT NULL,\ HIGH REAL NOT NULL,\ OPEN REAL NOT NULL,\ LOW REAL NOT NULL,\ CLOSE REAL NOT NULL,\ VOLUME REAL NOT NULL)"; auto ret = DBExec(strSql); Log(ret); // Add a piece of data Log(DBExec(":INSERT INTO TEST_TABLE (TS, HIGH, OPEN, LOW, CLOSE, VOLUME) VALUES (1518970320000, 100, 99.1, 90, 100, 12345.6);")); // Query the data Log(DBExec(":SELECT * FROM TEST_TABLE;")); } -
테이블을 생성합니다
function main() {
    var strSql = [
        "CREATE TABLE TEST_TABLE(",
        "TS INT PRIMARY KEY NOT NULL,",
        "HIGH REAL NOT NULL,",
        "OPEN REAL NOT NULL,",
        "LOW REAL NOT NULL,",
        "CLOSE REAL NOT NULL,",
        "VOLUME REAL NOT NULL)"
    ].join("")
    var ret = DBExec(strSql)
    Log(ret)
}
def main():
    arr = [
        "CREATE TABLE TEST_TABLE(",
        "TS INT PRIMARY KEY NOT NULL,",
        "HIGH REAL NOT NULL,",
        "OPEN REAL NOT NULL,",
        "LOW REAL NOT NULL,",
        "CLOSE REAL NOT NULL,",
        "VOLUME REAL NOT NULL)"
    ]
    strSql = ""
    for i in range(len(arr)):
        strSql += arr[i]
    ret = DBExec(strSql)
    Log(ret)
void main() {
    string strSql = "CREATE TABLE TEST_TABLE(\
        TS INT PRIMARY KEY NOT NULL,\
        HIGH REAL NOT NULL,\
        OPEN REAL NOT NULL,\
        LOW REAL NOT NULL,\
        CLOSE REAL NOT NULL,\
        VOLUME REAL NOT NULL)";
    auto ret = DBExec(strSql);
    Log(ret);
}
- 표에 기록된 추가, 삭제, 질의 및 변경 작업
function main() {
    var strSql = [
        "CREATE TABLE TEST_TABLE(",
        "TS INT PRIMARY KEY NOT NULL,",
        "HIGH REAL NOT NULL,",
        "OPEN REAL NOT NULL,",
        "LOW REAL NOT NULL,",
        "CLOSE REAL NOT NULL,",
        "VOLUME REAL NOT NULL)"
    ].join("")
    Log(DBExec(strSql))

    // Add a piece of data
    Log(DBExec("INSERT INTO TEST_TABLE (TS, HIGH, OPEN, LOW, CLOSE, VOLUME) VALUES (1518970320000, 100, 99.1, 90, 100, 12345.6);"))

    // Query the data
    Log(DBExec("SELECT * FROM TEST_TABLE;"))

    // Modify the data
    Log(DBExec("UPDATE TEST_TABLE SET HIGH=? WHERE TS=?", 110, 1518970320000))

    // Delete the data
    Log(DBExec("DELETE FROM TEST_TABLE WHERE HIGH=?", 110))
}
def main():
    arr = [
        "CREATE TABLE TEST_TABLE(",
        "TS INT PRIMARY KEY NOT NULL,",
        "HIGH REAL NOT NULL,",
        "OPEN REAL NOT NULL,",
        "LOW REAL NOT NULL,",
        "CLOSE REAL NOT NULL,",
        "VOLUME REAL NOT NULL)"
    ]
    strSql = ""
    for i in range(len(arr)):
        strSql += arr[i]
    Log(DBExec(strSql))

    # Add a piece of data
    Log(DBExec("INSERT INTO TEST_TABLE (TS, HIGH, OPEN, LOW, CLOSE, VOLUME) VALUES (1518970320000, 100, 99.1, 90, 100, 12345.6);"))

    # Query the data
    Log(DBExec("SELECT * FROM TEST_TABLE;"))

    # Modify the data
    Log(DBExec("UPDATE TEST_TABLE SET HIGH=? WHERE TS=?", 110, 1518970320000))

    # Delete the data
    Log(DBExec("DELETE FROM TEST_TABLE WHERE HIGH=?", 110))
void main() {
    string strSql = "CREATE TABLE TEST_TABLE(\
        TS INT PRIMARY KEY NOT NULL,\
        HIGH REAL NOT NULL,\
        OPEN REAL NOT NULL,\
        LOW REAL NOT NULL,\
        CLOSE REAL NOT NULL,\
        VOLUME REAL NOT NULL)";
    Log(DBExec(strSql));

    // Add a piece of data
    Log(DBExec("INSERT INTO TEST_TABLE (TS, HIGH, OPEN, LOW, CLOSE, VOLUME) VALUES (1518970320000, 100, 99.1, 90, 100, 12345.6);"));

    // Query the data
    Log(DBExec("SELECT * FROM TEST_TABLE;"));

    // Modify the data
    Log(DBExec("UPDATE TEST_TABLE SET HIGH=? WHERE TS=?", 110, 1518970320000));

    // Delete the data
    Log(DBExec("DELETE FROM TEST_TABLE WHERE HIGH=?", 110));
}
UUID (()
UUID(), 32비트 고유 UUID를 반환합니다. 이 기능은 실제 봇에서만 사용할 수 있습니다.
function main() {
    var uuid1 = UUID()
    var uuid2 = UUID()
    Log(uuid1, uuid2)
}
def main():
    uuid1 = UUID()
    uuid2 = UUID()
    Log(uuid1, uuid2)
void main() {
    auto uuid1 = UUID();
    auto uuid2 = UUID();
    Log(uuid1, uuid2);
}
이벤트 루프 (타임아웃)
EventLoop(timeout), 어떤 후 반환websocket가독성 또는exchange.Go, HttpQuery_Go그리고 다른 동시 작업이 완료됩니다.timeout0으로 설정되면, 반환하기 전에 이벤트가 발생하도록 기다립니다. 0보다 크다면, 이벤트 대기 타임 아웃을 설정합니다. 0보다 작다면, 가장 최근의 이벤트를 즉시 반환합니다. 반환된 객체가null, 그Event반환된 컨텐츠에 포함된 것은 트리거된 이벤트 유형입니다. 이 기능은 실제 봇 거래에서만 사용할 수 있습니다.
첫 번째 전화EventLoop코드에 있는 이 이벤트를 듣는 메커니즘을 초기화합니다.EventLoop이벤트 콜백 후 시작되면 이전 이벤트가 놓칠 것입니다. 기본 시스템에서 캡슐화 된 대기열 구조는 최대 500 이벤트 콜백까지 캐시를합니다.EventLoop프로그램 실행 중에 제거를 위해 시간에 호출되지 않으면, 500 캐시를 넘어 나중에 이벤트 호출은 손실됩니다.EventLoop함수는 캐시 대기열에 영향을 미치지 않습니다websocket기본 시스템, 또는 캐시exchange.Go그리고 다른 동시 기능. 이러한 캐시를 위해, 당신은 여전히 데이터를 검색하기 위해 자신의 방법을 사용해야합니다.EventLoop함수 반환, 반환 이벤트가 생성되지 않습니다EventLoop function.
이 협의의 주요 목적은EventLoop기능은 기본 시스템이 새로운 네트워크 데이터를 받았다는 전략 계층을 알리는 것입니다. 이벤트로 전체 전략을 실행합니다.EventLoop이 함수에서 이벤트를 반환하면 모든 데이터 소스를 탐색할 필요가 있습니다. 예를 들어,websocket연결 및 객체에 의해 생성exchange.Go데이터를 얻기 위해 노력합니다. 당신은 오픈 소스 클래스 라이브러리 디자인을 참조할 수 있습니다:클래스 라이브러리 링크.
function main() {
    var routine_getTicker = exchange.Go("GetTicker")
    var routine_getDepth = exchange.Go("GetDepth")
    var routine_getTrades = exchange.Go("GetTrades")

     // Sleep(2000), if the Sleep statement is used here, the subsequent EventLoop function will miss the previous events, because after waiting for 2 seconds, the concurrent function has received the data, and the EventLoop monitoring mechanism will start later, and these events will be missed
     // Unless you start calling EventLoop(-1) on the first line of code, first initialize the listening mechanism of EventLoop, you will not miss these events

     // Log("GetDepth:", routine_getDepth.wait()) If the wait function is called in advance to get the result of the concurrent call of the GetDepth function, the event that the GetDepth function receives the request result will not be returned in the EventLoop function
    var ts1 = new Date().getTime()
    var ret1 = EventLoop(0)

    var ts2 = new Date().getTime()
    var ret2 = EventLoop(0)

    var ts3 = new Date().getTime()
    var ret3 = EventLoop(0)

    Log("The first concurrent task completed was:", _D(ts1), ret1)
    Log("The second concurrent task completed was:", _D(ts2), ret2)
    Log("The third concurrent task completed was:", _D(ts3), ret3)

    Log("GetTicker:", routine_getTicker.wait())
    Log("GetDepth:", routine_getDepth.wait())
    Log("GetTrades:", routine_getTrades.wait())
}
import time
def main():
    routine_getTicker = exchange.Go("GetTicker")
    routine_getDepth = exchange.Go("GetDepth")
    routine_getTrades = exchange.Go("GetTrades")

    ts1 = time.time()
    ret1 = EventLoop(0)

    ts2 = time.time()
    ret2 = EventLoop(0)

    ts3 = time.time()
    ret3 = EventLoop(0)

    Log("The first concurrent task completed was:", _D(ts1), ret1)
    Log("The second concurrent task completed was:", _D(ts2), ret2)
    Log("The third concurrent task completed was:", _D(ts3), ret3)

    Log("GetTicker:", routine_getTicker.wait())
    Log("GetDepth:", routine_getDepth.wait())
    Log("GetTrades:", routine_getTrades.wait())
void main() {
    auto routine_getTicker = exchange.Go("GetTicker");
    auto routine_getDepth = exchange.Go("GetDepth");
    auto routine_getTrades = exchange.Go("GetTrades");

    auto ts1 = Unix() * 1000;
    auto ret1 = EventLoop(0);

    auto ts2 = Unix() * 1000;
    auto ret2 = EventLoop(0);

    auto ts3 = Unix() * 1000;
    auto ret3 = EventLoop(0);

    Log("The first concurrent task completed was:", _D(ts1), ret1);
    Log("The second concurrent task completed was:", _D(ts2), ret2);
    Log("The third concurrent task completed was:", _D(ts3), ret3);

    Ticker ticker;
    Depth depth;
    Trades trades;
    routine_getTicker.wait(ticker);
    routine_getDepth.wait(depth);
    routine_getTrades.wait(trades);

    Log("GetTicker:", ticker);
    Log("GetDepth:", depth);
    Log("GetTrades:", trades);
}
내장 기능
_G(K, V)
_G(K, V), 저장할 수 있는 글로벌 사전 기능과 함께 백테스트와 봇을 지원합니다. 백테스트가 끝나면 저장된 데이터가 삭제됩니다.
데이터 구조는KV테이블, 로컬 파일에 영구적으로 저장됩니다. 각 봇은 별도의 데이터베이스를 가지고 있습니다. 그것은 항상 재시작 후 또는 도커가 종료되면 존재합니다.K문자열이어야 합니다.V어떤 것도 될 수 있습니다.JSON순서형 컨텐츠._G()호출되고 bot 동작에서 매개 변수가 전달되지 않습니다, 함수_G()를 반환 합니다ID현재 로봇의
function main(){
    // Set a global variable num with a value of 1
    _G("num", 1)
    // Change a global variable num with the value "ok"
    _G("num", "ok")
    // Delete global variable num
    _G("num", null)
    // Return the value of the global variable num
    Log(_G("num"))
    // Delete all global variables
    _G(null)
    // Return bot ID
    var robotId = _G()
}
def main():
    _G("num", 1)
    _G("num", "ok")
    _G("num", None)
    Log(_G("num"))
    _G(None)
    robotId = _G()
void main() {
    _G("num", 1);
    _G("num", "ok");
    _G("num", NULL);
    Log(_G("num"));
    _G(NULL);
    // does not support auto robotId = _G();
}
참고:
이 약물을 사용할 때_G데이터 저장 기능, 그것은 하드웨어 장치의 메모리 및 하드 디스크 공간에 따라 합리적으로 사용되어야하며 남용되어서는 안됩니다.메모리 오버플로우 problem.
시간표, FMT
_D(Timestamp, Fmt), 지정된 시간표의 대응 시간 문자열을 반환 합니다. 매개 변수 값:Timestamp밀리초로 표현한 수치입니다.Fmt문자열 타입입니다.Fmt기본 설정:yyyy-MM-dd hh:mm:ss; 반환 값: 문자열 유형.
지정된 시간표 (timestamp ((ms)) 문자열을 반환하고 매개 변수를 전달하지 않고 현재 시간을 반환합니다. 예를 들어:_D()또는_D(1478570053241), 기본 형식은yyyy-MM-dd hh:mm:ss.
function main(){
    var time = _D()
    Log(time)
}
def main():
    strTime = _D()
    Log(strTime)
void main() {
    auto strTime = _D();
    Log(strTime);
}
참고:
사용 시_D()에Python전략, 우리는 매개 변수에서 전달되는 시간 스탬프에 주의를 기울여야 합니다JavaScript그리고C ++전략, 그리고 1초 = 1000 밀리초).
봇에서, 함수를 사용할 때_D()읽기 쉬운 시간표가 있는 시간 문자열을 분석하려면, 당신은 도커 프로그램의 운영 체제에서 시간대에 관심을 기울여야 합니다. 함수_D()도커 시스템의 시간에 기반한 시간 문자열로 시간표를 분석합니다.
예를 들어, 시간표를 분석1574993606000코드:
function main() {
    Log(_D(1574993606000))
}
def main():
    # Beijing time server runs: 2019-11-29 10:13:26, and the docker on another server in another region runs this code will get the results: 2019-11-29 02:13:26
    Log(_D(1574993606))
void main() {
    Log(_D(1574993606000));
}
_N (Num, 정밀)
_N(Num, Precision), 형식화 된 부동 소수점 번호. 파라미터 값:Num숫자로 표시되는 것Precision정수 타입입니다. 값 반환: 숫자 타입.
예를 들어:_N(3.1415, 2)의 두 소수점 뒤에 값을 삭제합니다3.1415그리고 돌아와3.14.
function main(){
    var i = 3.1415
    Log(i)
    var ii = _N(i, 2)
    Log(ii)
}
def main():
    i = 3.1415
    Log(i)
    ii = _N(i, 2)
    Log(ii)
void main() {
    auto i = 3.1415;
    Log(i);
    auto ii = _N(i, 2);
    Log(ii);
}
소수점 왼쪽에 있는 N자리들을 0으로 바꾸려면 이렇게 쓸 수 있습니다
function main(){
    var i = 1300
    Log(i)
    var ii = _N(i, -3)
    // Checking the log shows that it is 1000
    Log(ii)
}
def main():
    i = 1300
    Log(i)
    ii = _N(i, -3)
    Log(ii)
void main() {
    auto i = 1300;
    Log(i);
    auto ii = _N(i, -3);
    Log(ii);
}
_C(...)
_C(function, args…)재시험 함수입니다. 시장 정보 획득과 미완성 주문 획득 등에 대한 인터페이스의 오류 용도 측정에 사용됩니다.
인터페이스는 지정된 함수를 성공적으로 반환 할 때까지 지속적으로 호출합니다 (패러미터function참조 함수를 호출할 때 null값을 반환하거나false다시 시도합니다.) 예를 들어,_ C(exchange. GetTicker), 기본 재시험 간격은 3초입니다._CDelay (...)재시험 간격을 설정하기 위해_CDelay (1000)변화 함수를 의미합니다_C1초로 다시 시도합니다.
다음 기능을 위해:
exchange.GetTicker()exchange.GetDepth()exchange.GetTrades()exchange.GetRecords()exchange.GetAccount()exchange.GetOrders()exchange.GetOrder()exchange.GetPosition()
그들은 모두 함수에 의해 오류 관용을 수행 할 수 있습니다_C(...). 그 기능_C(function, args...)위와 같은 기능의 오류 용량에 국한되지 않습니다.function호출되지 않은 인용되고, 그것은 주의를 기울여_C(exchange.GetTicker)아니_C(exchange.GetTicker()).
function main(){
    var ticker = _C(exchange.GetTicker)
    // Adjust _C() function's retry interval to 2 seconds
    _CDelay(2000)
    var depth = _C(exchange.GetDepth)
    Log(ticker)
    Log(depth)
}
def main():
    ticker = _C(exchange.GetTicker)
    _CDelay(2000)
    depth = _C(exchange.GetDepth)
    Log(ticker)
    Log(depth)
void main() {
    auto ticker = _C(exchange.GetTicker);
    _CDelay(2000);
    auto depth = _C(exchange.GetDepth);
    Log(ticker);
    Log(depth);
}
매개 변수를 가진 함수에서_C(...)결함 허용을 위해:
function main(){
    var records = _C(exchange.GetRecords, PERIOD_D1)
    Log(records)
}
def main():
    records = _C(exchange.GetRecords, PERIOD_D1)
    Log(records)
void main() {
    auto records = _C(exchange.GetRecords, PERIOD_D1);
    Log(records);
}
또한 사용자 정의 함수 오류 허용 처리에도 사용할 수 있습니다.
var test = function(a, b){
    var time = new Date().getTime() / 1000
    if(time % b == 3){
        Log("Meet the criteria! ", "#FF0000")
        return true
    }
    Log("Retry!", "#FF0000")
    return false
}

function main(){
    var ret = _C(test, 1, 5)
    Log(ret)
}
import time
def test(a, b):
    ts = time.time()
    if ts % b == 3:
        Log("Meet the criteria!", "#FF0000")
        return True
    Log("Retry!", "#FF0000")
    return False

def main():
    ret = _C(test, 1, 5)
    Log(ret)
// C++ does not support this method for fault tolerance of custom functions.
_크로스 ((Arr1, Arr2)
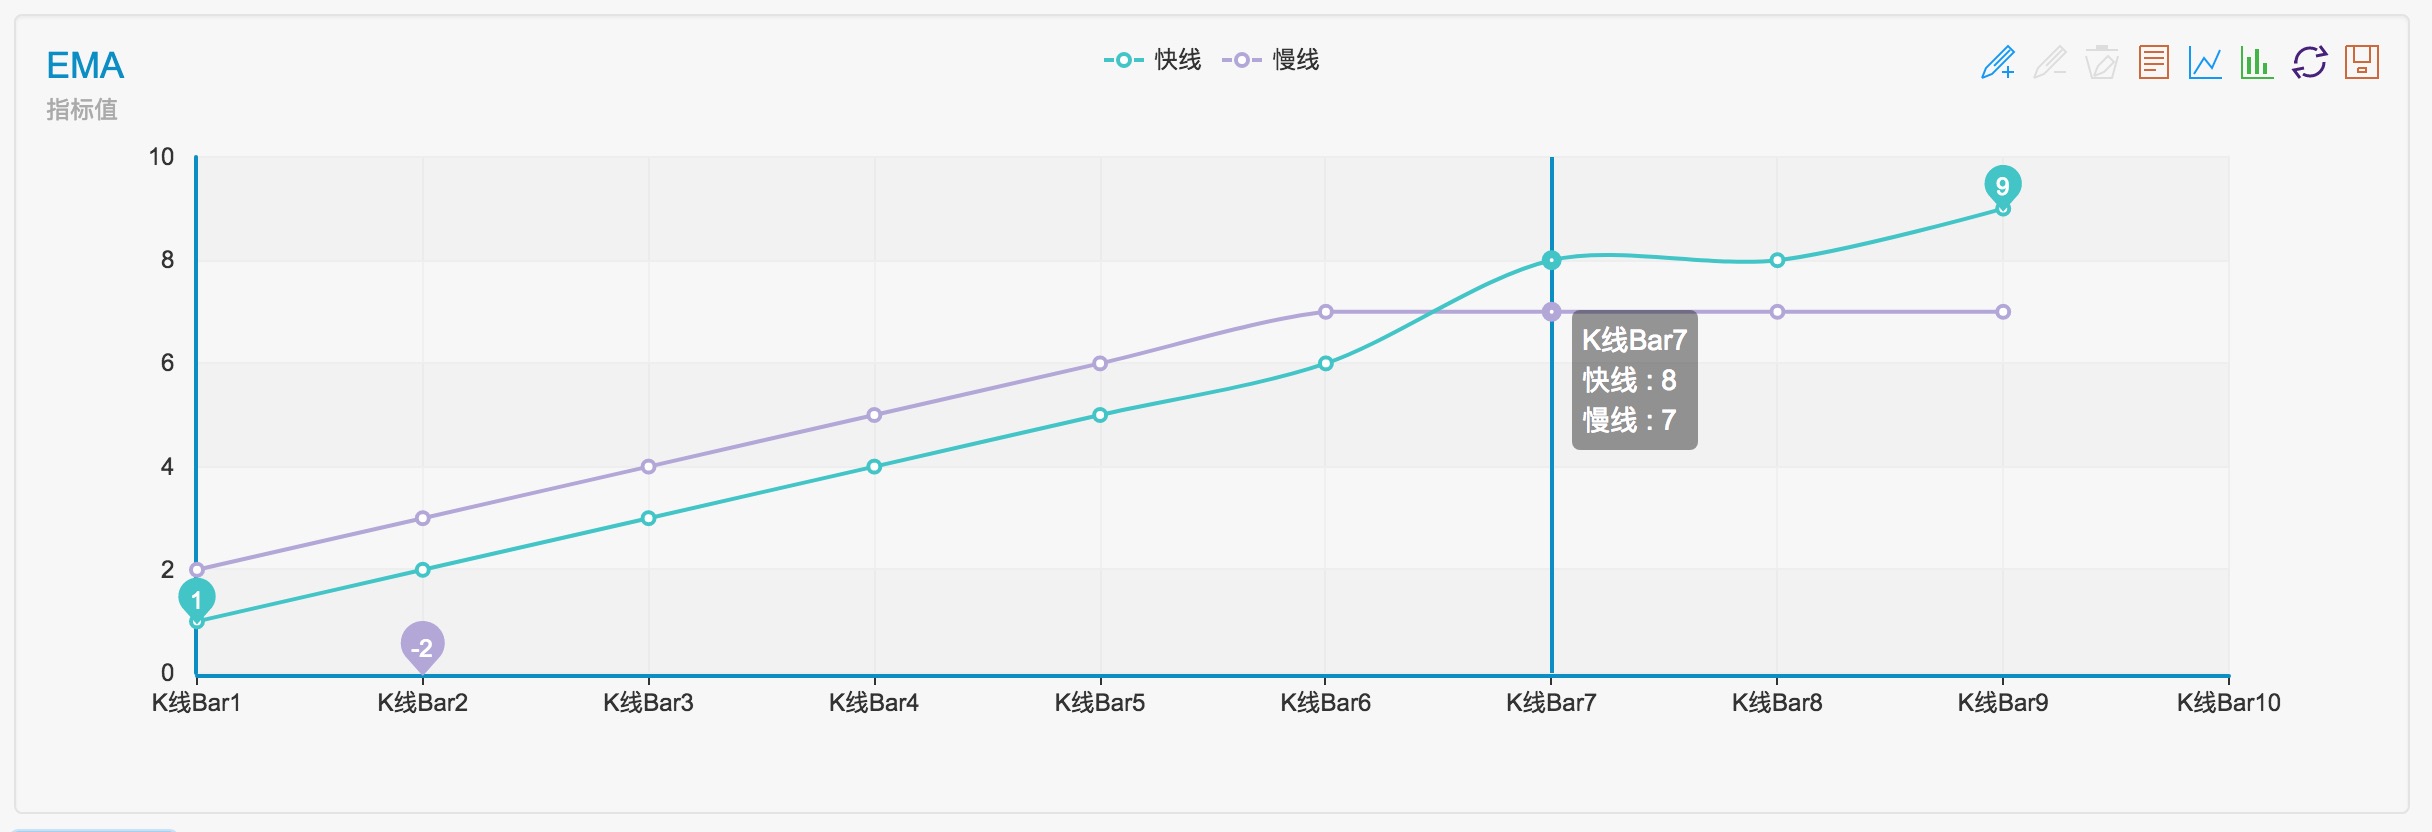
_Cross(Arr1, Arr2)배열의 교차 기간을 반환합니다.arr1그리고arr2. 긍정적 인 숫자는 상승 기간이고, 부정적인 숫자는 하락 기간이며, 0은 현재 가격과 동일합니다. 매개 변수 값: 숫자 유형의 배열.
함수를 테스트하기 위해 데이터 세트를 시뮬레이션 할 수 있습니다_Cross(Arr1, Arr2):
// Fast line indicator
var arr1 = [1,2,3,4,5,6,8,8,9]
// Slow line indicator
var arr2 = [2,3,4,5,6,7,7,7,7]
function main(){
    Log("_Cross(arr1, arr2) : ", _Cross(arr1, arr2))
    Log("_Cross(arr2, arr1) : ", _Cross(arr2, arr1))
}
arr1 = [1,2,3,4,5,6,8,8,9]
arr2 = [2,3,4,5,6,7,7,7,7]
def main():
    Log("_Cross(arr1, arr2) : ", _Cross(arr1, arr2))
    Log("_Cross(arr2, arr1) : ", _Cross(arr2, arr1))
void main() {
    vector<double> arr1 = {1,2,3,4,5,6,8,8,9};
    vector<double> arr2 = {2,3,4,5,6,7,7,7,7};
    Log("_Cross(arr1, arr2) : ", _Cross(arr1, arr2));
    Log("_Cross(arr2, arr1) : ", _Cross(arr2, arr1));
}

관찰을 위한 시뮬레이션 데이터를 시각화
구체적인 지침:내장 기능 _차별 분석 및 지침
JSONParse ((strJson)
JSONParse(strJson), 함수는 JSON 문자열을 분석하는 데 사용됩니다. 큰 숫자를 포함하는 JSON 문자열은 올바르게 분석 될 수 있으며 큰 숫자는 문자열 유형으로 분석됩니다. 백테스팅 시스템은이 기능을 지원하지 않습니다.
function main() {
    let s1 = '{"num": 8754613216564987646512354656874651651358}'
    Log("JSON.parse:", JSON.parse(s1))    // JSON.parse: {"num":8.754613216564988e+39}
    Log("JSONParse:", JSONParse(s1))      // JSONParse:  {"num":"8754613216564987646512354656874651651358"}

    let s2 = '{"num": 123}'
    Log("JSON.parse:", JSON.parse(s2))    // JSON.parse: {"num":123}
    Log("JSONParse:", JSONParse(s2))      // JSONParse:  {"num":123}
}
import json

def main():
    s1 = '{"num": 8754613216564987646512354656874651651358}'
    Log("json.loads:", json.loads(s1))    # json.loads: map[num:8.754613216564987e+39]
    Log("JSONParse:", JSONParse(s1))      # JSONParse:  map[num:8754613216564987646512354656874651651358]

    s2 = '{"num": 123}'
    Log("json.loads:", json.loads(s2))    # json.loads: map[num:123]
    Log("JSONParse:", JSONParse(s2))      # JSONParse:  map[num:123]
void main() {
    auto s1 = "{\"num\":8754613216564987646512354656874651651358}";
    Log("json::parse:", json::parse(s1));
    // Log("JSONParse:", JSONParse(s1));   // The function is not supported

    auto s2 = "{\"num\":123}";
    Log("json::parse:", json::parse(s2));
    // Log("JSONParse:", JSONParse(s2));   // The function is not supported
}
사용자 지정 색상
각 메시지 문자열은 다음과 같은 RGB 값으로 끝낼 수 있습니다.#ff0000, 표시되는 앞면 색상을 나타냅니다.#ff0000112233, 마지막 6개의 뒷면은 배경 색을 나타냅니다.
function main() {
    Log("Red", "#FF0000")
}
def main():
    Log("Red", "#FF0000")
void main() {
    Log("Red", "#FF0000");
}
로그 정보
봇이 실행될 때 로그 정보는 봇의 데이터베이스에 기록됩니다.sqlite3데이터베이스 파일은 도커 프로그램과 장치에 위치하고, 파일의 정확한 위치는 도커 프로그램의 사전에 있습니다 (robot실행 프로그램) 예를 들어: ID와 함께 bot 데이터베이스 파일130350디렉터리에 있습니다.../logs/storage/130350 (..도커가 있는 사전입니다robot위치하고 있습니다) 데이터베이스 파일 이름은130350.db3.
백테스트 시스템의 로그는 [로그 다운로드] 버튼은 백테스트가 끝난 후 백테스트 페이지의 오른쪽 아래쪽 구석에 있습니다.
다른 서버의 도커로 봇을 전송할 필요가 있을 때, 봇의 데이터베이스 파일 (확장자
로그...
Log(message)로그 목록에 메시지를 저장하는 것을 의미합니다. 파라미터 값:message어떤 종류도 될 수 있습니다.
이 문자를 추가하면@문자열이 끝나면 메시지는 푸시 큐에 들어가 FMZ 퀀트 트레이딩 플랫폼의 현재 WeChat 계정에 푸시됩니다. 그리고
참고:
Debug Tool에서 push는 지원되지 않습니다. 백테스트 시스템 에서는 푸시를 지원하지 않습니다.
function main() {
    Log("Hello FMZ Quant!@")
    Sleep(1000 * 5)
    // Add the string to #ff0000, print the log in red, and push the message
    Log("Hello, #ff0000@")
}
def main():
    Log("Hello FMZ Quant!@")
    Sleep(1000 * 5)
    Log("Hello, #ff0000@")
void main() {
    Log("Hello FMZ Quant!@");
    Sleep(1000 * 5);
    Log("Hello, #ff0000@");
}
웹후크눌러:
DEMO에 작성된 서비스 프로그램을 사용Golang:
package main
import (
    "fmt"
    "net/http"
)

func Handle (w http.ResponseWriter, r *http.Request) {
    defer func() {
        fmt.Println("req:", *r)
    }()
}

func main () {
    fmt.Println("listen http://localhost:9090")
    http.HandleFunc("/data", Handle)
    http.ListenAndServe(":9090", nil)
}
세트WebHook: http://XXX.XX.XXX.XX:9090/data?data=Hello_FMZ
서비스 프로그램을 실행 한 후 전략을 실행하고 정보를 누르십시오.
function main() {
    Log("msg", "@")
}
def main():
    Log("msg", "@")
void main() {
    Log("msg", "@");
}
푸시 정보를 받아서 서비스 프로그램이 정보를 인쇄합니다.
listen http://localhost:9090
req: {GET /data?data=Hello_FMZ HTTP/1.1 1 1 map[User-Agent:[Mozilla/5.0 (Macintosh; Intel Mac OS X 10_9_3) AppleWebKit/537.36 (KHTML, like Gecko) Chrome/xx.x.xxxx.xxx Safari/537.36] Accept-Encoding:[gzip]] {} <nil> 0 [] false 1XX.XX.X.XX:9090 map[] map[] <nil> map[] XXX.XX.XXX.XX:4xxx2 /data?data=Hello_FMZ <nil> <nil> <nil> 0xc420056300}
인쇄base64코딩된 이미지기능Log에 코딩 된 이미지를 인쇄 지원base64시작됩니다`, 그리고 끝으로`예를 들어:
function main() {
    Log("`data:image/png;base64,AAAA`")
}
def main():
    Log("`data:image/png;base64,AAAA`")
void main() {
    Log("`data:image/png;base64,AAAA`");
}
Log인쇄를 지원matplotlib.pyplot의 물건Python직접적으로, 즉, 객체가 포함하는 한savefig방법을 사용할 수 있습니다.Log직접 인쇄하기 위해, 예를 들어:
import matplotlib.pyplot as plt
def main():
    plt.plot([3,6,2,4,7,1])
    Log(plt)
인쇄 로그의 자동 언어 전환기능Log언어 전환을 지원합니다. 기능이 텍스트를 출력하면 플랫폼 페이지의 언어 설정에 따라 해당 언어로 자동으로 전환됩니다. 예를 들어:
function main() {
    Log("[trans]Chinese|abc[/trans]")
}
def main():
    Log("[trans]Chinese|abc[/trans]")
void main() {
    Log("[trans]Chinese|abc[/trans]");
}
LogProfit ((이익)
LogProfit(Profit)이윤값을 기록하고 이윤값을 인쇄하고 이윤값에 따라 이윤 곡선을 그립니다. 파라미터 값:수익숫자로 표시됩니다.
함수가 문자와 끝나는 경우&, 그것은 단지 이윤 차트를 그리는 것을 실현 할 수 있습니다, 그리고 이윤 로그를 인쇄하지 않습니다, 예를 들어:LogProfit(10, '&').
로그프로프트리셋 (LogProfitReset)
LogProfitReset()모든 이익 로그를 지우면, 정해진 항목의 수를 지정하기 위해 정수 값 매개 변수를 사용할 수 있습니다.
function main() {
    // Print 30 points on the income chart, then reset, and only retain the last 10 points
    for(var i = 0; i < 30; i++) {
        LogProfit(i)
        Sleep(500)
    }
    LogProfitReset(10)
}
def main():
    for i in range(30):
        LogProfit(i)
        Sleep(500)
    LogProfitReset(10)
void main() {
    for(int i = 0; i < 30; i++) {
        LogProfit(i);
        Sleep(500);
    }
    LogProfitReset(10);
}
로그Status ((Msg)
LogStatus(Msg), 정보는 로그 목록에 저장되지 않습니다, bot의 현재 상태 정보만 업데이트됩니다. 그것은 로그 위에 표시되며 상태를 업데이트하기 위해 여러 번 호출 할 수 있습니다. 매개 변수 값:Msg어떤 종류도 될 수 있습니다.
function main() {
    LogStatus('This is a normal status prompt')
    LogStatus('This is a status prompt in red font # ff0000')
    LogStatus('This is a multi-line status message \n I am the second line')
}
def main():
    LogStatus('This is a normal status prompt')
    LogStatus('This is a status prompt in red font # ff0000')
    LogStatus('This is a multi-line status message \nI am the second line')
void main() {
    LogStatus("This is a normal status prompt");
    LogStatus("This is a status prompt in red font # ff0000");
    LogStatus("This is a multi-line status message \nI am the second line");
}
LogStatus(Msg)인쇄를 지원합니다base64코딩된 사진,`그리고 끝으로`예를 들어:LogStatus("`data:image/png;base64,AAAA`").
LogStatus(Msg)직접 수입을 지원합니다Python's 'matplotlib.pyplot객체, 객체가 포함 한 한savefig방법, 당신은 함수에서 전달할 수 있습니다LogStatus(Msg)예를 들어:
import matplotlib.pyplot as plt
def main():
    plt.plot([3,6,2,4,7,1])
    LogStatus(plt)
상태 표시줄의 데이터 출력 예제:
function main() {
    var table = {type: 'table', title: 'Position Information', cols: ['Column1', 'Column2'], rows: [ ['abc', 'def'], ['ABC', 'support color #ff0000']]}
    // After the JSON order is serialized, add the character "`" on both sides, which is regarded as a complex message format (currently supporting tables)
    LogStatus('`' + JSON.stringify(table) + '`')
    // Table information can also appear in multiple lines
    LogStatus('First line message\n`' + JSON.stringify(table) + '`\nThird line message')
    // That supports multiple tables displayed at the same time, and that will be displayed in a group with TAB
    LogStatus('`' + JSON.stringify([table, table]) + '`')

    // You can also construct a button in the table, and the strategy uses "GetCommand" to receive the content of the cmd attribute
    var table = {
        type: 'table',
        title: 'Position operation',
        cols: ['Column1', 'Column2', 'Action'],
        rows: [
            ['abc', 'def', {'type':'button', 'cmd': 'coverAll', 'name': 'close position'}]
        ]
    }
    LogStatus('`' + JSON.stringify(table) + '`')
    // Or create a separate button
    LogStatus('`' + JSON.stringify({'type':'button', 'cmd': 'coverAll', 'name': 'close position'}) + '`')
    // You can customize the button style (button attribute of bootstrap)
    LogStatus('`' + JSON.stringify({'type':'button', 'class': 'btn btn-xs btn-danger', 'cmd': 'coverAll', 'name': 'close position'}) + '`')
}
import json
def main():
    table = {"type": "table", "title": "Position Information", "cols": ["Column1", "Column2"], "rows": [["abc", "def"], ["ABC", "support color #ff0000"]]}
    LogStatus('`' + json.dumps(table) + '`')
    LogStatus('First line message\n`' + json.dumps(table) + '`\nThird line message')
    LogStatus('`' + json.dumps([table, table]) + '`')

    table = {
        "type" : "table",
        "title" : "Position operation",
        "cols" : ["Column1", "Column2", "Action"],
        "rows" : [
            ["abc", "def", {"type": "button", "cmd": "coverAll", "name": "close position"}]
        ]
    }
    LogStatus('`' + json.dumps(table) + '`')
    LogStatus('`' + json.dumps({"type": "button", "cmd": "coverAll", "name": "close position"}) + '`')
    LogStatus('`' + json.dumps({"type": "button", "class": "btn btn-xs btn-danger", "cmd": "coverAll", "name": "close position"}) + '`')
void main() {
    json table = R"({"type": "table", "title": "Position Information", "cols": ["Column1", "Column2"], "rows": [["abc", "def"], ["ABC", "support color #ff0000"]]})"_json;
    LogStatus("`" + table.dump() + "`");
    LogStatus("First line message\n`" + table.dump() + "`\nThird line message");
    json arr = R"([])"_json;
    arr.push_back(table);
    arr.push_back(table);
    LogStatus("`" + arr.dump() + "`");

    table = R"({
        "type" : "table",
        "title" : "Position operation",
        "cols" : ["Column1", "Column2", "Action"],
        "rows" : [
            ["abc", "def", {"type": "button", "cmd": "coverAll", "name": "close position"}]
        ]
    })"_json;
    LogStatus("`" + table.dump() + "`");
    LogStatus("`" + R"({"type": "button", "cmd": "coverAll", "name": "close position"})"_json.dump() + "`");
    LogStatus("`" + R"({"type": "button", "class": "btn btn-xs btn-danger", "cmd": "coverAll", "name": "close position"})"_json.dump() + "`");
}
상태 표시줄 버튼의 비활성화 및 설명 기능을 설정합니다:

function main() {
    var table = {
        type: "table",
        title: "Test the disable and description functions of status bar buttons",
        cols: ["Column1", "Column2", "Column3"],
        rows: []
    }
    var button1 = {"type": "button", "name": "button1", "cmd": "button1", "description": "This is the first button"}
    var button2 = {"type": "button", "name": "button2", "cmd": "button2", "description": "This is the second button, set to disabled", "disabled": true}
    var button3 = {"type": "button", "name": "button3", "cmd": "button3", "description": "This is the third button, set to enabled", "disabled": false}
    table.rows.push([button1, button2, button3])
    LogStatus("`" + JSON.stringify(table) + "`")
}
import json
def main():
    table = {
        "type": "table",
        "title": "Test the disable and description functions of status bar buttons",
        "cols": ["Column1", "Column2", "Column3"],
        "rows": []
    }
    button1 = {"type": "button", "name": "button1", "cmd": "button1", "description": "This is the first button"}
    button2 = {"type": "button", "name": "button2", "cmd": "button2", "description": "This is the second button, set to disabled", "disabled": True}
    button3 = {"type": "button", "name": "button3", "cmd": "button3", "description": "This is the third button, set to enabled", "disabled": False}
    table["rows"].append([button1, button2, button3])
    LogStatus("`" + json.dumps(table) + "`")
void main() {
    json table = R"({
        "type": "table",
        "title": "Test the disable and description functions of status bar buttons",
        "cols": ["Column1", "Column2", "Column3"],
        "rows": []
    })"_json;
    json button1 = R"({"type": "button", "name": "button1", "cmd": "button1", "description": "This is the first button"})"_json;
    json button2 = R"({"type": "button", "name": "button2", "cmd": "button2", "description": "This is the second button, set to disabled", "disabled": true})"_json;
    json button3 = R"({"type": "button", "name": "button3", "cmd": "button3", "description": "This is the third button, set to enabled", "disabled": false})"_json;
    json arr = R"([])"_json;
    arr.push_back(button1);
    arr.push_back(button2);
    arr.push_back(button3);
    table["rows"].push_back(arr);
    LogStatus("`" + table.dump() + "`");
}
상태 표시 표시 버튼의 스타일을 설정합니다:

function main() {
    var table = {
        type: "table",
        title: "status bar button style",
        cols: ["default", "raw", "success", "information", "warning", "danger"],
        rows: [
            [
                {"type":"button", "class": "btn btn-xs btn-default", "name": "default"},
                {"type":"button", "class": "btn btn-xs btn-primary", "name": "raw"},
                {"type":"button", "class": "btn btn-xs btn-success", "name": "success"},
                {"type":"button", "class": "btn btn-xs btn-info", "name": "information"},
                {"type":"button", "class": "btn btn-xs btn-warning", "name": "warning"},
                {"type":"button", "class": "btn btn-xs btn-danger", "name": "danger"}
            ]
        ]
    }
    LogStatus("`" + JSON.stringify(table) + "`")
}
import json
def main():
    table = {
        "type": "table",
        "title": "status bar button style",
        "cols": ["default", "raw", "success", "information", "warning", "danger"],
        "rows": [
            [
                {"type":"button", "class": "btn btn-xs btn-default", "name": "default"},
                {"type":"button", "class": "btn btn-xs btn-primary", "name": "raw"},
                {"type":"button", "class": "btn btn-xs btn-success", "name": "success"},
                {"type":"button", "class": "btn btn-xs btn-info", "name": "information"},
                {"type":"button", "class": "btn btn-xs btn-warning", "name": "warning"},
                {"type":"button", "class": "btn btn-xs btn-danger", "name": "danger"}
            ]
        ]
    }
    LogStatus("`" + json.dumps(table) + "`")
void main() {
    json table = R"({
        "type": "table",
        "title": "status bar button style",
        "cols": ["default", "raw", "success", "information", "warning", "danger"],
        "rows": [
            [
                {"type":"button", "class": "btn btn-xs btn-default", "name": "default"},
                {"type":"button", "class": "btn btn-xs btn-primary", "name": "raw"},
                {"type":"button", "class": "btn btn-xs btn-success", "name": "success"},
                {"type":"button", "class": "btn btn-xs btn-info", "name": "information"},
                {"type":"button", "class": "btn btn-xs btn-warning", "name": "warning"},
                {"type":"button", "class": "btn btn-xs btn-danger", "name": "danger"}
            ]
        ]
    })"_json;
    LogStatus("`" + table.dump() + "`");
}
함수를 결합GetCommand()상태 표시줄 버튼의 상호 작용 기능을 구성하기 위해:
function test1() {
    Log("Call a custom function")
}

function main() {
    while (true) {
        var table = {
            type: 'table',
            title: 'operation',
            cols: ['Column1', 'Column2', 'Action'],
            rows: [
                ['a', '1', {
                    'type': 'button',
                    'cmd': "CoverAll",
                    'name': 'close position'
                }],
                ['b', '1', {
                    'type': 'button',
                    'cmd': 10,
                    'name': 'Send value'
                }],
                ['c', '1', {
                    'type': 'button',
                    'cmd': _D(),
                    'name': 'Call a function'
                }],
                ['d', '1', {
                    'type': 'button',
                    'cmd': 'test1',
                    'name': 'Call a custom function'
                }]
            ]
        }
        LogStatus(_D(), "\n", '`' + JSON.stringify(table) + '`')

        var str_cmd = GetCommand()
        if (str_cmd) {
            Log("Received interactive data str_cmd:", "Types of:", typeof(str_cmd), "Value:", str_cmd)
            if(str_cmd == "test1") {
                test1()
            }
        }

        Sleep(500)
    }
}
import json
def test1():
    Log("Call a custom function")

def main():
    while True:
        table = {
            "type": "table",
            "title": "Operation",
            "cols": ["Column1", "Column2", "Action"],
            "rows": [
                ["a", "1", {
                    "type": "button",
                    "cmd": "CoverAll",
                    "name": "close position"
                }],
                ["b", "1", {
                    "type": "button",
                    "cmd": 10,
                    "name": "Send value"
                }],
                ["c", "1", {
                    "type": "button",
                    "cmd": _D(),
                    "name": "Call a function"
                }],
                ["d", "1", {
                    "type": "button",
                    "cmd": "test1",
                    "name": "Call a custom function"
                }]
            ]
        }

        LogStatus(_D(), "\n", "`" + json.dumps(table) + "`")
        str_cmd = GetCommand()
        if str_cmd:
            Log("Received interactive data str_cmd", "Types:", type(str_cmd), "Value:", str_cmd)
            if str_cmd == "test1":
                test1()
        Sleep(500)
void test1() {
    Log("Call a custom function");
}

void main() {
    while(true) {
        json table = R"({
            "type": "table",
            "title": "Operation",
            "cols": ["Column1", "Column2", "Action"],
            "rows": [
                ["a", "1", {
                    "type": "button",
                    "cmd": "CoverAll",
                    "name": "close position"
                }],
                ["b", "1", {
                    "type": "button",
                    "cmd": 10,
                    "name": "Send value"
                }],
                ["c", "1", {
                    "type": "button",
                    "cmd": "",
                    "name": "Call a function"
                }],
                ["d", "1", {
                    "type": "button",
                    "cmd": "test1",
                    "name": "Call a custom function"
                }]
            ]
        })"_json;
        table["rows"][2][2]["cmd"] = _D();
        LogStatus(_D(), "\n", "`" + table.dump() + "`");
        auto str_cmd = GetCommand();
        if(str_cmd != "") {
            Log("Received interactive data str_cmd", "Type:", typeid(str_cmd).name(), "Value:", str_cmd);
            if(str_cmd == "test1") {
                test1();
            }
        }
        Sleep(500);
    }
}
상호작용을 위한 상태 표시줄 버튼을 구성할 때, 입력 데이터도 지원되며, 상호작용 명령어는 최종적으로GetCommand()기능.
더하기 위해input상태 표시줄에서 버튼 컨트롤의 데이터 구조에 항목, 예를 들어, 추가"input": {"name": "Number of opening orders", "type": "number", "defValue": 1}에{"type": "button", "cmd": "open", "name": "open position"}, 버튼을 클릭하면 입력 박스 컨트롤이 있는 대화 상자를 팝업 할 수 있습니다 (입기 상자의 기본 값은 1이며, 이는 111입력 상자에서 GetCommand함수는 메시지를 캡처합니다:open:111.
function main() {
    var tbl = {
        type: "table",
        title: "operation",
        cols: ["column 1", "column2"],
        rows: [
            ["Open position operation", {"type": "button", "cmd": "open", "name": "open position", "input": {"name": "number of opening positions", "type": "number", "defValue": 1}}],
            ["Close position operation", {"type": "button", "cmd": "coverAll", "name": "close all positions"}]
        ]
    }

    LogStatus(_D(), "\n", "`" + JSON.stringify(tbl) + "`")
    while (true) {
        var cmd = GetCommand()
        if (cmd) {
            Log("cmd:", cmd)
        }
        Sleep(1000)
    }
}
import json

def main():
    tbl = {
        "type": "table",
        "title": "operation",
        "cols": ["column 1", "column 2"],
        "rows": [
            ["Open position operation", {"type": "button", "cmd": "open", "name": "open position", "input": {"name": "number of opening positions", "type": "number", "defValue": 1}}],
            ["Close position operation", {"type": "button", "cmd": "coverAll", "name": "close all positions"}]
        ]
    }

    LogStatus(_D(), "\n", "`" + json.dumps(tbl) + "`")
    while True:
        cmd = GetCommand()
        if cmd:
            Log("cmd:", cmd)
        Sleep(1000)
void main() {
    json tbl = R"({
        "type": "table",
        "title": "operation",
        "cols": ["column 1", "column 2"],
        "rows": [
            ["Open position operation", {"type": "button", "cmd": "open", "name": "open position", "input": {"name": "number of opening positions", "type": "number", "defValue": 1}}],
            ["Close position operation", {"type": "button", "cmd": "coverAll", "name": "close all positions"}]
        ]
    })"_json;

    LogStatus(_D(), "\n", "`" + tbl.dump() + "`");
    while(true) {
        auto cmd = GetCommand();
        if(cmd != "") {
            Log("cmd:", cmd);
        }
        Sleep(1000);
    }
}
도표의 셀을 결합LogStatus(Msg)기능:
-
수평적 합병
function main() {
    var table = {
        type: 'table',
        title: 'position operation',
        cols: ['Column1', 'Column2', 'Action'],
        rows: [
            ['abc', 'def', {'type':'button', 'cmd': 'coverAll', 'name': 'close position'}]
        ]
    }
    var ticker = exchange.GetTicker()
    // Add a row of data, merge the first and second cells, and output the ticker variable in the merged cell
    table.rows.push([{body : JSON.stringify(ticker), colspan : 2}, "abc"])
    LogStatus('`' + JSON.stringify(table) + '`')
}
import json def main(): table = { "type" : "table", "title" : "position operation", "cols" : ["Column1", "Column2", "Action"], "rows" : [ ["abc", "def", {"type": "button", "cmd": "coverAll", "name": "close position"}] ] } ticker = exchange.GetTicker() table["rows"].append([{"body": json.dumps(ticker), "colspan": 2}, "abc"]) LogStatus("`" + json.dumps(table) + "`")void main() { json table = R"({ "type" : "table", "title" : "position operation", "cols" : ["Column1", "Column2", "Action"], "rows" : [