Oak le enseña a usar JS para interfacer con FMZ API extendida
El autor:- ¿ Por qué?, Creado: 2022-12-20 13:27:24, Actualizado: 2023-09-20 11:12:14
Oak le enseña a usar JS para interfacer con FMZ API extendida
Introducción
Hola a todos, soy
Este artículo presenta principalmente:
- ¿Cómo interactúan los desarrolladores con las APIs extendidas de FMZ a través del lenguaje JS? (Este artículo toma el método GetNodeList como ejemplo.)
- Caso 1: utilizar el método CommandRobot de la API extendida para realizar la comunicación de mensajes entre el robot de monitoreo y otros robots.
- Caso 2: Utilice el método GetRobotDetail de la API extendida para realizar el monitoreo y visualización unificados de múltiples datos del robot.
1. Utilice JS para interactuar con la API extendida de FMZ
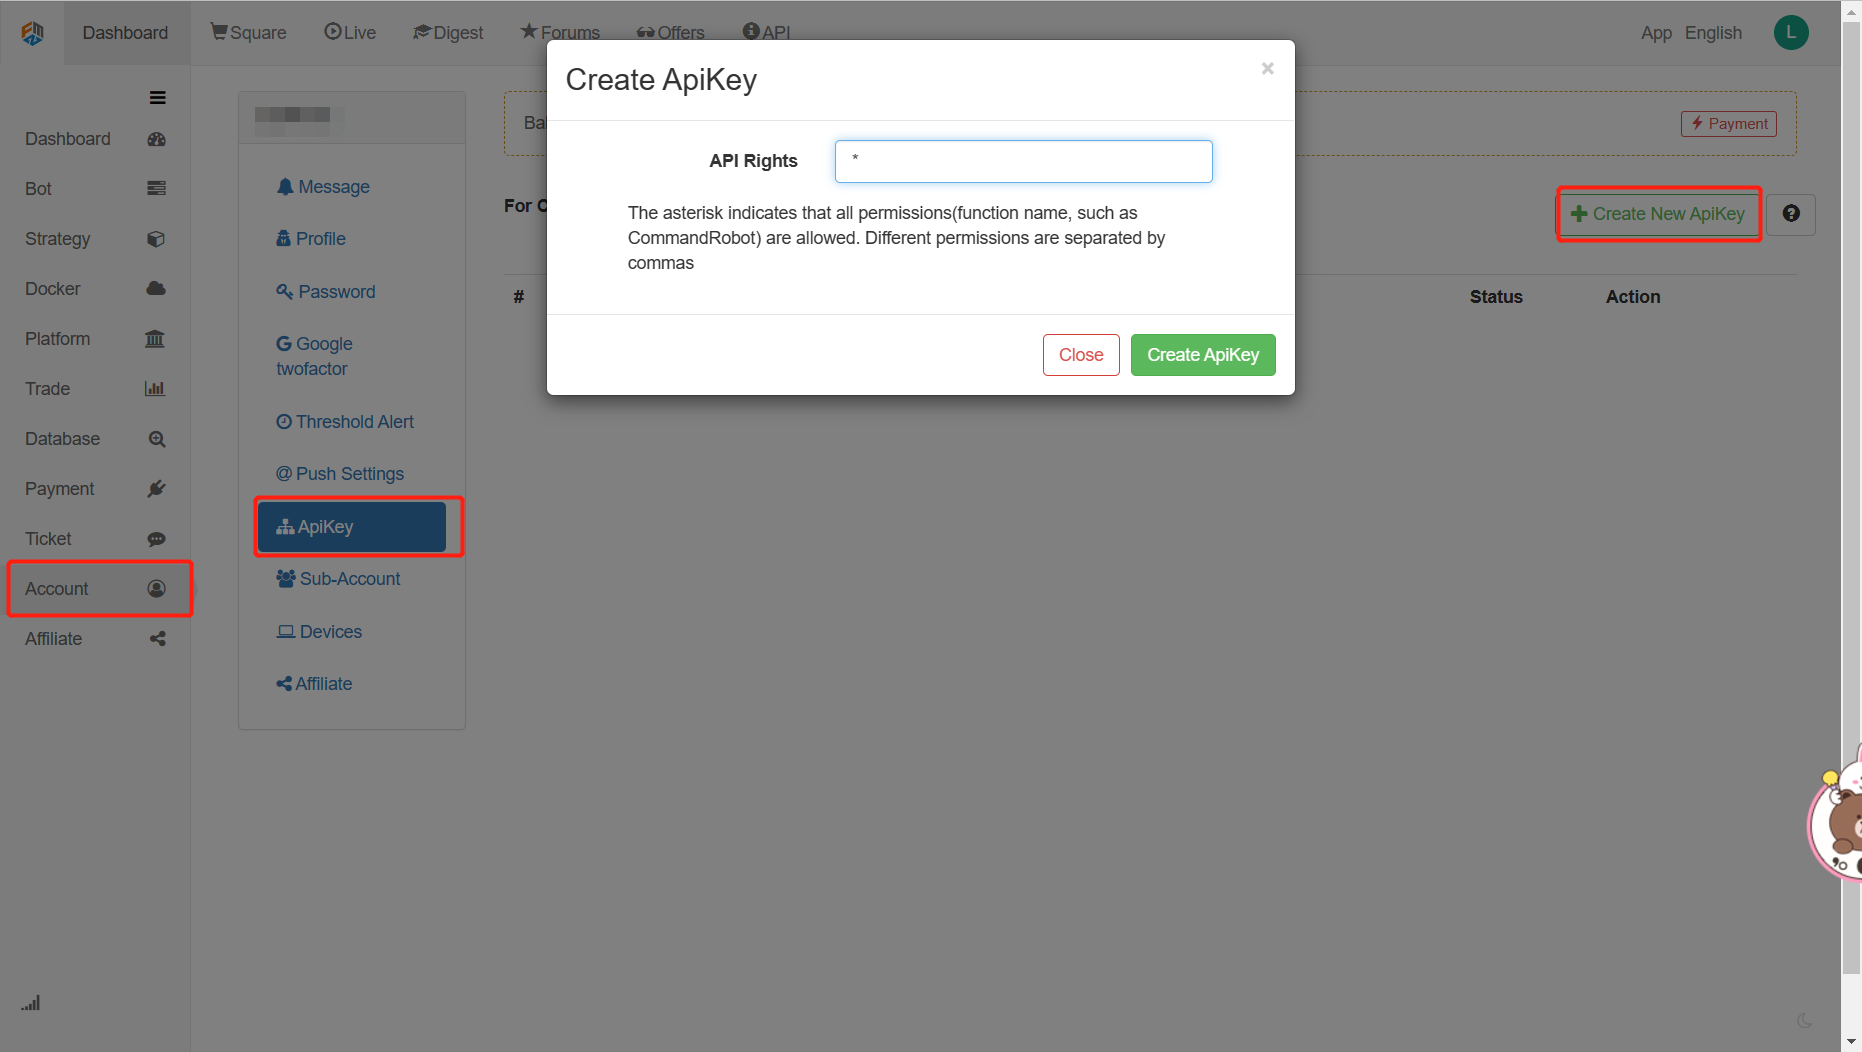
1) Solicitar las claves AccessKey y SecretKey (en lo sucesivo denominadas AK y SK). Aplicamos en el menú de [Cuenta] -> [ApiKey] -> [Crear nueva ApiKey] en el sitio web oficial de FMZ, y luego obtenemos y registramos un grupo de AK y SK. (AK y SK en FMZ son visibles, podemos ver los datos completos de AK y SK en el menú [API Interface] en cualquier momento.)

2) Desarrollar de acuerdo con el documento API ampliado Primero, veamos los pasos clave de la API de solicitud.
- Interfaz de la API de FMZ:
https://www.fmz.com/api/v1
- Parámetros básicos de la solicitud
{
    'version'   : '1.0',                                //Custom version number
    'access_key': '8a148320e0bxxxxxxxxxxxxxx19js99f',   //AK
    'method'    : 'GetNodeList',                        //The specific method to call
    'args'      : [],                                   //List of parameters for the specific method algorithm
    'nonce'     : 1516292399361,                        //Timestamp, in milliseconds
    'sign'      : '085b63456c93hfb243a757366600f9c2'    //Signature (need to be encrypted according to the above 5 parameters to obtain, as discussed below)
}
- Las URL completas de la solicitud se empalman en forma de signo de interrogación y paso de parámetros
Take the GetNodeList method as an example:
https://www.fmz.com/api/v1?
access_key=8a148320e0bxxxxxxxxxxxxxx19js99f&
nonce=1516292399361&
args=%5B%5D&
sign=085b63456c93hfb243a757366600f9c2&
version=1.0&
method=GetNodeList
- Método de firma
After the parameters are spliced in the following order, the MD5 encryption algorithm is used to encrypt the string and convert it to a hexadecimal data string value, which is used as the value of the parameter sign.
version + "|" + method + "|" + args + "|" + nonce + "|" + secretKey
- En resumen, está disponible el siguiente código: Dirección del código fuente:[Oak Quant] - JS acoplamiento FMZ extendida API Demo
var URL = "https://www.fmz.com/api/v1?";
var AK = "b3a53d3XXXXXXXXXXXXXXXXXXX866fe5";//Replace here with your own AccessKey
var SK = "1d9ddd7XXXXXXXXXXXXXXXXXXX85be17";//Replace here with your own SecretKey

function main() {
    //Get 5 basic parameter objects
    var param = getParam("1.0.0",AK,getArgs());
    Log("param:",param);
    //Get the result after md5 encryption of splicing parameters
    var md5Result = md5(param);
    //Assign the encryption result to the basic parameter object
    param.sign = md5Result;
    //Get the URL of the request api
    var finalUrl = getFinalUrl(param);
    Log("finalUrl:",finalUrl);
    //Execute the request and print the results
    var info = HttpQuery(finalUrl);
    Log("info:",info);
}

//Get 5 basic parameter objects
function getParam(version,ak,args){
    return {
        'version': version,
        'access_key': ak,
        'method': 'GetNodeList',
        'args': JSON.stringify(args),
        'nonce': new Date().getTime()
    }
}

//Execute md5 encryption
function md5(param){
    var paramUrl = param.version+"|"+param.method+"|"+param.args+"|"+param.nonce+"|"+SK
    Log("paramUrl:",paramUrl);
    return Hash("md5", "hex", paramUrl)
}

//Get the final request URL
function getFinalUrl(param){
    return URL+"access_key="+AK+"&nonce="+param.nonce+"&args="+param.args+"&sign="+param.sign+"&version="+param.version+"&method="+param.method;
}

//The naming method of... args is not supported in js, so the arguments keyword is used instead to obtain the parameter array
function getArgs(){
    return [].slice.call(arguments);
}
Caso 2: Usando el método CommandRobot de la API extendida para lograr la comunicación de mensajes entre robots
Sobre la base del código anterior, utilizaremos el método CommandRobot para lograr la comunicación de mensajes entre robots.
En primer lugar, echemos un vistazo a los dos parámetros requeridos por el método CommandRobot (RobotId, Cmd):
| Nombre del parámetro | Tipo de producto | Significado |
|---|---|---|
| El robot | Int | Robot ID, que se puede obtener con GetRobotList (...) o en la página de detalles del robot |
| El Cmd | Cuadrícula | Mensaje enviado al robot |
Ahora que sabemos el significado del parámetro, vamos a implementar el método de llamada.
-
Obtenga la ID del robot en la página de detalles del robot
-
Implementar el método de obtención del mensaje Cmd
//Get message header information
function getMessageBody(toUserName,msgType,content){
    return ({
        "toUserName":toUserName,//Who to send to
        "fromUserName":AOKE_INFO,//Source
        "createTime": new Date().getTime(),//Current timestamp
        "msgType":msgType,//Message Type
        "content":content,//Message content
        "msgId":Math.random().toString(36).slice(-8)//Message ID
    })
}

//Get message body trend information (data of message header content field)
function getCtaDate(symbol,timeCycle,direction,nowCycleTime){
    return {
        "symbol":symbol,//Trading currency
        "timeCycle":timeCycle,//Trend cycle
        "direction":direction,//Current entry direction, 0: berish, 1: bullish
        "createTime":new Date().getTime(),//Current timestamp
        "nowCycleTime":nowCycleTime//Start time of current cycle
    }
}
- Modificar el código de envío del mensaje
//Get messages before sending them
var sendMessage = getMessageBody("Test object",'CTARemind',getCtaDate('BTC_USDT','120','0','2020-05-1620:00:00'));

//Get the robot ID and message body through the getArgs() method, and pass in the basic parameters.
var param = getParam("1.0.0",AK,getArgs(17777,sendMessage));
- Ejecute el método principal. Después de enviar el mensaje, use el método GetCommand() para obtener el mensaje
function main(){
    while(true) {
        var cmd = GetCommand()
        if (cmd) {
            Log(cmd)
        }
        Sleep(1000)
    }
}
El mensaje fue enviado correctamente:

El mensaje recibido con éxito:

Caso 3: Utilice los métodos GetRobotList y GetRobotDetail de la API extendida para realizar el monitoreo y visualización de datos de los robots.
Del mismo modo, vamos a ver primero las descripciones de parámetros de los dos métodos siguientes GetRobotList ((desfase, longitud, robotEstado, etiqueta):
| Nombre del parámetro | Tipo de producto | Significado |
|---|---|---|
| de desplazamiento | Int | Número de página de la consulta |
| longitud | Int | Duración de datos de la página de consulta |
| robotEstado | Int | Pasa en - 1 para obtener todo |
| etiqueta | Cuadrícula | Las etiquetas personalizadas pueden filtrar todos los robots con esta etiqueta |
GetRobotDetail ((RobotId)): el nombre del robot
| Nombre del parámetro | Tipo de producto | Significado |
|---|---|---|
| El robot | Int | Identificación del robot |
- Obtener la lista de robots a través del método GetRobotList
//Get robot list information
var robotListJson = getAPIInfo('GetRobotList',getArgs(OFF_SET,PAGE_LENGTH,-1));
var robotList = robotListJson.data.result.robots;
- Obtener información detallada del robot
//Get robot detail information
var robotDetailJson = getAPIInfo('GetRobotDetail',getArgs(robotId));
var robotDetail = robotDetailJson.data.result.robot;
- Datos de la tabla de salida de la consola
function getLogPrient(infoArr){
    return table = {
            type: 'table',
            title: 'Oak Quant robot display',
            cols: [''Robot ID', 'Robot name', 'Strategy name', 'Next deduction time', 'Consumed time ms', 'Consumed amount CNY', 'Latest active time', 'Publish or not'],
            rows: infoArr
        };
}
- En resumen, está disponible el siguiente código: Dirección del código fuente:Utilice la API extendida para obtener información sobre el robot y mostrarlo
var URL = "https://www.fmz.com/api/v1?";
var AK = "b3a53d3XXXXXXXXXXXXXXXXXXX866fe5";//Replace here with your own AccessKey
var SK = "1d9ddd7XXXXXXXXXXXXXXXXXXX85be17";//Replace here with your own SecretKey
var OFF_SET = 0;//Page number subscript of query
var PAGE_LENGTH = 5;//Data length of the query page

function main() {
    LogReset();
    while(true){
        //Get robot list information
        var robotListJson = getAPIInfo('GetRobotList',getArgs(OFF_SET,PAGE_LENGTH,-1));
        //Get the robot list information
        var robotList = robotListJson.data.result.robots;
        //Create an array to display robot information
        var infoArr = new Array();
        var infoArr_index = 0;
        for (index = 0; index < robotList.length; index++) {
            var robot = robotList[index];
            //Get the robot ID of the current loop
            var robotId = robot.id;
            //Get robot detail information
            var robotDetailJson = getAPIInfo('GetRobotDetail',getArgs(robotId));
            var robotDetail = robotDetailJson.data.result.robot;
            //Convert details to array objects
            var arr = getLogPrientItem(robotDetail);
            infoArr[infoArr_index] = arr;
            infoArr_index++;
        }
        Log("infoArr:",infoArr);
        LogStatus('`' + JSON.stringify(getLogPrient(infoArr)) + '`');
        Sleep(30000);
    }
}

function getLogPrient(infoArr){
    return table = {
            type: 'table',
            title: 'Oak Quant robot display',
            cols: [''Robot ID', 'Robot name', 'Strategy name', 'Next deduction time', 'Consumed time ms', 'Consumed amount CNY', 'Latest active time', 'Publish or not'],
            rows: infoArr
        };
}

//Get API information by parameters
function getAPIInfo(method,dateInfo){
    //Get 5 basic parameter objects
    var param = getParam("1.0.0",AK,method,dateInfo);
    //Log("param:",param);
    //Get the result after md5 encryption of splicing parameters
    var md5Result = md5(param);
    //Assign the encryption result to the basic parameter object
    param.sign = md5Result;
    //Get the URL of the request api
    var finalUrl = getFinalUrl(param);
    //Log("finalUrl:",finalUrl);
    //Execute the request and print the results
    var info = HttpQuery(finalUrl);
    //Log("info:",info);
    return JSON.parse(info);
}

//Get the object of the basic 5 parameters
function getParam(version,ak,method,args){
    return {
        'version': version,
        'access_key': ak,
        'method': method,
        'args': JSON.stringify(args),
        'nonce': new Date().getTime()
    }
}

//Execute md5 encryption
function md5(param){
    var paramUrl = param.version+"|"+param.method+"|"+param.args+"|"+param.nonce+"|"+SK
    //Log("paramUrl:",paramUrl);
    return Hash("md5", "hex", paramUrl)
}

//Get the final request URL
function getFinalUrl(param){
    return URL+"access_key="+AK+"&nonce="+param.nonce+"&args="+param.args+"&sign="+param.sign+"&version="+param.version+"&method="+param.method;
}

//The naming method of... args is not supported in js, so the arguments keyword is used instead to obtain the parameter array
function getArgs(){
    return [].slice.call(arguments);
}

//Get the display details object: ['Robot ID', 'Robot Name', 'Strategy Name', 'Next Deduction Time', 'Time Consumed ms', 'Amount Consumed CNY', 'Latest Active Time', 'Whether to Publish'],
function getLogPrientItem(robotDetail){
    var itemArr = new Array();
    var iteArr_index = 0;
    itemArr[iteArr_index++] = robotDetail.id;
    itemArr[iteArr_index++] = robotDetail.name;
    itemArr[iteArr_index++] = robotDetail.strategy_name;
    itemArr[iteArr_index++] = robotDetail.charge_time;
    itemArr[iteArr_index++] = robotDetail.charged;
    itemArr[iteArr_index++] = robotDetail.consumed/1e8;
    itemArr[iteArr_index++] = robotDetail.refresh;
    itemArr[iteArr_index++] = robotDetail.public == 0?"Published":"Unpublished";
    return itemArr;
}
Conclusión
En la extensión real, se pueden realizar más y más funciones interesantes. Por ejemplo, utilizando el método CommandRobot, cada robot envía detección de latidos cardíacos al robot A. Si el robot A encuentra que una máquina no tiene latidos cardíacos, pero el robot todavía está funcionando, puede dar una alarma a través del servicio FMZ. De esta manera, se pueden evitar alarmas como _C() bucles muertos que conducen a escenarios de muerte falsos de programación. Espero que a través de mi introducción esta vez, la plataforma FMZ pueda tener más y más funciones interesantes para desarrollar y abrir. Finalmente, me gustaría agradecer a la plataforma FMZ y a todos los grandes hombres como Xiaoxiaomeng, el Sr. Zhang y el Sr. Z por su apoyo y ayuda.
- Cuantificar el análisis fundamental en el mercado de criptomonedas: ¡Deja que los datos hablen por sí mismos!
- La investigación cuantitativa básica del círculo monetario - ¡No confíes más en los profesores de idiomas, los datos hablan objetivamente!
- Una herramienta esencial en el campo de la transacción cuantitativa - inventor de módulos de exploración de datos cuantitativos
- Dominarlo todo - Introducción a FMZ Nueva versión de la terminal de negociación (con el código fuente de TRB Arbitrage)
- Conozca todo acerca de la nueva versión del terminal de operaciones de FMZ (con código de código de TRB)
- FMZ Quant: Análisis de ejemplos de diseño de requisitos comunes en el mercado de criptomonedas (II)
- Cómo explotar robots de venta sin cerebro con una estrategia de alta frecuencia en 80 líneas de código
- Cuantificación FMZ: Desarrollo de casos de diseño de necesidades comunes en el mercado de criptomonedas (II)
- Cómo utilizar una estrategia de alta frecuencia de 80 líneas de código para explotar y vender robots sin cerebro
- FMZ Quant: Análisis de ejemplos de diseño de requisitos comunes en el mercado de criptomonedas (I)
- Cuantificación FMZ: Desarrollo de casos de diseño de necesidades comunes en el mercado de criptomonedas (1)