
I. Preface
Hello everyone, recently I've received a lot of feedback about workflow usage, and the most frequently asked questions are about equity percentage ordering and take-profit/stop-loss settings. Many friends say: "I know I need to control risk, but how exactly do I calculate order quantities based on account balance? And how do I automatically set take-profit and stop-loss after opening positions to let the system manage risk for us?"
Today, we'll address these practical needs and, using actual code from the FMZ Quant platform, explain in detail how to implement these two core functions.
II. Detailed Explanation of Equity Percentage Ordering

2.1 What is Equity Percentage Ordering
Equity percentage ordering means not using a fixed number of contracts, but calculating the order quantity based on a fixed percentage of the total account balance.
Example:
- Account has 10,000 USDT
- Risk ratio is set to 5% (riskRatio = 0.05)
- The system will use 500 USDT to open a position
Core Advantages:
- Controllable risk: Each trade's risk is a fixed percentage, regardless of account balance
- High capital utilization: When account balance changes, order quantity automatically adjusts—when capital increases, order quantity increases; when capital decreases, order quantity also decreases accordingly
- Strong adaptability: Suitable for accounts of different capital sizes
2.2 Complete Calculation Logic and Code Implementation
Step 1: Get Account Information
javascript
// 1. Get account information
const accountInfo = exchange.GetAccount();
if (!accountInfo) {
return [{
json: {
success: false,
error: "Failed to get account information"
}
}];
}
const availBalance = accountInfo.Balance; // Available balance
Log("Account available balance:", availBalance);
Key Point: The Balance field represents the available balance, which is the foundation for calculations.
Step 2: Get Market Information
            javascript

            // 2. Get market information
const symbol = $vars.coin + '_USDT.swap' || 'ETH_USDT.swap';
const allMarkets = exchange.GetMarkets();
const marketsInfo = allMarkets[symbol];
if (!marketsInfo) {
    return [{
        json: {
            success: false,
            error: `Trading pair information not found: ${symbol}`
        }
    }];
}
Core Parameter Descriptions:
- CtVal: Contract value (e.g., ETH perpetual contract value is 0.01 ETH)
- MinQty: Minimum order quantity
- MaxQty: Maximum order quantity
- AmountPrecision: Quantity precision
- PricePrecision: Price precision
Special Note: Be sure to check whether the coin you want to trade exists on the exchange.
Step 3: Get Current Price
            javascript

            // 3. Get current price
const ticker = exchange.GetTicker(symbol);
if (!ticker) {
    return [{
        json: {
            success: false,
            error: "Failed to get price information"
        }
    }];
}
const currentPrice = ticker.Last; // Latest transaction price
Log("Current price:", currentPrice);
Step 4: Calculate Contract Quantity
            javascript

            // 4. Calculate contract quantity
const riskRatio = $vars.riskRatio || 0.05; // Default 5% risk ratio
// Step 1: Calculate risk amount
const riskAmount = availBalance * riskRatio;
// Step 2: Calculate coin quantity
let coinQuantity = riskAmount / currentPrice;
// Step 3: Convert to contract quantity (because futures trading uses contract units)
let contractQuantity = coinQuantity / marketsInfo.CtVal;
// Step 4: Precision handling (ensure order quantity meets exchange requirements)
contractQuantity = _N(contractQuantity, marketsInfo.AmountPrecision);
Log("Calculation steps:");
Log("- Risk amount:", riskAmount);
Log("- Coin quantity:", coinQuantity);
Log("- Contract value:", marketsInfo.CtVal);
Log("- Original contract quantity:", coinQuantity / marketsInfo.CtVal);
Log("- After precision handling:", contractQuantity);
Calculation Formula Summary:
Contract Quantity = (Account Balance × Risk Ratio ÷ Current Price) ÷ Contract Value
Step 5: Check Limits
            javascript

            // 5. Check limits
if (contractQuantity < marketsInfo.MinQty) {
    return [{
        json: {
            success: false,
            error: `Calculated quantity ${contractQuantity} is less than minimum requirement ${marketsInfo.MinQty}`,
            calculatedQuantity: contractQuantity,
            minQty: marketsInfo.MinQty
        }
    }];
}
if (contractQuantity > marketsInfo.MaxQty) {
    Log("Quantity exceeds maximum limit, using maximum value:", marketsInfo.MaxQty);
    contractQuantity = marketsInfo.MaxQty;
}
Log("Final order quantity:", contractQuantity);
Common Beginner Mistakes:
- ❌ Not checking minimum order quantity, resulting in order failure
- ❌ Improper precision handling, exchange rejects the order
- ❌ Not considering contract value, calculation errors
When the above settings are incorrect, order failure alerts will appear, which is something beginners need to pay special attention to.
III. Detailed Explanation of Take-Profit and Stop-Loss Settings
3.1 Core Logic of Take-Profit and Stop-Loss
Many friends easily get confused about the direction of take-profit and stop-loss orders. Let's clarify:
| Position Type | Take-Profit Operation | Stop-Loss Operation |
|---|---|---|
| Long Position | Sell to close when price rises | Sell to close when price falls |
| Short Position | Buy to close when price falls | Buy to close when price rises |
Key Point: Both take-profit and stop-loss are closing operations, and the direction must be opposite to the position direction.
3.2 Detailed Explanation of Conditional Order Parameters
On the FMZ platform, use the CreateConditionOrder function to set take-profit and stop-loss:
Currently, the FMZ platform's live trading supports CreateConditionOrder conditional orders, but backtesting does not yet support them.
- CreateConditionOrder(symbol, side, amount, condition)
- GetConditionOrder(id)
- GetConditionOrders(symbol)
- CancelConditionOrder(id)
- GetHistoryConditionOrders(symbol, since, limit)
            javascript

            exchange.CreateConditionOrder(
    symbol,           // Trading pair
    closeDirection,   // Close direction: closebuy or closesell
    positionSize,     // Close quantity
    {
        "ConditionType": ORDER_CONDITION_TYPE_SL,  // Stop-loss type
        "SlTriggerPrice": stopLossPrice,           // Trigger price
        "SlOrderPrice": executionPrice             // Execution price
    },
    "Stop-loss order"  // Order note
);
Parameter Descriptions:
-
Operation Type (closeDirection):
- Use closebuy to close long positions
- Use closesell to close short positions
-
ConditionType:
- ORDER_CONDITION_TYPE_SL: Stop-loss (Stop Loss)
- ORDER_CONDITION_TYPE_TP: Take-profit (Take Profit)
-
TriggerPrice (Trigger Price): Order is activated when this price is reached
-
OrderPrice (Execution Price): Order is executed at this price after activation
Note: Currently only live trading supports conditional orders, and the docker needs to be updated.
3.3 Take-Profit and Stop-Loss Price Calculation
In the code, we dynamically calculate based on the opening direction:
            javascript

            const stopLossPercent = 0.02;   // 2% stop-loss
const takeProfitPercent = 0.04; // 4% take-profit

if (openSide == 'openShort') {
    // Short position: stop-loss price rises, take-profit price falls
    stopLossPrice = _N(entryPrice * (1 + stopLossPercent), pricePrecision);
    takeProfitPrice = _N(entryPrice * (1 - takeProfitPercent), pricePrecision);
} else {
    // Long position: stop-loss price falls, take-profit price rises
    stopLossPrice = _N(entryPrice * (1 - stopLossPercent), pricePrecision);
    takeProfitPrice = _N(entryPrice * (1 + takeProfitPercent), pricePrecision);
}

Log("Entry price:", entryPrice);
Log("Stop-loss price:", stopLossPrice);
Log("Take-profit price:", takeProfitPrice);
3.4 Management and Monitoring of Conditional Orders
After setting up conditional orders, we still need to manage and monitor them:
            javascript

            // Query conditional order status
const slOrder = exchange.GetConditionOrder(stopLossOrderId);
const tpOrder = exchange.GetConditionOrder(takeProfitOrderId);

Log("Stop-loss order status:", slOrder.Status);
Log("Take-profit order status:", tpOrder.Status);
Log("Status description: 0=Active, 1=Triggered, -1=Does not exist");
Status Handling Logic:
            javascript

            if (slStatus == 1 && tpStatus == 0) {
    // Stop-loss triggered, cancel take-profit order
    Log("🛑 Stop-loss order triggered, canceling take-profit order");
    exchange.CancelConditionOrder(takeProfitOrderId);
    _G('status', 'finished');

} else if (tpStatus == 1 && slStatus == 0) {
    // Take-profit triggered, cancel stop-loss order
    Log("🎯 Take-profit order triggered, canceling stop-loss order");
    exchange.CancelConditionOrder(stopLossOrderId);
    _G('status', 'finished');

} else if (slStatus == 0 && tpStatus == 0) {
    // Both orders still active, continue monitoring
    Log("⏳ Both take-profit and stop-loss orders active, continue monitoring");
}
Key Functions:
- The FMZ platform provides the GetConditionOrder function to view the status of all current conditional orders
- If one side's take-profit or stop-loss order is triggered, you need to promptly cancel the conditional order in the opposite direction
- You can use the CancelConditionOrder function by passing the order ID
Important Notes:
- It's recommended to regularly check conditional order status to ensure they're working properly
- Sometimes when market fluctuates too quickly, conditional orders may not execute promptly, and manual handling may be required
IV. Complete Workflow Integration
4.1 Trading Status Management
In the demonstration workflow, we use a state machine to manage the complete trading cycle:
            javascript

            const savestatus = _G('status');
// Initialize status
if (!savestatus) {
    _G('status', 'unfinished');
}
Three States:
- unfinished: Position not opened, need to execute opening process
- monitor: Position opened and take-profit/stop-loss set, entering monitoring phase
- finished: Trade completed, ready to reset status
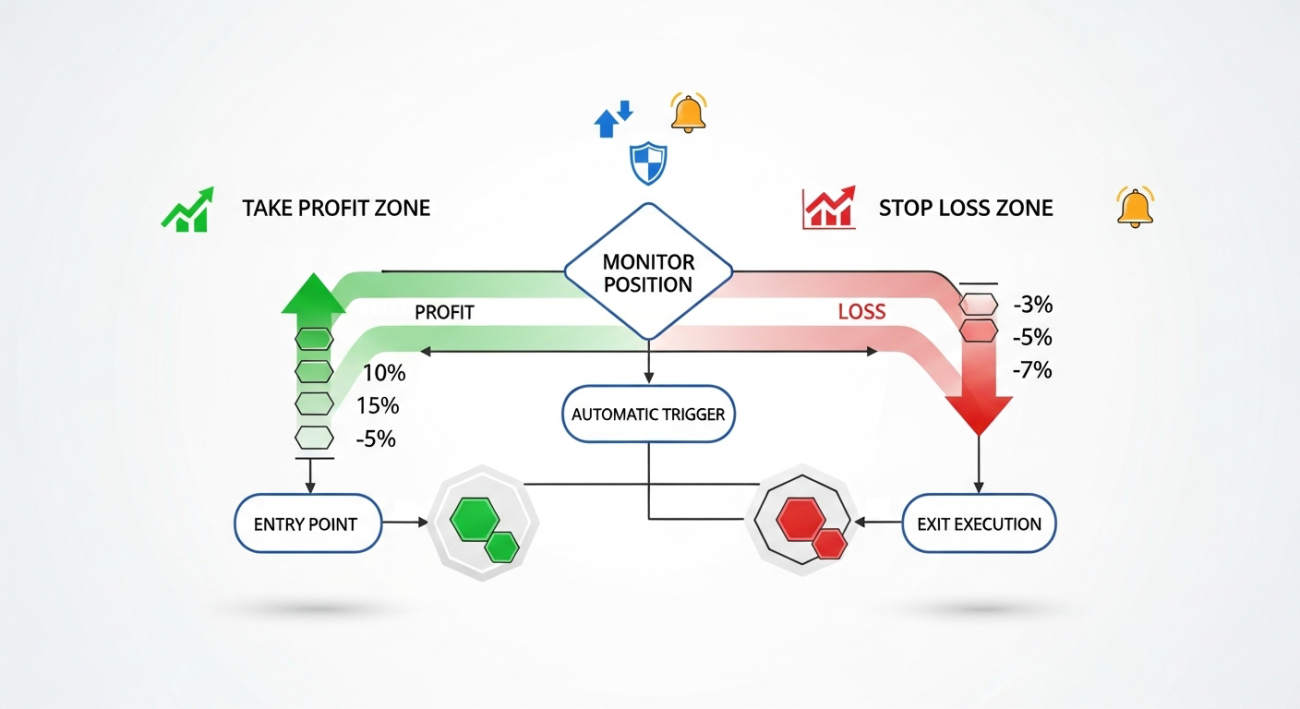
4.2 Complete Trading Process
By integrating equity percentage ordering with take-profit and stop-loss, we have a complete trading workflow:
Flowchart:
Calculate Order Quantity → Execute Opening → Set Take-Profit/Stop-Loss → Monitor Position → Trade Completed
Code Implementation:
            javascript

            // State 1: Execute opening
if (positionData.status == 'unfinished') {
    // 1. Open position order
    const openOrder = exchange.CreateOrder(symbol, dir, -1, positionSize);

    // 2. Wait for order execution
    Sleep(3000);
    const openOrderInfo = exchange.GetOrder(openOrder);

    // 3. Set take-profit and stop-loss after order execution
    if (openOrderInfo.Status == ORDER_STATE_CLOSED) {
        const stopLossOrderId = exchange.CreateConditionOrder(...);
        const takeProfitOrderId = exchange.CreateConditionOrder(...);

        // 4. Save order IDs and switch to monitoring state
        _G('stopLossOrderId', stopLossOrderId);
        _G('takeProfitOrderId', takeProfitOrderId);
        _G('status', 'monitor');
    }
}

// State 2: Monitor take-profit and stop-loss
if (positionData.status == 'monitor') {
    // Check conditional order status, handle trigger situations
    // ...
}

// State 3: Trade completed
if (positionData.status == 'finished') {
    _G('status', 'unfinished'); // Reset status, prepare for next trade
}
Advantages of the Entire Process:
- Controls the risk of individual trades (through equity percentage)
- Protects profits and limits losses through automated take-profit and stop-loss
- The entire process is executed programmatically, reducing human intervention and improving trading consistency
V. Risk Control Best Practices
5.1 Parameter Setting Recommendations
Risk Ratio:
- Beginners recommended: 2-3%
- Experienced traders: 5-10%
- Don't be greedy and set it too high; set it according to your own risk tolerance
Take-Profit and Stop-Loss Ratios:
- Stop-loss: 1-3% (adjust based on coin volatility)
- Take-profit: 2-6% (usually 1.5-2 times the stop-loss)
- Need to set reasonably based on different coin characteristics
5.2 Testing and Validation
Complete Testing Checklist:
- ✅ Is the quantity calculation correct
- ✅ Are take-profit and stop-loss prices reasonable
- ✅ Do conditional orders trigger normally
- ✅ Is state switching correct
- ✅ Is exception handling comprehensive
Testing Process:
- First validate all logic in a test environment
- Conduct live trading tests with small amounts
- Only invest formal capital after ensuring no issues
Remember: Test thoroughly before going live - this is a fundamental principle of quantitative trading.
VI. Conclusion
Alright, that's all for today's discussion on equity percentage ordering and take-profit/stop-loss settings. This workflow combines risk control with automated execution, making our trading more standardized. However, everyone's trading style and risk tolerance are different, so remember to adjust the parameters according to your actual situation when using it. If you encounter any problems during use, or have other questions about quantitative trading, feel free to come and consult. Let's discuss together and improve together.
Source Code Reference: https://www.fmz.com/strategy/517040
- 1