
Introduction
In our previous video, we built a dual moving average strategy using ClawdBot/OpenClaw. Many viewers wanted more and asked in the comments: Can we let AI monitor the market, make decisions, and execute trades on its own? Today, we're going to tackle this ultimate goal and build a fully automated AI trading system.
Some of you are concerned that letting AI trade directly is too risky. That's why we've designed a safer architecture: ClawdBot serves as the brain, responsible for collecting data, analyzing news, and generating trading signals; FMZ Quant Platform serves as the hands, responsible for receiving signals, executing trades, and managing risk control. This approach leverages AI's analytical capabilities while maintaining the safety guarantees of a professional platform, plus real-time monitoring and review capabilities.

1. System Architecture Breakdown
Before we start coding, let's break down the entire system. The complete system consists of two core components—the Brain and the Executor—connected via HTTP requests to form a complete AI quantitative trading loop:
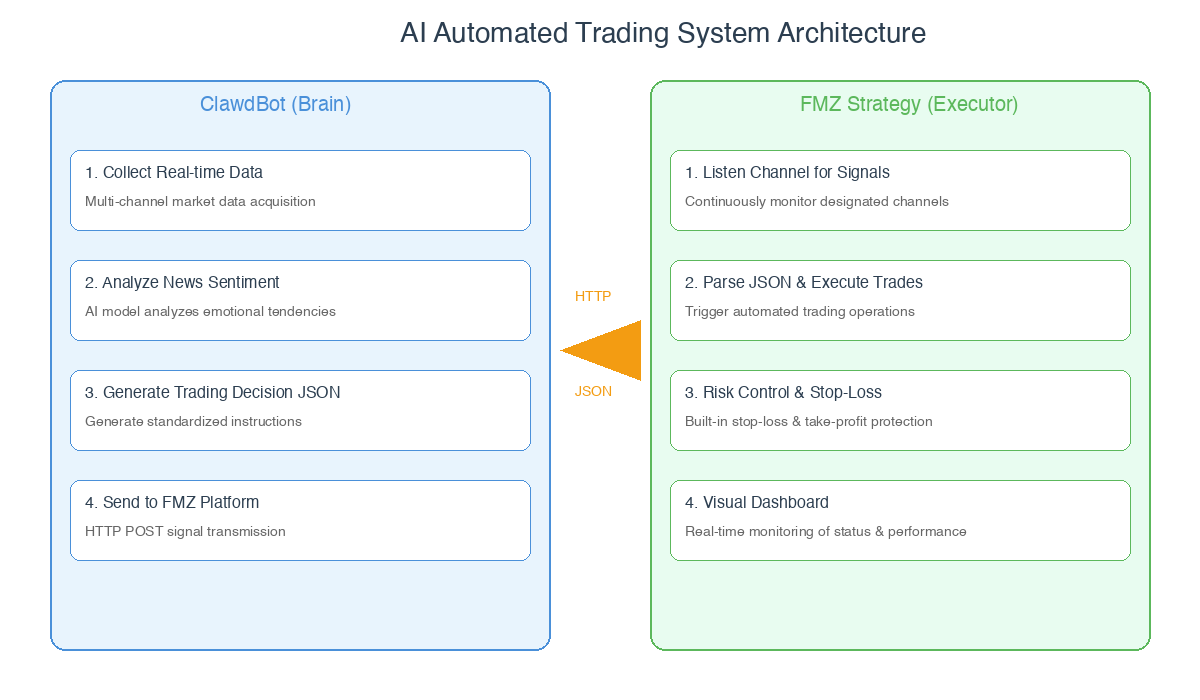
1.1 ClawdBot (OpenClaw - Brain)
- Collect Real-time Data: Through browser automation, obtain the target cryptocurrency's real-time price, trading volume, and news updates.
- Analyze News Sentiment: AI integrates news content and determines market sentiment as bullish, bearish, or neutral.
- Generate Trading Decision JSON: Combining data and sentiment analysis, generate buy, sell, or hold decisions, packaged as JSON format for standardized cross-platform communication.
- HTTP POST to FMZ: Push the JSON-formatted decision signals to the FMZ Quant Platform executor via HTTP POST requests.
1.2 FMZ Strategy (Executor)
- Listen to Channel for Signals: Continuously monitor the designated channel to capture HTTP requests and trading signals from the brain.
- Parse JSON and Execute Trades: Parse the received JSON data, extract core trading instructions, and trigger the platform's live trading bot to automatically complete order placement.
- Risk Management and Stop-Loss Protection: Monitor market prices in real-time during trade execution, implementing stop-loss and FOMO protection according to preset rules to reduce trading risks.
- Visual Dashboard Display: Display trading status, execution results, risk control data, and account equity on the platform dashboard in real-time for full-process visual monitoring.
2. Writing Instructions: Teaching AI What to Do
The core of ClawdBot is the instruction set—essentially a detailed operating manual for the AI, specifying its operating steps, judgment criteria, and execution actions. Let's look at the structure of these instructions:
2.1 Data Collection Section
First, tell the AI to open the target cryptocurrency's page and specify which key data to read:
markdown
[Operation Instructions]
1. Automatically open a new browser tab
2. Navigate to the target cryptocurrency page: https://www.coingecko.com/en/coins/bitcoin
3. Wait for the page to fully load
[Data to Read]
- BTC current price
- 24-hour trading volume
[News to Read]
- Scroll the page to find the "News" section
- Read the latest 3-5 news headlines and summaries
- Consolidate all news into a single summary
- Determine overall sentiment (bullish/bearish/neutral)
2.2 Decision Logic Section
Next, define clear trading judgment criteria, specifying when to buy and when to sell:
            markdown

            [Buy Conditions]
□ Overall positive news sentiment (bullish news dominant)
□ Increased trading volume indicating active market
□ Comprehensive judgment of upward market trend

[Sell Conditions]
□ Overall negative news sentiment (bearish news dominant)
□ Clear risk signals in the market

[Hold Conditions]
□ Neutral or mixed news sentiment
□ Unclear market direction
2.3 Output Format Definition
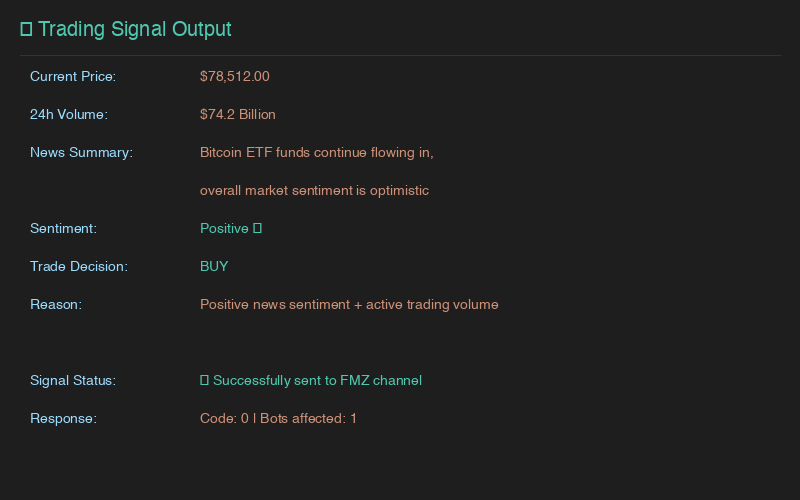
Require AI to generate standard JSON format data—the core communication protocol between ClawdBot and FMZ platform, ensuring unambiguous data parsing:
            json

            {
    "coin": "BTC",
    "timestamp": "2024-01-15T14:00:00.000Z",
    "current_price": 42500.00,
    "volume_24h": "25,000,000,000",
    "news_summary": "Continuous ETF fund inflows, strong institutional accumulation interest",
    "news_sentiment": "positive",
    "trade_decision": "buy",
    "decision_reason": "Positive news sentiment, increased trading volume, suitable for position building"
}
2.4 Execution Actions
Finally, tell the AI to push the JSON signal to the FMZ platform and maintain local operation records for future review:
            markdown

            [Send Signal]
Execute HTTP POST request:
URL: https://www.fmz.com/api/v1?method=pub&robot={LiveTradingID}&channel={UUID}
- Live Trading ID: The unique numeric identifier of the corresponding bot on FMZ platform, used to precisely specify the target trading bot receiving signals.
- UUID: Universal Unique Identifier, serving as the custom channel's unique identifier and the communication key between ClawdBot and FMZ. Do not disclose it to avoid malicious operations.

[Record Log]
Append each operation's time, cryptocurrency, decision, and signal sending status to the local tradediary.csv file for subsequent strategy review and optimization.
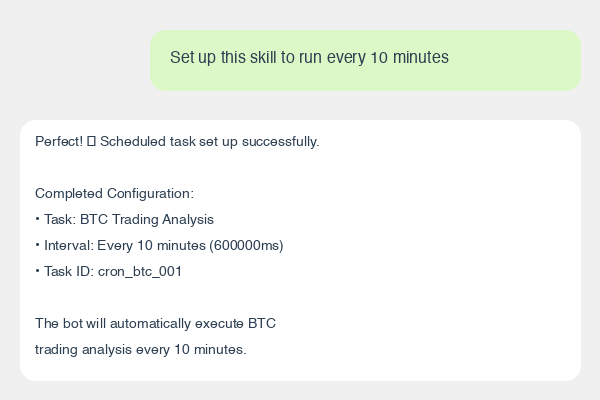
Of course, this instruction set was refined through multiple tests. After testing passes, we can package it as a Skill and set up scheduled tasks for automatic execution.
3. FMZ Platform: Signal Receiving Code
With AI decisions ready, we now need to write corresponding code on the FMZ platform to implement signal reception, trade execution, and risk management.
3.1 Configuration Parameters
First, define core configuration items to centrally manage trading, monitoring, and risk control parameters. The UUID must match the one in ClawdBot's instructions:
            javascript

            const CONFIG = {
    TRADE_AMOUNT: 0.01,           // Fixed trading amount per transaction
    CHECK_INTERVAL: 3000,         // Signal monitoring and risk check interval (milliseconds)
    UUID: "CustomUUID",           // Channel identifier matching ClawdBot, serves as communication key
    STOP_LOSS_PERCENT: 5,         // Stop-loss/FOMO protection percentage (%)
};
3.2 Signal Reception and Deduplication
Use FMZ platform's built-in GetChannelData function to monitor the specified UUID channel and retrieve AI-sent JSON signals. An important detail: use timestamps to determine if a signal has been processed, preventing duplicate execution due to network or platform issues:
javascript
function receiveSignal() {
try {
const res = GetChannelData(CONFIG.UUID);
if (res === null || res === "") {
return null;
}
const signal = typeof res === 'string' ? JSON.parse(res) : res;
// Validate signal format, ensure core fields are complete
if (!signal.coin || !signal.trade_decision) {
Log("❌ Invalid signal format, missing core fields");
return null;
}
// Check if timestamp has been processed (core deduplication logic)
if (isSignalProcessed(signal.timestamp)) {
return null;
}
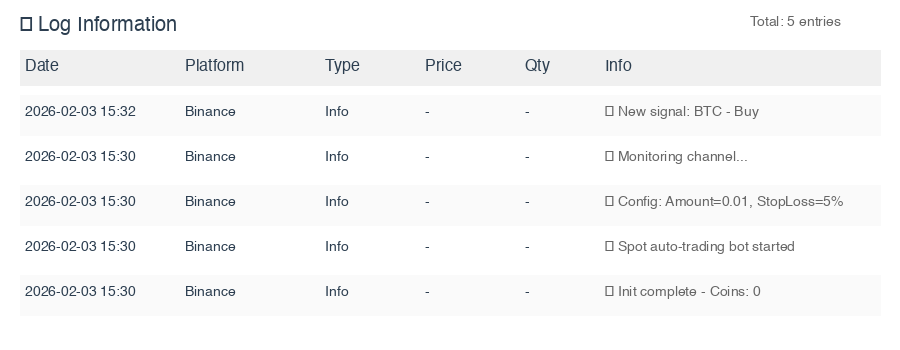
Log(`📥 New signal received: ${signal.coin} - ${signal.trade_decision}`);
return signal;
} catch (e) {
Log(`❌ Failed to get signal: ${e.message}`);
return null;
}
}
3.3 Trade Execution Logic
Parse the core content from signals and execute corresponding buy/sell operations based on the trade_decision field. Before buying, check if USDT balance is sufficient; before selling, check if target cryptocurrency balance is sufficient to avoid trade failures due to insufficient balance:
            javascript

            function executeBuy(signal, reason) {
    const symbol = signal.coin + "_USDT"; // Construct trading pair, e.g., BTC_USDT
    exchange.SetCurrency(symbol); // Set current trading pair

    const account = _C(exchange.GetAccount); // Get real-time account assets
    const ticker = _C(exchange.GetTicker); // Get real-time market data
    const currentPrice = ticker.Last; // Get latest transaction price

    // Check sufficient funds
    const requiredBalance = currentPrice * CONFIG.TRADE_AMOUNT;
    if (account.Balance < requiredBalance) {
        Log(`❌ Insufficient balance, need USDT $${requiredBalance.toFixed(2)}, current $${account.Balance.toFixed(2)}`);
        return false;
    }

    // Execute market buy (-1 means market order, transact at current market price)
    const orderId = exchange.Buy(-1, CONFIG.TRADE_AMOUNT * currentPrice);

    if (orderId) {
        addTradeRecord({
            coin: signal.coin,
            action: "Buy",
            price: currentPrice,
            amount: CONFIG.TRADE_AMOUNT,
            reason: reason
        });
        Log(`✅ ${signal.coin} market buy successful, transaction price: $${currentPrice.toFixed(2)}`);
        return true;
    }
    Log(`❌ ${signal.coin} buy failed, no order ID generated`);
    return false;
}

function executeSell(signal, reason) {
    try {
        const symbol = signal.coin + "_USDT";
        exchange.SetCurrency(symbol);

        const account = _C(exchange.GetAccount);
        const ticker = _C(exchange.GetTicker);
        const currentPrice = ticker.Last;

        // Check sufficient target cryptocurrency
        if (account.Stocks < CONFIG.TRADE_AMOUNT) {
            Log(`❌ ${signal.coin} insufficient balance, need ${CONFIG.TRADE_AMOUNT}, current ${account.Stocks.toFixed(6)}`);
            return false;
        }

        // Execute market sell
        const orderId = exchange.Sell(-1, CONFIG.TRADE_AMOUNT);

        if (orderId) {
            // Add trade record to platform
            addTradeRecord({
                coin: signal.coin,
                action: "Sell",
                price: currentPrice,
                amount: CONFIG.TRADE_AMOUNT,
                reason: reason || signal.decision_reason,
                timestamp: new Date().toISOString()
            });

            Log(`✅ ${signal.coin} market sell successful - Price: $${currentPrice.toFixed(2)}, Amount: ${CONFIG.TRADE_AMOUNT}`);
            return true;
        } else {
            Log(`❌ ${signal.coin} sell failed, no order ID generated`);
            return false;
        }

    } catch (e) {
        Log(`❌ Sell exception: ${e.message}`);
        return false;
    }
}
3.4 Stop-Loss Risk Control Mechanism
The code sets a fixed stop-loss percentage. When market price hits the preset stop-loss line, it automatically executes reverse trading operations. This covers two core scenarios—loss stop-loss and FOMO stop-loss—for comprehensive risk control:
            javascript

            function checkStopLoss() {
    const latestTrade = getLatestTradeRecord(); // Get latest trade record

    if (!latestTrade) return { triggered: false }; // Skip risk check if no trade records

    const ticker = _C(exchange.GetTicker);
    const currentPrice = ticker.Last;
    const tradePrice = latestTrade.price; // Latest trade's transaction price
    const priceChangePercent = ((currentPrice - tradePrice) / tradePrice) * 100; // Price change percentage

    // Scenario 1: Price drops after buying, trigger loss stop-loss to limit maximum loss
    if (latestTrade.action === "Buy") {
        const stopLossPrice = tradePrice * (1 - CONFIG.STOP_LOSS_PERCENT / 100); // Calculate stop-loss price

        if (currentPrice <= stopLossPrice) {
            Log(`🔴 Loss stop-loss triggered! Current drop: ${priceChangePercent.toFixed(2)}%, hit ${CONFIG.STOP_LOSS_PERCENT}% stop-loss line`);
            return {
                triggered: true,
                action: "Sell",
                reason: `Stop-loss sell: Drop triggered ${CONFIG.STOP_LOSS_PERCENT}% stop-loss line, current drop ${priceChangePercent.toFixed(2)}%`
            };
        }
    }

    // Scenario 2: Price rises after selling, trigger FOMO stop-loss to avoid missing major rallies
    if (latestTrade.action === "Sell") {
        const stopLossPrice = tradePrice * (1 + CONFIG.STOP_LOSS_PERCENT / 100); // Calculate FOMO protection price

        if (currentPrice >= stopLossPrice) {
            Log(`🟢 FOMO stop-loss triggered! Current rise: ${priceChangePercent.toFixed(2)}%, hit ${CONFIG.STOP_LOSS_PERCENT}% protection line`);
            return {
                triggered: true,
                action: "Buy",
                reason: `FOMO stop-loss: Rise triggered ${CONFIG.STOP_LOSS_PERCENT}% protection line, current rise ${priceChangePercent.toFixed(2)}%`
            };
        }
    }

    return { triggered: false };
}
3.5 Main Loop Logic
The strategy's core is an infinite loop that processes stop-loss checks, AI signal handling, and dashboard updates in sequence following a risk-first principle, ensuring risk control always has the highest priority:
javascript
function main() {
initialize(); // Initialize: create trade records, dashboard, etc.
Log("🚀 Spot auto-trading bot started, listening for AI signals...");
while (true) { // Infinite loop, continuous operation
// 1. Check stop-loss (highest priority), execute immediately if triggered
const stopLossInfo = checkStopLoss();
if (stopLossInfo.triggered) {
executeStopLoss(stopLossInfo);
}
// 2. Get and process AI signals, skip if no signal
const signal = receiveSignal();
if (signal) {
processSignal(signal);
}
// 3. Update visual dashboard in real-time
displayDashboard();
// 4. Wait for preset interval, enter next check cycle
Sleep(CONFIG.CHECK_INTERVAL);
}
}
3.6 Visual Display
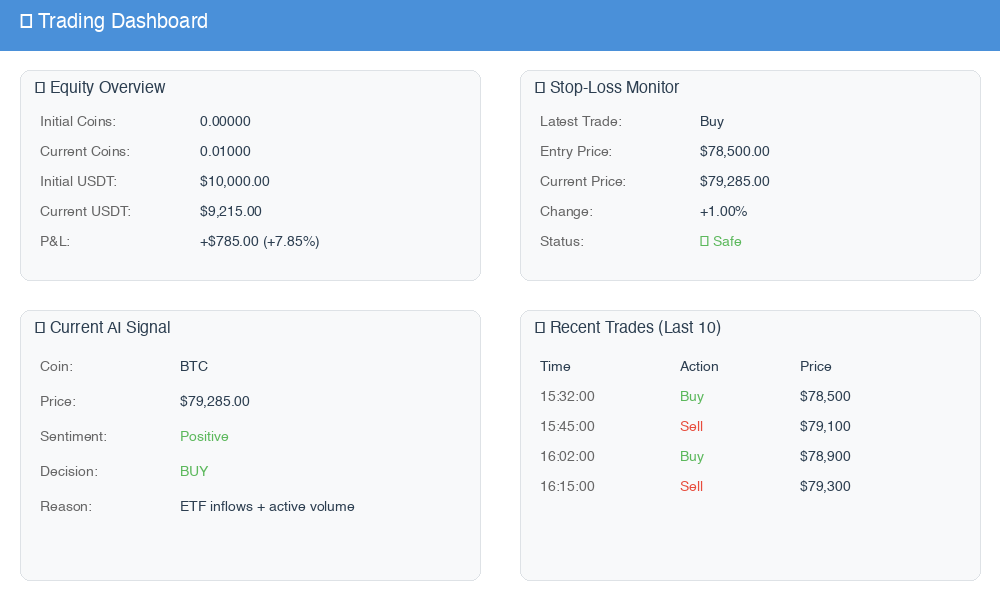
Running trades alone isn't intuitive enough. We've also created a visual dashboard with four core data tables, presenting account, risk control, signals, and trade records in one place for clear system status visibility:
| Table Name | Display Content |
|---|---|
| 💰 Equity Overview | Initial/current cryptocurrency amount, USDT balance, total account equity, P&L amount and percentage |
| 🛡️ Stop-Loss Monitor | Latest trade type, transaction price, current price change, distance to stop-loss line, current risk control status |
| 🤖 Current AI Signal | Target cryptocurrency, real-time price, news summary, sentiment judgment, AI trading decision and reasoning |
| 📋 Trade Records | Last 10 trades' time, operation type, transaction price, trading reason |
4. Automated Execution
Once ClawdBot instructions are debugged and FMZ platform code is tested successfully, the system can run fully automatically: Package the written instructions as a Skill (reusable AI operation template) in ClawdBot's backend, and set up scheduled tasks (e.g., execute every 10 minutes). The system will automatically collect data, analyze decisions, and send signals at the set frequency, while FMZ platform listens in real-time and executes trades—all without manual monitoring.
5. Precautions and Risk Warnings
Here's a special reminder: Quantitative trading always carries market risks, and AI decisions are not absolutely accurate. Please note the following before operating:
- AI decisions are for reference only—its analysis is based on public data and preset logic, and you cannot completely rely on it for investment decisions;
- Although stop-loss mechanisms are in place, the strategy may fail under extreme market conditions (such as flash crashes), unable to completely avoid losses;
- It's recommended to test with paper trading or small amounts first, running at least 1-2 trading cycles to verify system stability before gradually increasing investment;
- Pay attention to risk isolation—it's recommended to use separate trading accounts and devices for operations to avoid exposing account information and UUID communication keys;
- Regularly check strategy operation status, review trading logs and platform error messages to ensure all ClawdBot and FMZ platform modules are working properly;
- Trading logs can serve as feedback data to optimize ClawdBot instruction decision logic and FMZ platform risk control parameters for continuous system iteration.
Summary
Let's review today's achievements: We successfully built an end-to-end AI fully automated quantitative trading system with two core modules—ClawdBot serves as the brain for market data collection, news sentiment analysis, and trading decision generation; FMZ Quant Platform serves as the executor for signal reception, automated trading, risk management, and visual monitoring. Both sides communicate through HTTP interfaces with standardized data, truly achieving fully automated trading without manual monitoring.
More importantly, this architecture is highly extensible: Trading logs can be fed back to AI for review and optimization, and ClawdBot's Skills can continuously iterate with more data sources (such as futures data, industry research reports) and more refined decision logic. Of course, the current model is still basic, providing everyone with an AI quantitative trading concept and practical approach.
If you have better optimization ideas or new feature requirements, feel free to discuss in the comments!
Reference Code: https://www.fmz.com/strategy/526322
- 1