Le microphone tombe en panne et la stratégie de moyenne mobile sur plusieurs périodes


Date de création: 2023-11-01 16:37:17 Dernière modification: 2023-11-01 16:37:17
Copier: 2 Nombre de clics: 737
1
Suivre
1617
Abonnés

Le microphone tombe en panne et la stratégie de moyenne mobile sur plusieurs périodes

Aperçu

Cette stratégie fusionne l’indicateur MACD et la courbe moyenne multi-châtres pour former une stratégie de trading à long terme et à double sens qui utilise à la fois les signaux de tendance et de revers de tendance. La stratégie permet de tirer des bénéfices supplémentaires en cas de revers de tendance, tout en saisissant les occasions de revers.

Principe de stratégie

  1. Le groupe de moyenne EMA de deux groupes de différentes périodes a collaboré pour des filtres à plusieurs temps-frames, pour déterminer la direction du long-courrier: 15 minutes d’EMA rapide supérieure à 1 heure d’EMA lente pour les filtres à baisse, 15 minutes d’EMA rapide inférieure à 1 heure d’EMA lente pour les filtres à baisse.

  2. Le jugement peut être inversé lorsque l’on observe la formation d’un décalage entre le plateau de microphone (la colonne et le prix).

  3. Lorsque le filtre de baisse est ouvert, si le marché haussier est dévié (prix nouveau haut et MACD non innovant haut), attendez que le MACD soit porté sur l’axe zéro, faites plus; lorsque le filtre de baisse est ouvert, si le marché baissier est dévié (prix nouveau bas et MACD non innovant bas), attendez que le MACD soit porté sur l’axe zéro, faites vide.

  4. La méthode de stop loss est une méthode de stop loss de suivi continu, calculée en fonction de la plage de fluctuation de la plus haute et de la plus basse des prix.

  5. Le MACD est à plat lorsque la colonne est traversée dans la direction zéro de l’axe.

Analyse des avantages

  1. Le portefeuille de l’EMA multi-temporel permet de juger les tendances du grand cycle et d’éviter les transactions à contre-courant.

  2. La déviation du MACD capte les occasions de retournement de prix, ce qui convient à une stratégie de retournement.

  3. Le suivi dynamique des pertes permet de bloquer les bénéfices et d’éviter l’expansion des pertes.

  4. Le rendement attendu peut être obtenu en calculant la distance d’arrêt en fonction du stop loss.

Analyse des risques

  1. L’EMA et le Groupe d’équilibrage travaillent en tant que filtres, et des erreurs de jugement de direction peuvent survenir au cours de la période de compilation.

  2. Le MACD a connu un rebond insuffisant et pourrait ne pas être rentable.

  3. La distance d’arrêt n’est pas réglée correctement et peut être trop lâche ou trop serrée.

  4. Le nombre de tournois est limité.

  5. Il est nécessaire de bien saisir le moment de faire demi-tour, car trop tôt ou trop tard peut entraîner des pertes.

Direction d’optimisation

  1. Des combinaisons de paramètres EMA peuvent être testées pour obtenir des jugements de tendance plus précis.

  2. On peut essayer d’ajuster les paramètres MACD à une combinaison de paramètres plus sensible.

  3. Il est possible de tester différents réglages de stop-loss.

  4. Il est possible d’ajouter des conditions de filtrage supplémentaires pour éviter de tomber dans le faux rebond. Par exemple, ajouter un cadre de temps plus élevé pour que l’EMA juge la tendance globale.

  5. L’optimisation des conditions de confirmation de l’inversion de coupe permet de s’assurer que la tendance à l’inversion est suffisamment mature.

Résumer

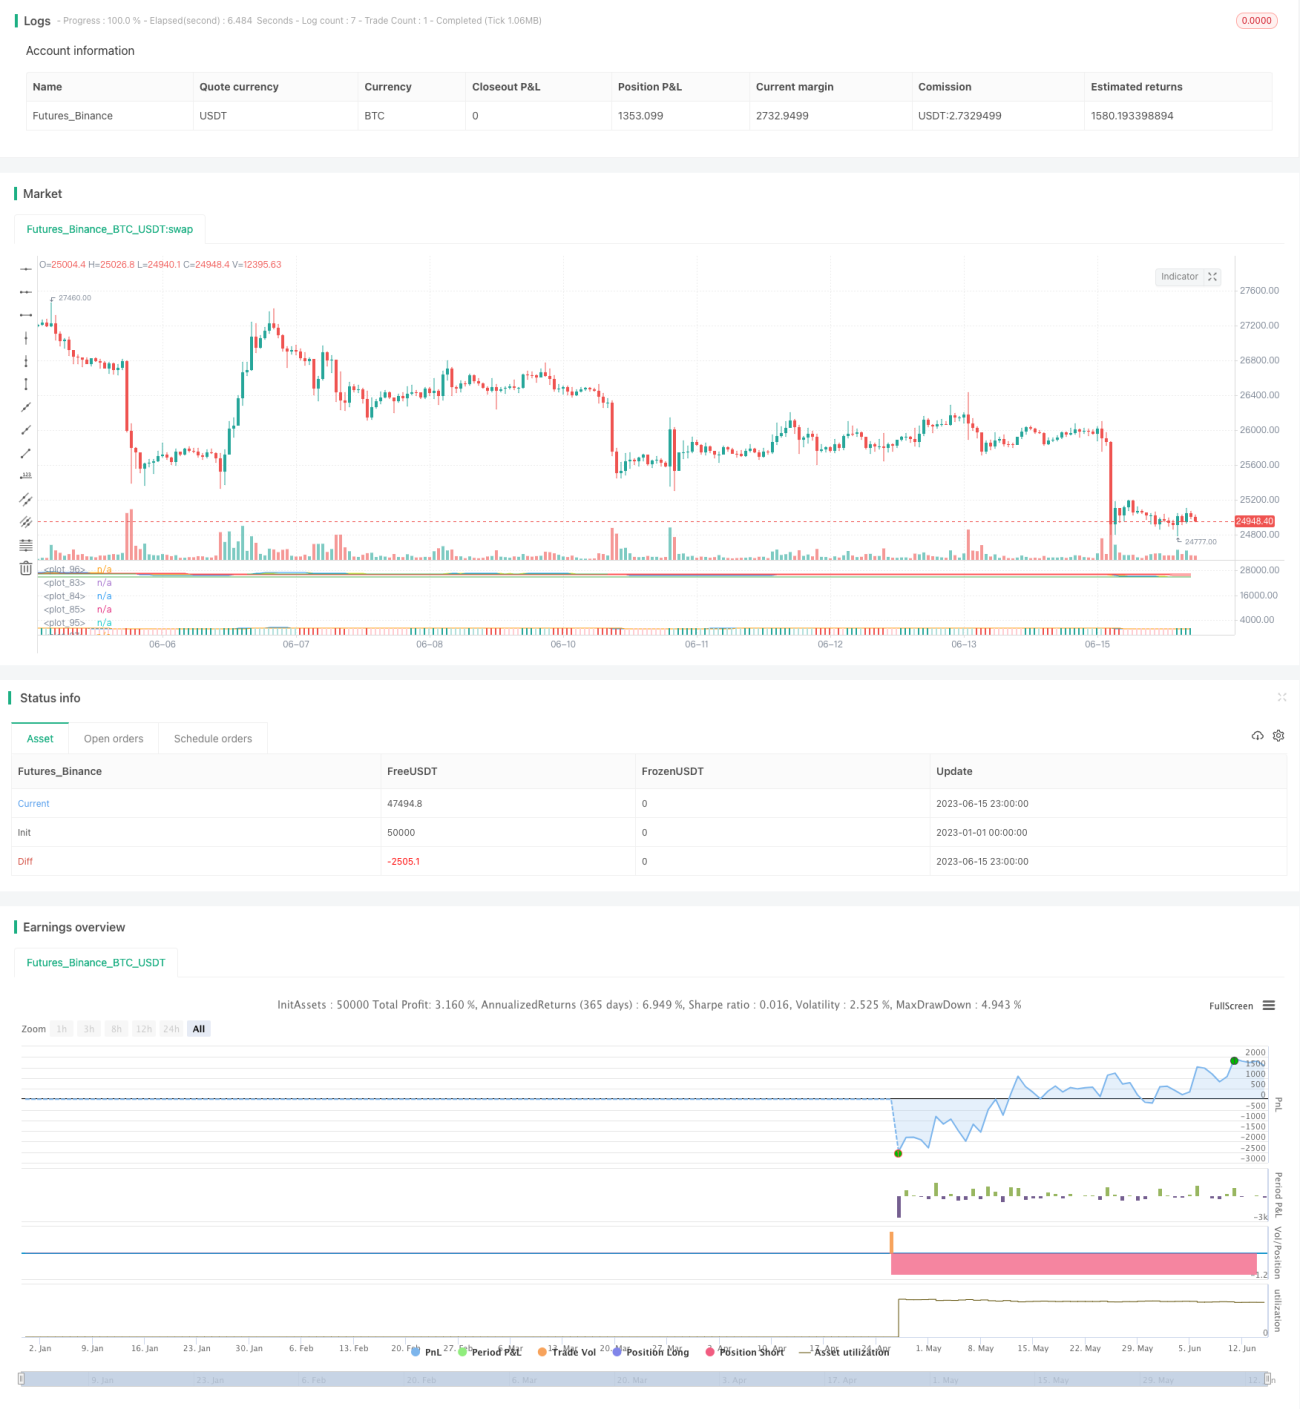
Cette stratégie utilise des moyens tels que le filtrage de tendance, les signaux de renversement de tendance et la gestion dynamique des arrêts de perte. Elle peut être exécutée en continu ou en inversion.

Code source de la stratégie
/*backtest
start: 2023-01-01 00:00:00
end: 2023-06-16 00:00:00
period: 1h
basePeriod: 15m
exchanges: [{"eid":"Futures_Binance","currency":"BTC_USDT"}]
*/

// This source code is subject to the terms of the Mozilla Public License 2.0 at https://mozilla.org/MPL/2.0/
// © maxits
//@version=4

// MACD Divergence + Multi Time Frame EMA
// This Strategy uses 3 indicators: the Macd and two emas in different time frames
// The configuration of the strategy is:
// Macd standar configuration (12, 26, 9) in 1H resolution
// 10 periods ema, in 1H resolution
// 5 periods ema, in 15 minutes resolution

// We use the two emas to filter for long and short positions. 
// If 15 minutes ema is above 1H ema, we look for long positions
// If 15 minutes ema is below 1H ema, we look for short positions 

// We can use an aditional filter using a 100 days ema, so when the 15' and 1H emas are above the daily ema we take long positions
// Using this filter improves the strategy 

// We wait for Macd indicator to form a divergence between histogram and price
// If we have a bullish divergence, and 15 minutes ema is above 1H ema, we wait for macd line to cross above signal line and we open a long position
// If we have a bearish divergence, and 15 minutes ema is below 1H ema, we wait for macd line to cross below signal line and we open a short position

// We close both position after a cross in the oposite direction of macd line and signal line
// Also we can configure a Take profit parameter and a trailing stop loss


// strategy("Macd + MTF EMA",
//          overlay=true,
//          initial_capital=1000,
//          default_qty_value=20,
//          default_qty_type=strategy.percent_of_equity,
//          commission_value=0.1,
//          pyramiding=0)

// User Inputs
i_time          = input(defval = timestamp("01 Apr 2018 13:30 +0000"), title = "Start Time",  type = input.time)    // Starting  time for backtest
f_time          = input(defval = timestamp("30 Sep 2021 13:30 +0000"), title = "Finish Time", type = input.time)    // Finishing time for backtest

long_pos        = input(title="Show Long Positions",  defval=true, type=input.bool)                                 // Enable Long  Positions
short_pos       = input(title="Show Short Positions", defval=true, type=input.bool)                                 // Enable Short Positions
src             = input(close, title="Source")                                                                      // Price value to calculate indicators

emas_properties = input(title="============ EMAS Properties ============", defval=false, type=input.bool)           // Properties

mtf_15          = input(title="Fast EMA", type=input.resolution, defval="15")                                         // Resolucion para MTF EMA 15 minutes
ma_15_length    = input(5, title = "Fast EMA Period")                                                              // MTF EMA 15 minutes Length
mtf_60          = input(title="Slow EMA", type=input.resolution, defval="60")                                         // Resolucion para MTF EMA 60 minutes
ma_60_length    = input(10, title = "Slow EMA Period")                                                              // MTF EMA 60 minutes Length

e_new_filter    = input(title="Enable a Third Ema filter?", defval=true, type=input.bool) 
slowest_ema_len = input(100, title = "Fast EMA Period")
slowest_ema_res = input(title="Slowest EMA", type=input.resolution, defval="D")
macd_res        = input(title="MACD TimeFrame", type=input.resolution, defval="")                                   // MACD Time Frame

macd_properties = input(title="============ MACD Properties ============", defval="")                               // Properties

fast_len        = input(title="Fast Length", type=input.integer, defval=12)                                         // Fast MA Length
slow_len        = input(title="Sign Length", type=input.integer, defval=26)                                         // Sign MA Length
sign_len        = input(title="Sign Length", type=input.integer, defval=9) 

syst_properties = input(title="============ System Properties ============", defval="")                             // Properties

lookback        = input(title="Lookback period", type=input.integer, defval=14, minval=1)                            // Candles to lookback for swing high or low
multiplier      = input(title="Profit Multiplier based on Stop Loss", type=input.float, defval=6.0, minval=0.1)     // Profit multiplier based on stop loss
shortStopPer    = input(title="Short Stop Loss Percentage", type=input.float, defval=1.0, minval=0.0)/100           
longStopPer     = input(title="Long Stop Loss Percentage",  type=input.float, defval=2.0, minval=0.0)/100


// Indicators

[macd, signal, hist] = security(syminfo.tickerid, macd_res, macd(src, fast_len, slow_len, sign_len))
ma_15  = security(syminfo.tickerid, mtf_15, ema(src, ma_15_length))
ma_60  = security(syminfo.tickerid, mtf_60, ema(src, ma_60_length))
ma_slo = security(syminfo.tickerid, slowest_ema_res, ema(src, slowest_ema_len))

// Macd Plot

col_grow_above = #26A69A
col_grow_below = #FFCDD2
col_fall_above = #B2DFDB
col_fall_below = #EF5350

plot(macd,   color=color.new(color.blue, 0))              // Solo para visualizar que se plotea correctamente
plot(signal, color=color.new(color.orange, 0))
plot(hist,   style=plot.style_columns,
     color=(hist >= 0 ? (hist[1] < hist ? col_grow_above : col_fall_above) : 
     (hist[1] < hist ? col_grow_below : col_fall_below)))


// MTF EMA Plot
 
bullish_filter = e_new_filter ? ma_15 > ma_60 and ma_60 > ma_slo : ma_15 > ma_60 
bearish_filter = e_new_filter ? ma_15 < ma_60 and ma_60 < ma_slo : ma_15 < ma_60
    
plot(ma_15,  color=color.new(color.blue, 0))
plot(ma_60,  color=color.new(color.yellow, 0))
plot(e_new_filter ? ma_slo : na, color = ma_60 > ma_slo ? color.new(color.green, 0) : color.new(color.red, 0))

////////////////////////////////////////////// Logic For Divergence

zero_cross = false                                     
zero_cross := crossover(hist,0) or crossunder(hist,0)  //Cruce del Histograma a la linea 0
// plot(zero_cross ? 1 : na)

// MACD DIVERGENCE TOPS (Bearish Divergence) 

highest_top  = 0.0
highest_top := (zero_cross == true ? 0.0 : (hist > 0 and hist > highest_top[1] ? hist : highest_top[1]))
prior_top    = 0.0
prior_top   := (crossunder(hist,0) ? highest_top[1] : prior_top[1])  // Búsqueda del Maximo en MACD
// plot(highest_top)
// plot(prior_top)

highest_top_close  = 0.0
highest_top_close := (zero_cross == true ? 0.0 : (hist > 0 and hist > highest_top[1] ? close : highest_top_close[1]))
prior_top_close    = 0.0
prior_top_close   := (crossunder(hist,0) ? highest_top_close[1] : prior_top_close[1]) // Búsqueda del Maximo en pRECIO
// plot(highest_top_close)
// plot(prior_top_close)

top = false 
top := highest_top[1] < prior_top[1]
     and highest_top_close[1] > prior_top_close[1]
     and hist < hist[1]
     and crossunder(hist,0)                         // Bearish Divergence: top == true 


// MACD DIVERGENCE BOTTOMS (Bullish Divergence) 

lowest_bottom  = 0.0
lowest_bottom := (zero_cross == true ? 0.0 : (hist < 0 and hist < lowest_bottom[1] ? hist : lowest_bottom[1]))
prior_bottom   = 0.0
prior_bottom  := (crossover(hist,0) ? lowest_bottom[1] : prior_bottom[1])

lowest_bottom_close = 0.0
lowest_bottom_close := (zero_cross == true ? 0.0 : (hist < 0 and hist < lowest_bottom[1] ? close : lowest_bottom_close[1]))
prior_bottom_close = 0.0
prior_bottom_close := (crossover(hist,0) ? lowest_bottom_close[1] : prior_bottom_close[1])

bottom = false
bottom := lowest_bottom[1] > prior_bottom[1]
     and lowest_bottom_close[1] < prior_bottom_close[1]
     and hist > hist[1]
     and crossover(hist,0)                              // Bullish Divergence: bottom == true 


////////////////////////////////////////////// System Conditions //////////////////////////////////////////////

inTrade     = strategy.position_size != 0       // In Trade
longTrade   = strategy.position_size  > 0       // Long position
shortTrade  = strategy.position_size  < 0       // Short position
notInTrade  = strategy.position_size == 0       // No trade
entryPrice  = strategy.position_avg_price       // Position Entry Price

////////////////////////////////////////////// Long Conditions //////////////////////////////////////////////

sl = lowest(low, lookback)                  // Swing Low for Long Entry

longStopLoss    = 0.0                       // Trailing Stop Loss calculation
longStopLoss   := if (longTrade)
    astopValue  = sl * (1 - longStopPer)
    max(longStopLoss[1], astopValue)
else
    0

longTakeProf  = 0.0                         // Profit calculation based on stop loss
longTakeProf := if (longTrade)
    profitValue = entryPrice + (entryPrice - longStopLoss) * multiplier
    max(longTakeProf[1], profitValue)
else
    0
    
// Long Entry Conditions

if bottom and notInTrade and bullish_filter and long_pos
    strategy.entry(id="Go Long", long=strategy.long, comment="Long Position")

// strategy.close(id="Go Long", when=zero_cross)

if longTrade
    strategy.exit("Exit Long", "Go Long", limit = longTakeProf, stop = longStopLoss)

plot(longTrade and longStopLoss ? longStopLoss  : na, title="Long Stop Loss",  color=color.new(color.red, 0),   style=plot.style_linebr)
plot(longTrade and longTakeProf ? longTakeProf  : na, title="Long Take Prof",  color=color.new(color.green, 0), style=plot.style_linebr)

////////////////////////////////////////////// Short Conditions //////////////////////////////////////////////

sh = highest(high, lookback) // Swing High for Short Entry

shortStopLoss  = 0.0 
shortStopLoss := if (shortTrade)
    bstopValue = sh * (1 + shortStopPer)
    min(shortStopLoss[1], bstopValue)
else 
    999999
    
shortTakeProf    = 0.0    
shortTakeProf   := if (shortTrade)
    SprofitValue = entryPrice - (shortStopLoss - entryPrice) * multiplier
    min(SprofitValue, shortTakeProf[1])
else 
    999999
    
// Short Entry
if top and notInTrade and bearish_filter and short_pos
    strategy.entry(id="Go Short", long=strategy.short, comment="Short Position")

// strategy.close(id="Go Short", when=zero_cross)

if shortTrade
    strategy.exit("Exit Short", "Go Short", limit = shortTakeProf, stop = shortStopLoss)


plot(shortTrade and shortStopLoss ? shortStopLoss : na, title="Short Stop Loss", color=color.new(color.red, 0),   style=plot.style_linebr)
plot(shortTrade and shortTakeProf ? shortTakeProf : na, title="Short Take Prof", color=color.new(color.green, 0), style=plot.style_linebr)