내부 이득 정지를 기반으로 한 롱-숏 모멘텀 돌파 전략

개요
이 전략은 비정상적으로 상승한 K선 (K line) 을 식별하여 현재 시장에 갑작스러운 일방적인 상황이 있는지 판단한다. 비정상적으로 상승한 K선 (K line) 을 식별할 때, 이 K선 (K line) 의 고점 인근에 구매 중지 명령을 설정하고, 이전 K선 (K line) 의 저점 인근에 중지 손실 명령을 설정하여, 높은 레버리지 리스크 제어를 형성한다. 이 전략은 실시간으로 중지 손실을 모니터링하며, 가격이 아래로 스톱 손실 선을 돌파하면 즉시 단독 손실을 철회한다.
전략 원칙
이 전략은 주로 close>open과 high<high이 발생했을 때 K선 형성을 판단하는 비정상적인 상승입니다.[1] 그리고low>low[1]의 K선일 때, 현재의 주기적 비정상적인 상승상황이 있다고 본다. 이 때 긴 단일 입시 신호를 설정하고, 입시 가격이 현재 K선의 최고 가격 인근에 있다. 동시에 상위 K선의 최저 가격 인근에 있는 스톱로스 가격을 설정하고, 높은 레버리지의 위험 제어 모드를 형성한다. 가격의 지속적인 모니터링을 통해 스톱로스 라인 상황을 뚫고 위험을 실현한다.
우위 분석
이 전략의 가장 큰 장점은 시장상황의 짧은 라인 특이한 돌발상황을 포착할 수 있다는 점, 초고주파 거래의 실현이다. 동시에, 더 큰 스톱로스 범위를 설정함으로써, 더 높은 레버리지를 사용하여 위험을 통제할 수 있는 거래가 이루어져 더 큰 수익을 얻을 수 있다. 또한, 전략은 자동으로 스톱로스 라인을 모니터링하고, 가격이 하향으로 스톱로스 라인을 돌파할 때, 신속하게 스톱로스, 효과적으로 거래 위험을 통제할 수 있다.
위험 분석
이 전략의 주요 위험은 비정상적인 상승 판단이 정확하지 않고 거래의 갑작스러운 상황을 효과적으로 포착할 수 없기 때문에 거래 신호를 잘못 판단할 가능성이 높습니다. 또한, 중지 위치 설정은 거래 위험과 수익에 큰 영향을 미칩니다. 중지 손실이 너무 느슨하면 거래 손실 위험이 커지고, 중지 손실이 너무 좁으면 움직임을 효과적으로 추적 할 수 없습니다.
최적화 방향
이 전략은 다음과 같은 부분에서 최적화될 수 있습니다.
-
비정상적인 상승 판단 기준은 전략 거래 신호 판단의 정확성을 높이기 위해 더 많은 지표 또는 딥러닝 모델 보조 판단을 도입 할 수 있습니다.
-
스톱로스 포지션 설정은 거래 위험과 수익 수준을 균형을 맞추기 위해 더 좋은 스톱로스 포지션을 찾기 위해 많은 통계 및 최적화 분석을 수행 할 수 있습니다.
-
거래량 필터링, 간격 돌파 확인 등과 같은 더 많은 고주파 거래 제어 장치를 도입할 수 있습니다.
-
전략 입시 기준은 조정할 수 있으며, K선 이상 상승에만 국한될 필요는 없으며, 더 많은 지표와 모델과 결합하여 판단할 수 있으며, 다중 검증 메커니즘을 형성한다.
요약하다
이 전략은 전체적으로 전형적인 고주파 트레이딩 전략으로, 단선 돌파 유형 전략에 속한다. 그것은 시장상황의 갑작스러운 비정상적인 변동을 포착함으로써 초고주파 트레이딩을 실현한다. 동시에 손실 위험 제어와 높은 레버리지 메커니즘을 사용하여 위험을 통제한다. 이 전략은 최적화 공간이 넓고, 여러 측면에서 조정 및 최적화를 할 수 있으며, 최종 목표는 위험을 통제하는 전제 조건에서 더 높은 초고주파 트레이딩 수익을 얻는 것이다.
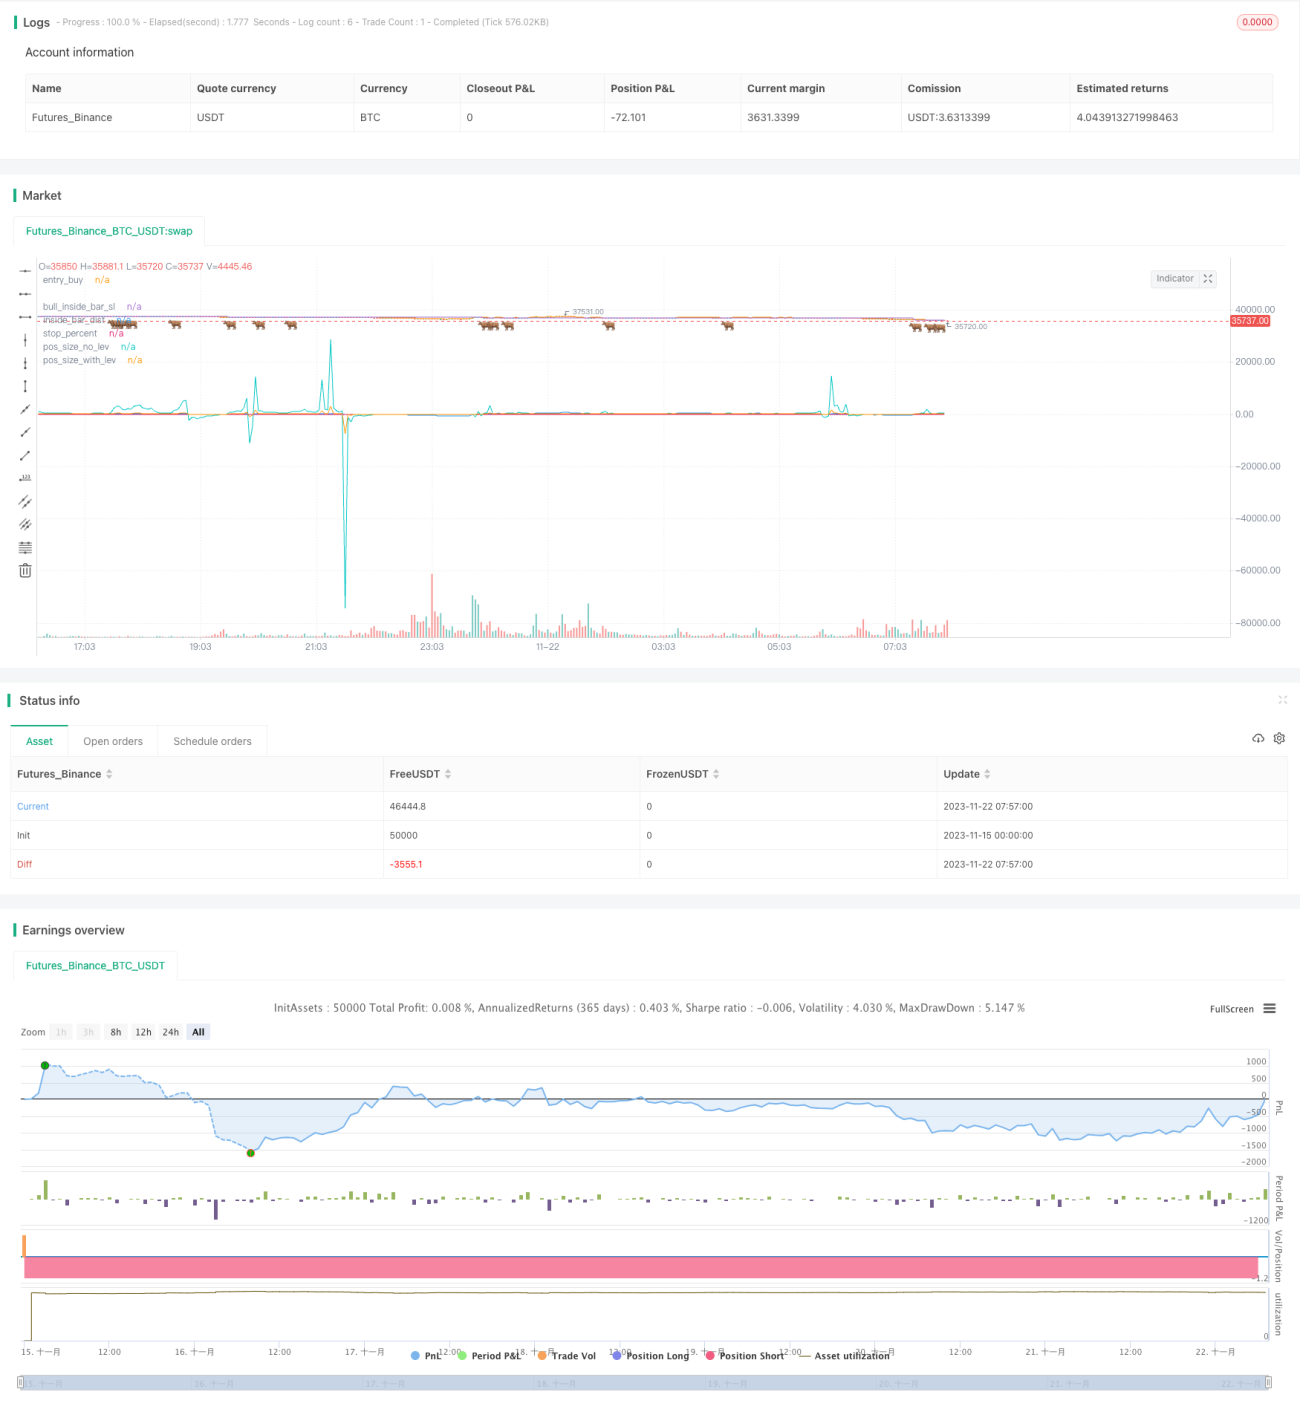
/*backtest
start: 2023-11-15 00:00:00
end: 2023-11-22 08:00:00
period: 3m
basePeriod: 1m
exchanges: [{"eid":"Futures_Binance","currency":"BTC_USDT"}]
*/

// LOVE JOY PEACE PATIENCE KINDNESS GOODNESS FAITHFULNESS GENTLENESS SELF-CONTROL
// This source code is subject to the terms of the Mozilla Public License 2.0 at https://mozilla.org/MPL/2.0/
// © JoshuaMcGowan
// I needed to test/verify the functionality for canceling an open limit order in a strategy and also work thru the pieces needed to set the position sizing so each loss is a set amount. - 1