
개요
대박 대박 전략은 거대한 선선 음선을 검출하여 입점을 하는 전략이다. 거대한 선선 음선이 검출될 때 공백을 만들고, 거대한 음선이 검출될 때 더한다. 중지 손실은 트리거 신호의 기둥 선의 낮은 지점에 위치한다. 반대로 더하면, 중지 손실의 1배이다. 사용자는 최소한의 선선 음선의 부피를 정의할 수 있으며, 이전 기간의 평균 기둥 부피의 배수를 정의할 수 있다.
전략 원칙
이 전략의 핵심 논리는 다음과 같습니다.
-
현재 K 선의 총 변동 범위 ((고위점-저위점) 와 엔터티의 크기를 계산한다 ((폐쇄 가격이 개시 가격보다 더 큰 경우 긍정적이고, 반대로 부정적이다)
-
과거 N 근 K 선 내의 변동의 평균값을 계산한다.
-
현재 K 선이 만족하는지 판단하기: 변동 범위>= 평균 변동幅度 x 곱하기 그리고 실체 크기>= 변동 범위 x 최소 실체수
-
위의 조건을 충족하면 신호를 트리거: 양선 공백, 음선 과잉
-
선택적으로 스톱 손실을 설정할 수 있습니다. 스톱 손실은 신호 기둥의 최저점과 스톱 손실 계수의 몇 배의 변동폭을 더합니다. 스톱 손실의 1 배입니다.
엔티티 판단에서 라인 세그먼트를 필터링하여 충분한 힘이 있는지 확인합니다. 동적으로 평균 변동폭을 계산하여 시장 변화에 적응할 수 없는 고정 하락값을 피합니다.
전략적 이점
이 전략의 가장 큰 장점은 양질의 트렌드 반전 신호를 포착하는 데 있습니다.
-
엄청난 양이 나타난다는 것은 이 트렌드가 초기에 이미 강세를 보였다는 것을 의미하기 때문에 전체 트렌드의 구조적 전환점이 될 가능성이 높습니다.
-
동적으로 평균 변동의 폭을 계산하여 정상적인 수준을 초과하는 비정상적인 변동을 포착하여 일반적인 회귀 상황을 필터링합니다.
또한, 스톱 스톱 설정은 매우 합리적이며, 단일 스톱 손실을 효과적으로 제어할 수 있으며, 스톱 스톱의 수익률은 1이며, 너무 추격하지 않습니다.
전반적으로, 이 전략은 높은 품질의 구조적 전환점을 성공적으로 배치하여 효율적인 작업을 수행합니다. 이것은 트렌드를 추적하는 거래자에게 매우 적합하며 중간 과정에 갇히지 않도록합니다.
전략적 위험
이 전략의 주요 위험은 두 가지로 나뉘어집니다.
-
큰 폭의 폭락은 파열을 막아 무효 신호를 형성할 수 있다.
-
손실을 조절할 수 없는 너무 느린 Stop Loss 설정
첫 번째 위험에는 최소 변동幅度와 실체 크기를 추가하여 오판률을 필터링 할 수 있지만, 몇 가지 기회를 놓치게 될 것입니다. <unk>값에 따라 균형을 잡아야합니다.
두 번째 위험은 스톱 손실 계수를 조정하여 스톱 손실을 지지점에 더 가깝게 만들 수 있지만 너무 밀리지 않도록 최적화 할 수 있습니다. 또한 스톱 손실의 손실을 보상하기 위해 스톱 손실 수익률을 높이는 것도 고려해야합니다.
전략 최적화 방향
이 전략은 다음과 같은 부분에서 더 개선될 수 있습니다.
-
트렌드 방향에 대한 판단을 높이고 역동적인 조작을 피하십시오.
-
최적의 배열을 찾기 위해 변수 설정을 최적화합니다.
-
대양선 대양선 대양선 대양선 대양선 대양선 대양선 대양선 대양선 대양선 대양선 대양선 대양선 대양선
-
더 많은 필터링 조건을 추가하는 것을 고려하십시오. 예를 들어, 플랫폼, 브린 띠 등으로, 잘못된 판단의 가능성을 줄입니다.
-
다양한 품종의 매개 변수의 효과를 테스트하고 매개 변수를 최적화
-
스톱로스 추적을 추가하여 스톱로스를 가격 움직임에 따라 동적으로 조정할 수 있습니다.
-
다시 입학할 수 있는 기회를 추가하는 것을 고려하십시오.
위의 몇 가지 점들을 최적화함으로써 이 전략이 더 효과적일 수 있고, 이로 인해 수익률을 실제로 높일 수 있다. 충분한 재검토와 최적화가 필요한 최적의 매개 변수를 찾아내는 것이다.
요약하다
대박 대박 전략은 엄청난 양의 선과 음을 포착하여 효율적인 수익을 창출하고, 손실을 막는 설정을 가지고 있다. 그것은 높은 품질의 구조적 역전 기회를 성공적으로 위치시키고, 트렌드 트레이더에게 매우 귀중한 정보를 제공할 수 있다. 변수 최적화와 규칙 최적화를 통해 이 전략은 매우 실용적인 보조 의사 결정 도구가 될 수 있다.
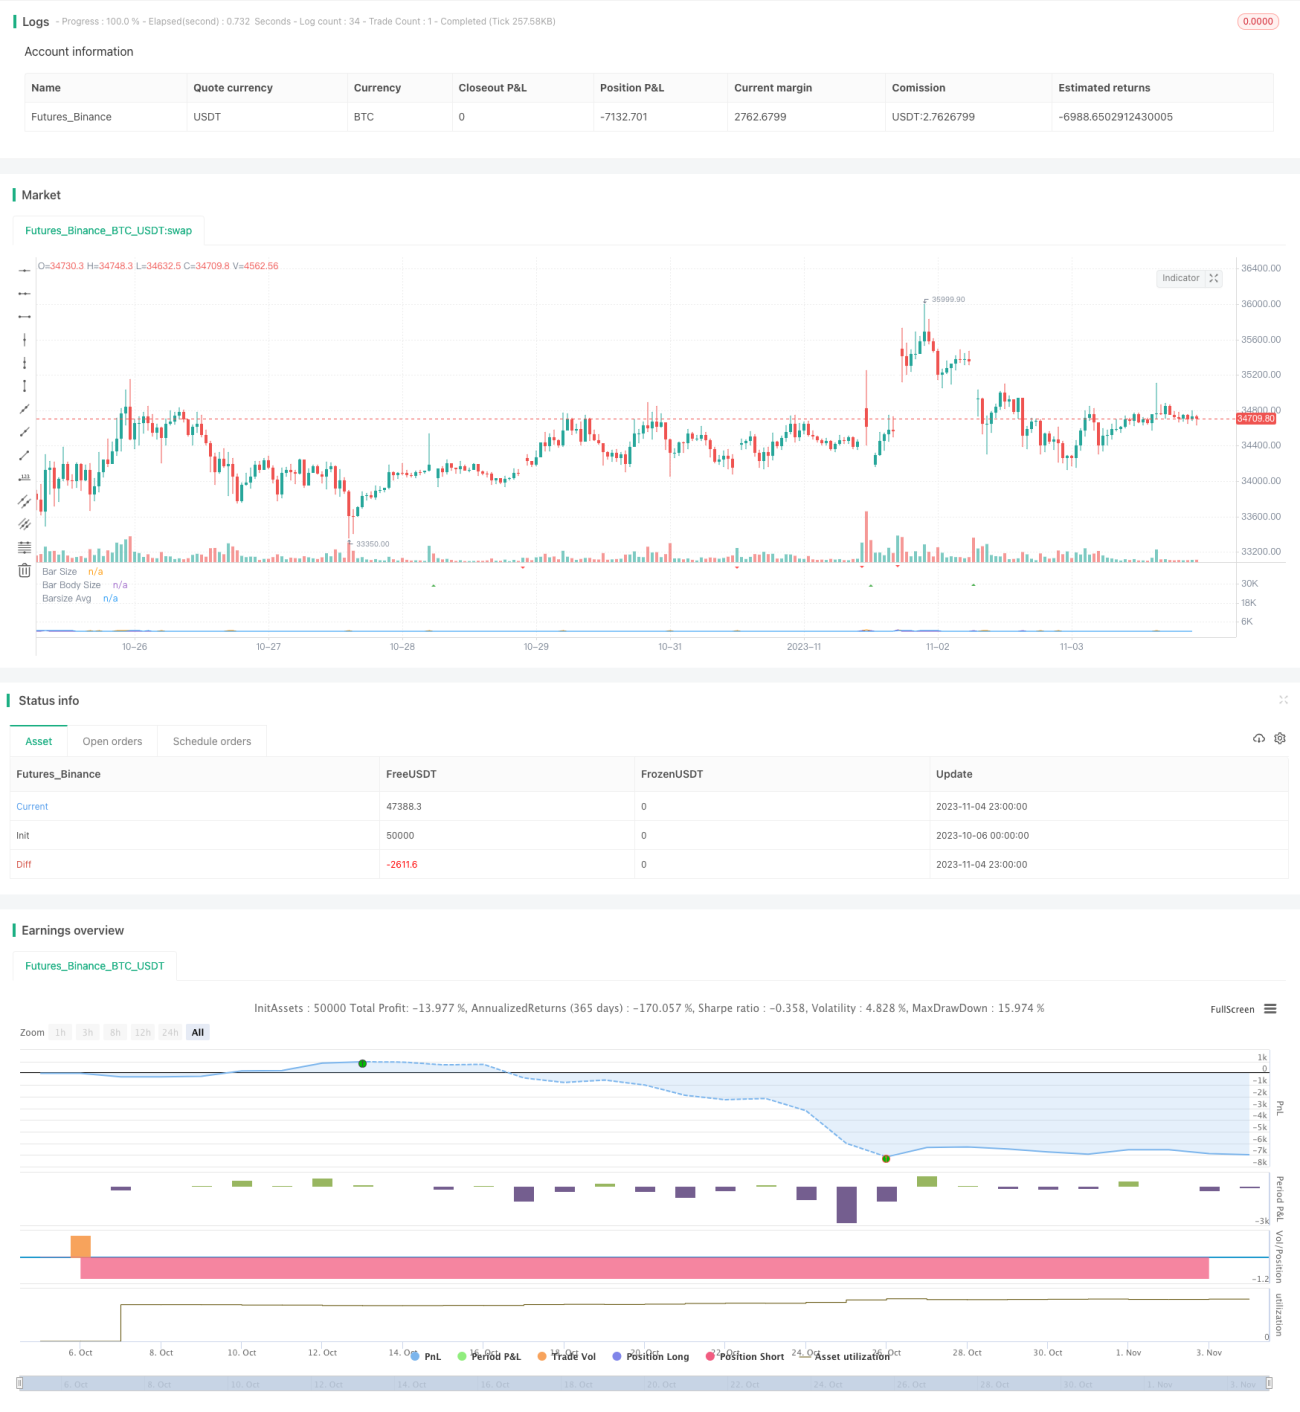
/*backtest
start: 2023-10-06 00:00:00
end: 2023-11-05 00:00:00
period: 1h
basePeriod: 15m
exchanges: [{"eid":"Futures_Binance","currency":"BTC_USDT"}]
*/

// This source code is subject to the terms of the Mozilla Public License 2.0 at https://mozilla.org/MPL/2.0/
// © tweakerID

// This strategy detects and uses big bars to enter a position. When the Big Bar - 1