Platform Basics
The basic objects of the platform: account and billing, exchange accounts, the docker that runs strategies, the strategy library and live robots.
Account and Billing
How live robots are billed, how to top up, and how to hand some live robots to other people with sub-accounts. Other account settings (push notifications, two-factor authentication, API keys, etc.) are on the account settings page.
Live Robot Billing and Top-up
Billing
- Live robots are billed by the hour at 0.05 USD per robot per hour; a partial hour counts as a full hour.
- Billing starts when the robot is created, and starting it prepays the first hour, so a robot cannot start if the account balance is insufficient. Stopping or restarting a robot does not bill it twice.
- If the balance runs out while a robot is running, the platform stops the robot; when a rented strategy expires, the robots using it are stopped as well.
- Servers rented with one-click docker rental are billed separately from live robots (see Platform Basics → Docker → Deploy Docker → One-Click Docker Rental).
Bills and balance alerts
- The billing page shows the balance, top-up records and every billing item.
- Under balance alert in account settings, set an alert threshold: when the available balance drops below it you get an email and WeChat notification (at most once every 24 hours unless you top up or change the setting); 0 turns the alert off.
Top-up
Choose the payment method and amount on the billing page. When topping up with USDT, check carefully:
- The transfer network must match the network selected on the billing page; TRC20, ERC20 and BSC are supported. ERC20 and BSC addresses both start with
0xand look the same, which makes them the easiest to mix up. - The asset is
USDT. - The destination address is the one shown on the billing page.
Sub-accounts
A sub-account lets other people view and operate some of your live robots without giving them the main account.
Create a sub-account
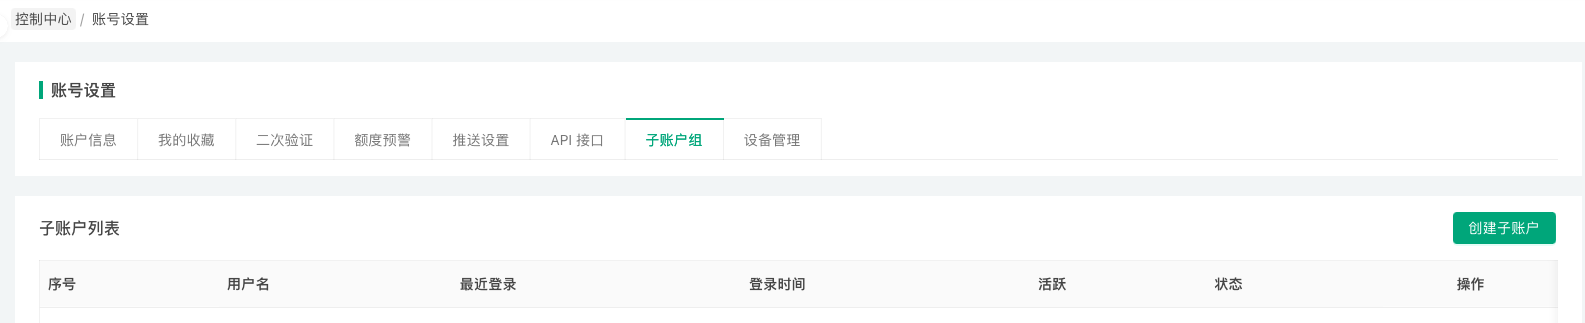
On the account settings page, open the sub-account tab, select the live robots the sub-account may access under operation permissions, enter its username and login password, and create it. Sub-accounts are listed on the same page, where you can edit, lock/unlock or delete them.
Permissions
A sub-account sees only the live robots authorized to it. On those robots it can change parameters, stop and restart, but it cannot change the exchange objects configured for the robot.
Typical uses
- A quant team sharing the management of several live robots.
- Letting the renter of a strategy help debug a live robot.
Exchange
The Exchange page manages the exchange accounts you have configured. On FMZ, an "exchange" is an account a strategy program can operate: it holds the keys of the funding account together with the protocol and API wrapper used to talk to that exchange.
Click "Add Exchange" on the exchange management page to open the add exchange page, then choose the exchange and fill in its configuration. Encrypted fields such as keys are encrypted in the browser before being saved to the platform, so the platform never stores them in plain text (see Getting Started → Key Security).
**Exchange objects**
In strategy code a configured exchange is the exchange object exchange. A backtest or live robot can be configured with several exchanges; in code they form the exchange object array exchanges.
Using an exchange object
Strategy code reads the account and market data, places orders and cancels them through the exchange object. In JavaScript:
javascript
function main() {
let account = exchange.GetAccount() // query account information
let ticker = exchange.GetTicker() // get the ticker
let id = exchange.Buy(1000, 1) // price 1000, amount 1
if (id) {
exchange.CancelOrder(id) // an order Id exists only if the order was placed; cancel it if still open
}
}
The rest of this chapter:
- General Protocol: connect an exchange the platform has not integrated yet.
- Local Credential Files: keep private keys and other secrets only on the docker's machine.
- Exchange-Specific Notes: configuration steps and behavior differences of individual exchanges.
General Protocol
For exchange API interfaces that have not yet been encapsulated and integrated by the FMZ Quant Trading Platform, you can access them by writing general protocol plugin programs.
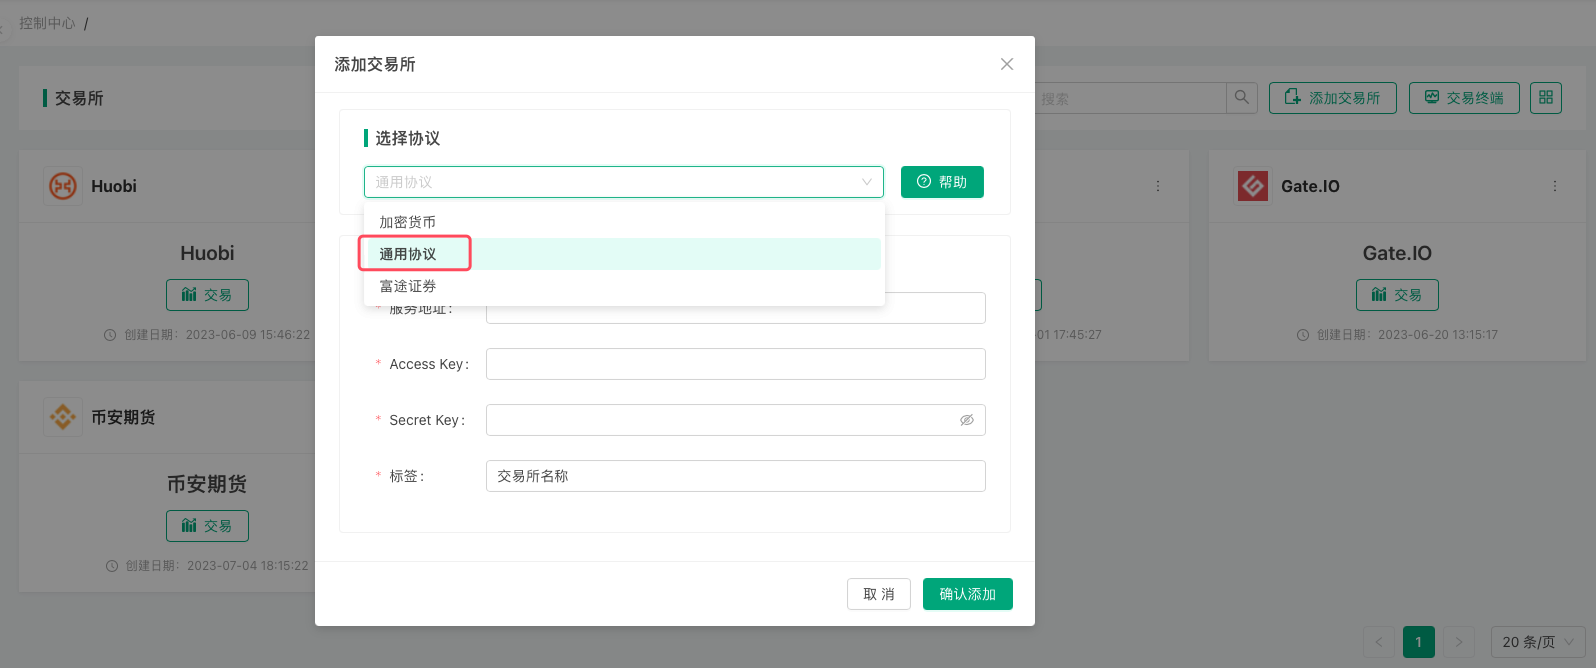
This general protocol can be used to access any exchange that provides API interfaces, supporting the following two protocols:
RESTProtocol: Reference Documentation.FIXProtocol: Reference Project.
The difference between FIX protocol plugin programs and REST protocol plugin programs lies only in the interaction method between the plugin program and the exchange interface. The interaction method, data format, and other implementation details between the protocol plugin program and the FMZ Quant docker program are exactly the same. For specific implementation, please refer to the examples in the above links.
Local Credential Files
When configuring an exchange, every masked encrypted input (Secret Key, private key, password, etc.) can hold a credential file path file:///name.txt instead of the secret itself. When the live robot runs, the docker reads that file on its own machine and uses the content as the value. The private key then exists only on the docker's machine, and the platform stores nothing but a path.
Path rules
- The path is resolved relative to this robot's directory
logs/storage/<robot ID>/(logsis under the docker's working directory). For robot ID123456,file:///rsaKey.txtmeanslogs/storage/123456/rsaKey.txt. - Subdirectories are allowed, e.g.
file:///keys/rsaKey.txt. - Only the
.txtsuffix is recognized; with any other suffix the text is not read as a file but used literally as the configuration value. - The path cannot be absolute, cannot contain
.., and after resolution cannot leave the robot directory (symbolic links pointing outside are rejected too). - Credential files are read from each robot's own directory, so when several robots use the same exchange configuration, every robot directory needs its own copy.
- If the file cannot be read, the robot fails to start with an error containing
read key file; an invalid path fails withkey file path must be relative and cannot contain '..'orkey file path escapes the robot directory.
Example: an RSA key
For an exchange that supports RSA KEY authentication:
- Generate an RSA public/private key pair, e.g. a PKCS#8 pair with
openssl. - Create an
RSA KEYon the exchange and upload the public key from step 1. - Configure the exchange on the platform: put the exchange's
RSA KEYinAccess Keyandfile:///rsaKey.txtinSecret Key. - Create the live robot and note its ID (e.g.
123456). - Save the private key from step 1 as
logs/storage/123456/rsaKey.txt, then start (or restart) the robot.
See the video walkthrough (Chinese) for the full process.
Exchange-Specific Notes
Configuration steps of individual exchanges and the places where they behave differently from the general API. Exchanges not listed here follow the general descriptions in the syntax manual; the switches each exchange supports through exchange.IO() are listed under exchange.IO.
Securities and Futures
Futu Securities
Futu NiuNiu live trading and paper trading are supported. FutuOpenD must run on the docker's machine. For configuring the exchange object and running FutuOpenD, see the Futu Securities configuration guide.
When FutuOpenD is used for paper trading, some stock codes are not supported and cannot be traded (paper trading works in the Futu NiuNiu mobile app).
-
Call frequency
GetOrder,GetOrders,GetPositionsandGetAccountuse cached data by default, so their call frequency is not limited;FutuOpenDupdates the cache automatically when new data arrives.
exchange.IO("refresh", true)disables the cache; without the cache the limit is at most 10 queries every 30 seconds, and exceeding it returns an error. -
Stock codes
The format iscode.market, e.g.600519.SH. Market suffixes:- HK: Hong Kong stocks
- US: US stocks
- SH: Shanghai
- SZ: Shenzhen
- SG: Singapore futures
- JP: Japan futures
Set the stock code with
exchange.SetContractType()in the strategy, for example:javascriptfunction main() { var info = exchange.SetContractType("600519.SH") // set the stock 600519.SH (Moutai); the account switches to the mainland market Log(info) Log(exchange.GetAccount()) // the current stock is Moutai, so GetAccount returns the mainland market assets Log(exchange.GetTicker()) // current quote of Moutai }pythondef main(): info = exchange.SetContractType("600519.SH") Log(info) Log(exchange.GetAccount()) Log(exchange.GetTicker())rustfn main() { let info = exchange.SetContractType("600519.SH"); // set the stock 600519.SH (Moutai); the account switches to the mainland market Log!(info); Log!(exchange.GetAccount()); // the current stock is Moutai, so GetAccount returns the mainland market assets Log!(exchange.GetTicker(None)); // current quote of Moutai }exchange.SetDirection(trade direction),exchange.Buy/exchange.Sell(orders),exchange.CancelOrder(cancellation),exchange.GetOrder(order query) and the like are used the same way as in futures markets. -
Account information
Futu usesTrdMarketto tell the Hong Kong, US, mainland and other markets apart. From theFutu APIdocumentation:mylangconst ( TrdMarket_TrdMarket_Unknown TrdMarket = 0 // unknown market TrdMarket_TrdMarket_HK TrdMarket = 1 // Hong Kong market TrdMarket_TrdMarket_US TrdMarket = 2 // US market TrdMarket_TrdMarket_CN TrdMarket = 3 // mainland market TrdMarket_TrdMarket_HKCC TrdMarket = 4 // Hong Kong Stock Connect market TrdMarket_TrdMarket_Futures TrdMarket = 5 // futures market )Data returned by
exchange.GetAccount():json{ "Info": [{ "Header": { ... // omitted "TrdMarket": 1 // market ID in the raw Info data: assets of the Hong Kong market }, "Funds": { // account assets in this market ... } }, ...], "Stocks": 0, "FrozenStocks": 0, "Balance": 1000000, // assets in the current market "FrozenBalance": 0 } -
FutuOpenDdecides the region by the IP address it logs in from; accounts logged in from outside mainland China have some market data restrictions. See the officialFutuOpenD(Futu) documentation.
Interactive Brokers
-
Configure the exchange
Run "IB Gateway" or "TWS (Trader Workstation)" on the docker's machine. With TWS: after logging in, click the configuration button at the top right, open "Configure" → "API" → "Settings", uncheck "Read-Only API", check "Enable ActiveX and Socket Clients", and note the "Socket port" (TWS defaults to 7496 for live and 7497 for paper; IB Gateway to 4001 for live and 4002 for paper).
Then choose Interactive Brokers on the platform's add exchange page:- Server address: the address and port of TWS or IB Gateway, e.g.
localhost:7496. - Market data type: realtime, frozen, delayed or delayed frozen. Accounts without a realtime market data subscription can choose delayed data. It can also be switched at run time with
exchange.IO("marketDataType", n)(nfrom 1 to 4, in the order above).
- Server address: the address and port of TWS or IB Gateway, e.g.
-
Contract codes
Set withexchange.SetContractType()in the formsymbol.currency[.type[.exchange]]; the type defaults to stockSTKand the exchange toSMART:- US stocks:
AAPL.US,TSLA.US(USmeans priced in USD). - Hong Kong stocks:
symbol.HK(HKmeans priced in HKD). - Futures (
FUT):symbol-expiry[-multiplier].currency.FUT.exchange, with the expiry month written asYYYYMMand the exchange as IB's exchange code. - Options (
OPT) and futures options (FOP):symbol-expiry-C or P-strike×100[-multiplier].currency.OPT or FOP.exchange, with the strike multiplied by 100 and written as an integer. - A plain number: used directly as the IB contract ID (conId).
- US stocks:
-
Other notes
- The docker connects to TWS with the live trading ID as its client ID (clientId), so the client ID stays the same across restarts and orders placed earlier can still be cancelled or modified. TWS only lets the client ID that placed an order (or the master client) modify or cancel it.
Symbolin positions and orders is the short form (e.g.Z74.SGD);exchange.GetPositions()andexchange.GetOrders()accept either the short form or the full code used when ordering (e.g.Z74.SGD.STK.SGX).- When the gateway rejects an order, the
Rejectfield in the order'sInfoholds the reason. - After
exchange.IO("debug", true), every frame sent to or received from TWS is logged in the TWS API log format, so it can be matched against the gateway's own log.
Crypto
-
Futures_Binance
Binance trading pairs with Chinese names are supported:javascriptfunction main() { let ticker = exchange.GetTicker("币安人生_USDT.swap") Log("ticker:", ticker) // {"Info":{...},"Symbol":"币安人生_USDT.swap","Open":0.29622,"High":0.31661, ...} }For the
exchange.IO()switches of Binance Futures (dual-side position mode, isolated/cross margin, unified account, STP mode, etc.), seeexchange.IO. -
Futures_HuobiDM
Useexchange.IO("base", "https://xxx.xxx.xxx")orexchange.SetBase("https://xxx.xxx.xxx")to switch the base address of the exchange API.For the
exchange.IO()switches of Huobi Futures (signHost, isolated/cross margin, one-way/two-way position mode, unified account, etc.), seeexchange.IO.Condition orders of the OCO type (
ORDER_CONDITION_TYPE_OCO) are not supported; condition orders also work in multi-asset margin mode. -
Huobi
Huobi trading pairs with Chinese names are supported:javascriptfunction main() { let ticker = exchange.GetTicker("币安人生_USDT") Log("ticker:", ticker) // {"Info":{...},"Symbol":"币安人生_USDT","Open":0.29622,"High":0.31661, ...} } -
Bitfinex
The amount of a spot market buy order is the quantity of the traded coin, not the quote amount. -
AscendEx
The amount of a spot market buy order is the quantity of the traded coin, not the quote amount. -
Futures_Hyperliquid
See the Hyperliquid guide.For the
exchange.IO()switches of Hyperliquid Futures (isolated/cross margin, mainnet/testnet, vaultAddress, walletAddress, expiresAfter, etc.), seeexchange.IO. -
Futures_Lighter
The test environment can be selected when configuring the exchange object, or reached by changing the REST API endpoint withexchange.SetBase().For the
exchange.IO()switches of Futures_Lighter (isolated/cross margin, order expiry, etc.), seeexchange.IO.BuyandSellreturned byexchange.GetTickers()are each instrument's last trade price (the exchange has no batch order book endpoint); useexchange.GetTicker()orexchange.GetDepth()when you need the best bid and ask. -
Futures_edgeX
All edgeX perpetuals are quoted in USDC: write the trading pair asBTC_USDCand so on, with full symbols such asBTC_USDC.swap;BTC_USDTorBTC_USDis reported as a contract that does not exist. -
Poloniex
Spot condition orders support stop-loss only (ORDER_CONDITION_TYPE_SL): a buy triggers when the price rises to the trigger price, a sell when it falls to the trigger price. Take-profit (ORDER_CONDITION_TYPE_TP) and OCO condition orders return an error and no order is placed.
Docker
The docker is the program that runs strategies: live strategies run on a docker, not on the FMZ website. The docker talks to the platform, starts and stops strategy processes and sends logs back; every request a strategy makes to an exchange also leaves from the docker's machine. The docker runs on your own server (or a server rented with one click), so a network failure of the platform website does not affect the live robots already running on it.
Supported systems
Only 64-bit builds are released: Linux (x86_64, ARM64), macOS (Intel, Apple Silicon) and Windows (x64, ARM64, plus a GUI version). 32-bit systems are not supported.
Data directory
All docker data is in the logs directory under the working directory (the startup directory by default, or the one given with -w):
logs/storage/<robot ID>/<robot ID>.db3: the robot database (SQLite) holding logs, profit, charts, the status bar and_G()data; it can be opened with anySQLitetool.logs/storage/<robot ID>/stdout.log,stderr.log: standard output and standard error of the strategy process.logs/docker.log: the docker's own log.logs/docker.pid: the docker's identity; keep it and the platform gives the docker its old ID back after a restart.
Network proxy
The docker does not read the system proxy settings or environment variables such as HTTP_PROXY. To reach an exchange through a proxy:
- set a proxy on the exchange object in the strategy with
exchange.SetProxy; - or use a transparent proxy that takes over traffic at the network layer (such as Clash in TUN mode), which needs no docker configuration.
This chapter covers deploying the docker (manual deployment, one-click rental, operation precautions), command-line options, migrating live robot data and docker monitoring.
Deploy Docker
The docker management page lists the dockers of your account, as a list or with details, including each docker's IP address, version and build time. Click Deploy Docker to open the docker deployment page, which offers two ways: one-click docker rental and manual deployment.
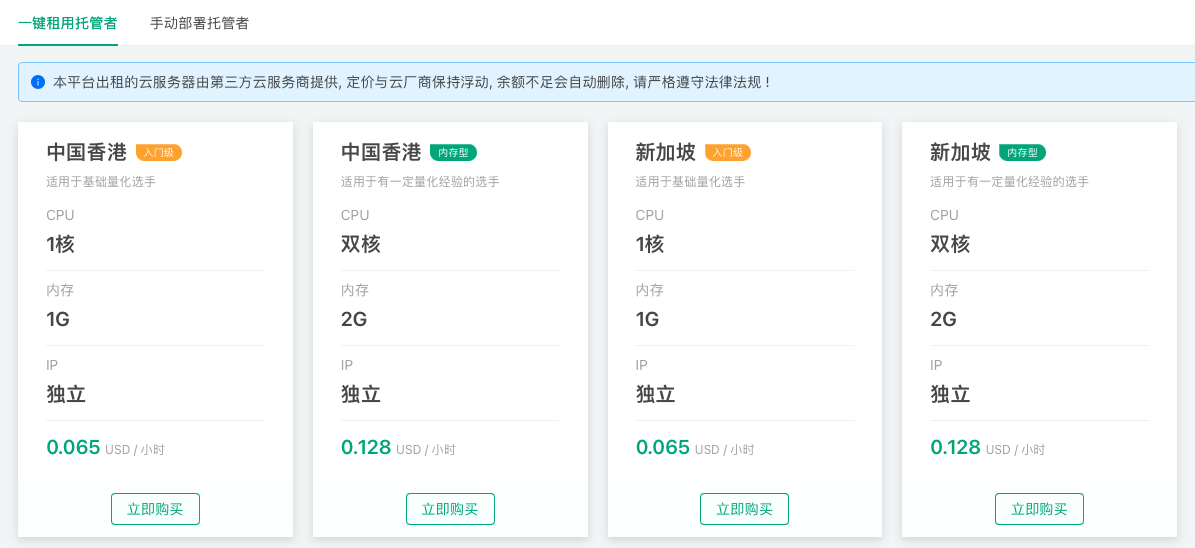
One-Click Docker Rental
On the Docker Deployment Page, click the One-Click Docker Rental tab and select the server to deploy based on your configuration requirements and server location preferences.
Click "Buy Now" and enter your FMZ Quant Trading Platform account credentials for verification. After successful verification, the docker program will be deployed automatically. The entire deployment process takes a few minutes, and the system will automatically install commonly used Python libraries.
After clicking "Buy Now", the rented server is provisioned through the platform on your behalf and has limited system permissions, with no support for remote login. If you need to use third-party Python libraries that are not pre-installed, it is recommended to use a private server for manual deployment.
Servers rented through the One-Click Docker Rental feature use independent billing, which is separate from live trading billing.
Clicking the "Redeploy" button will not delete the live trading logs and data files in the logs directory under the docker directory.
Manual Deployment of Docker
The docker can run on a PC, a server, a Raspberry Pi (64-bit OS) and similar devices. Only 64-bit builds are released:
- Linux command line: x86_64 (amd64), ARM64 (aarch64)
- macOS command line: Intel, Apple Silicon
- Windows: x64 and ARM64, each with a command-line and a GUI version
On the docker deployment page, click Manual Deployment, download the build for your system and unpack it; the executable robot is the docker program. The same page shows the two pieces of information needed:
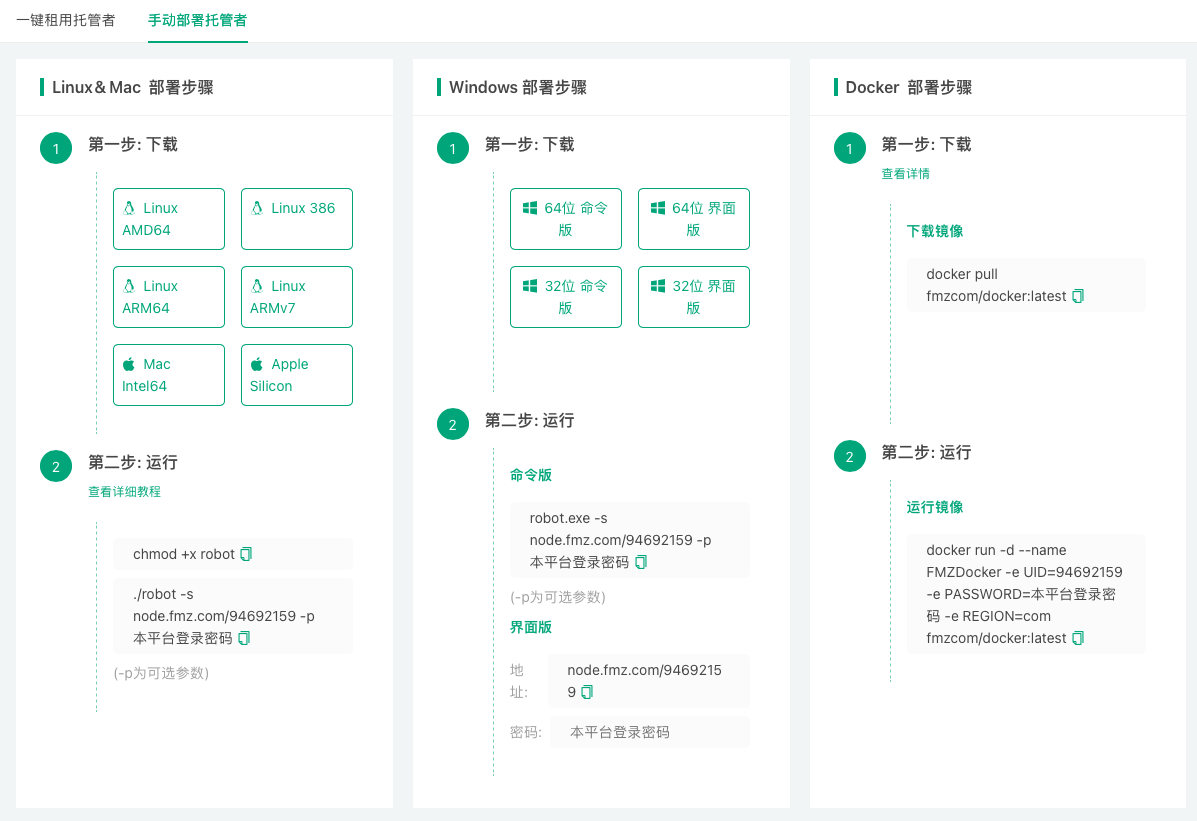
- Communication address: contains your account UID, like
node.fmz.com/123456. - Password: the password of the FMZ account that owns the UID.
Windows GUI version
Run robot.exe, enter the communication address and password, and click start.
Command-line version
            bash

            chmod +x robot                      # Linux/macOS: make it executable before the first run
./robot -s node.fmz.com/123456      # prompts for the password, which is not echoed
123456 is only an example; the real address is on the docker deployment page. Do not pass the password in plain text with -p: it stays in the shell history and the process list. For unattended start-up, put the address and password in a configuration file robot.conf that only you can read:
            bash

            cat > robot.conf <<'EOF'
s=node.fmz.com/123456
p=your-password
EOF
chmod 600 robot.conf
./robot -c robot.conf               # with robot.conf in the startup directory, plain ./robot loads it too
All options and the configuration file format are described in Platform Basics → Docker → Command-Line Options.
Running in the background
The docker ignores the terminal hang-up signal: start it in the foreground over SSH and simply disconnect, and it keeps running, with its log also written to logs/docker.log. To start at boot or restart after a crash, run it under a service manager such as systemd, e.g. /etc/systemd/system/robot.service:
            ini

            [Unit]
Description=FMZ robot
After=network-online.target
Wants=network-online.target

[Service]
WorkingDirectory=/opt/robot
ExecStart=/opt/robot/robot -c /opt/robot/robot.conf
Restart=on-failure
TimeoutStopSec=90

[Install]
WantedBy=multi-user.target
            bash

            sudo systemctl daemon-reload
sudo systemctl enable --now robot
The SIGTERM sent by systemctl stop robot makes the docker shut down gracefully: it stops all its live robots, reports their state and then logs out of the platform. TimeoutStopSec leaves enough time so that it is not killed before finishing.
Upgrading the docker
The strategy runtime and the exchange connectors are delivered by the platform when needed and need no manual updates. To upgrade the docker program itself, stop the docker (see Docker Operation Precautions), replace the robot executable with the new version and start it in the same working directory. The logs directory there keeps the docker identity and the robot data, so the docker comes back with its old ID.
Isolating strategy processes in Docker containers
On Linux and macOS, the command-line version can run each strategy process in its own Docker container with the -i option (Docker must be installed and running on the machine). This isolates strategy processes; it is not a Docker image of the docker program itself. See Command-Line Options for the parameters.
Docker Operation Precautions
Stop the robots first, then the docker
Before deleting a docker or stopping its process, make sure no live robot is running on it.
Stopping the docker normally
- Command-line version: press
Ctrl+Conce in the terminal, or sendSIGTERMto the process (kill <PID>,systemctl stop). - Windows GUI version: click the stop button.
On a stop request the docker shuts down gracefully: it stops all its live robots, reports their final state and then logs out of the platform. Pressing Ctrl+C again during this shutdown skips the reporting and logout and exits at once; normally do not do that.
Avoid forced termination
Do not end the docker with kill -9, cut the power or force a shutdown. The docker then has no chance to log out, and its live robots may still show as running on the platform and keep being billed; in that case the offline docker has to be deleted before those robots can be stopped. Stop the docker before rebooting the server; when it runs under a service manager such as systemd, a system shutdown sends SIGTERM automatically.
Command-Line Options
Starting the command-line docker program robot:
            bash

            ./robot -s node.fmz.com/123456            # prompts for the password (not echoed)
./robot node.fmz.com/123456               # short form: robot address [password]
./robot -c robot.conf                     # read options from a configuration file
./robot -v                                # show the version
Options
| Option | Description |
|---|---|
-s address | Address for talking to the platform, like node.fmz.com/123456 (123456 is the account UID); a ws:// or wss:// prefix is allowed. Shown on the docker deployment page. |
-p password | Account password. Not recommended: a plain-text password stays in the shell history and the process list. Without it the password is prompted for, or read from the configuration file. |
-n name | Docker name, shown on the platform's docker page. |
-w dir | Working directory. logs (robot data, docker log, identity file) lives under it. |
-c file | Configuration file; format below. |
-u user | Linux/macOS only: run strategy processes as this system user; the docker itself must run as root. Ignored with -i. |
-I IP | Local outbound IP: the connection to the platform and the strategies' connections to exchanges are bound to this address; see below. |
-i image | Linux/macOS only: run each strategy process in its own container created from this Docker image; Docker must be installed and running. |
-e path | With -i: path of the executable inside the container. |
-f JSON | With -i: Docker container settings, as inline JSON or @path to read them from a file. |
-H address | With -i: address the container uses to connect back to the host. |
-vv | Verbose log (including the messages exchanged with the platform); off by default to keep logs small. |
-d DNS | The old custom DNS option; still accepted but ignored, as the docker always uses the system resolver. |
-v, -V, --version | Print version and build information and exit. |
-h, --help | Print usage. |
--ctl-stdin | Read control commands from standard input (the first line is the password when -p is not given); stop or end of input triggers a graceful shutdown. Meant for programs that wrap the docker as a service. |
Options that take a value can also be written as -option=value, e.g. -n=server01. An invalid option prints the usage and exits.
Configuration file robot.conf
One key=value per line; the key is the option name without - (s p n w u I d i e f H vv), and lines starting with # are comments:
            ini

            # robot.conf
s=node.fmz.com/123456
p=your-password
n=server01
vv=true
- Give the file with
-c; without-cand without an address,robot.confin the startup directory is loaded automatically if present. - When an option is given both on the command line and in the file, the command line wins.
- Keys are case-sensitive:
Iis the outbound IP andithe Docker image. - The configuration file path and
-f @fileare resolved relative to the startup directory (before-wchanges directory). - The file holds your password, so make it readable only by you (
chmod 600 robot.conf).
Pinning the outbound IP (-I)
When the server has several IP addresses and the exchange API key is whitelisted for one of them, pin the outbound IP with -I, e.g. ./robot -s node.fmz.com/123456 -I 192.168.1.100. The connection to the platform and the strategies' connections to exchanges then leave from that address. With -i container isolation the container's network may not have that address; in that case let the container use the host network.
The Windows GUI version has no IP setting; use the command-line version when you need to pin the outbound IP. The GUI version accepts only -s, -p and -n, which prefill the window; when both -s and -p are given it starts automatically.
Live Trading Data Migration
Each live robot's data is in logs/storage/<robot ID>/ under the docker's working directory (the database <robot ID>.db3, stdout.log, stderr.log and so on). The logs, profit and charts the platform shows for a robot are read from the docker that runs it.
Moving one robot to a docker on another machine
- Stop the robot.
- Copy the whole
logs/storage/<robot ID>/directory to the same place under the new docker's working directory, keeping the robot ID as the directory name. - Switch the robot's docker to the new one in the robot configuration and start the robot.
The robot's existing logs, profit and other data are then kept on the new machine.
Moving a whole docker
- Stop the robots on the old docker, then stop the old docker.
- Copy the entire
logsdirectory from the old docker's working directory to the working directory on the new machine. - Start the docker on the new machine.
logs/docker.pid holds the docker's identity: with the old docker offline, the docker on the new machine gets the old docker ID back, so robot configurations need no change. Never run dockers on two machines with the same logs directory at the same time.
Docker Monitor
On the docker management page, Docker Monitor can be enabled from the actions of the docker list or of the docker details. Once enabled, the platform emails the address bound to your account when the docker goes offline abnormally.
Strategy Library
The Strategy Library page holds all strategies of the current account, written in any of the programming languages or visually.
- Grouping: strategies can be grouped just like robots (see Platform Basics → Live Trading → Grouping).
- Import and export: besides the source code, a complete strategy includes its parameters, interactions, description, notes, manual, template references and more, so move a strategy by exporting and importing the complete strategy (see Import and Export of Complete Strategies).
- Sharing and renting: generate a "copy code" to share a strategy or a "registration code" to rent it out (see Strategy Sharing and Renting).
Import and Export of Complete Strategies
Copying the source code is not enough to move a strategy: the parameter design, interaction design, template references and more are not in the source. "Export Strategy" and "Import Strategy" on the strategy editing page move a strategy completely.

-
Export Strategy
Exports onexmlfile, for strategies in every programming language. When exporting you can choose what to include: name, source code, notes, description, manual, template references, strategy parameters, interactive controls and backtest settings. -
Import Strategy
Click "Import Strategy" on the strategy editing page, choose anxmlfile produced by "Export Strategy", and select what to import. Click "Save" afterwards to save the strategy.
Strategy Sharing and Renting
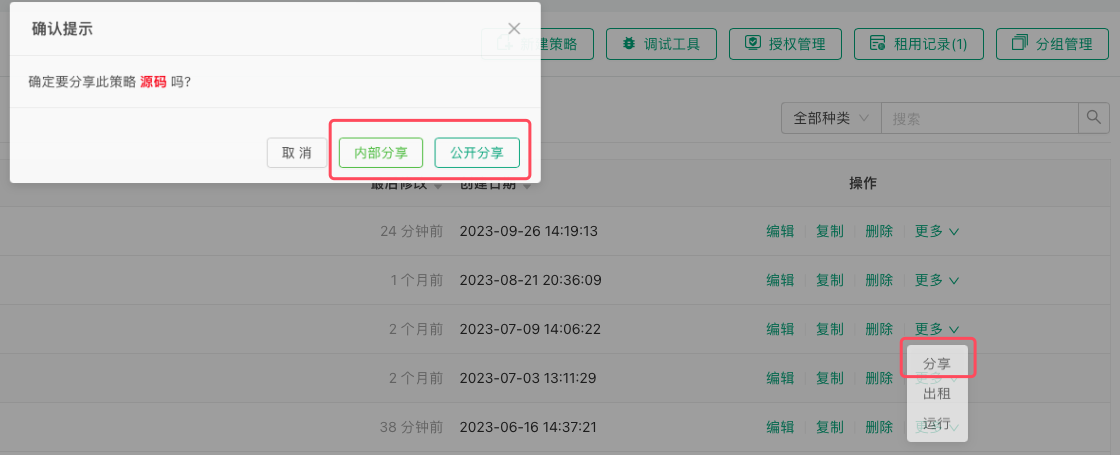
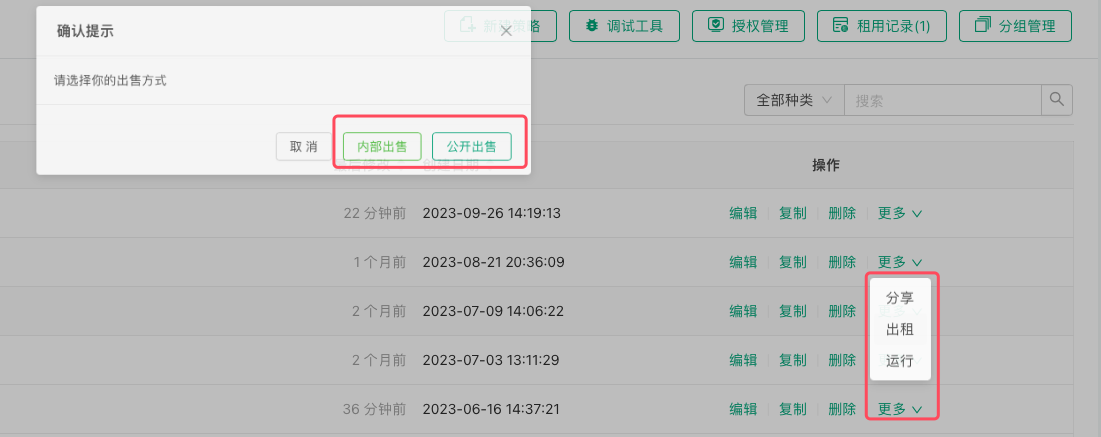
On the Strategy Library page, click the "Actions" button on the right side of a strategy to display a menu containing sharing and renting options.
Important Notice: When creating and distributing strategy registration codes, please carefully confirm whether it is a "Registration Code" or "Copy Code" to avoid accidentally leaking your strategy.
Strategy Sharing
-
Public Sharing
After clicking the "Share" button, a dialog box will pop up where you can select "Public Sharing". The strategy will be fully shared to the platform's Strategy Square, where any user can copy the strategy. -
Private Sharing
After clicking the "Share" button, a dialog box will pop up where you can select "Private Sharing". After selecting the sharing validity period and sharing limit, a copy page URL and copy code for the strategy will be generated. These can be distributed to designated FMZ platform users. Users who need the strategy can simply use the copy page URL link, log in to the copy page and enter the copy code to obtain the strategy. Once obtained, the strategy will automatically appear in their strategy library.
Strategy Rental
-
Public Sale
After clicking the "Rent" button, a dialog box will pop up where you can select "Public Sale". The strategy can then be submitted for listing (requires approval). -
Internal Sale
After clicking the "Rent" button, a dialog box will pop up where you can select "Internal Sale". After selecting the number of days, maximum concurrent instances, and number of registration codes, the system will generate a registration page URL and registration codes for this strategy. You can distribute these to designated FMZ platform users. Users who need this strategy only need to visit the registration page URL link, log in to the registration page, and enter the registration code to obtain access to the strategy. The strategy will also appear in the strategy library, but users will only have backtesting and live trading permissions, and cannot view the strategy source code or other information. When the number of concurrent live trading instances is set to 0, it means there is no limit on concurrent instances, allowing unlimited creation of live trading bots.
Live Trading
As opposed to a backtest, a live robot is a strategy program instance that really interacts with an exchange (fetching market data, querying positions, placing and canceling orders, etc.). An instance connected to the exchange's production environment is a live robot, and so is one connected to the exchange's simulation environment (many exchanges offer a test environment).
Creating a live robot
On the robot creation page, choose the strategy, the docker host and the exchanges, then create the robot. Three things must be ready beforehand:
- A strategy: click "New Strategy" in the Strategy Library, write it and save it.
- An online docker: click "Deploy Docker" on the Docker page (see Platform Basics → Docker).
- An exchange account: click "Add Exchange" on the Exchange page and configure it (see Platform Basics → Exchange).
Live robots are billed by the hour and cannot start without enough balance (see Platform Basics → Account and Billing → Live Robot Billing and Top-up).
Robot monitoring
On the live trading page, click "Monitor" in the actions column of a running robot to enable monitoring. Once enabled, the platform emails the address bound to your account when the robot exits for any reason other than a manual operation.
Robot database
For robot ID 123456, the database file is logs/storage/123456/123456.db3 (SQLite) under the working directory of the docker running it, with these tables:
- chart: chart data.
- cfg: the latest state such as the status bar content and the chart configuration.
- kvdb: data persisted with the
_G()function. - log: robot logs.
- profit: profit data.
The same directory also holds the strategy process's standard output stdout.log and standard error stderr.log.
In this chapter
- Grouping: group management of robots and strategies.
- Live Trading Observation: show a robot publicly or create a private viewing link.
- Live Trading Message Push: push logs to the mobile app, email or a WebHook.
- Common Causes of Live Trading Errors and Abnormal Exits.
To let other people view and operate some of your robots, use sub-accounts (see Platform Basics → Account and Billing → Sub-accounts).
Grouping
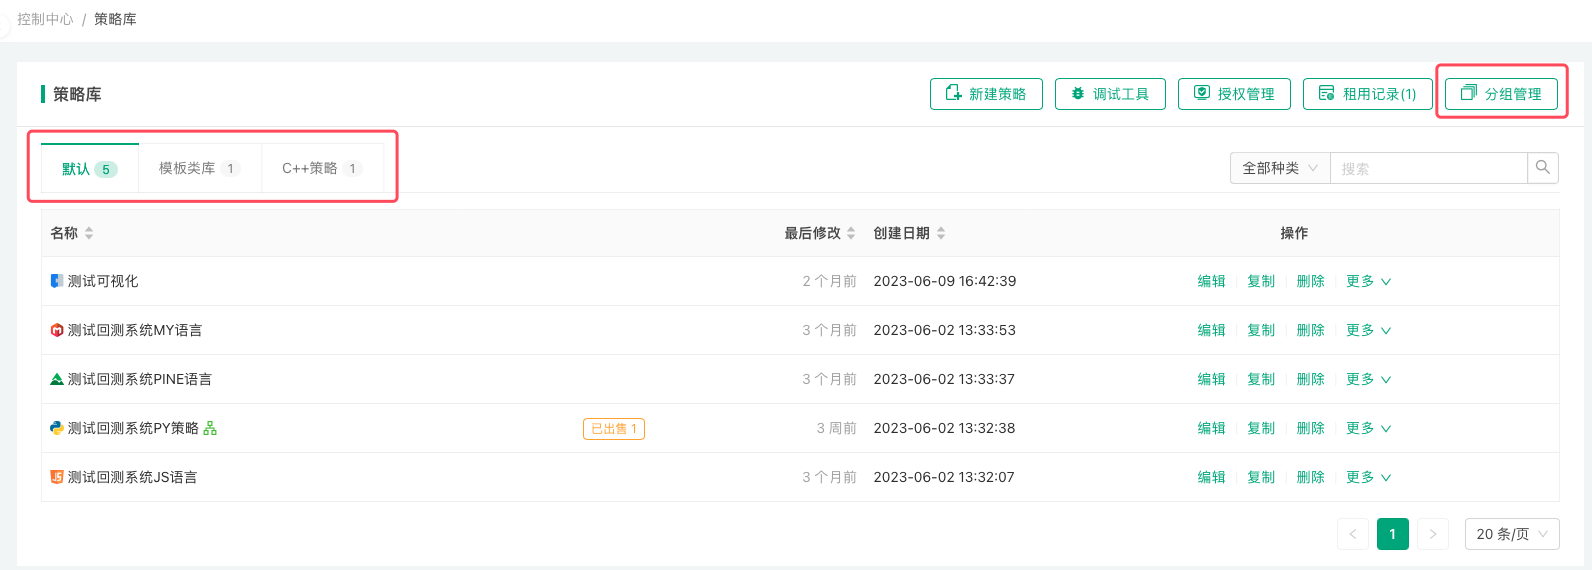
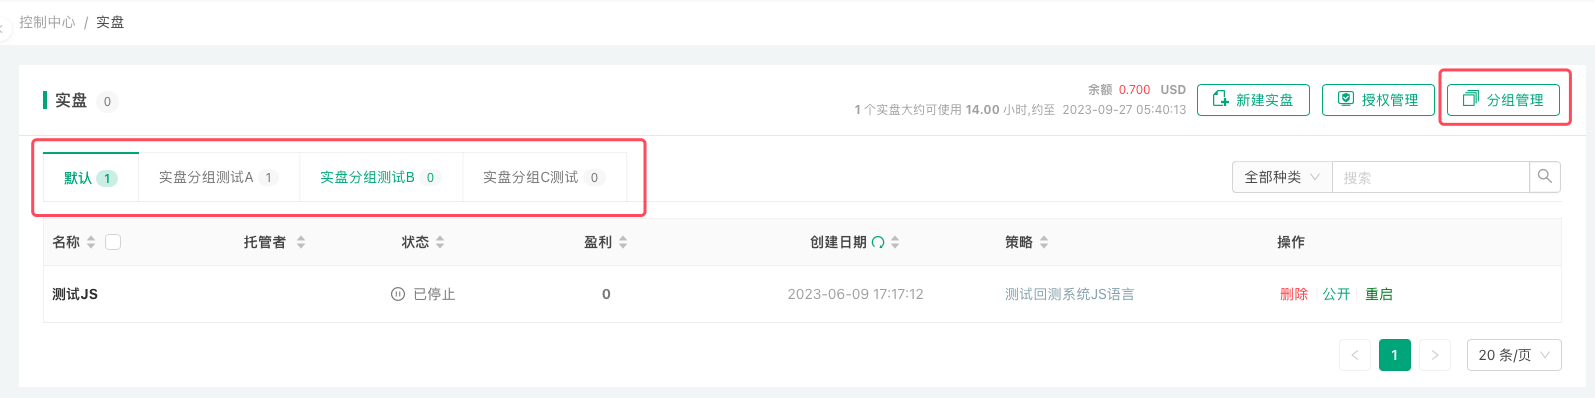
Click the Group Management button on the right of the "Live Trading" page or the "Strategy Library" page to group robots or strategies; group names are up to you.
For strategies, for example, you can put template libraries in one group, JavaScript strategies in another and test strategies in a third.
-
Strategy groups
-
Robot groups
Live Trading Observation
Click the "Public" button in the live trading list on the Live Trading Page of FMZ Quant Trading Platform to publicly display the current live trading instance.
Live trading observation currently supports two methods:
-
- Publicly display live trading on the Live Trading Observation page of FMZ Quant Trading Platform. Click the "Public" button and select Public Sharing.
-
- Create a private link for live trading observation.
Click the "Public" button and select Internal Sharing, set the validity period to generate a private link for accessing the private observation page of this strategy's live trading.
- Create a private link for live trading observation.
Live Trading Message Push
You can enable the message push feature on the Push Settings page.
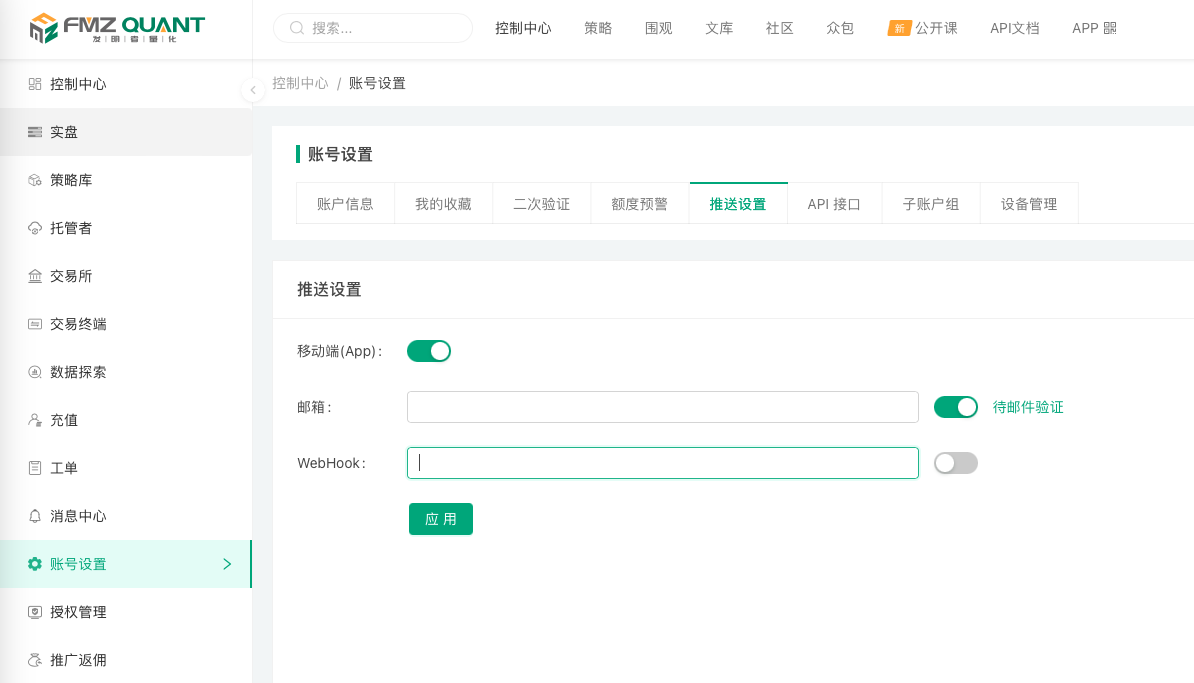
- Mobile (App)
After enabling mobile App push, push messages sent by the live trading program will be delivered to the FMZ Quant mobile App. - Email
To enable email push, you must first verify your email address. Once verified, you can receive push messages sent by the live trading program. - WebHook
After enabling WebHook push, you can customize the push address, for example:http://abc.com/push.php?data={body}.
When the live trading program sends a push message, the platform will send a request to the configured addresshttp://abc.com/push.php?data={body}(only theGETmethod is supported), and the pushed message content will replace the{body}placeholder.
Pushing Messages in Strategies
- JavaScript/TypeScript/Python/Rust Languages
In the strategy code, you can use theLog()function as well as other functions that output log information in the log area, such asexchange.CreateOrder(),exchange.CancelOrder(), etc.
By passing an additional parameter"@"to these functions (i.e., adding an extra parameter beyond the required ones), for exampleLog("This is a push message", "@"), the output log information will be pushed, and the platform will push the message according to the "Push Settings". In the Rust language, the correspondingLog!macro is used the same way:Log!("This is a push message", "@");. - PINE Language/My Language
In the "Trading Library" parameters integrated into PINE Language/My Language strategies, you can enable trading log push, which will automatically push messages after a trading action is triggered. - Blockly Visual
In the "Tools" section, select the Message Push module to push specified information.
Message push is subject to a frequency limit, with the following rule: within each 20-second cycle of live trading, only the last message is retained and pushed, while all other messages are filtered out and not pushed.
Common Causes of Live Trading Errors and Abnormal Exits
The robot cannot start
- No online docker
A robot cannot start while its docker is offline. Check on the docker page that the docker is online, or pick another online docker. - Insufficient balance
Starting a robot prepays its first hour, so it cannot start without enough balance; if the balance runs out while it runs, the platform stops it. Top up and start it again (see Platform Basics → Account and Billing → Live Robot Billing and Top-up). - Rented strategy expired or concurrency limit reached
When a rented strategy expires, robots using it are stopped and cannot be started again; once the rental's maximum number of concurrent robots is reached, no further robot can start. - Key decryption failed
The error containssecret key decrypt failed (wrong password). The FMZ account password was changed, so the exchange keys configured earlier can no longer be decrypted. To fix it:- Re-enter the exchange keys, passwords and similar fields on the Exchange management page.
- Stop all dockers and start them again with the new password.
- Credential file not found
The exchange configuration uses afile:///xxx.txtcredential file that is missing from the robot directory; the error containsread key file. An invalid path fails withkey file path must be relative and cannot contain '..'orkey file path escapes the robot directory. See Platform Basics → Exchange → Local Credential Files.
Errors caused by strategy code
-
Static syntax errors
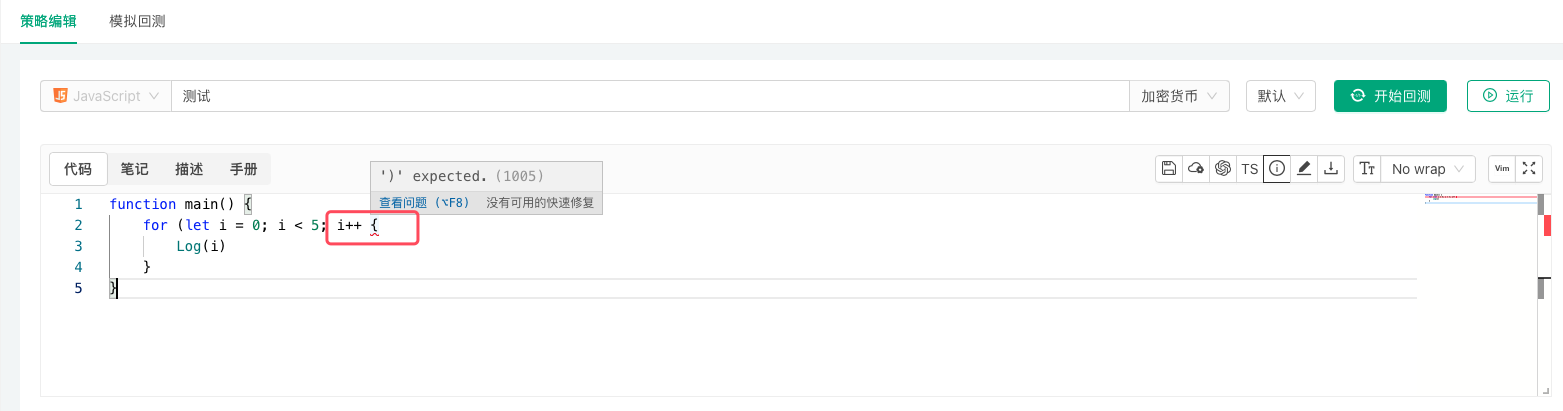
These are obvious: the strategy editing page usually marks them, and a backtest reveals them too.
-
Runtime errors
The most common one is using a function's return value without checking that it is valid. -
Excessive memory usage
Keeping too much data that cannot be garbage-collected in global variables. -
Improper use of
exchange.Gofor concurrent requests
Calling the asynchronousexchange.Gowithout callingwaitfor the results in time, so that too many concurrent tasks pile up. -
Recursion too deep
Too many levels of recursion exceed the call stack size.
Other errors
- API business errors and network request errors
These show the exchange object name, the function name, the error message and the reason, and do not stop the robot by themselves. They are usually the trigger rather than the direct cause, which is typically a program exception from using an API return value without checking it. interrupterror
Logged when the user clicks the Stop button on the robot page while the program is in the middle of an operation (such as an exchange API call) and the stop interrupts it. It is harmless, just a log entry.
See the FAQ collection for more.