Docker
The docker is the program that runs strategies: live strategies run on a docker, not on the FMZ website. The docker talks to the platform, starts and stops strategy processes and sends logs back; every request a strategy makes to an exchange also leaves from the docker's machine. The docker runs on your own server (or a server rented with one click), so a network failure of the platform website does not affect the live robots already running on it.
Supported systems
Only 64-bit builds are released: Linux (x86_64, ARM64), macOS (Intel, Apple Silicon) and Windows (x64, ARM64, plus a GUI version). 32-bit systems are not supported.
Data directory
All docker data is in the logs directory under the working directory (the startup directory by default, or the one given with -w):
logs/storage/<robot ID>/<robot ID>.db3: the robot database (SQLite) holding logs, profit, charts, the status bar and_G()data; it can be opened with anySQLitetool.logs/storage/<robot ID>/stdout.log,stderr.log: standard output and standard error of the strategy process.logs/docker.log: the docker's own log.logs/docker.pid: the docker's identity; keep it and the platform gives the docker its old ID back after a restart.
Network proxy
The docker does not read the system proxy settings or environment variables such as HTTP_PROXY. To reach an exchange through a proxy:
- set a proxy on the exchange object in the strategy with
exchange.SetProxy; - or use a transparent proxy that takes over traffic at the network layer (such as Clash in TUN mode), which needs no docker configuration.
This chapter covers deploying the docker (manual deployment, one-click rental, operation precautions), command-line options, migrating live robot data and docker monitoring.
Deploy Docker
The docker management page lists the dockers of your account, as a list or with details, including each docker's IP address, version and build time. Click Deploy Docker to open the docker deployment page, which offers two ways: one-click docker rental and manual deployment.
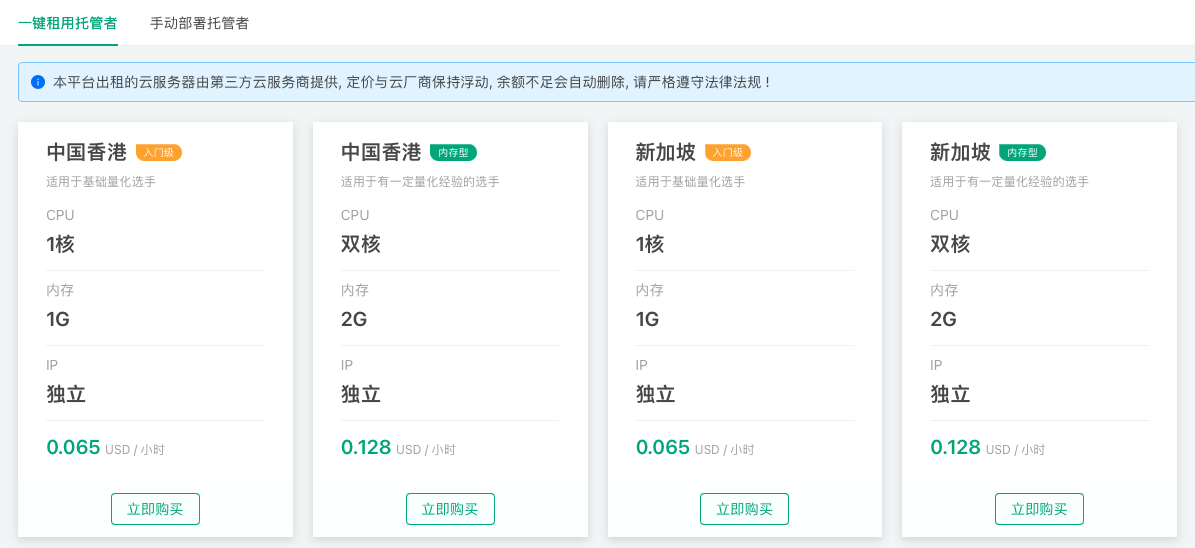
One-Click Docker Rental
On the Docker Deployment Page, click the One-Click Docker Rental tab and select the server to deploy based on your configuration requirements and server location preferences.
Click "Buy Now" and enter your FMZ Quant Trading Platform account credentials for verification. After successful verification, the docker program will be deployed automatically. The entire deployment process takes a few minutes, and the system will automatically install commonly used Python libraries.
After clicking "Buy Now", the rented server is provisioned through the platform on your behalf and has limited system permissions, with no support for remote login. If you need to use third-party Python libraries that are not pre-installed, it is recommended to use a private server for manual deployment.
Servers rented through the One-Click Docker Rental feature use independent billing, which is separate from live trading billing.
Clicking the "Redeploy" button will not delete the live trading logs and data files in the logs directory under the docker directory.
Manual Deployment of Docker
The docker can run on a PC, a server, a Raspberry Pi (64-bit OS) and similar devices. Only 64-bit builds are released:
- Linux command line: x86_64 (amd64), ARM64 (aarch64)
- macOS command line: Intel, Apple Silicon
- Windows: x64 and ARM64, each with a command-line and a GUI version
On the docker deployment page, click Manual Deployment, download the build for your system and unpack it; the executable robot is the docker program. The same page shows the two pieces of information needed:
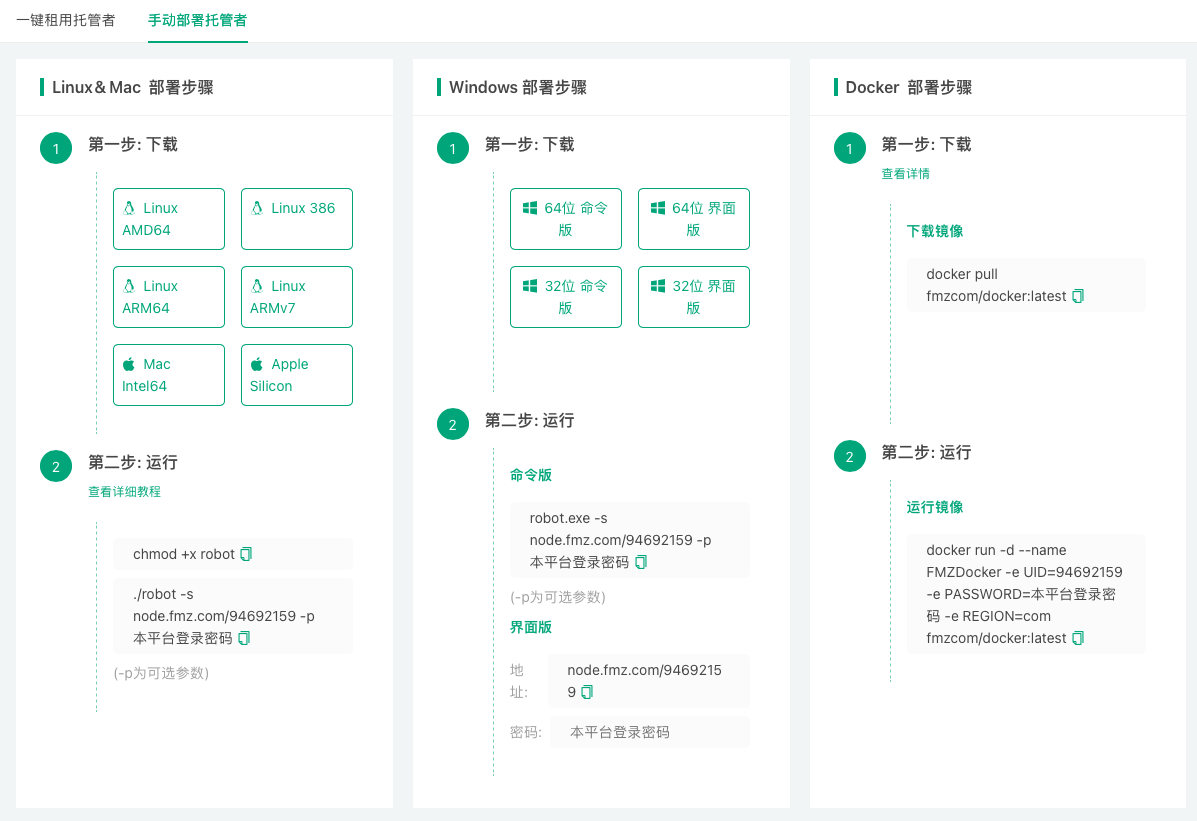
- Communication address: contains your account UID, like
node.fmz.com/123456. - Password: the password of the FMZ account that owns the UID.
Windows GUI version
Run robot.exe, enter the communication address and password, and click start.
Command-line version
bash
chmod +x robot # Linux/macOS: make it executable before the first run
./robot -s node.fmz.com/123456 # prompts for the password, which is not echoed
123456 is only an example; the real address is on the docker deployment page. Do not pass the password in plain text with -p: it stays in the shell history and the process list. For unattended start-up, put the address and password in a configuration file robot.conf that only you can read:
            bash

            cat > robot.conf <<'EOF'
s=node.fmz.com/123456
p=your-password
EOF
chmod 600 robot.conf
./robot -c robot.conf               # with robot.conf in the startup directory, plain ./robot loads it too
All options and the configuration file format are described in Platform Basics → Docker → Command-Line Options.
Running in the background
The docker ignores the terminal hang-up signal: start it in the foreground over SSH and simply disconnect, and it keeps running, with its log also written to logs/docker.log. To start at boot or restart after a crash, run it under a service manager such as systemd, e.g. /etc/systemd/system/robot.service:
            ini

            [Unit]
Description=FMZ robot
After=network-online.target
Wants=network-online.target

[Service]
WorkingDirectory=/opt/robot
ExecStart=/opt/robot/robot -c /opt/robot/robot.conf
Restart=on-failure
TimeoutStopSec=90

[Install]
WantedBy=multi-user.target
            bash

            sudo systemctl daemon-reload
sudo systemctl enable --now robot
The SIGTERM sent by systemctl stop robot makes the docker shut down gracefully: it stops all its live robots, reports their state and then logs out of the platform. TimeoutStopSec leaves enough time so that it is not killed before finishing.
Upgrading the docker
The strategy runtime and the exchange connectors are delivered by the platform when needed and need no manual updates. To upgrade the docker program itself, stop the docker (see Docker Operation Precautions), replace the robot executable with the new version and start it in the same working directory. The logs directory there keeps the docker identity and the robot data, so the docker comes back with its old ID.
Isolating strategy processes in Docker containers
On Linux and macOS, the command-line version can run each strategy process in its own Docker container with the -i option (Docker must be installed and running on the machine). This isolates strategy processes; it is not a Docker image of the docker program itself. See Command-Line Options for the parameters.
Docker Operation Precautions
Stop the robots first, then the docker
Before deleting a docker or stopping its process, make sure no live robot is running on it.
Stopping the docker normally
- Command-line version: press
Ctrl+Conce in the terminal, or sendSIGTERMto the process (kill <PID>,systemctl stop). - Windows GUI version: click the stop button.
On a stop request the docker shuts down gracefully: it stops all its live robots, reports their final state and then logs out of the platform. Pressing Ctrl+C again during this shutdown skips the reporting and logout and exits at once; normally do not do that.
Avoid forced termination
Do not end the docker with kill -9, cut the power or force a shutdown. The docker then has no chance to log out, and its live robots may still show as running on the platform and keep being billed; in that case the offline docker has to be deleted before those robots can be stopped. Stop the docker before rebooting the server; when it runs under a service manager such as systemd, a system shutdown sends SIGTERM automatically.
Command-Line Options
Starting the command-line docker program robot:
            bash

            ./robot -s node.fmz.com/123456            # prompts for the password (not echoed)
./robot node.fmz.com/123456               # short form: robot address [password]
./robot -c robot.conf                     # read options from a configuration file
./robot -v                                # show the version
Options
| Option | Description |
|---|---|
-s address | Address for talking to the platform, like node.fmz.com/123456 (123456 is the account UID); a ws:// or wss:// prefix is allowed. Shown on the docker deployment page. |
-p password | Account password. Not recommended: a plain-text password stays in the shell history and the process list. Without it the password is prompted for, or read from the configuration file. |
-n name | Docker name, shown on the platform's docker page. |
-w dir | Working directory. logs (robot data, docker log, identity file) lives under it. |
-c file | Configuration file; format below. |
-u user | Linux/macOS only: run strategy processes as this system user; the docker itself must run as root. Ignored with -i. |
-I IP | Local outbound IP: the connection to the platform and the strategies' connections to exchanges are bound to this address; see below. |
-i image | Linux/macOS only: run each strategy process in its own container created from this Docker image; Docker must be installed and running. |
-e path | With -i: path of the executable inside the container. |
-f JSON | With -i: Docker container settings, as inline JSON or @path to read them from a file. |
-H address | With -i: address the container uses to connect back to the host. |
-vv | Verbose log (including the messages exchanged with the platform); off by default to keep logs small. |
-d DNS | The old custom DNS option; still accepted but ignored, as the docker always uses the system resolver. |
-v, -V, --version | Print version and build information and exit. |
-h, --help | Print usage. |
--ctl-stdin | Read control commands from standard input (the first line is the password when -p is not given); stop or end of input triggers a graceful shutdown. Meant for programs that wrap the docker as a service. |
Options that take a value can also be written as -option=value, e.g. -n=server01. An invalid option prints the usage and exits.
Configuration file robot.conf
One key=value per line; the key is the option name without - (s p n w u I d i e f H vv), and lines starting with # are comments:
            ini

            # robot.conf
s=node.fmz.com/123456
p=your-password
n=server01
vv=true
- Give the file with
-c; without-cand without an address,robot.confin the startup directory is loaded automatically if present. - When an option is given both on the command line and in the file, the command line wins.
- Keys are case-sensitive:
Iis the outbound IP andithe Docker image. - The configuration file path and
-f @fileare resolved relative to the startup directory (before-wchanges directory). - The file holds your password, so make it readable only by you (
chmod 600 robot.conf).
Pinning the outbound IP (-I)
When the server has several IP addresses and the exchange API key is whitelisted for one of them, pin the outbound IP with -I, e.g. ./robot -s node.fmz.com/123456 -I 192.168.1.100. The connection to the platform and the strategies' connections to exchanges then leave from that address. With -i container isolation the container's network may not have that address; in that case let the container use the host network.
The Windows GUI version has no IP setting; use the command-line version when you need to pin the outbound IP. The GUI version accepts only -s, -p and -n, which prefill the window; when both -s and -p are given it starts automatically.
Live Trading Data Migration
Each live robot's data is in logs/storage/<robot ID>/ under the docker's working directory (the database <robot ID>.db3, stdout.log, stderr.log and so on). The logs, profit and charts the platform shows for a robot are read from the docker that runs it.
Moving one robot to a docker on another machine
- Stop the robot.
- Copy the whole
logs/storage/<robot ID>/directory to the same place under the new docker's working directory, keeping the robot ID as the directory name. - Switch the robot's docker to the new one in the robot configuration and start the robot.
The robot's existing logs, profit and other data are then kept on the new machine.
Moving a whole docker
- Stop the robots on the old docker, then stop the old docker.
- Copy the entire
logsdirectory from the old docker's working directory to the working directory on the new machine. - Start the docker on the new machine.
logs/docker.pid holds the docker's identity: with the old docker offline, the docker on the new machine gets the old docker ID back, so robot configurations need no change. Never run dockers on two machines with the same logs directory at the same time.
Docker Monitor
On the docker management page, Docker Monitor can be enabled from the actions of the docker list or of the docker details. Once enabled, the platform emails the address bound to your account when the docker goes offline abnormally.