SMA, EMA 및 볼륨을 기반으로 한 간단한 모멘텀 전략


생성 날짜: 2023-12-08 11:15:30 마지막으로 수정됨: 2023-12-08 11:15:30
복사: 8 클릭수: 709
avatar of ChaoZhang ChaoZhang
1
집중하다
1621
수행원

SMA, EMA 및 볼륨을 기반으로 한 간단한 모멘텀 전략

개요

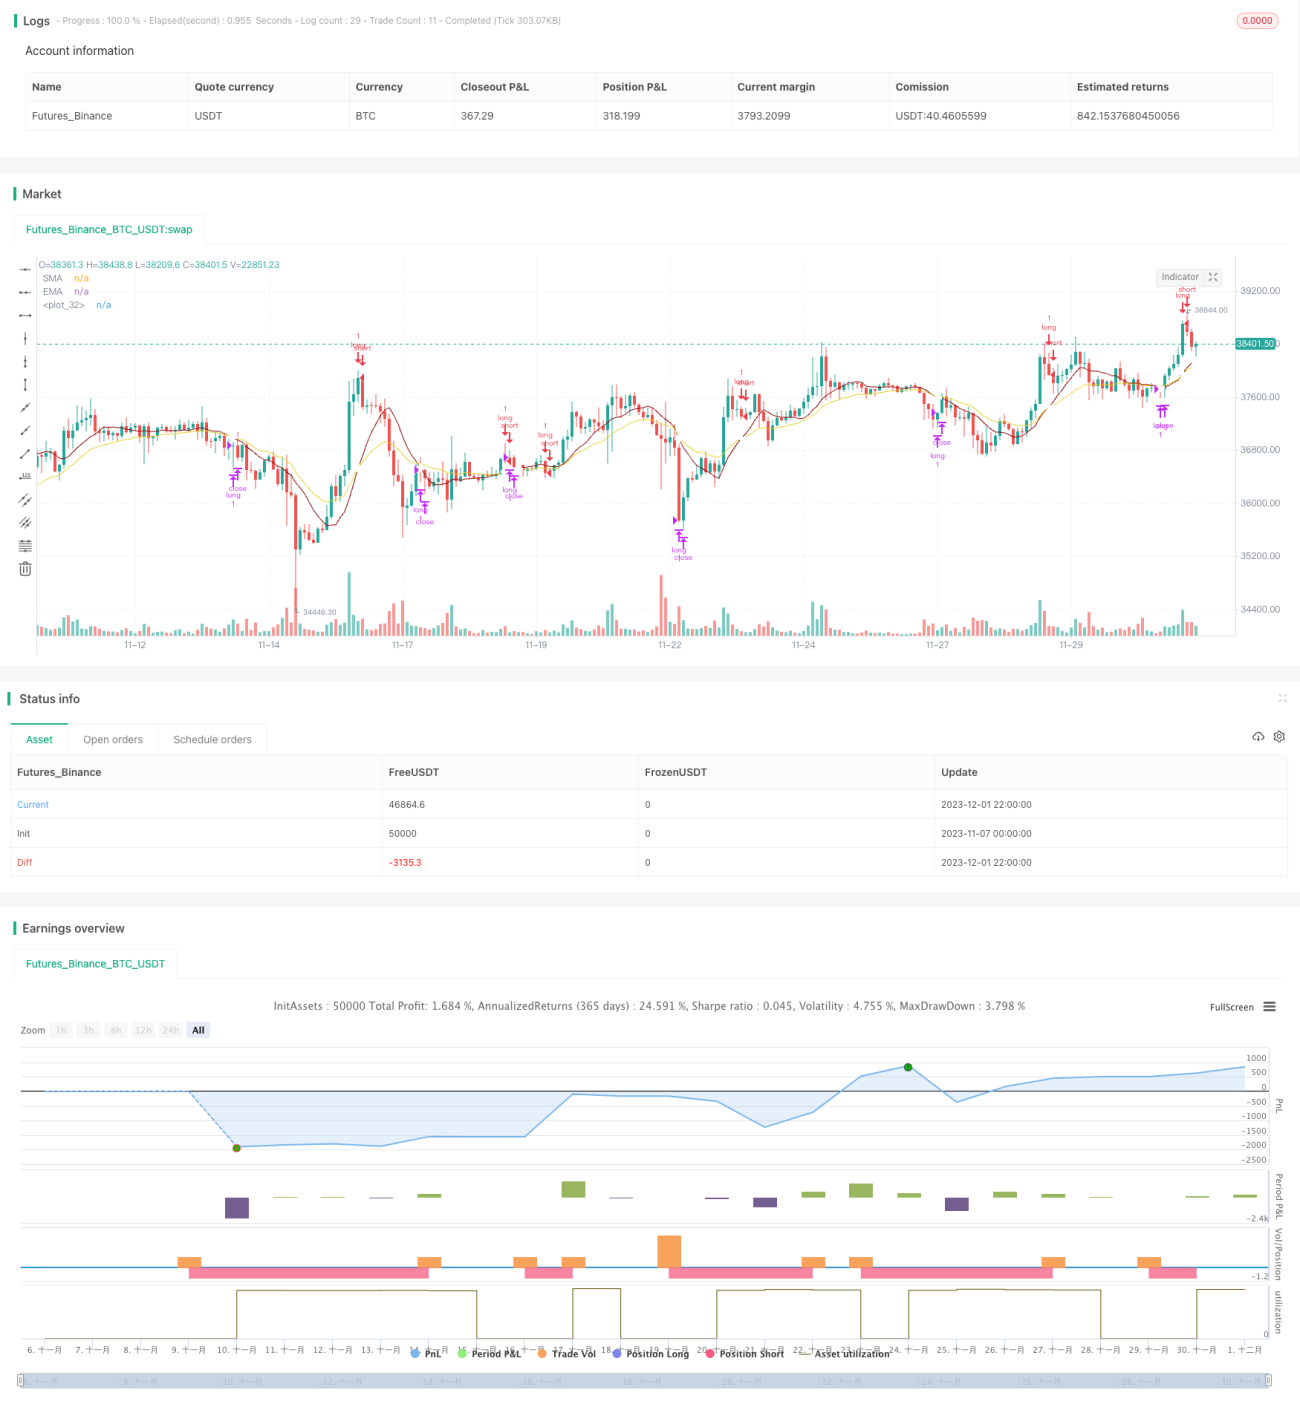
이 전략은 비공수 (空頭) 의 간단한 일일 동력 전략이다. 그것은 SMA, EMA 및 거래량 지표를 사용하여 최적의 시간에 (즉, 가격과 동력이 동시에 상승할 때) 시장에 진입하려고 한다. 그것의 장점은 단순함을 구현하고, 추세를 식별하는 데 약간의 능력이 있다는 것이다.

전략 원칙

이 전략의 거래 Einty 신호 생성 논리는 다음과 같습니다: 동시에 SMA 지표가 EMA 지표보다 높고 3개의 연속적인 K선 또는 4개의 연속적인 K선으로 상향 트렌드를 형성하고, 중간 K선 최저 가격이 상향 K선의 개시 가격보다 높을 때 Entry 신호를 생성한다.

출구 신호 생성 논리는 다음과 같다: SMA 지표 아래 EMA 기호를 통과할 때 출구 신호가 발생한다.

이 전략은 공백이 아닌, 단지 더 많은 수를 다. 그것의 입출력 논리는 지속적인 상승 추세를 인식하는 데 약간의 능력을 가지고 있다.

우위 분석

이 전략은 다음과 같은 장점을 가지고 있습니다.

  1. 전략의 논리는 간단하고 이해하기 쉽고 실행이 가능합니다.

  2. SMA, EMA 및 거래량과 같은 일반적인 기술 지표를 사용하여 파라미터를 조정하는 유연성;

  3. 계속 상승하는 추세에 대해 인식하는 능력이 있고, 그 추세에 있는 부분적 기회를 잡을 수 있다.

위험 분석

이 전략에는 다음과 같은 위험도 있습니다.

  1. 시장이 하락하거나 상쇄되는 것을 식별할 수 없는 것은 큰 회수로 이어질 수 있습니다.

  2. 부진을 막기 위해 공백기를 이용하지 못하고, 더 나은 수익 기회를 놓칠 수도 있습니다.

  3. 거래량 지표는 고주파 데이터에 효과가 좋지 않아 변수를 조정해야 한다.

  4. 위험관리를 위해 손해배상 제약을 사용할 수 있습니다.

최적화 방향

이 전략은 다음과 같은 부분에서 최적화될 수 있습니다.

  1. 공허 거래 기회를 늘리고, 다공허 양방향 거래를 실현하고, 침체 추세를 활용하여 중매하는 것;

  2. MACD, RSI 등과 같은 더 진보된 지표의 조합 전략을 사용하여 트렌드를 판단하는 능력을 향상시킵니다.

  3. 이 경우, 이 경우, 이 경우, 이 경우.

  4. 매개 변수를 조정하고, 다른 주기에서 데이터를 테스트하고, 최적의 매개 변수 조합을 찾습니다.

요약하다

이 전략은 전체적으로 매우 간단한 트렌드 추적 전략으로 SMA, EMA 및 거래량 지표를 통해 진입 시기를 판단한다. 이 전략은 간단하고 쉽게 구현할 수 있으며, 입문 학습에 적합하지만, 조회 및 하락 트렌드를 식별할 수 없으며, 일정 위험이 있다. 공허, 최적화 지표 및 상쇄 등의 수단을 도입하여 개선할 수 있다.

전략 소스 코드
/*backtest
start: 2023-11-07 00:00:00
end: 2023-12-02 00:00:00
period: 2h
basePeriod: 15m
exchanges: [{"eid":"Futures_Binance","currency":"BTC_USDT"}]
*/

// This source code is subject to the terms of the Mozilla Public License 2.0 at https://mozilla.org/MPL/2.0/
// © slip_stream

//@version=4

// Simple strategy for riding the momentum and optimising the timings of truer/longer price moves upwards for an long posistions on a daily basis (can be used, but with less effect
// on other time frames. Volume settings would have to be adjusted by the user accordingly. (short positions are not used).
// This strategy has default settings of a short(er) SMA of 10, a long(er) EMA of 20, and Volume trigger of 10 units and above. All these settings can be changed by the user
// using the GUI settings and not having to change the script.

// The strategy will only open a long position when there is a clear indication that price momentum is upwards through the SMA moving and remaining above the EMA (mandatory) and price period indicators
// of either 1) a standard 3 bar movement upwards, 2) a standard but "aggressive" 3 or 4 bar play where the low of the middle resting bars can be equal to or higher than (i.e. not
// the more standard low of about half) of the opening of the ignition bar. The "aggression" of the 3/4 bar play was done in order to counteract the conservatisme of having a mandatory
// SMA remaining higher than the EMA (this would have to be changed in the script by the user if they want to optimise to their own specifications. However, be warned, all programmatic
// settings for the maximum acceptable low of the middle resting bars runs a risk of ignoring good entry points due to the low being minutely e.g. 0.01%, lower than the user defined setting)


strategy(title = "Simple Momentum Strategy Based on SMA, EMA and Volume", overlay = true, pyramiding = 1, initial_capital = 100000, currency = currency.USD)


// Obtain inputs
sma_length = input(defval = 10, minval=1, type = input.integer, title = "SMA (small length)")
ema_length = input(defval = 20,minval=1, type = input.integer, title = "EMA (large length)")
volume_trigger = input(defval = 10, title = "Volume Trigger", type = input.integer)
sma_line = sma(close, sma_length)
ema_line = ema(close, ema_length)


// plot SMA and EMA lines with a cross for when they intersect
plot(sma_line, color = #8b0000, title = "SMA")
plot(ema_line, color = #e3d024, title = "EMA")
plot(cross(sma_line, ema_line) ? sma_line : na, style = plot.style_cross, linewidth = 4, color = color.white)


// Create variables
// variables to check if trade should be entered
//three consecutive bar bar moves upwards and volume of at least one bar is more than 10
enter_trade_3_bar_up = sma_line > ema_line and close[1] >= close [2] and close[3] >= close[4] and close[2] >= close[3] and (volume[1] >= volume_trigger or volume[2] >= volume_trigger or volume[3] >= volume_trigger)
// aggressive three bar play that ensures the low of the middle bar is equal to or greater than the open of the instigator bar. Volume is not taken into consideration (i.e. aggressive/risky)
enter_3_bar_play = sma_line > ema_line and close[1] > close[3] and low[2] >= open[3]
// aggressive four bar play similar to the 3 bar play above
enter_4_bar_play = sma_line > ema_line and close[1] > close[4] and low[2] >= open[4]
trade_entry_criteria = enter_trade_3_bar_up or enter_3_bar_play or enter_4_bar_play // has one of the trade entry criterias returned true?

// exit criteria for the trade: when the sma line goes under the ema line
trade_exit_criteria = crossunder (sma_line, ema_line)


if (year >= 2019)
    strategy.entry(id = "long", long = true, qty = 1, when = trade_entry_criteria)
    strategy.close(id = "long", when = trade_exit_criteria, qty = 1)
    // for when you want to brute force close all open positions: strategy.close_all (when = trade_exit_criteria)