Padrões de velas de negociação quantitativa e estratégias de acompanhamento de tendências
Visão geral
A estratégia é chamada de “Quantificação de Tendências de Negociação” e “Estratégia de Seguimento de Tendências”. A estratégia combina a análise de tendências de negociação e a ideia de estratégia de seguimento de tendências.
A estratégia é baseada na identificação de diferentes formas de queda e na determinação da situação atual de mercado e de possíveis pontos de reversão. Combinado com o rastreamento dos preços mais altos e mais baixos, os sinais de entrada e saída são formados para capturar a tendência de preço da linha média e longa.
Princípio da estratégia
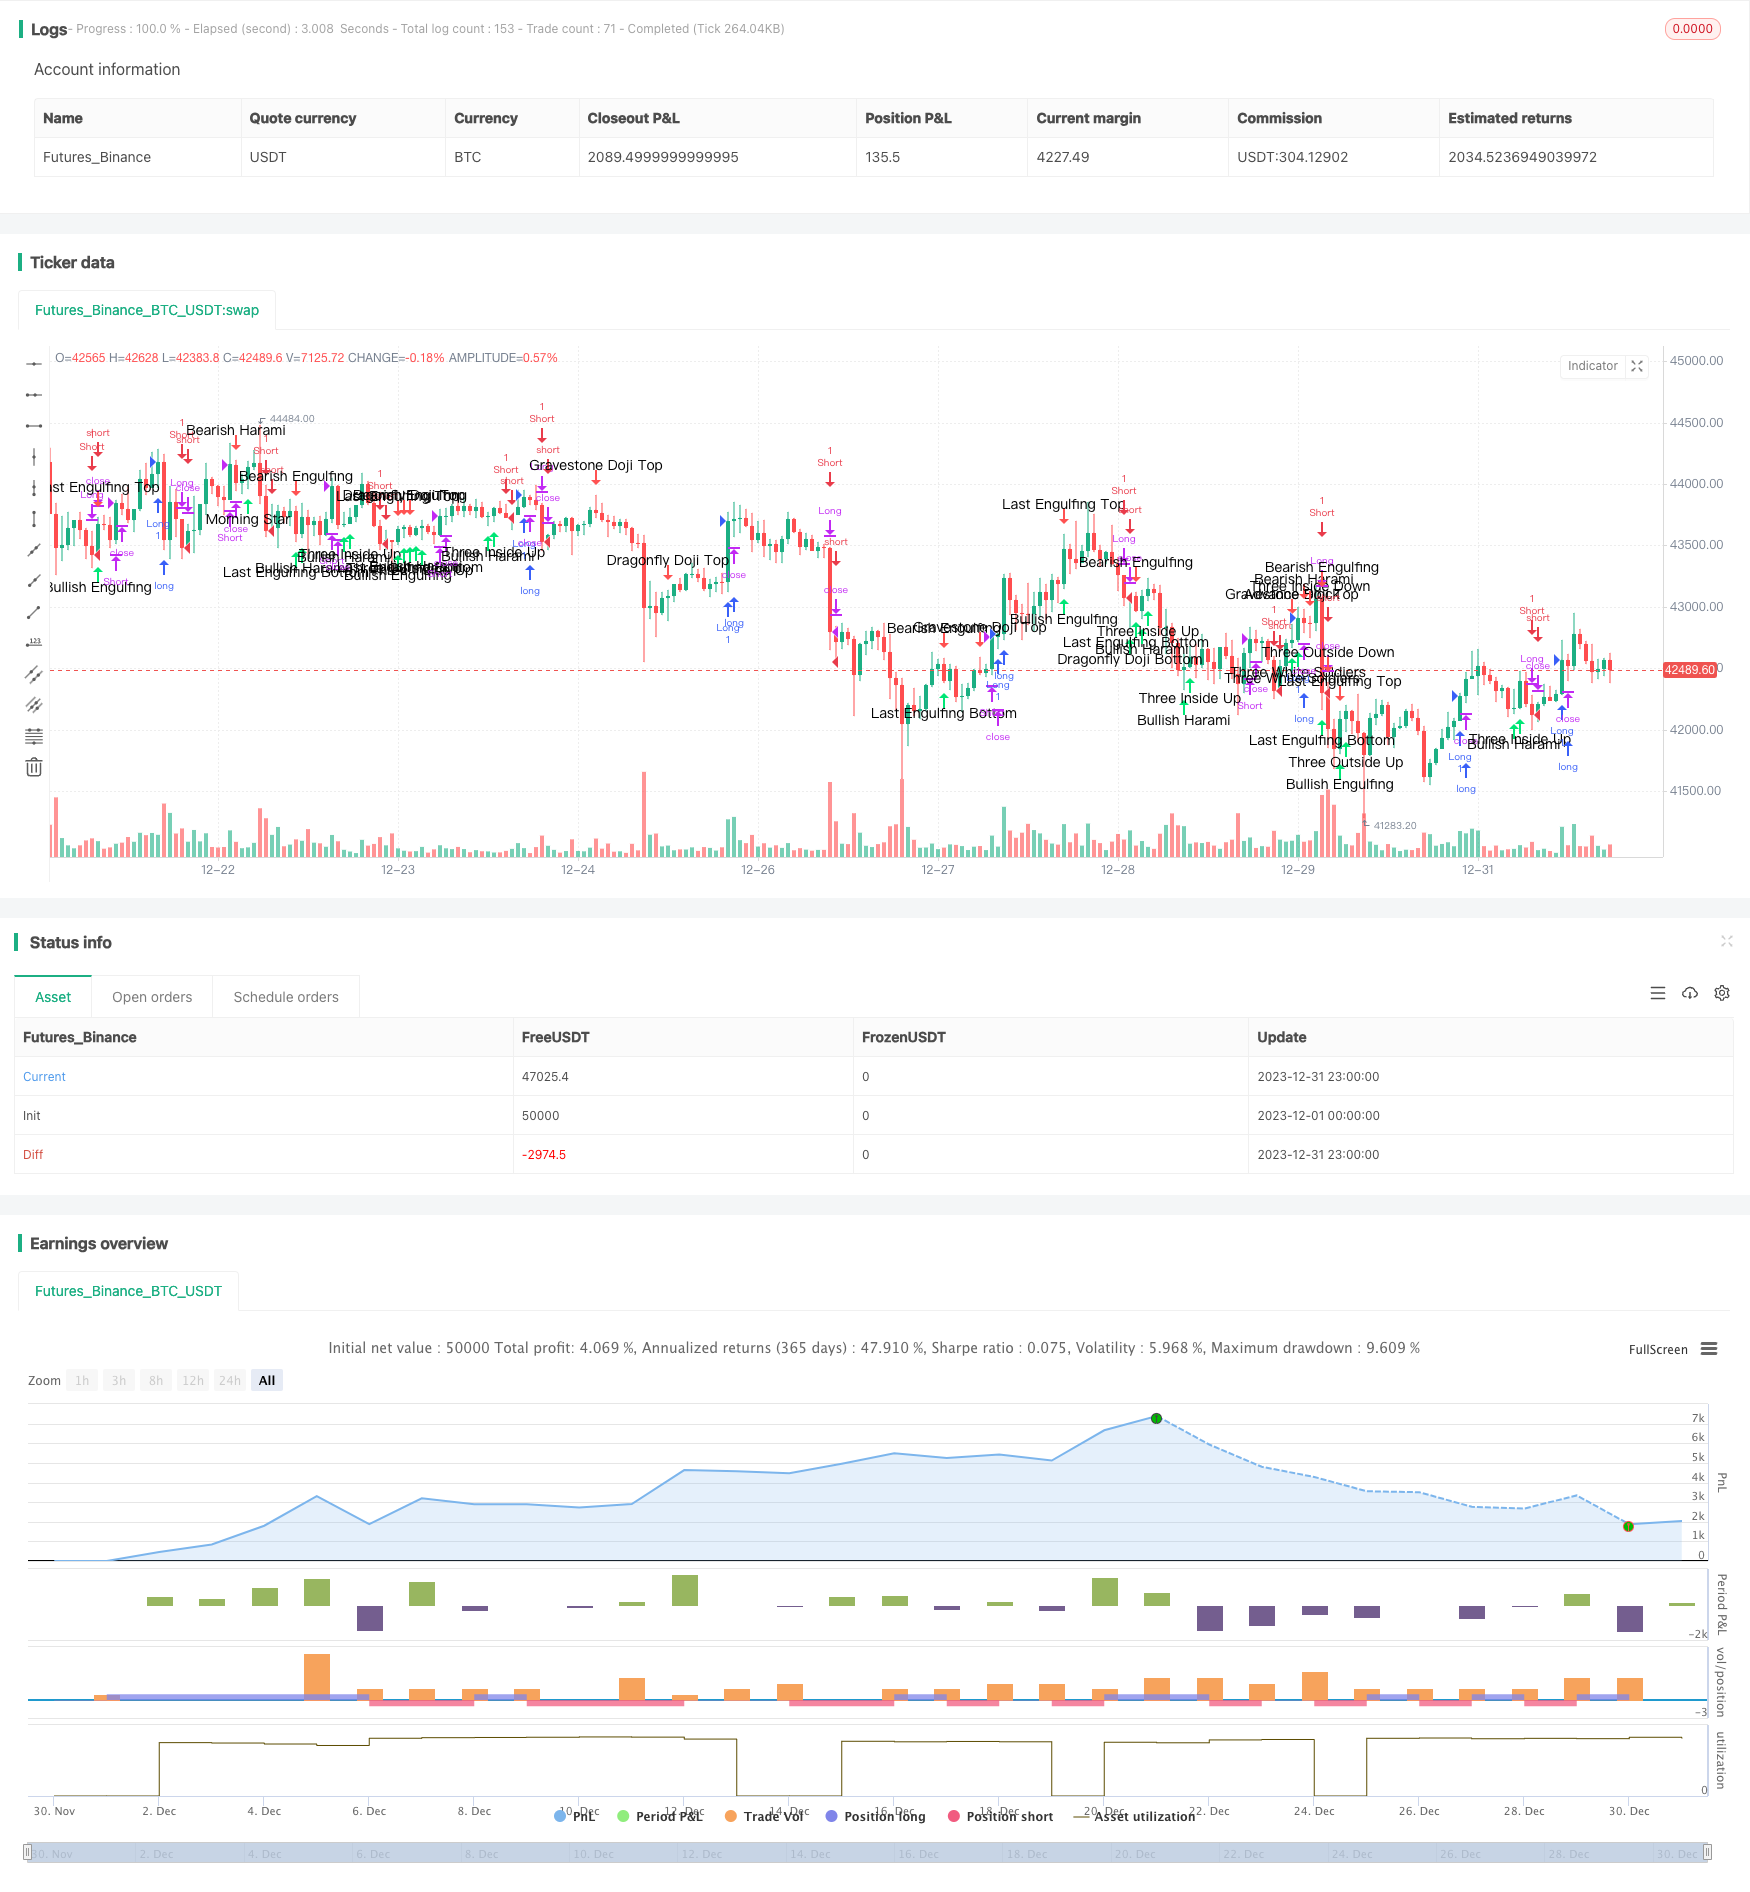
A estratégia é dividida em vários módulos:
- Juízo de forma
A estratégia primeiro define os elementos do corpo, como a entidade, a linha de sombra e outros, e define alguns parâmetros para identificar mais de 40 formas de estrela comum, como a estrela de cruz, estrela de luz, e três subidas internas. Quando essas formas são identificadas, são marcadas e julgadas como sinais de cabeça múltipla ou sem cabeça.
- Julgar tendências
A estratégia usa o rastreamento de preços mais altos e mais baixos para determinar a tendência. Quando o preço supera o preço mais alto em N dias, é considerado uma tendência ascendente.
- Entradas e saídas
De acordo com o padrão de padrão de padrão, os sinais de vazio, combinados com a ruptura do preço mais alto e mais baixo no julgamento da tendência, formam as regras de entrada e saída.
Por exemplo, quando se reconhece uma forma de cabeça múltipla, como uma linha de alfinete, e o preço supera o máximo de N dias, faça mais; quando o preço cai abaixo do mínimo de N dias, leve o mais.
- Definição de alcance de detecção
A estratégia termina o ciclo de fechamento de toda a lógica da estratégia, definindo o tempo de início e fim da retomada.
Análise de vantagens
A estratégia tem as seguintes vantagens:
- Combinação de formas e tendências
Utilizando a combinação de análise de tendências e rastreamento de tendências, pode-se determinar os possíveis pontos de reversão de preços através de tendências e, ao mesmo tempo, determinar o momento de entrada através de tendências.
- Identificação de múltiplas formas
A estratégia inclui a identificação de mais de 40 padrões comuns, uma ampla cobertura e mais oportunidades potenciais de negociação em diferentes cenários de mercado.
- Alta ajustabilidade de parâmetros
Os parâmetros da estratégia, como o número de dias de rastreamento e a identificação de formas, podem ser ajustados automaticamente, são mais adaptáveis e mais fáceis de ajustar para mercados específicos.
- Facilidade de expansão
Pode-se estender mais módulos de identificação de formas diretamente sobre a lógica existente, ou adicionar mais módulos de julgamento de fatores, para continuar a otimizar o efeito da estratégia.
Análise de Riscos
A estratégia também apresenta os seguintes riscos:
- A precisão de reconhecimento de forma não é de 100%
A determinação de um padrão não é totalmente precisa, e ainda existe uma certa probabilidade de erro de identificação, podendo ocorrer situações em que os sinais de negociação são desencadeados erroneamente.
- Falta de módulo de parada
A estratégia atual não possui lógica de stop loss e não pode controlar efetivamente os prejuízos individuais. Quando o julgamento da tendência falha, pode trazer maiores perdas para a conta.
- Risco de ressonância de dados
O efeito da estratégia atual pode ter uma certa adequação com os dados da faixa de ressonância, e o desempenho no disco pode diminuir.
Direção de otimização
Os principais pontos de otimização da estratégia são:
- Adição de módulo de stop loss
Aumentar as estratégias de stop loss, tais como stop loss móvel, stop loss percentual, pode ser eficaz para controlar o risco e limitar a perda máxima de uma única moeda.
- Aprendizagem de Máquina para Melhorar a Precisão de Determinação de Forma
A utilização de algoritmos de aprendizagem de máquina para treinar o modelo, aumentando a precisão de julgamento da forma do cone e reduzindo a taxa de falha.
- Verificação de vários mercados
Teste a robustez da estratégia em mais mercados, como o mercado de divisas e moedas digitais, para evitar a correspondência de dados de retrospectiva.
- Combinando mais fatores
Pode-se introduzir mais fatores de quantificação, como indicadores de preço de quantidade, indicadores de fluxo de capital, etc., enriquecendo a lógica da estratégia e aumentando a estabilidade.
Resumir
De um modo geral, a estratégia, combinada com o julgamento de tendências e o rastreamento de tendências, pode capturar tendências de preços e obter lucros extras ao mesmo tempo em que julga os pontos de inflexão do mercado. O espaço de otimização da estratégia é grande e pode ser aprimorado em termos de controle de risco, aprendizado de máquina e múltiplos fatores, tornando a estratégia mais robusta e comercialmente valiosa.
/*backtest
start: 2023-12-01 00:00:00
end: 2023-12-31 23:59:59
period: 1h
basePeriod: 15m
exchanges: [{"eid":"Futures_Binance","currency":"BTC_USDT"}]
*/

//@version=3
strategy("Candle analysis & long/short strategy (HF) inspired by TurtleBC", shorttitle="TurtleBC-V.Troussel", overlay=true,initial_capital=1000)

//VARIABLES
body=close-open
range=high-low
middle=(open+close)/2
abody=abs(body)
ratio=abody/range
longcandle= (ratio>0.6)
bodytop=max(open, close)
bodybottom=min(open, close)
shadowtop=high-bodytop
shadowbottom=bodybottom-low

//Doji
DojiSize = input(0.05, minval=0.01, title="Doji size")
data=(abs(open - close) <= (high - low) * DojiSize)
plotchar(data, title="Doji", text='Doji', color=black)

//BULLISH SIGNALS
//Homing Pigeon
HomingPigeon=(body[1]<0 and body<0 and longcandle[1] and bodybottom>bodybottom[1] and bodytop<bodytop[1])
plotshape(HomingPigeon, title= "Homing Pigeon", location=location.belowbar, color=lime, style=shape.arrowup, text="Homing\nPigeon")

//Dragonfly Doji Bottom
DragonflyDojiBottom=(body[1]<0 and longcandle[1] and low<low[1] and shadowbottom>3*abody and shadowtop<shadowbottom/3)
plotshape(DragonflyDojiBottom, title= "Dragonfly Doji Bottom", location=location.belowbar, color=lime, style=shape.arrowup, text="Dragonfly\nDoji\nBottom")

//Concealing Baby Swallow
ConcealingBabySwallow=(body[3]<0 and body[2]<0 and body[1]<0 and body<0 and ratio[3]>0.8 and ratio[2]>0.8 and ratio>0.8 and open[1]<close[2] and high[1]>close[2] and shadowtop[1]>0.6*(abody[1]+shadowbottom[1]) and bodybottom<bodybottom[1] and bodytop>high[1])
plotshape(ConcealingBabySwallow, title= "Concealing Baby Swallow", location=location.belowbar, color=lime, style=shape.arrowup, text="Concealing\nBaby\nSwallow")

//Gravestone Doji Bottom
GravestoneDojiBottom=(body[1]<0 and longcandle[1] and low<low[1] and shadowtop>3*abody and shadowbottom<shadowtop/3)
plotshape(GravestoneDojiBottom, title= "Gravestone Doji Bottom", location=location.belowbar, color=lime, style=shape.arrowup, text="Gravestone\nDoji\nBottom")

//Last Engulfing Bottom
LastEngulfingBottom=(body[1]>0 and body<0 and bodybottom<bodybottom[1] and bodytop>bodytop[1] and longcandle)
plotshape(LastEngulfingBottom, title= "Last Engulfing Bottom", location=location.belowbar, color=lime, style=shape.arrowup, text="Last\nEngulfing\nBottom")

//Bullish Harami Cross
BullishHaramiCross=(body[1]<0 and longcandle[1] and bodybottom>bodybottom[1] and bodytop<bodytop[1] and ratio<0.3 and range<0.3*range[1])
plotshape(BullishHaramiCross, title= "Bullish Harami Cross", location=location.belowbar, color=lime, style=shape.arrowup, text="Bullish\nHarami\nCross")

//Three Stars in the South
ThreeStarsInTheSouth=(body[2]<0 and body[1]<0 and body<0 and shadowtop[2]<range[2]/4 and shadowbottom[2]>abody[2]/2 and low[1]>low[2] and high[1]<high[2] and abody[1]<abody[2]  and shadowtop[1]<range[1]/4 and shadowbottom[1]>abody[1]/2 and low>low[1] and high<high[1] and abody<abody[1] and shadowtop<range/4 and shadowbottom<range/4)
plotshape(ThreeStarsInTheSouth, title= "Three Stars In TheSouth", location=location.belowbar, color=lime, style=shape.arrowup, text="Three\nStars\nIn\nThe\nSouth")

//Bullish Breakaway
BullishBreakaway=(body[4]<0 and body[3]<0 and body>0 and open[3]<close[4] and close[2]<close[3] and close[1]<close[2] and longcandle and close<close[4] and close>open[3])
plotshape(BullishBreakaway, title= "Bullish Breakaway", location=location.belowbar, color=lime, style=shape.arrowup, text="Bullish\nBreakaway")

//Hammer
Hammer=(body[1]<0 and longcandle[1] and low<low[1] and shadowbottom>2*abody and shadowtop<0.3*abody)
plotshape(Hammer, title= "Hammer", location=location.belowbar, color=lime, style=shape.arrowup, text="Hammer")

//Inverted Hammer
InvertedHammer=(body[1]<0 and longcandle[1] and low<low[1] and shadowtop>2*abody and shadowbottom<0.3*abody)
plotshape(InvertedHammer, title= "Inverted Hammer", location=location.belowbar, color=lime, style=shape.arrowup, text="Inverted\nHammer")

//Rising Three Methods
RisingThreeMethods=(body[4]>0 and body[3]<0 and body[1]<0 and body>0 and longcandle[4] and longcandle and close[2]<close[3] and close[1]<close[2] and high[2]<high[3] and high[1]<high[2] and low[1]>low[4] and open>close[1] and close>high[4] and close>high[3] and close>high[2] and close>high[1])
plotshape(RisingThreeMethods, title= "Rising Three Methods", location=location.belowbar, color=lime, style=shape.arrowup, text="Rising\nThree\nMethods")

//BullishThreeLineStrike
BullishThreeLineStrike=(body[3]>0 and body[2]>0 and body[1]>0 and body<0 and longcandle[3] and longcandle[2] and longcandle[1] and close[2]>close[3] and close[1]>close[2] and open>close[1] and close<open[3])
plotshape(BullishThreeLineStrike, title= "Bullish Three Line Strike", location=location.belowbar, color=lime, style=shape.arrowup, text="Bullish\nThreeLine\nStrike")

//Bullish Mat Hold
BullishMatHold=(body[4]>0 and body[3]<0 and body[1]<0 and body>0 and longcandle[4] and close[3]>close[4] and close[2]<close[3] and close[1]<close[2] and high[2]<high[3] and high[1]<high[2] and low[1]>low[4] and open>close[1] and close>high[4] and  close>high[3] and close>high[2] and close>high[1])
plotshape(BullishMatHold, title= "Bullish Mat Hold", location=location.belowbar, color=lime, style=shape.arrowup, text="Bullish\nMat\nHold")

//Doji Star Bottom
DojiStarBottom=(body[1]<0 and longcandle[1] and low<low[1] and open<close[1] and ratio<0.3 and range<0.3*range[1])
plotshape(DojiStarBottom, title= "Doji Star Bottom", location=location.belowbar, color=lime, style=shape.arrowup, text="Doji\nStar\nBottom")

//Morning Star
MorningStar=(body[2]<0 and body>0 and longcandle[2] and open[1]<close[2] and open>close[1] and ratio[1]<0.3 and abody[1]<abody[2] and abody[1]<abody and low[1]<low and low[1]<low[2] and high[1]<open[2] and high[1]<close)
plotshape(MorningStar,  title= "Morning Star", location=location.belowbar, color=lime, style=shape.arrowup, text="Morning\nStar")

//Abandoned Baby Bottom
AbandonedBabyBottom=(body[2]<0 and body>0 and longcandle[2] and ratio[1]<0.3 and high[1]<low[2] and high[1]<low)
plotshape(AbandonedBabyBottom,  title= "Abandoned Baby Bottom", location=location.belowbar, color=lime, style=shape.arrowup, text="Abandoned\nBaby\nBottom")

//Bullish Harami
BullishHarami=(body[1]<0 and body>0 and longcandle[1] and bodybottom>bodybottom[1] and bodytop<bodytop[1])
plotshape(BullishHarami,  title= "Bullish Harami", location=location.belowbar, color=lime, style=shape.arrowup, text="Bullish\nHarami")

//Three Inside Up
ThreeInsideUp=(body[2]<0 and body[1]>0 and body>0 and BullishHarami[1] and close>close[1])
plotshape(ThreeInsideUp,  title= "Three Inside Up", location=location.belowbar, color=lime, style=shape.arrowup, text="Three\nInside\nUp")

//Bullish Engulfing
BullishEngulfing=(body[1]<0 and body>0 and bodybottom<bodybottom[1] and bodytop>bodytop[1] and longcandle)
plotshape(BullishEngulfing, title= "Bullish Engulfing", location=location.belowbar, color=lime, style=shape.arrowup, text="Bullish\nEngulfing")

//Piercing Line
PiercingLine=(body[1]<0 and body>0 and longcandle[1] and longcandle and open<low[1] and close>middle[1] and close<open[1])
plotshape(PiercingLine, title= "Piercing Line", location=location.belowbar, color=lime, style=shape.arrowup, text="Piercing\nLine")

//Three Outside Up
ThreeOutsideUp=(body[2]<0 and body[1]>0 and body>0 and BullishEngulfing[1] and close>close[1])
plotshape(ThreeOutsideUp, title= "Three Outside Up", location=location.belowbar, color=lime, style=shape.arrowup, text="Three\nOutside\nUp")

//Three White Soldiers
ThreeWhiteSoldiers=(body[2]>0 and body[1]>0 and body>0 and high[1]>high[2] and high>high[1] and close[1]>close[2] and close>close[1] and open[1]>open[2] and open[1]<close[2] and open>open[1] and open<close[1])
plotshape(ThreeWhiteSoldiers, title= "Three White Soldiers", location=location.belowbar, color=lime, style=shape.arrowup, text="Three\nWhite\nSoldiers")

//BEARISH SIGNALS

//Evening Star
EveningStar=(body[2]>0 and body<0 and longcandle[2] and open[1]>close[2] and open<close[1] and ratio[1]<0.3 and abody[1]<abody[2] and abody[1]<abody and high[1]>high and high[1]>high[2] and low[1]>open[2] and low[1]>close)
plotshape(EveningStar, title= "Evening Star", color=red, style=shape.arrowdown, text="Evening\nStar")

//Dark Cloud Cover
DarkCloudCover=(body[1]>0 and body<0 and longcandle[1] and longcandle and open>high[1] and close<middle[1] and close>open[1])
plotshape(DarkCloudCover, title= "Dark Cloud Cover", color=red, style=shape.arrowdown, text="Dark\nCloud\nCover")

//Abandoned Baby Top
AbandonedBabyTop=(body[2]>0 and body<0 and longcandle[2] and ratio[1]<0.3 and low[1]>high[2] and low[1]>high)
plotshape(AbandonedBabyTop, title= "Abandoned Baby Top", color=red, style=shape.arrowdown, text="Abandoned\nBaby\nTop")

//Bearish Harami
BearishHarami=(body[1]>0 and body<0 and longcandle[1] and bodybottom>bodybottom[1] and bodytop<bodytop[1])
plotshape(BearishHarami, title= "Bearish Harami", color=red, style=shape.arrowdown, text="Bearish\nHarami")

//Descending Hawk
DescendingHawk=(body[1]>0 and body>0 and longcandle[1] and bodybottom>bodybottom[1] and bodytop<bodytop[1])
plotshape(DescendingHawk, title= "Descending Hawk", color=red, style=shape.arrowdown, text="Descending\nHawk")

//Bearish Engulfing
BearishEngulfing=(body[1]>0 and body<0 and bodybottom<bodybottom[1] and bodytop>bodytop[1] and longcandle)
plotshape(BearishEngulfing, title= "Bearish Engulfing", color=red, style=shape.arrowdown, text="Bearish\nEngulfing")

//Gravestone Doji Top
GravestoneDojiTop=(body[1]>0 and longcandle[1] and high>high[1] and shadowtop>3*abody and shadowbottom<shadowtop/3)
plotshape(GravestoneDojiTop, title= "Gravestone Doji Top", color=red, style=shape.arrowdown, text="Gravestone\nDoji\nTop")

//Shooting Star
ShootingStar=(body[1]>0 and longcandle[1] and high>high[1] and shadowtop>2*abody and shadowbottom<0.3*abody)
plotshape(ShootingStar, title= "Shooting Star", color=red, style=shape.arrowdown, text="Shooting\nStar")

//Hanging Man
HangingMan=(body[1]>0 and longcandle[1] and high>high[1] and shadowbottom>2*abody and shadowtop<0.3*abody)
plotshape(HangingMan, title= "Hanging Man", color=red, style=shape.arrowdown, text="Hanging\nMan")

//Bearish Three Line Strike
BearishThreeLineStrike=(body[3]<0 and body[2]<0 and body[1]<0 and body>0 and longcandle[3] and longcandle[2] and longcandle[1] and close[2]<close[3] and close[1]<close[2] and open<close[1] and close>open[3])
plotshape(BearishThreeLineStrike, title= "Bearish Three Line Strike", color=red, style=shape.arrowdown, text="Bearish\nThree\nLine\nStrike")

//Falling Three Methods
FallingThreeMethods=(body[4]<0 and body[3]>0 and body[1]>0 and body<0 and longcandle[4] and longcandle and close[2]>close[3] and close[1]>close[2] and low[2]>low[3] and low[1]>low[2] and high[1]<high[4] and open<close[1] and close<low[4] and close<low[3] and close<low[2] and close<low[1])
plotshape(FallingThreeMethods, title= "Falling Three Methods", color=red, style=shape.arrowdown, text="Falling\n\nThreeMethods")

//Three Inside Down
ThreeInsideDown=(body[2]>0 and body[1]<0 and body<0 and BearishHarami[1] and close<close[1])
plotshape(ThreeInsideDown, title= "Three Inside Down", color=red, style=shape.arrowdown, text="Three\nInside\nDown")

//Three Outside Down
ThreeOutsideDown=(body[2]>0 and body[1]<0 and body<0 and BearishEngulfing[1] and close<close[1])
plotshape(ThreeOutsideDown, title= "Three Outside Down", color=red, style=shape.arrowdown, text="Three\nOutside\nDown")

//Three Black Crows
ThreeBlackCrows=(body[2]<0 and body[1]<0 and body<0 and longcandle[2] and longcandle[1] and longcandle and low[1]<low[2] and low<low[1] and close[1]<close[2] and close<close[1] and open[1]<open[2] and open[1]>close[2] and open<open[1] and open>close[1])
plotshape(ThreeBlackCrows, title= "Three Black Crows", color=red, style=shape.arrowdown, text="Three\nBlack\nCrows")

//Upside Gap Two Crows
UpsideGapTwoCrows=(body[2]>0 and body[1]<0 and body<0 and longcandle[2] and open[1]>close[2] and bodytop>bodytop[1] and bodybottom<bodybottom[1] and close>close[2])
plotshape(UpsideGapTwoCrows, title= "Upside Gap Two Crows", color=red, style=shape.arrowdown, text="Upside\nGap\nTwo\nCrows")

//Last Engulfing Top
LastEngulfingTop=(body[1]<0 and body>0 and bodybottom<bodybottom[1] and bodytop>bodytop[1] and longcandle)
plotshape(LastEngulfingTop, title= "Last Engulfing Top", color=red, style=shape.arrowdown, text="Last\nEngulfing\nTop")

//Dragonfly Doji Top
DragonflyDojiTop=(body[1]>0 and longcandle[1] and high>high[1] and shadowbottom>3*abody and shadowtop<shadowbottom/3)
plotshape(DragonflyDojiTop, title= "Dragonfly Doji Top", color=red, style=shape.arrowdown, text="Dragonfly\nDoji\nTop")

//Bearish Harami Cross
BearishHaramiCross=(body[1]>0 and longcandle[1] and bodybottom>bodybottom[1] and bodytop<bodytop[1] and ratio<0.3 and range<0.3*range[1])
plotshape(BearishHaramiCross, title= "Bearish Harami Cross", color=red, style=shape.arrowdown, text="Bearish\nHarami\nCross")

//Advance Block
AdvanceBlock=(body[2]>0 and body[1]>0 and body>0 and high[2]<high[1] and high[1]<high and open[1]>bodybottom[2] and open[1]<bodytop[2] and open>bodybottom[1] and open<bodytop[1] and abody[1]<abody[2] and abody<abody[1])
plotshape(AdvanceBlock, title= "Advance Block", color=red, style=shape.arrowdown, text="Advance\nBlock")

//Bearish Breakaway
BearishBreakaway=(body[4]>0 and body[3]>0 and body<0 and open[3]>close[4] and close[2]>close[3] and close[1]>close[2] and longcandle and close>close[4] and close<open[3])
plotshape(BearishBreakaway, title= "Bearish Breakaway", color=red, style=shape.arrowdown, text="Bearish\nBreakaway")

//Two Crows

TwoCrows=(body[2]>0 and body[1]<0 and body<0 and longcandle[2] and open[1]>close[2] and close[1]>close[2] and open<bodytop[1] and open>bodybottom[1] and close<bodytop[2] and close>bodybottom[2])
plotshape(TwoCrows, title= "Two Crows", color=red, style=shape.arrowdown, text="Two\nCrows")


// === BACKTEST RANGE ===
FromMonth = input(defval = 1, title = "From Month", minval = 1)
FromDay   = input(defval = 1, title = "From Day", minval = 1)
FromYear  = input(defval = 2016, title = "From Year", minval = 2016)
ToMonth   = input(defval = 1, title = "To Month", minval = 1)
ToDay     = input(defval = 1, title = "To Day", minval = 1)
ToYear    = input(defval = 9999, title = "To Year", minval = 9999)

enter_fast = input(20, minval=1)
exit_fast = input(10, minval=1)
exit_fast_short=input(10,minval=1)


fastL = highest(close, enter_fast)
fastS = highest(close ,exit_fast_short)
fastLC = lowest(close, exit_fast)


//entrées et sorties pour long et short, le short utilise la sortie du long comme entrée
enterL1 = close > fastL[1]
exitL1 = close <= fastLC[1]
exitS=close>fastS[1]


strategy.entry("Long", strategy.long, when = enterL1 )
strategy.close("Long", when = exitL1)

strategy.entry("Short", strategy.short, when = exitL1)
strategy.close("Short", when = exitS)